
Assembly Instructions
Page 1
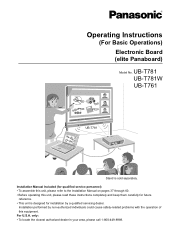
... safety-related problems with the operation of this unit, please read these instructions completely and keep them carefully for future reference. • This unit is sold separately. Installation Manual Included (for qualified service personnel) • To assemble this unit, please refer to the Installation Manual on pages 37 through 60. • Before operating this equipment. Operating Instructions (For Basic Operations) Electronic Board (elite Panaboard) Model No.
... safety-related problems with the operation of this unit, please read these instructions completely and keep them carefully for future reference. • This unit is sold separately. Installation Manual Included (for qualified service personnel) • To assemble this unit, please refer to the Installation Manual on pages 37 through 60. • Before operating this equipment. Operating Instructions (For Basic Operations) Electronic Board (elite Panaboard) Model No.
Assembly Instructions
Page 2
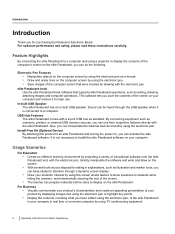
... in explanations, such as scanners, printers, or external USB memory sources, you can keep students' attention through the USB speaker when it for purchasing the Panasonic Electronic Board. It is connected to install the elite Panaboard software on your company in real time on a remote computer by using the electronic pen, of the elite Panaboard in your computer. For Business • Visually...
... in explanations, such as scanners, printers, or external USB memory sources, you can keep students' attention through the USB speaker when it for purchasing the Panasonic Electronic Board. It is connected to install the elite Panaboard software on your company in real time on a remote computer by using the electronic pen, of the elite Panaboard in your computer. For Business • Visually...
Assembly Instructions
Page 3
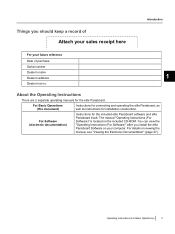
... Panaboard Software on your future reference Date of Attach your sales receipt here Introduction For your computer. You can view the "Operating Instructions (For Software)" after you should keep a record of purchase Serial number Dealer's name Dealer's address 1 Dealer's tel no. Operating Instructions (For Basic Operations) 3 For Software (electronic documentation) Instructions for installation construction. About the Operating Instructions There are 2 separate operating manuals for the elite Panaboard...
... Panaboard Software on your future reference Date of Attach your sales receipt here Introduction For your computer. You can view the "Operating Instructions (For Software)" after you should keep a record of purchase Serial number Dealer's name Dealer's address 1 Dealer's tel no. Operating Instructions (For Basic Operations) 3 For Software (electronic documentation) Instructions for installation construction. About the Operating Instructions There are 2 separate operating manuals for the elite Panaboard...

Assembly Instructions
Page 5
..., or Adobe® Flash® Player installed to insert and play back video. Operating Instructions (For Basic Operations) 5 Inserting and playing back video is not supported in Windows Vista Home Basic and Windows XP Home Edition. The system requirements above do not meet the recommended specifications of all important data is saved by operational errors, static electricity, electrical noise, vibration...
..., or Adobe® Flash® Player installed to insert and play back video. Operating Instructions (For Basic Operations) 5 Inserting and playing back video is not supported in Windows Vista Home Basic and Windows XP Home Edition. The system requirements above do not meet the recommended specifications of all important data is saved by operational errors, static electricity, electrical noise, vibration...
Assembly Instructions
Page 7
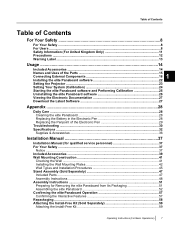
... Electronic Pen 28 Replacing the Penpoint of the Electronic Pen 29 Troubleshooting ...30 Specifications ...32 Supplies & Accessories 36 Installation Manual 37 Installation Manual (for qualified service personnel 37 For Your Safety ...37 Notice ...37 Included Accessories ...39 Wall Mounting Construction 41 Checking the Wall ...41 Installing the Wall Mounting Plates 42 Wall Types and Installation Procedures 45 Stand Assembly (Sold Separately 47 Included Parts ...47 Assembly Instructions ...48 Assembly Instructions...
... Electronic Pen 28 Replacing the Penpoint of the Electronic Pen 29 Troubleshooting ...30 Specifications ...32 Supplies & Accessories 36 Installation Manual 37 Installation Manual (for qualified service personnel 37 For Your Safety ...37 Notice ...37 Included Accessories ...39 Wall Mounting Construction 41 Checking the Wall ...41 Installing the Wall Mounting Plates 42 Wall Types and Installation Procedures 45 Stand Assembly (Sold Separately 47 Included Parts ...47 Assembly Instructions ...48 Assembly Instructions...

Assembly Instructions
Page 15
... the audio input port in the center when shipped. to the elite Panaboard using these ports. (Page 20) USB Port Directly connect a computer using a projector. 1 Power Switch Pen Tray Push the center of the electronic pen. Operating Instructions (For Basic Operations) 15 Screen Board Project the contents of a computer screen using a USB cable (included). External Audio Input Port Connect the audio output port...
... the audio input port in the center when shipped. to the elite Panaboard using these ports. (Page 20) USB Port Directly connect a computer using a projector. 1 Power Switch Pen Tray Push the center of the electronic pen. Operating Instructions (For Basic Operations) 15 Screen Board Project the contents of a computer screen using a USB cable (included). External Audio Input Port Connect the audio output port...
Assembly Instructions
Page 18
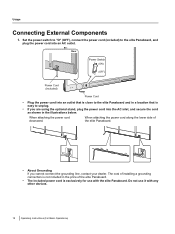
... cord as shown in the price of the elite Panaboard. • About Grounding If you are using the optional stand, plug the power cord into an AC outlet. The cost of installing a grounding connection is exclusively for use it with the elite Panaboard. Do not use with any other devices. 18 Operating Instructions (For Basic Operations) When attaching the power cord...
... cord as shown in the price of the elite Panaboard. • About Grounding If you are using the optional stand, plug the power cord into an AC outlet. The cost of installing a grounding connection is exclusively for use it with the elite Panaboard. Do not use with any other devices. 18 Operating Instructions (For Basic Operations) When attaching the power cord...

Assembly Instructions
Page 22
...; In Windows Vista, if the Autoplay dialog box is connected to install the elite Panaboard software on -screen directions to do so. • The group [elite Panaboard] will be created in the [Panasonic] group in the program menu. • The following screen is displayed, confirm that will be used with the installation. 8. Operating Instructions for Basic Operations - Usage Installing the elite Panaboard software You...
...; In Windows Vista, if the Autoplay dialog box is connected to install the elite Panaboard software on -screen directions to do so. • The group [elite Panaboard] will be created in the [Panasonic] group in the program menu. • The following screen is displayed, confirm that will be used with the installation. 8. Operating Instructions for Basic Operations - Usage Installing the elite Panaboard software You...
Assembly Instructions
Page 23
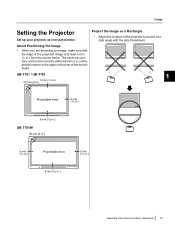
... (1/4 in.) UB-T781W 50 mm (2 in.) 5 mm (1/4 in.) Projectable Area 5 mm (1/4 in.) 5 mm (1/4 in the upper-left corner of the position sensor in .) Operating Instructions (For Basic Operations) 23 Usage Setting the Projector Set up your projector as a Rectangle • Adjust the location of the projected image is at a right angle with the elite Panaboard. The electronic pen may not...
... (1/4 in.) UB-T781W 50 mm (2 in.) 5 mm (1/4 in.) Projectable Area 5 mm (1/4 in.) 5 mm (1/4 in the upper-left corner of the position sensor in .) Operating Instructions (For Basic Operations) 23 Usage Setting the Projector Set up your projector as a Rectangle • Adjust the location of the projected image is at a right angle with the elite Panaboard. The electronic pen may not...

Assembly Instructions
Page 24
... to perform calibration. Refer to your computer to perform calibration before use the elite Panaboard software installed on your projector's documentation for information on the screen board with the electronic pen while operating can cause misalignment. 24 Operating Instructions (For Basic Operations) If the resolution is not set up the elite Panaboard and projector so that lines and comments drawn on adjusting the...
... to perform calibration. Refer to your computer to perform calibration before use the elite Panaboard software installed on your projector's documentation for information on the screen board with the electronic pen while operating can cause misalignment. 24 Operating Instructions (For Basic Operations) If the resolution is not set up the elite Panaboard and projector so that lines and comments drawn on adjusting the...

Assembly Instructions
Page 27
... your computer. Open "Operating Instructions (For Software)" from the Start menu. ([Start] ® [All Programs] ® [Panasonic] ® [elite Panaboard] ® [Operating Instructions for Software]) • The electronic documentation will be displayed. • For Windows 2000, [Programs] is connected to the Internet, you must have Adobe® Reader® installed on your computer is displayed instead of the software from Adobe's web...
... your computer. Open "Operating Instructions (For Software)" from the Start menu. ([Start] ® [All Programs] ® [Panasonic] ® [elite Panaboard] ® [Operating Instructions for Software]) • The electronic documentation will be displayed. • For Windows 2000, [Programs] is connected to the Internet, you must have Adobe® Reader® installed on your computer is displayed instead of the software from Adobe's web...

Assembly Instructions
Page 30
... Troubleshooting When experiencing problems, please refer to a USB hub. → Do not connect the elite Panaboard through a USB hub. The electronic pen's position is blocked. Apart from writing directly on batteries. → Check that the power cord is causing the problem. Part of the above , perform the calibration again. hand. • Several electronic pens are not connected. holding the electronic pen at the...
... Troubleshooting When experiencing problems, please refer to a USB hub. → Do not connect the elite Panaboard through a USB hub. The electronic pen's position is blocked. Apart from writing directly on batteries. → Check that the power cord is causing the problem. Part of the above , perform the calibration again. hand. • Several electronic pens are not connected. holding the electronic pen at the...

Assembly Instructions
Page 31
... Panaboard is low. → Adjust the volume using the volume dial. 1 • The volume of your computer is low. is weak. 17 battery soon." may not be erased. Replace the The electronic pen's...Replace the electronic pen's battery. 28 on your computer. → Install the driver or application following the instructions in the manual for projector images, you cannot erase the marks with a standard eraser. → Use commercially available white-board cleaner or neutral 28 household cleaner diluted with a white-board marker cannot be installed on the computer screen. Windows...
... Panaboard is low. → Adjust the volume using the volume dial. 1 • The volume of your computer is low. is weak. 17 battery soon." may not be erased. Replace the The electronic pen's...Replace the electronic pen's battery. 28 on your computer. → Install the driver or application following the instructions in the manual for projector images, you cannot erase the marks with a standard eraser. → Use commercially available white-board cleaner or neutral 28 household cleaner diluted with a white-board marker cannot be installed on the computer screen. Windows...
Assembly Instructions
Page 32
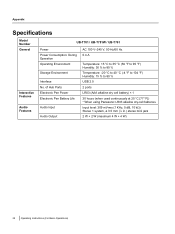
...;F to 104 °F) Humidity: 15 % to 80 % USB 2.0 2 ports LR03 (AAA alkaline dry cell battery) × 1 30 hours (when used continuously at 25 °C [77 °F]) * When using Panasonic LR03 alkaline dry-cell batteries. Appendix Specifications Model Number General Interactive Features Audio Features UB-T781 / UB-T781W / UB-T761 Power Power Consumption: During Operation Operating Environment Storage Environment Interface No. Input level: 309...
...;F to 104 °F) Humidity: 15 % to 80 % USB 2.0 2 ports LR03 (AAA alkaline dry cell battery) × 1 30 hours (when used continuously at 25 °C [77 °F]) * When using Panasonic LR03 alkaline dry-cell batteries. Appendix Specifications Model Number General Interactive Features Audio Features UB-T781 / UB-T781W / UB-T761 Power Power Consumption: During Operation Operating Environment Storage Environment Interface No. Input level: 309...
Assembly Instructions
Page 37
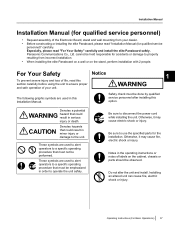
... a specific operating procedure that could result in the operating instructions or notes of labels on the stand, perform installation with 2 people. Safety check must not be done by qualified service personnel after installing this Installation Manual. CAUTION Denotes hazards that must be performed. Be sure to ensure proper and safe operation of the Electronic Board, stand and wall mounting from incorrect installation. • When installing the elite Panaboard...
... a specific operating procedure that could result in the operating instructions or notes of labels on the stand, perform installation with 2 people. Safety check must not be done by qualified service personnel after installing this Installation Manual. CAUTION Denotes hazards that must be performed. Be sure to ensure proper and safe operation of the Electronic Board, stand and wall mounting from incorrect installation. • When installing the elite Panaboard...
Assembly Instructions
Page 38
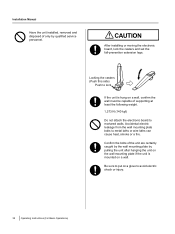
... be capable of supporting at least the following weight. 1,373 N (140 kgf) Do not attach the electronic board to mortared walls. CAUTION After installing or moving the electronic board, lock the casters and set the fall-prevention extension legs. Confirm the bolts of the unit are certainly caught by the wall mounting plate by qualified service personnel. Accidental electric...
... be capable of supporting at least the following weight. 1,373 N (140 kgf) Do not attach the electronic board to mortared walls. CAUTION After installing or moving the electronic board, lock the casters and set the fall-prevention extension legs. Confirm the bolts of the unit are certainly caught by the wall mounting plate by qualified service personnel. Accidental electric...

Assembly Instructions
Page 39
Wall Mounting Plate (Right) Battery (LR03 AAA alkaline battery) Electronic Pen Penpoint (Replacement) Cable Tie Operating Instructions 1 - 1 For electronic pen 1 - 2 For electronic pen 1 Fastener for the 1 United States. Part Name Illustration Power Cord (3 m [9 ft. 10 1/8 in.]) USB Cable (5 m [16 ft. 4 7/8 in.]) CD-ROM Cable Holder Q'ty Remarks The illustration of the plug may vary depending on a wall Operating Instructions 1 (For Basic Operations) (includes Installation Manual) Operating Instructions (For Basic Operations) 39...
Wall Mounting Plate (Right) Battery (LR03 AAA alkaline battery) Electronic Pen Penpoint (Replacement) Cable Tie Operating Instructions 1 - 1 For electronic pen 1 - 2 For electronic pen 1 Fastener for the 1 United States. Part Name Illustration Power Cord (3 m [9 ft. 10 1/8 in.]) USB Cable (5 m [16 ft. 4 7/8 in.]) CD-ROM Cable Holder Q'ty Remarks The illustration of the plug may vary depending on a wall Operating Instructions 1 (For Basic Operations) (includes Installation Manual) Operating Instructions (For Basic Operations) 39...
Assembly Instructions
Page 41
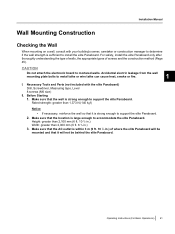
...not attach the electronic board to metal laths or wire laths can cause heat, smoke or fire. 1 I. Make sure that it is strong enough to accommodate the elite Panaboard. Accidental electric leakage from the wall mounting plate bolts to...install the elite Panaboard. Installation Manual Wall Mounting Construction Checking the Wall When mounting on a wall, consult with the elite Panaboard) Drill, Screwdriver, Measuring tape, Level 8 screws (M6 size) II. Make sure that the location is large enough to support the elite Panaboard. 2. Operating Instructions (For Basic Operations...
...not attach the electronic board to metal laths or wire laths can cause heat, smoke or fire. 1 I. Make sure that it is strong enough to accommodate the elite Panaboard. Accidental electric leakage from the wall mounting plate bolts to...install the elite Panaboard. Installation Manual Wall Mounting Construction Checking the Wall When mounting on a wall, consult with the elite Panaboard) Drill, Screwdriver, Measuring tape, Level 8 screws (M6 size) II. Make sure that the location is large enough to support the elite Panaboard. 2. Operating Instructions (For Basic Operations...

Assembly Instructions
Page 55
...board surface. Attach the power cord. • Connect the power cord to clean. (Doing so can operate. See "Confirming the elite Panaboard Operation" (page 57). 2. Depending on the location of the elite Panaboard. Operating Instructions (For Basic Operations) 55 For Mounting on the stand. Confirm that the elite Panaboard... wipe the screen board with a soft, moist cloth. Power Cord 1 Notice • Do not use thinner, benzene, or abrasive chemicals to the elite Panaboard before installing on a Stand (Sold Separately) 1. Gently wipe the screen board surface with a dry...
...board surface. Attach the power cord. • Connect the power cord to clean. (Doing so can operate. See "Confirming the elite Panaboard Operation" (page 57). 2. Depending on the location of the elite Panaboard. Operating Instructions (For Basic Operations) 55 For Mounting on the stand. Confirm that the elite Panaboard... wipe the screen board with a soft, moist cloth. Power Cord 1 Notice • Do not use thinner, benzene, or abrasive chemicals to the elite Panaboard before installing on a Stand (Sold Separately) 1. Gently wipe the screen board surface with a dry...
Assembly Instructions
Page 57
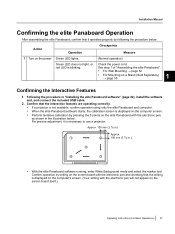
... board itself.) Operating Instructions (For Basic Operations) 57 See step 1 of "Assembling the elite Panaboard". • For Wall Mounting ® page 52 • For Mounting on the power. Approx. 100 mm (3 7/8 in.) Approx. 1 2 100 mm (3 7/8 in "Installing the elite Panaboard software" (page 22), install the software and, and connect the included USB cable. 2. Confirm operation by pressing the 5 points on the screen board with the electronic pen...
... board itself.) Operating Instructions (For Basic Operations) 57 See step 1 of "Assembling the elite Panaboard". • For Wall Mounting ® page 52 • For Mounting on the power. Approx. 100 mm (3 7/8 in.) Approx. 1 2 100 mm (3 7/8 in "Installing the elite Panaboard software" (page 22), install the software and, and connect the included USB cable. 2. Confirm operation by pressing the 5 points on the screen board with the electronic pen...


