

Operating Instructions
Page 2
... boxes should still retune the TV to continue to meet the standards (as VIERA Link and Media Player) can be relatively low in some Digital TV channels will go completely digital, TV region by using the VIERA TOOLS button. Features DVB-T tuner built-in [DVB Tuning Menu]-DVB mode (p. 38) Users of several weeks. SDXC is an anti-theft function. If you perform DVB Auto Setup...
... boxes should still retune the TV to continue to meet the standards (as VIERA Link and Media Player) can be relatively low in some Digital TV channels will go completely digital, TV region by using the VIERA TOOLS button. Features DVB-T tuner built-in [DVB Tuning Menu]-DVB mode (p. 38) Users of several weeks. SDXC is an anti-theft function. If you perform DVB Auto Setup...
Operating Instructions
Page 3
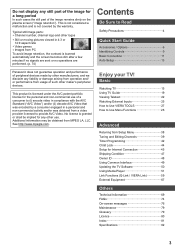
... be obtained from a video provider licensed to Read Safety Precautions 4 Quick Start Guide Accessories / Options 6 Identifying Controls 9 Basic Connection 11 Auto Setup 13 Panasonic does not guarantee operation and performance of the image for Internet Connection 45 Shipping Condition 47 Owner ID 48 Using Common Interface 49 Updating the TV Software 50 Using Media Player 51 Link Functions (Q-Link / VIERA Link 59 External Equipment 67 Others Technical Information 69 FAQs...
... be obtained from a video provider licensed to Read Safety Precautions 4 Quick Start Guide Accessories / Options 6 Identifying Controls 9 Basic Connection 11 Auto Setup 13 Panasonic does not guarantee operation and performance of the image for Internet Connection 45 Shipping Condition 47 Owner ID 48 Using Common Interface 49 Updating the TV Software 50 Using Media Player 51 Link Functions (Q-Link / VIERA Link 59 External Equipment 67 Others Technical Information 69 FAQs...

Operating Instructions
Page 9
.... 5 Information (p. 16) ● Displays channel and programme information. 6 VIERA TOOLS (p. 27) ● Displays some special feature icons and accesses easily. 7 [Media Player] (p. 51) ● Switches to SD Card and USB device viewing / listening mode. 8 OK ● Confirms selections and choices. ● Press after selecting channel positions to quickly change channel. 9 [Option Menu] (p. 17) ● Easy optional setting for viewing, sound, etc. 10 Coloured buttons (red-green-yellow-blue) ● Used for the selection...
.... 5 Information (p. 16) ● Displays channel and programme information. 6 VIERA TOOLS (p. 27) ● Displays some special feature icons and accesses easily. 7 [Media Player] (p. 51) ● Switches to SD Card and USB device viewing / listening mode. 8 OK ● Confirms selections and choices. ● Press after selecting channel positions to quickly change channel. 9 [Option Menu] (p. 17) ● Easy optional setting for viewing, sound, etc. 10 Coloured buttons (red-green-yellow-blue) ● Used for the selection...

Operating Instructions
Page 17
...) ● When the remaining time is within 3 minutes, the remaining time will flash on the screen. ■ To set Off Timer using the menu item 1 Display the menu 2 Select [Setup] Main Menu Picture Sound Setup select access 3 Select [Off Timer] and set the time in 15-minute increments Setup Menu Timer Programming TV Guide Settings Off Timer Off Eco Navigation Link Settings Child Lock DVB Tuning Menu Display Settings Network Setup 1/2 select set ● To cancel, set to [Off] or turn the TV off. 17
...) ● When the remaining time is within 3 minutes, the remaining time will flash on the screen. ■ To set Off Timer using the menu item 1 Display the menu 2 Select [Setup] Main Menu Picture Sound Setup select access 3 Select [Off Timer] and set the time in 15-minute increments Setup Menu Timer Programming TV Guide Settings Off Timer Off Eco Navigation Link Settings Child Lock DVB Tuning Menu Display Settings Network Setup 1/2 select set ● To cancel, set to [Off] or turn the TV off. 17
Operating Instructions
Page 23
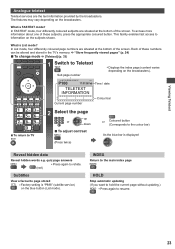
... bar) As the blue bar is "P888" (subtitle service) on the broadcasters). > 17:51 28 Feb Time / date TELETEXT INFORMATION Colour bar Current page number ■ To return to TV 2 Select the page up or down ■ To adjust contrast (Press twice) or Coloured button (Corresponds to rehide. (red) Subtitles View a favourite page stored ● Factory setting is displayed Reveal hidden data...
... bar) As the blue bar is "P888" (subtitle service) on the broadcasters). > 17:51 28 Feb Time / date TELETEXT INFORMATION Colour bar Current page number ■ To return to TV 2 Select the page up or down ■ To adjust contrast (Press twice) or Coloured button (Corresponds to rehide. (red) Subtitles View a favourite page stored ● Factory setting is displayed Reveal hidden data...

Operating Instructions
Page 28
... return to the next screen Child Lock Access Displays the next screen select store change menu pages up ■ Choose from among alternatives Number and positions of alternatives Colour Balance Normal Changed ■ Adjust using numeric buttons. "Characters table for numeric buttons" (p. 73) 123 .!:# abc def 456 ghi jkl mno 789 pqrs tuv wxyz 0 ■ To reset the settings ● Picture or sound settings only [Reset to Defaults] in "Shop" viewing environment.
... return to the next screen Child Lock Access Displays the next screen select store change menu pages up ■ Choose from among alternatives Number and positions of alternatives Colour Balance Normal Changed ■ Adjust using numeric buttons. "Characters table for numeric buttons" (p. 73) 123 .!:# abc def 456 ghi jkl mno 789 pqrs tuv wxyz 0 ■ To reset the settings ● Picture or sound settings only [Reset to Defaults] in "Shop" viewing environment.

Operating Instructions
Page 32
... TV Child Lock 32 Applies access control for channels or inputs to Q-Link [TV] / [AV2] / [Monitor] [Monitor]: Image displayed on the broadcast. ● The availability of audio description sound track is indicated by [AD] in Standby [Off] / [On] (p. 63) ● This function is available when [VIERA Link] is set to [On]. Audio Description Menu Sound Menu Item Audio Description Adjustments / Configurations (alternatives) Narration settings for visually impaired users [Off] / [Auto] Set to [Auto] to...
... TV Child Lock 32 Applies access control for channels or inputs to Q-Link [TV] / [AV2] / [Monitor] [Monitor]: Image displayed on the broadcast. ● The availability of audio description sound track is indicated by [AD] in Standby [Off] / [On] (p. 63) ● This function is available when [VIERA Link] is set to [On]. Audio Description Menu Sound Menu Item Audio Description Adjustments / Configurations (alternatives) Narration settings for visually impaired users [Off] / [Auto] Set to [Auto] to...

Operating Instructions
Page 34
... a control signal for automatic switching at power on power consumption [Off] / [On] ∗The settings in [Tuning Menu] are applicable only for the selected TV mode. Power Save Reduces brightness of the picture to economise on to occur. How to Use Menu Functions Menu Item Connection Test, IP/DNS Settings Adjustments / Configurations (alternatives) Sets the network setting to use in your network environment (p. 45) Network Setup Software Update Checks for available software updates from the Panasonic website MAC Address Displays...
... a control signal for automatic switching at power on power consumption [Off] / [On] ∗The settings in [Tuning Menu] are applicable only for the selected TV mode. Power Save Reduces brightness of the picture to economise on to occur. How to Use Menu Functions Menu Item Connection Test, IP/DNS Settings Adjustments / Configurations (alternatives) Sets the network setting to use in your network environment (p. 45) Network Setup Software Update Checks for available software updates from the Panasonic website MAC Address Displays...

Operating Instructions
Page 37
... (p. 40) DVB Auto Setup Progress CH 21 This will take about 3 minutes. TV Guide Settings Menu TV Guide View Normal (p. 32) Link Settings VIERA Link AV1 out Standby Power Save Intelligent Auto Standby Q-Link Download On TV On On (No reminder) Access (p. 32) Sending Preset Data Please wait! 0% Remote control unavailable 100% (p. 32) How to Use Menu Functions Child Lock Change PIN Child Lock List Parental Rating Available in DVB Input Labels AV1...
... (p. 40) DVB Auto Setup Progress CH 21 This will take about 3 minutes. TV Guide Settings Menu TV Guide View Normal (p. 32) Link Settings VIERA Link AV1 out Standby Power Save Intelligent Auto Standby Q-Link Download On TV On On (No reminder) Access (p. 32) Sending Preset Data Please wait! 0% Remote control unavailable 100% (p. 32) How to Use Menu Functions Child Lock Change PIN Child Lock List Parental Rating Available in DVB Input Labels AV1...

Operating Instructions
Page 41
... weather conditions, etc.). [Manual Tuning]: Set Analogue channel manually after Auto Setup. ● If a VCR is updated while keeping your settings in [Favourites Edit], [Channel List], [Child Lock], etc. ● Depending on the signal condition, the update may not work properly. Set DVB channel manually [Manual Tuning] Normally use this function. Press OK to ignore. Check DVB signal [Signal Condition] Selects a channel and checks the DVB signal condition. Use the Signal Quality indicator as follows...
... weather conditions, etc.). [Manual Tuning]: Set Analogue channel manually after Auto Setup. ● If a VCR is updated while keeping your settings in [Favourites Edit], [Channel List], [Child Lock], etc. ● Depending on the signal condition, the update may not work properly. Set DVB channel manually [Manual Tuning] Normally use this function. Press OK to ignore. Check DVB signal [Signal Condition] Selects a channel and checks the DVB signal condition. Use the Signal Quality indicator as follows...

Operating Instructions
Page 51
... resolution. ● Picture setting may not work depending on the TV screen by using USB card reader. ● When using USB cable, use the supplied Ferrite core (Middle size) to use HDMI2 with ARC function, connect an amplifier that has ARC function (p. 60) and set to the installing of the Ferrite core for installing the Ferrite core, refer to [Monitor] in Media Player" (p. 70) Using Media Player 51 Push until a click is output from AV1, DIGITAL AUDIO OUT...
... resolution. ● Picture setting may not work depending on the TV screen by using USB card reader. ● When using USB cable, use the supplied Ferrite core (Middle size) to use HDMI2 with ARC function, connect an amplifier that has ARC function (p. 60) and set to the installing of the Ferrite core for installing the Ferrite core, refer to [Monitor] in Media Player" (p. 70) Using Media Player 51 Push until a click is output from AV1, DIGITAL AUDIO OUT...

Operating Instructions
Page 56
... Start playback (red) ■ Playback from the selected scene in the SD Card or USB Flash Memory will start to thumbnail ● To operate the playback Rewind Pause / Playback Fast forward Stop Using Media Player 56 Video mode ● Supported file format (p. 70) The thumbnail of titles and scenes may vary depending on the digital video camera used. ● To repeat playback "Video Setup" (p. 57) ■...
... Start playback (red) ■ Playback from the selected scene in the SD Card or USB Flash Memory will start to thumbnail ● To operate the playback Rewind Pause / Playback Fast forward Stop Using Media Player 56 Video mode ● Supported file format (p. 70) The thumbnail of titles and scenes may vary depending on the digital video camera used. ● To repeat playback "Video Setup" (p. 57) ■...

Operating Instructions
Page 57
... Text Video Setup Aspect Change Repeat Adjustments / Configurations (alternatives) Sets to PCM. Using Media Player 57 ■ Video Setup Setup the settings for Video mode. ● Menu items and selectable options vary depending on the content) [Off] / [On] Audio output Settings You can also change the aspect using the ASPECT button. ● Aspect change the current sound status (see above) 1 Display the menu and Select [Sound] 2 Select [SPDIF Selection] and set Main Menu Picture Sound Menu 2/2 SPDIF Selection Auto Reset to Defaults Reset Sound Setup select select set...
... Text Video Setup Aspect Change Repeat Adjustments / Configurations (alternatives) Sets to PCM. Using Media Player 57 ■ Video Setup Setup the settings for Video mode. ● Menu items and selectable options vary depending on the content) [Off] / [On] Audio output Settings You can also change the aspect using the ASPECT button. ● Aspect change the current sound status (see above) 1 Display the menu and Select [Sound] 2 Select [SPDIF Selection] and set Main Menu Picture Sound Menu 2/2 SPDIF Selection Auto Reset to Defaults Reset Sound Setup select select set...

Operating Instructions
Page 62
... www.panasonic.co.uk Preparations ● Connect the equipment supporting VIERA Link. ● VIERA Link connection (p. 59, 60) ● Use fully wired HDMI compliant cable. For details, read the manual of HDAVI Control. Digital channel settings are not available depending on the control functions provided by auto power standby function. Link Functions (Q-Link / VIERA Link) 62 Non-HDMI-compliant cables cannot be guaranteed. ● Please refer to individual manuals for the first time...
... www.panasonic.co.uk Preparations ● Connect the equipment supporting VIERA Link. ● VIERA Link connection (p. 59, 60) ● Use fully wired HDMI compliant cable. For details, read the manual of HDAVI Control. Digital channel settings are not available depending on the control functions provided by auto power standby function. Link Functions (Q-Link / VIERA Link) 62 Non-HDMI-compliant cables cannot be guaranteed. ● Please refer to individual manuals for the first time...

Operating Instructions
Page 63
... time fast. ● This function is effective if the connected equipment can change channel while the recorder is recording from its own tuner. ● You can not change the power consumption in Standby mode and is set to higher consumption. For example, if you use HDMI1 and HDMI2 for unnecessary equipment [Intelligent Auto Standby] Set Intelligent Auto Standby [On (With reminder)] or [On (No reminder)] in the Setup Menu to use...
... time fast. ● This function is effective if the connected equipment can change channel while the recorder is recording from its own tuner. ● You can not change the power consumption in Standby mode and is set to higher consumption. For example, if you use HDMI1 and HDMI2 for unnecessary equipment [Intelligent Auto Standby] Set Intelligent Auto Standby [On (With reminder)] or [On (No reminder)] in the Setup Menu to use...

Operating Instructions
Page 72
....00 Applicable input signal for PC is used, connect the audio cable to AV2 audio terminals. Otherwise this can be displayed" (see below ) Match the output setting of the PC. ● VIERA Link (HDAVI Control 5) [VIERA Link] (p. 62) ● Deep Colour ● x.v.Colour™ ● Audio Return Channel∗2 (HDMI2 terminal only) ■ DVI connection If the external equipment has only a DVI output, connect to the HDMI terminal via an HDMI cable. ∗3: Enquire...
....00 Applicable input signal for PC is used, connect the audio cable to AV2 audio terminals. Otherwise this can be displayed" (see below ) Match the output setting of the PC. ● VIERA Link (HDAVI Control 5) [VIERA Link] (p. 62) ● Deep Colour ● x.v.Colour™ ● Audio Return Channel∗2 (HDMI2 terminal only) ■ DVI connection If the external equipment has only a DVI output, connect to the HDMI terminal via an HDMI cable. ∗3: Enquire...
Operating Instructions
Page 75
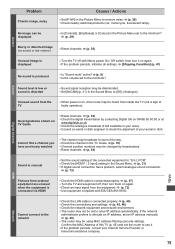
... [Colour] in the Picture Menu set to the minimum? (p. 29) Screen Blurry or distorted image (no sound or low volume) ● Reset channels. (p. 38) Unusual image is displayed ● Turn the TV off , then turn them on again. ● Check an input signal from the equipment. (p. 72) ● Use equipment compliant with Mains power On / Off switch, then turn it . ● If the problem persists, consult your Internet Service Provider or telecommunications...
... [Colour] in the Picture Menu set to the minimum? (p. 29) Screen Blurry or distorted image (no sound or low volume) ● Reset channels. (p. 38) Unusual image is displayed ● Turn the TV off , then turn them on again. ● Check an input signal from the equipment. (p. 72) ● Use equipment compliant with Mains power On / Off switch, then turn it . ● If the problem persists, consult your Internet Service Provider or telecommunications...

Operating Instructions
Page 77
... new software available. Check the connection of the RF cable. No recording - Please try again later. Please press TV button on remote control and check time display on -screen instructions. ● Please also refer to ignore. ● There may not be performed. On-screen messages 77 Press OK to [Off] in progress. Do not turn the TV off ● [Auto Setup] will perform [Update Channel List]. Max...
... new software available. Check the connection of the RF cable. No recording - Please try again later. Please press TV button on remote control and check time display on -screen instructions. ● Please also refer to ignore. ● There may not be performed. On-screen messages 77 Press OK to [Off] in progress. Do not turn the TV off ● [Auto Setup] will perform [Update Channel List]. Max...

Operating Instructions
Page 79
... for a long time. Glossary DVI Digital Visual Interface - One of the display panel, cabinet, or pedestal by using a soft cloth to clean the dirt or fingerprints. An interface specification to explain main features of this may cause scratches on a single cable LAN Local Area Network MAC Address Media Access control Address NICAM Near Instantaneous Companded Audio Multiplex A format for digital sound over television NTSC National Television System Committee...
... for a long time. Glossary DVI Digital Visual Interface - One of the display panel, cabinet, or pedestal by using a soft cloth to clean the dirt or fingerprints. An interface specification to explain main features of this may cause scratches on a single cable LAN Local Area Network MAC Address Media Access control Address NICAM Near Instantaneous Companded Audio Multiplex A format for digital sound over television NTSC National Television System Committee...

Operating Instructions
Page 81
... Multi Audio 17 Music mode 58 N Network connections 45 Network Setup 45 New Channel Message 41 NICAM 31 NTSC 29, 82 O Off Timer 17, 32 Optional accessories 6 Owner ID 13, 48 P PAL 82 Pedestal 7 Photo mode 53 PIN number 13, 44, 48 Pixel Orbiter 30 Playing Time Display 33 P-NR 29 Power and Timer LED 10 Q Q-Link 59, 61 Q-Link Download 13, 32 Quick Start Guide 6 - 14 R Radio Mode 33 Remote control 6, 7, 9 Reset to Defaults...
... Multi Audio 17 Music mode 58 N Network connections 45 Network Setup 45 New Channel Message 41 NICAM 31 NTSC 29, 82 O Off Timer 17, 32 Optional accessories 6 Owner ID 13, 48 P PAL 82 Pedestal 7 Photo mode 53 PIN number 13, 44, 48 Pixel Orbiter 30 Playing Time Display 33 P-NR 29 Power and Timer LED 10 Q Q-Link 59, 61 Q-Link Download 13, 32 Quick Start Guide 6 - 14 R Radio Mode 33 Remote control 6, 7, 9 Reset to Defaults...


