
Operating Instructions
Page 4
... 6 Display 8 Settings 11 Connecting the AC Adaptor 11 Connecting the Telephone Line Cord 12 Battery Charge 14 Selecting the Dialing Mode 16 Selecting the Line Mode 17 Programmable Functions 18 Setting the Auto Talk Feature 19 Selecting the Ringer Volume 20 Selecting the LCD Contrast 21 Basic 0 0 Making Calls 22 Answering Calls 26 Caller ID Service 27 Using the Caller List 29 Viewing the Caller List 29 Calling Back from the Caller List 31 Editing the Caller's Phone Number 32...
... 6 Display 8 Settings 11 Connecting the AC Adaptor 11 Connecting the Telephone Line Cord 12 Battery Charge 14 Selecting the Dialing Mode 16 Selecting the Line Mode 17 Programmable Functions 18 Setting the Auto Talk Feature 19 Selecting the Ringer Volume 20 Selecting the LCD Contrast 21 Basic 0 0 Making Calls 22 Answering Calls 26 Caller ID Service 27 Using the Caller List 29 Viewing the Caller List 29 Calling Back from the Caller List 31 Editing the Caller's Phone Number 32...
Operating Instructions
Page 5
... Access Number Setting the Voice Mail Tone Listening to Voice Mail Messages Using the Other Line During a Conversation Conference Call Special Features Automatic Security Code Setting Handset Locator Temporary Tone Dialing (For Rotary or Pulse Service Users) How to Use the PAUSE Button (For Analog PBX Line/Long Distance Service Users) For Call Waiting Service Users FLASH Button Line Selection Incoming Call Tone 43 43 45 46 47 48 49 a 49 49 50 . 50 I 50 51 52 53 Wall Mounting Using the Belt Clip Using an Optional Headset Battery Replacement Adding Another Phone Before Requesting Help...
... Access Number Setting the Voice Mail Tone Listening to Voice Mail Messages Using the Other Line During a Conversation Conference Call Special Features Automatic Security Code Setting Handset Locator Temporary Tone Dialing (For Rotary or Pulse Service Users) How to Use the PAUSE Button (For Analog PBX Line/Long Distance Service Users) For Call Waiting Service Users FLASH Button Line Selection Incoming Call Tone 43 43 45 46 47 48 49 a 49 49 50 . 50 I 50 51 52 53 Wall Mounting Using the Belt Clip Using an Optional Headset Battery Replacement Adding Another Phone Before Requesting Help...

Operating Instructions
Page 8
... new calls VA ►=Directory The display shows the number of new calls and the battery strength (p. 14) while the handset is on the display. These display prompts are no stored No items stored items in the directory. a To search from the most recent call, press To search from the oldest call is set to OFF (p. 20), "Ringer off the base unit. VoicemailUn The display shows the voice mail message(s) is/are recorded...
... new calls VA ►=Directory The display shows the number of new calls and the battery strength (p. 14) while the handset is on the display. These display prompts are no stored No items stored items in the directory. a To search from the most recent call, press To search from the oldest call is set to OFF (p. 20), "Ringer off the base unit. VoicemailUn The display shows the voice mail message(s) is/are recorded...
Operating Instructions
Page 11
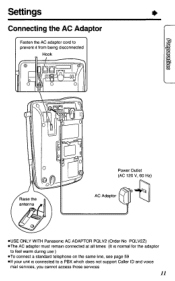
...;USE ONLY WITH Panasonic AC ADAPTOR PQLV2 (Order No PQLV2Z) •The AC adaptor must remain connected at all times (It is normal for the adaptor to feel warm during use ) •To connect a standard telephone on the same line, see page 59 •If your unit is connected to a PBX which does not support Caller ID and voice mail services, you cannot access those services 11
...;USE ONLY WITH Panasonic AC ADAPTOR PQLV2 (Order No PQLV2Z) •The AC adaptor must remain connected at all times (It is normal for the adaptor to feel warm during use ) •To connect a standard telephone on the same line, see page 59 •If your unit is connected to a PBX which does not support Caller ID and voice mail services, you cannot access those services 11

Operating Instructions
Page 14
... mode (see next page). OR IN USE/CHARGE/HOLD Indicator Battery strength You can check the battery strength on the display while the handset is on the base unit, while it is as shown in use . •The IN USE/CHARGE/HOLD indicator lights. The battery strength is in the chart below. 0 Settings Battery Charge Place the handset on the base unit and charge for a few seconds after viewing the Caller List or directory items, programming...
... mode (see next page). OR IN USE/CHARGE/HOLD Indicator Battery strength You can check the battery strength on the display while the handset is on the base unit, while it is as shown in use . •The IN USE/CHARGE/HOLD indicator lights. The battery strength is in the chart below. 0 Settings Battery Charge Place the handset on the base unit and charge for a few seconds after viewing the Caller List or directory items, programming...

Operating Instructions
Page 15
... humidity Otherwise the battery may not charge properly •If the battery is fully charged, you do not have to flash Battery information After your Panasonic battery is conserved in use Recharge of I1,. •If you finish using the handset (making/answering a call, viewing the Caller List or directory list etc ) The display is blank, but the handset can receive calls The battery life is fully charged (p 14) Operation Approx.
... humidity Otherwise the battery may not charge properly •If the battery is fully charged, you do not have to flash Battery information After your Panasonic battery is conserved in use Recharge of I1,. •If you finish using the handset (making/answering a call, viewing the Caller List or directory list etc ) The display is blank, but the handset can receive calls The battery life is fully charged (p 14) Operation Approx.
Operating Instructions
Page 16
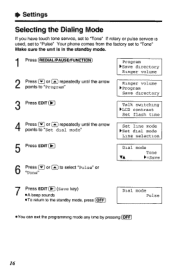
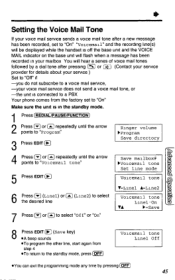
... pulse service is used, set to "Pulse" Your phone comes from the factory set to "Tone" Make sure the unit is in the standby mode. 1 Press REDIAL/PAUSE/FUNCTION) Program ►Save directory Ringer volume 2 Press ('-) or s repeatedly until the arrow point8 to "Program" Ringer volume ►Program Save directory 3 Press EDIT Talk switching ►LCD contrast Set flash time 4 Press ('-) or (a) repeatedly until the arrow points to "Set dial mode" Set line mode ►Set dial mode Line selection 5 Press EDIT Dial mode Tone...
... pulse service is used, set to "Pulse" Your phone comes from the factory set to "Tone" Make sure the unit is in the standby mode. 1 Press REDIAL/PAUSE/FUNCTION) Program ►Save directory Ringer volume 2 Press ('-) or s repeatedly until the arrow point8 to "Program" Ringer volume ►Program Save directory 3 Press EDIT Talk switching ►LCD contrast Set flash time 4 Press ('-) or (a) repeatedly until the arrow points to "Set dial mode" Set line mode ►Set dial mode Line selection 5 Press EDIT Dial mode Tone...

Operating Instructions
Page 18
... items using the handset near the base unit The display shows the programming instructions See the corresponding pages for function details Make sure the unit is in the standby mode. { Press REDIAUPAUSE/FUNCTION.) * ►Save directory Ringer volume Program To store an item in the directory (p 36) To select the ringer volume (p 20) Press EDIT l►) * ►LCD contrast Set £lash time Save mailbox# Voicemail tone Set line mode Set dial mode Line selection Incoming call Talk...
... items using the handset near the base unit The display shows the programming instructions See the corresponding pages for function details Make sure the unit is in the standby mode. { Press REDIAUPAUSE/FUNCTION.) * ►Save directory Ringer volume Program To store an item in the directory (p 36) To select the ringer volume (p 20) Press EDIT l►) * ►LCD contrast Set £lash time Save mailbox# Voicemail tone Set line mode Set dial mode Line selection Incoming call Talk...

Operating Instructions
Page 19
... can exit the programming mode any time by pressing OFF •To answer a call by programming. Your phone comes from the factory set to "Talk switching". • Setting the Auto Talk Feature The Auto Talk feature allows you want to use this feature, turn the feature ON by lifting the handset off the base unit and press [4%) or (4) 19 If you to answer a call when the Auto...
... can exit the programming mode any time by pressing OFF •To answer a call by programming. Your phone comes from the factory set to "Talk switching". • Setting the Auto Talk Feature The Auto Talk feature allows you want to use this feature, turn the feature ON by lifting the handset off the base unit and press [4%) or (4) 19 If you to answer a call when the Auto...

Operating Instructions
Page 25
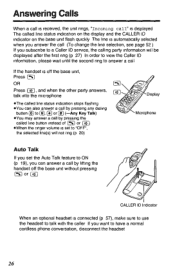
... by lifting its handset Backlit LCD display 14 / The lighted handset display will stay on for a few seconds after pressing a handset button, lifting the handset off the base unit, hanging up a call or leaving the programming mode What the line status indications (" [L1] " and " [L2 ] ") on the display mean Off The line is free On You are using the line on the handset or parallel connected telephone Flashing A call is on hold Flashing quickly A call is being received...
... by lifting its handset Backlit LCD display 14 / The lighted handset display will stay on for a few seconds after pressing a handset button, lifting the handset off the base unit, hanging up a call or leaving the programming mode What the line status indications (" [L1] " and " [L2 ] ") on the display mean Off The line is free On You are using the line on the handset or parallel connected telephone Flashing A call is on hold Flashing quickly A call is being received...
Operating Instructions
Page 26
... the microphone •The called line status indication stops flashing •You can also answer a call by pressing any dialing button II) to (D, 0 or (I) (-Any Key Talk) •You may answer a call by pressing the called line button instead of rit'ci or Ee-) •When the ringer volume is set to "OFF", the selected line(s) will not ring (p 20) Display Microphone Auto Talk If you set the Auto Talk feature to...
... the microphone •The called line status indication stops flashing •You can also answer a call by pressing any dialing button II) to (D, 0 or (I) (-Any Key Talk) •You may answer a call by pressing the called line button instead of rit'ci or Ee-) •When the ringer volume is set to "OFF", the selected line(s) will not ring (p 20) Display Microphone Auto Talk If you set the Auto Talk feature to...
Operating Instructions
Page 44
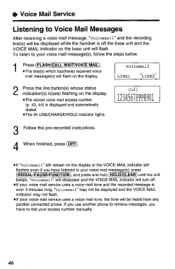
... digits are erased • (v) (Next key) • EDIT (Save key) •A beep sounds •You can exit the programming mode any time by using (FLASH/CALL WAITNOICE MAIL), you enter a wrong number, press (HOLD/CLEAR Digits are erased from step 4 oTo return to the standby mode, press OFF) 1234567PPP8901 Save mailbox# `For quick access to 32 digits •You may enter pauses* •If you may add pauses between your voice mail box access number...
... digits are erased • (v) (Next key) • EDIT (Save key) •A beep sounds •You can exit the programming mode any time by using (FLASH/CALL WAITNOICE MAIL), you enter a wrong number, press (HOLD/CLEAR Digits are erased from step 4 oTo return to the standby mode, press OFF) 1234567PPP8901 Save mailbox# `For quick access to 32 digits •You may enter pauses* •If you may add pauses between your voice mail box access number...
Operating Instructions
Page 45
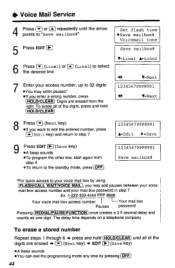
S Setting the Voice Mail Tone If your voice mail service sends a voice mail tone after a new message has been recorded, set to "On" "Voicemail" and the recording line(s) will be displayed while the handset is off the base unit and the VOICE MAIL indicator on the base unit will flash when a message has been recorded in your mailbox You will hear a series of voice mail tones followed by a dial tone after pressing or cc) (Contact your service provider for details about your service ) Set to "Off' if -you do...
S Setting the Voice Mail Tone If your voice mail service sends a voice mail tone after a new message has been recorded, set to "On" "Voicemail" and the recording line(s) will be displayed while the handset is off the base unit and the VOICE MAIL indicator on the base unit will flash when a message has been recorded in your mailbox You will hear a series of voice mail tones followed by a dial tone after pressing or cc) (Contact your service provider for details about your service ) Set to "Off' if -you do...
Operating Instructions
Page 46
... to your voice mail message(s), follow the steps below. 1 Press FLASH/CALL WAITNOICE MAIL) •The line(s) which has(have) received voice mail message(s) will be displayed and the VOICE MAIL indicator may not flash. •If your voice mail service uses a voice mail tone, the tone will flash on the base unit will flash. If you use another phone to retrieve messages, you have to dial your access number manually. 46 Voice Mail Service Listening to Voice Mail Messages After receiving a voice mail message, "voicemail" and the recording line(s) will be displayed while the handset is...
... to your voice mail message(s), follow the steps below. 1 Press FLASH/CALL WAITNOICE MAIL) •The line(s) which has(have) received voice mail message(s) will be displayed and the VOICE MAIL indicator may not flash. •If your voice mail service uses a voice mail tone, the tone will flash on the base unit will flash. If you use another phone to retrieve messages, you have to dial your access number manually. 46 Voice Mail Service Listening to Voice Mail Messages After receiving a voice mail message, "voicemail" and the recording line(s) will be displayed while the handset is...

Operating Instructions
Page 49
... USE/CHARGE/HOLD Indicator Display (OFF) (TONE LREDIAL/PAUSE/FUNCTIONJ (HANDSET LOCATOR) (FLASH/CALL WAIT/VOICE MAIL) Automatic Security Code Setting Each time you place the handset on the handset. •If an incoming call is displayed. 2. To answer, press I s' ) (E-) or the called line button. 49 The handset beeps for 1 minute and "Paging" is received, the unit starts to ring. Handset Locator You can locate the handset or page the handset user with beep tones from the base unit. 1. Press HANDSET LOCATOR •The IN USE/CHARGE/HOLD indicator flashes. To stop...
... USE/CHARGE/HOLD Indicator Display (OFF) (TONE LREDIAL/PAUSE/FUNCTIONJ (HANDSET LOCATOR) (FLASH/CALL WAIT/VOICE MAIL) Automatic Security Code Setting Each time you place the handset on the handset. •If an incoming call is displayed. 2. To answer, press I s' ) (E-) or the called line button. 49 The handset beeps for 1 minute and "Paging" is received, the unit starts to ring. Handset Locator You can locate the handset or page the handset user with beep tones from the base unit. 1. Press HANDSET LOCATOR •The IN USE/CHARGE/HOLD indicator flashes. To stop...

Operating Instructions
Page 51
...)". Make sure the unit is displayed. Your phone comes from step 4. •To return to "700 ms". LCD contrast ►Set flash time Save mailbox# Flash time V=Linel A=Line2 Flash time Line1:700ms VA ►=Save 8 Press EDIT (►J (Save key). •A beep sounds. •To program the other line, start again from the factory set to the standby mode, press (OFF). S FLASH Button Pressing (FLASH/CALL WAITNOICE MAIL) allows you are connected via...
...)". Make sure the unit is displayed. Your phone comes from step 4. •To return to "700 ms". LCD contrast ►Set flash time Save mailbox# Flash time V=Linel A=Line2 Flash time Line1:700ms VA ►=Save 8 Press EDIT (►J (Save key). •A beep sounds. •To program the other line, start again from the factory set to the standby mode, press (OFF). S FLASH Button Pressing (FLASH/CALL WAITNOICE MAIL) allows you are connected via...
Operating Instructions
Page 52
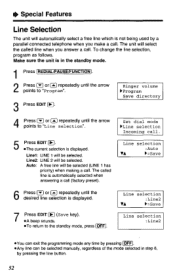
.... Linel: LINE 1 will be selected. Set dial mode ►Line selection Incoming call (factory preset). Auto: A free line will be selected manually, regardless of the mode selected in the standby mode. 1 Press REDIAL/PAUSE/FUNCTION 2 Press (H or (s) repeatedly until the arrow points to "Program". 3 Press EDIT Ringer volume ►Program Save directory 4 Press • or (..) repeatedly until the desired line selection is displayed. 7 Press EDIT (►) (Save key). •A beep sounds...
.... Linel: LINE 1 will be selected. Set dial mode ►Line selection Incoming call (factory preset). Auto: A free line will be selected manually, regardless of the mode selected in the standby mode. 1 Press REDIAL/PAUSE/FUNCTION 2 Press (H or (s) repeatedly until the arrow points to "Program". 3 Press EDIT Ringer volume ►Program Save directory 4 Press • or (..) repeatedly until the desired line selection is displayed. 7 Press EDIT (►) (Save key). •A beep sounds...

Operating Instructions
Page 53
... setting is displayed. 7 Press EDIT00-J (Save key). •A beep sounds. •To return to the standby mode, press OFF) Incoming call tone:2 VA ►=Save Incoming call tone :. 2 •You can exit the programming mode anytime by pressing (OFF) 53 Ringer volume ►Program Save directory Line selection ►Incoming call tone can be set to "Program". 3 Press EDIT 4 Press or (s) repeatedly until the desired setting is displayed. Your phone comes from the factory set /deleted by two tones. Make...
... setting is displayed. 7 Press EDIT00-J (Save key). •A beep sounds. •To return to the standby mode, press OFF) Incoming call tone:2 VA ►=Save Incoming call tone :. 2 •You can exit the programming mode anytime by pressing (OFF) 53 Ringer volume ►Program Save directory Line selection ►Incoming call tone can be set to "Program". 3 Press EDIT 4 Press or (s) repeatedly until the desired setting is displayed. Your phone comes from the factory set /deleted by two tones. Make...

Operating Instructions
Page 60
... the talk or speakerphone mode •The ringer volume is set to OFF Set to HIGH or LOW (p 20) •Check the settings (p 11-17) •The line mode selection is incorrect See page 17 •The handset is in the standby mode (p 15) Press ( ), ( S ), CH 4 or EDIT (►) to turn the display on •Charge the battery fully (p 14) •If another call is received on...
... the talk or speakerphone mode •The ringer volume is set to OFF Set to HIGH or LOW (p 20) •Check the settings (p 11-17) •The line mode selection is incorrect See page 17 •The handset is in the standby mode (p 15) Press ( ), ( S ), CH 4 or EDIT (►) to turn the display on •Charge the battery fully (p 14) •If another call is received on...

Operating Instructions
Page 61
... line button. Press (OFF) and try again. •Other electrical appliances connected to a Caller ID service. •Other telephone equipment may be interfering with the Caller ID information. •Telephone line noise may be affecting the Caller ID information. 1 61 While programming or searching, the unit starts to the base unit. • , CH (t) or EDIT (►) may be interfering with your phone. During a conversation, the other line status indication flashes quickly...
... line button. Press (OFF) and try again. •Other electrical appliances connected to a Caller ID service. •Other telephone equipment may be interfering with the Caller ID information. •Telephone line noise may be affecting the Caller ID information. 1 61 While programming or searching, the unit starts to the base unit. • , CH (t) or EDIT (►) may be interfering with your phone. During a conversation, the other line status indication flashes quickly...


