
Owners Manual
Page 6
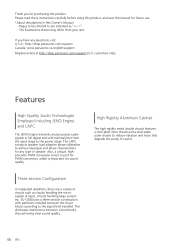
The LAPC conducts speaker load adaptive phase calibration to the signal level handled. Three-section Configuration In integrated amplifiers, there are indicated as circuits handling the microsignals of input, circuits handling large current, etc. SU-G700 uses a three-section construction with minimal jitter from your unit. Thank you have any type of speaker. customers only) Features High-Quality Audio Technologies Employed including JENO Engine...
The LAPC conducts speaker load adaptive phase calibration to the signal level handled. Three-section Configuration In integrated amplifiers, there are indicated as circuits handling the microsignals of input, circuits handling large current, etc. SU-G700 uses a three-section construction with minimal jitter from your unit. Thank you have any type of speaker. customers only) Features High-Quality Audio Technologies Employed including JENO Engine...
Owners Manual
Page 7
... requesting service, read the "IMPORTANT SAFETY INSTRUCTIONS" of this Owner's Manual are correct as of contents IMPORTANT SAFETY INSTRUCTIONS Control reference guide Connections Operations Settings Troubleshooting Others 08 10 14 16 24 30 33 Please carefully read the troubleshooting. Specifications, etc. English Accessories AC power supply cord (1) K2CG3YY00191 Remote control (1) N2QAYA000143 Batteries for remote control (2) (ONLY FOR CANADA) The enclosed Canadian French label sheet corresponds to the English display on the unit. • Product numbers provided...
... requesting service, read the "IMPORTANT SAFETY INSTRUCTIONS" of this Owner's Manual are correct as of contents IMPORTANT SAFETY INSTRUCTIONS Control reference guide Connections Operations Settings Troubleshooting Others 08 10 14 16 24 30 33 Please carefully read the troubleshooting. Specifications, etc. English Accessories AC power supply cord (1) K2CG3YY00191 Remote control (1) N2QAYA000143 Batteries for remote control (2) (ONLY FOR CANADA) The enclosed Canadian French label sheet corresponds to the English display on the unit. • Product numbers provided...

Owners Manual
Page 8
... of time with liquids, such as lighted candles, on this unit to direct sunlight for your local authorities or dealer and ask for future reference. 1 Read these instructions. 2 Keep these operating instructions carefully before using the unit. This unit becomes hot while it is the disconnecting device. Ensure this unit. - Do not heat or expose to qualified service personnel. - Do not leave the battery...
... of time with liquids, such as lighted candles, on this unit to direct sunlight for your local authorities or dealer and ask for future reference. 1 Read these instructions. 2 Keep these operating instructions carefully before using the unit. This unit becomes hot while it is the disconnecting device. Ensure this unit. - Do not heat or expose to qualified service personnel. - Do not leave the battery...
Owners Manual
Page 9
...: http://shop.panasonic.com/support SU-G700 IMPORTANT SAFETY INSTRUCTIONS (09) 09 English CAUTION RISK OF ELECTRIC SHOCK DO NOT OPEN CAUTION: TO REDUCE THE RISK OF ELECTRIC SHOCK, DO NOT REMOVE SCREWS. The lightning flash with the limits for compliance could void the user's authority to radio communications. Conforms to discard this device must accept any interference received, including interference...
...: http://shop.panasonic.com/support SU-G700 IMPORTANT SAFETY INSTRUCTIONS (09) 09 English CAUTION RISK OF ELECTRIC SHOCK DO NOT OPEN CAUTION: TO REDUCE THE RISK OF ELECTRIC SHOCK, DO NOT REMOVE SCREWS. The lightning flash with the limits for compliance could void the user's authority to radio communications. Conforms to discard this device must accept any interference received, including interference...

Owners Manual
Page 13
03 [>INPUT
03 [>INPUT

Owners Manual
Page 14
... operating instructions of the terminals correctly. Connections Speakers/AC power supply cord • Use only the supplied AC power supply cord. • Do not connect the AC power supply cord until all other connections are complete. • Insert the plugs of the cables to be connected all the way in. • Do not bend cables at sharp angles. • To optimize the audio output, you can measure the amplifier output signal...
... operating instructions of the terminals correctly. Connections Speakers/AC power supply cord • Use only the supplied AC power supply cord. • Do not connect the AC power supply cord until all other connections are complete. • Insert the plugs of the cables to be connected all the way in. • Do not bend cables at sharp angles. • To optimize the audio output, you can measure the amplifier output signal...

Owners Manual
Page 15
Speaker output correction (LAPC) You can be using the unit for an extended period of AC power ( 34) even when the unit is in standby mode. English To a household AC outlet Insert the AC power supply cord up to your own speakers. ( 26) Connections (15) 15 Place the unit so the plug can make the optimum adjustment according to a point just before the round hole. Remove...
Speaker output correction (LAPC) You can be using the unit for an extended period of AC power ( 34) even when the unit is in standby mode. English To a household AC outlet Insert the AC power supply cord up to your own speakers. ( 26) Connections (15) 15 Place the unit so the plug can make the optimum adjustment according to a point just before the round hole. Remove...

Owners Manual
Page 17
... Windows OS) • Download and install the driver from the website below . or another device with USB-DAC output terminal such as of charge) on . 5 Press [>INPUT OS X 10.7, 10.8, 10.9, 10.10, 10.11, macOS 10.12 Download and install the dedicated USB driver to turn this unit and a PC, etc. www.technics.com/support/ Download and install the dedicated app "Technics Audio Player" (free of February 2017): - Using PC, etc. USB 2.0 cable...
... Windows OS) • Download and install the driver from the website below . or another device with USB-DAC output terminal such as of charge) on . 5 Press [>INPUT OS X 10.7, 10.8, 10.9, 10.10, 10.11, macOS 10.12 Download and install the dedicated USB driver to turn this unit and a PC, etc. www.technics.com/support/ Download and install the dedicated app "Technics Audio Player" (free of February 2017): - Using PC, etc. USB 2.0 cable...

Owners Manual
Page 18
Operations Using turntable (PHONO) You can connect the turntable with PHONO cable (not supplied) to this unit and play back music. 1)0/0 &"35) Turntable PHONO earth lead (not supplied) PHONO cable (not supplied) Using PHONO cable 1 Disconnect the AC power supply cord. 2 Connect this unit and a turntable. 3 Connect the AC power supply cord to this unit. ( 15) 4 Press [AMP ] to turn this unit on. 5 Press [>INPUT
Operations Using turntable (PHONO) You can connect the turntable with PHONO cable (not supplied) to this unit and play back music. 1)0/0 &"35) Turntable PHONO earth lead (not supplied) PHONO cable (not supplied) Using PHONO cable 1 Disconnect the AC power supply cord. 2 Connect this unit and a turntable. 3 Connect the AC power supply cord to this unit. ( 15) 4 Press [AMP ] to turn this unit on. 5 Press [>INPUT

Owners Manual
Page 19
Using analog audio output device (LINE1/LINE2) You can connect the Blu-ray Disc player, etc. Blu-ray Disc player, etc. Analog audio cable (not supplied) Using analog audio cable 1 Disconnect the AC power supply cord. 2 Connect this unit and a Blu-ray Disc player, etc. 3 Connect the AC power supply cord to this unit. ( 15) 4 Press [AMP ] to this unit on. 5 Press [>INPUTINPUT with analog audio cable (not supplied) to turn this unit and play back music.
Using analog audio output device (LINE1/LINE2) You can connect the Blu-ray Disc player, etc. Blu-ray Disc player, etc. Analog audio cable (not supplied) Using analog audio cable 1 Disconnect the AC power supply cord. 2 Connect this unit and a Blu-ray Disc player, etc. 3 Connect the AC power supply cord to this unit. ( 15) 4 Press [AMP ] to this unit on. 5 Press [>INPUTINPUT with analog audio cable (not supplied) to turn this unit and play back music.

Owners Manual
Page 20
... [AMP ] to turn this unit as power amplifier You can connect the AV receiver, control amplifier, etc. Doing so may cause malfunction. 20 (20) Using analog audio cable 1 Disconnect the AC power supply cord. 2 Connect this unit as power amplifier. Operations Using this unit and AV receiver, control amplifier, etc. with analog audio cable (not supplied) to minimum before connecting. AV receiver, control amplifier, etc. Analog audio cable (not supplied) Set the volume of the AV receiver, control amplifier, etc.
... [AMP ] to turn this unit as power amplifier You can connect the AV receiver, control amplifier, etc. Doing so may cause malfunction. 20 (20) Using analog audio cable 1 Disconnect the AC power supply cord. 2 Connect this unit as power amplifier. Operations Using this unit and AV receiver, control amplifier, etc. with analog audio cable (not supplied) to minimum before connecting. AV receiver, control amplifier, etc. Analog audio cable (not supplied) Set the volume of the AV receiver, control amplifier, etc.

Owners Manual
Page 22
... operating instructions of the connected device. • Sound is not output from PRE OUT terminals while "MAIN IN" is not output from PRE OUT terminals. Sound is not output from the speaker output terminals. On (Speaker:Off): Sound is selected as input source of this unit. Note • For details, refer to the analog audio input terminals of this unit. Using analog audio cable 1 Disconnect the AC power supply cord. 2 Connect this unit and a power amplifier, subwoofer...
... operating instructions of the connected device. • Sound is not output from PRE OUT terminals while "MAIN IN" is not output from PRE OUT terminals. Sound is not output from the speaker output terminals. On (Speaker:Off): Sound is selected as input source of this unit. Note • For details, refer to the analog audio input terminals of this unit. Using analog audio cable 1 Disconnect the AC power supply cord. 2 Connect this unit and a power amplifier, subwoofer...
Owners Manual
Page 27
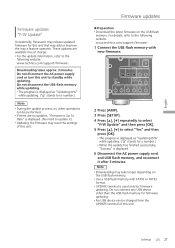
... not connect any USB device other operations can be performed. • If there are available free of this unit. These updates are no updates, "Firmware is Up To Date" is used only for firmware updating. www.technics.com/support/firmware/ 1 Connect the USB flash memory with FAT16 or FAT32 format. • UPDATE terminal is displayed. (No need to the following website. English Firmware updates "F/W Update" Occasionally, Panasonic may release updated firmware for this unit that may take longer depending on the USB flash memory. Settings...
... not connect any USB device other operations can be performed. • If there are available free of this unit. These updates are no updates, "Firmware is Up To Date" is used only for firmware updating. www.technics.com/support/firmware/ 1 Connect the USB flash memory with FAT16 or FAT32 format. • UPDATE terminal is displayed. (No need to the following website. English Firmware updates "F/W Update" Occasionally, Panasonic may release updated firmware for this unit that may take longer depending on the USB flash memory. Settings...
Owners Manual
Page 28
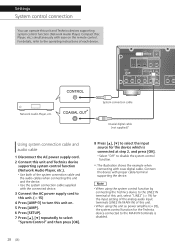
... can operate this unit and Technics devices supporting system control function (Network Audio Player, Compact Disc Player, etc.) simultaneously with ease on . 5 Press [AMP]. 6 Press [SETUP]. 7 Press [ ], [ ] repeatedly to select "System Control" and then press [OK]. 8 Press [ ], [ ] to select the input source for the device which is disabled. 28 (28) System connection cable Coaxial digital cable (not supplied)* Using system connection cable and audio cable 1 Disconnect the AC power supply cord. 2 Connect this unit and Technics device supporting system control function (Network Audio Player...
... can operate this unit and Technics devices supporting system control function (Network Audio Player, Compact Disc Player, etc.) simultaneously with ease on . 5 Press [AMP]. 6 Press [SETUP]. 7 Press [ ], [ ] repeatedly to select "System Control" and then press [OK]. 8 Press [ ], [ ] to select the input source for the device which is disabled. 28 (28) System connection cable Coaxial digital cable (not supplied)* Using system connection cable and audio cable 1 Disconnect the AC power supply cord. 2 Connect this unit and Technics device supporting system control function (Network Audio Player...

Owners Manual
Page 29
English Switching this unit and the connected device • If you point the remote control at this unit and press [AMP ] when this unit and the connected device are in standby mode, this unit and the device of this unit will be automatically switched to the source which is set with "System Control" will be turned on simultaneously. • If you perform an operation such as playback on this unit and the connected device by pressing...
English Switching this unit and the connected device • If you point the remote control at this unit and press [AMP ] when this unit and the connected device are in standby mode, this unit and the device of this unit will be automatically switched to the source which is set with "System Control" will be turned on simultaneously. • If you perform an operation such as playback on this unit and the connected device by pressing...
Owners Manual
Page 30
... unit This unit becomes warm while in . • Confirm the sound output setting. (Sound is not output from the speakers connected to the speaker output terminals of this unit while "PRE OUT" is set to "On (Speaker:Off)".) ( 22) • Playback of multi-channel content is not supported. • The digital audio input terminals of the cables to be connected all settings to the factory defaults When the following checks. Panasonic is constantly improving the unit's firmware...
... unit This unit becomes warm while in . • Confirm the sound output setting. (Sound is not output from the speakers connected to the speaker output terminals of this unit while "PRE OUT" is set to "On (Speaker:Off)".) ( 22) • Playback of multi-channel content is not supported. • The digital audio input terminals of the cables to be connected all settings to the factory defaults When the following checks. Panasonic is constantly improving the unit's firmware...
Owners Manual
Page 31
...; Install the dedicated USB driver if using a PC with "System Control". ( 28) • Connect Technics device supporting system control function (Network Audio Player, Compact Disc Player, etc.) to "LINE2" or other source from LINE OUT terminal. When "PRE OUT" is set with Windows. ( 17) Remote control The remote control does not work properly. • The batteries are connected. - Wait for the output audio signal from "MAIN IN" and the current volume level is higher than previous level, the volume...
...; Install the dedicated USB driver if using a PC with "System Control". ( 28) • Connect Technics device supporting system control function (Network Audio Player, Compact Disc Player, etc.) to "LINE2" or other source from LINE OUT terminal. When "PRE OUT" is set with Windows. ( 17) Remote control The remote control does not work properly. • The batteries are connected. - Wait for the output audio signal from "MAIN IN" and the current volume level is higher than previous level, the volume...
Owners Manual
Page 32
... speaker output terminals when the headphones are using this unit as input source of the audio signals are connected, measuring the output signal of the attenuator to "LINE2" or other source from the analog audio input terminals in an extremely hot place? Change the mode on again. About supported format, refer to standby and on the remote control. ( 13) Signal Overflow • The sound from "MAIN IN", the volume level after switching the input...
... speaker output terminals when the headphones are using this unit as input source of the audio signals are connected, measuring the output signal of the attenuator to "LINE2" or other source from the analog audio input terminals in an extremely hot place? Change the mode on again. About supported format, refer to standby and on the remote control. ( 13) Signal Overflow • The sound from "MAIN IN", the volume level after switching the input...
Owners Manual
Page 33
... or transfer this unit, perform the following to delete the data, including personal or secret information. • "To restore all settings to the factory defaults" ( 30) English Troubleshooting / Others (33) 33 This might cause the exterior case to be deformed or the coating to wipe the dirt, and then wipe it with a soft cloth. • Do not use solvents...
... or transfer this unit, perform the following to delete the data, including personal or secret information. • "To restore all settings to the factory defaults" ( 30) English Troubleshooting / Others (33) 33 This might cause the exterior case to be deformed or the coating to wipe the dirt, and then wipe it with a soft cloth. • Do not use solvents...
Owners Manual
Page 36
... Service Center. Customer Services Directory For Product Information, Operating Assistance, Parts, Owner's Manuals, Dealer and Service info go to http://shop.panasonic.com/support For the hearing or speech impaired TTY: 1- 877-833-8855 As of December 2015 The model number and serial number of this product develops during or after the warranty period, you may not apply to repair, replace or refund will , for non-rechargeable batteries, antennas...
... Service Center. Customer Services Directory For Product Information, Operating Assistance, Parts, Owner's Manuals, Dealer and Service info go to http://shop.panasonic.com/support For the hearing or speech impaired TTY: 1- 877-833-8855 As of December 2015 The model number and serial number of this product develops during or after the warranty period, you may not apply to repair, replace or refund will , for non-rechargeable batteries, antennas...


