SCHTB170 User Guide
Page 3
...another confined space. Operation is subject to direct sunlight for a long period of time. Responsible Party: Panasonic Corporation of North America One Panasonic Way, Secaucus, NJ 07094 Support Contact: Panasonic Consumer Marketing Company of North America Telephone No.: 1-800-211-PANA (7262) ' This transmitter must ...interference in Supplement C to operate this device. This equipment has very low levels of RF energy that is deemed to use the remote control for a long period of time with the instructions, may cause undesired operation. j Remove the battery if you do not ...
...another confined space. Operation is subject to direct sunlight for a long period of time. Responsible Party: Panasonic Corporation of North America One Panasonic Way, Secaucus, NJ 07094 Support Contact: Panasonic Consumer Marketing Company of North America Telephone No.: 1-800-211-PANA (7262) ' This transmitter must ...interference in Supplement C to operate this device. This equipment has very low levels of RF energy that is deemed to use the remote control for a long period of time with the instructions, may cause undesired operation. j Remove the battery if you do not ...
SCHTB170 User Guide
Page 4
Table of contents IMPORTANT SAFETY INSTRUCTIONS 2 Before use Supplied items 5 This system ...5 Accessories ...5 Control reference guide 6 This system (Front)...6 This system (Rear) ...6 Remote control ...7 Getting started Step 1 Selecting the placement method 8 The main unit...8 Wireless interference ...9 Step 2 Placement 10 When placing the main unit in a rack or on a ...
Table of contents IMPORTANT SAFETY INSTRUCTIONS 2 Before use Supplied items 5 This system ...5 Accessories ...5 Control reference guide 6 This system (Front)...6 This system (Rear) ...6 Remote control ...7 Getting started Step 1 Selecting the placement method 8 The main unit...8 Wireless interference ...9 Step 2 Placement 10 When placing the main unit in a rack or on a ...
SCHTB170 User Guide
Page 5
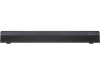
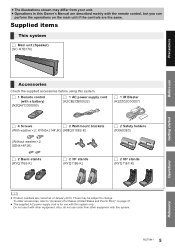
...Main unit (Speaker) (SC-HTB170) Precautions Before use Getting started Accessories Check the supplied accessories before using this system. ∏ 1 Remote control (with other equipment with this system. 5 RQT9841 To order accessories, refer to change. Also, do not use with this ...(RYQ1165-K) ∏ 2 30o stands (RYQ1166-K) ∏ 2 80o stands (RYQ1167-K) Operations Reference ≥ Product numbers are described mainly with the remote control, but you can perform the operations on page 31. ≥ The supplied AC power supply cord is for use cords from your unit. ...
...Main unit (Speaker) (SC-HTB170) Precautions Before use Getting started Accessories Check the supplied accessories before using this system. ∏ 1 Remote control (with other equipment with this system. 5 RQT9841 To order accessories, refer to change. Also, do not use with this ...(RYQ1165-K) ∏ 2 30o stands (RYQ1166-K) ∏ 2 80o stands (RYQ1167-K) Operations Reference ≥ Product numbers are described mainly with the remote control, but you can perform the operations on page 31. ≥ The supplied AC power supply cord is for use cords from your unit. ...
SCHTB170 User Guide
Page 6
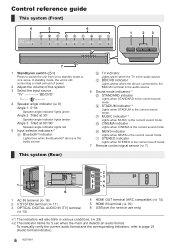
Control reference guide This system (Front) 4 5 6 1 23 7 1 Standby/on switch (Í/I STEREO indicator Lights when STEREO is the current sound mode 7 Remote control signal sensor (> 7) This system (Rear) 6 1 AC IN terminal (> 18) 2 Ir SYSTEM terminal (> 17) 3 OPTICAL DIGITAL AUDIO IN (TV) terminal (> 15) 4 HDMI OUT terminal (ARC ...
Control reference guide This system (Front) 4 5 6 1 23 7 1 Standby/on switch (Í/I STEREO indicator Lights when STEREO is the current sound mode 7 Remote control signal sensor (> 7) This system (Rear) 6 1 AC IN terminal (> 18) 2 Ir SYSTEM terminal (> 17) 3 OPTICAL DIGITAL AUDIO IN (TV) terminal (> 15) 4 HDMI OUT terminal (ARC ...
SCHTB170 User Guide
Page 7
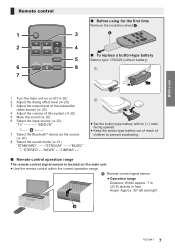
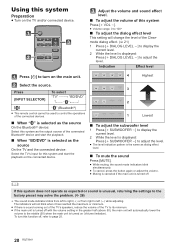
... 20) "TV BD/DVD" 7 Select the Bluetooth® device as the source (> 20) 8 Select the sound mode (> 21) "STANDARD" -----#"STADIUM" -----#"MUSIC" ^- Before use Remote control 1 2 INPUT SELECTOR 6 7 SOUND ∫ Before using for the first time Remove the insulation sheet A. 3 4 ∫ To replace a button-type battery 5 Battery type:... level (> 20) 3 Adjust the output level of the subwoofer (bass sound) (> 20) 4 Adjust the volume of children to prevent swallowing. ∫ Remote control operation range The remote control signal sensor is located on the main unit. ≥ Use the...
... 20) "TV BD/DVD" 7 Select the Bluetooth® device as the source (> 20) 8 Select the sound mode (> 21) "STANDARD" -----#"STADIUM" -----#"MUSIC" ^- Before use Remote control 1 2 INPUT SELECTOR 6 7 SOUND ∫ Before using for the first time Remove the insulation sheet A. 3 4 ∫ To replace a button-type battery 5 Battery type:... level (> 20) 3 Adjust the output level of the subwoofer (bass sound) (> 20) 4 Adjust the volume of children to prevent swallowing. ∫ Remote control operation range The remote control signal sensor is located on the main unit. ≥ Use the...
SCHTB170 User Guide
Page 9
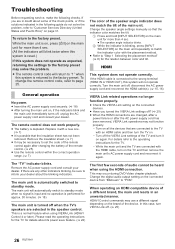
PANASONIC DISCLAIMS ANY PROPERTY DAMAGE AND/OR SERIOUS INJURY, INCLUDING DEATH RESULTING FROM .../or the speaker, and may block or interfere with the TV's various sensors (C.A.T.S. (Contrast Automatic Tracking System) sensor, remote control sensor, etc.) and the 3D Eyewear transmitters on your TV, turn the TV off for about 30 minutes. ...B other than a qualified installation specialist. The installation should never be done by the main unit Try using the TV's remote control from the TV. ≥ Keep magnetized items away. Caution ≥ This system is blocked by any other electronic ...
PANASONIC DISCLAIMS ANY PROPERTY DAMAGE AND/OR SERIOUS INJURY, INCLUDING DEATH RESULTING FROM .../or the speaker, and may block or interfere with the TV's various sensors (C.A.T.S. (Contrast Automatic Tracking System) sensor, remote control sensor, etc.) and the 3D Eyewear transmitters on your TV, turn the TV off for about 30 minutes. ...B other than a qualified installation specialist. The installation should never be done by the main unit Try using the TV's remote control from the TV. ≥ Keep magnetized items away. Caution ≥ This system is blocked by any other electronic ...
SCHTB170 User Guide
Page 17
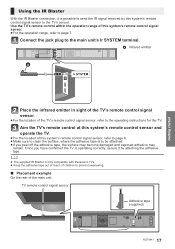
... sensor and operate the TV. ≥For the location of this system's remote control signal sensor, refer to page 6. ≥Make sure to clean the surface, where the adhesive tape is only compatible with Panasonic TVs. ≥ Keep the adhesive tape out of reach of children to prevent swallowing. &#...8747; Placement example On the rear of the TV's remote control signal sensor, refer to page 7. Getting started Using the IR ...
... sensor and operate the TV. ≥For the location of this system's remote control signal sensor, refer to page 6. ≥Make sure to clean the surface, where the adhesive tape is only compatible with Panasonic TVs. ≥ Keep the adhesive tape out of reach of children to prevent swallowing. &#...8747; Placement example On the rear of the TV's remote control signal sensor, refer to page 7. Getting started Using the IR ...
SCHTB170 User Guide
Page 20
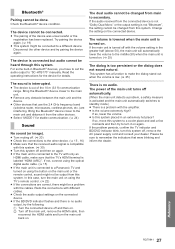
... the problem. (> 26) § The sound mode indicators blink from left (s) while adjusting. Press [INPUT SELECTOR] To select "TV" -------# "BD/DVD" [] " " (Bluetooth®) ≥ This remote control cannot be used to control the operations of the connected devices. ∫ When " " is selected as the source On the Bluetooth® device: Select...
... the problem. (> 26) § The sound mode indicators blink from left (s) while adjusting. Press [INPUT SELECTOR] To select "TV" -------# "BD/DVD" [] " " (Bluetooth®) ≥ This remote control cannot be used to control the operations of the connected devices. ∫ When " " is selected as the source On the Bluetooth® device: Select...
SCHTB170 User Guide
Page 22
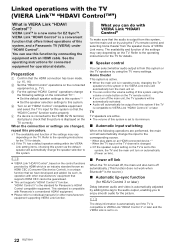
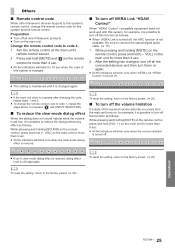
... the TV for this system so that the "HDAVI Control" function works properly. 5 If a device is connected to enjoy smooth audio for Panasonic's HDAVI Control compatible equipment. Preparation 1 Confirm that the HDMI connection has been made. (> 15, 16) 2 Set the "HDAVI Control" operations...HDAVI Control". VIERA LinkTM is compatible with Panasonic's conventional HDAVI equipment. ≥ Please refer to on the TV. VIERA Link "HDAVI Control" is VIERA Link "HDAVI Control"? You can control the volume setting of this system using the TV's remote control and selecting home theater from this...
... the TV for this system so that the "HDAVI Control" function works properly. 5 If a device is connected to enjoy smooth audio for Panasonic's HDAVI Control compatible equipment. Preparation 1 Confirm that the HDMI connection has been made. (> 15, 16) 2 Set the "HDAVI Control" operations...HDAVI Control". VIERA LinkTM is compatible with Panasonic's conventional HDAVI equipment. ≥ Please refer to on the TV. VIERA Link "HDAVI Control" is VIERA Link "HDAVI Control"? You can control the volume setting of this system using the TV's remote control and selecting home theater from this...
SCHTB170 User Guide
Page 23
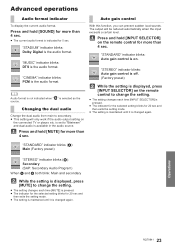
..., you can prevent sudden loud sounds. Audio format is not indicated when " " is the audio format. Press and hold [INPUT SELECTOR] on the remote control for 5 sec. Operations 23 RQT9841 "MUSIC" indicator blinks: DTS is selected as the source. is set to change the setting. ≥ The... setting changes each time [MUTE] is displayed, press [INPUT SELECTOR] on the remote control to secondary. ≥ This setting will be reduced automatically when the input exceeds a certain level. The output will only work if the audio...
..., you can prevent sudden loud sounds. Audio format is not indicated when " " is the audio format. Press and hold [INPUT SELECTOR] on the remote control for 5 sec. Operations 23 RQT9841 "MUSIC" indicator blinks: DTS is selected as the source. is set to change the setting. ≥ The... setting changes each time [MUTE] is displayed, press [INPUT SELECTOR] on the remote control to secondary. ≥ This setting will be reduced automatically when the input exceeds a certain level. The output will only work if the audio...
SCHTB170 User Guide
Page 24
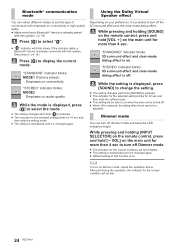
... changed again. ≥ Default setting of connections with emphasis on dimmer mode, repeat the operation above. While pressing and holding [INPUT SELECTOR] on the remote control, press and hold [VOL i] on audio quality While the mode is displayed, press [ ] to select the mode. ≥ The setting changes...; communication mode You can turn brighter. ≥ The setting is maintained until it is changed again. While pressing and holding [SOUND] on the remote control, press and hold [s VOL] on the main unit for more than 4 sec to turn off Dimmer mode. ≥ The indicator for ...
... changed again. ≥ Default setting of connections with emphasis on dimmer mode, repeat the operation above. While pressing and holding [INPUT SELECTOR] on the remote control, press and hold [VOL i] on audio quality While the mode is displayed, press [ ] to select the mode. ≥ The setting changes...; communication mode You can turn brighter. ≥ The setting is maintained until it is changed again. While pressing and holding [SOUND] on the remote control, press and hold [s VOL] on the main unit for more than 4 sec to turn off Dimmer mode. ≥ The indicator for ...
SCHTB170 User Guide
Page 25
...system is changed. ∫ To turn them on the main unit for 10 sec when the code of this system and the remote control. Others ∫ Remote control code When other Panasonic products. ≥ Turn on the main unit. To reset the setting, return to the factory preset. (> 26) ∫... and hold [VOL i] on the main unit for more than 4 sec. 2 After the setting has changed, turn off all other Panasonic devices respond to this system's remote control, change the remote control code to code 1, repeat the steps above, but replace [ ] with this system, for more than 4 sec. ≥ All...
...system is changed. ∫ To turn them on the main unit for 10 sec when the code of this system and the remote control. Others ∫ Remote control code When other Panasonic products. ≥ Turn on the main unit. To reset the setting, return to the factory preset. (> 26) ∫... and hold [VOL i] on the main unit for more than 4 sec. 2 After the setting has changed, turn off all other Panasonic devices respond to this system's remote control, change the remote control code to code 1, repeat the steps above, but replace [ ] with this system, for more than 4 sec. ≥ All...
SCHTB170 User Guide
Page 26
... "Bitstream" to page 25. In this system does not operate as expected, returning the settings to the factory preset may not function properly. The remote control does not work properly. ≥ The battery is automatically switched to standby mode. Turn the main unit off, disconnect the AC power supply ...the speaker angle indicator does not match the tilt of the check points, or if the solutions indicated in the speaker control. To change the remote control code, refer to "PCM". The main unit will automatically switch to standby mode when no signal is reset.) If this case, turn ...
... "Bitstream" to page 25. In this system does not operate as expected, returning the settings to the factory preset may not function properly. The remote control does not work properly. ≥ The battery is automatically switched to standby mode. Turn the main unit off, disconnect the AC power supply ...the speaker angle indicator does not match the tilt of the check points, or if the solutions indicated in the speaker control. To change the remote control code, refer to "PCM". The main unit will automatically switch to standby mode when no signal is reset.) If this case, turn ...
SCHTB170 User Guide
Page 27
... that the received audio signal is not "Bitstream", the setting cannot be heard through this system off and then on the main unit or the remote control, sound might be connected to the TV with the cables. Read the operating instructions for the device for stable communication. (> 24) Sound No .... Bring the Bluetooth® device closer to turn the main unit on using the button on again. ≥ If the main unit is connected to a Panasonic TV and turned on . If so, move this system placed in an extremely hot place? Try pairing the device again. (> 19) ≥ This system might...
... that the received audio signal is not "Bitstream", the setting cannot be heard through this system off and then on the main unit or the remote control, sound might be connected to the TV with the cables. Read the operating instructions for the device for stable communication. (> 24) Sound No .... Bring the Bluetooth® device closer to turn the main unit on using the button on again. ≥ If the main unit is connected to a Panasonic TV and turned on . If so, move this system placed in an extremely hot place? Try pairing the device again. (> 19) ≥ This system might...
SCHTB170 User Guide
Page 29
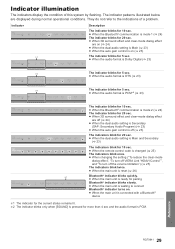
... indicators blink for 20 sec. ≥ When the dual audio setting is Main and Secondary (> 23) The indicators blink for 10 sec. ≥ When the remote control code is changed (> 25) The indicators blink once. ≥ When changing the setting ("To reduce the clear-mode dialog effect", "To turn off VIERA...
... indicators blink for 20 sec. ≥ When the dual audio setting is Main and Secondary (> 23) The indicators blink for 10 sec. ≥ When the remote control code is changed (> 25) The indicators blink once. ≥ When changing the setting ("To reduce the clear-mode dialog effect", "To turn off VIERA...


