Home Theater Audio System
Page 3
... cables to 2. ........15 Adjusting sound quality 21 Adjusting the volume balance of front speakers... 21 Setting distances 22 Setting 7.1-channel virtual surround 22 Reducing standby power consumption (In standby condition (HDMI off mode)) ........ 22 VIERA Link "HDAVI Control" setting 23 Adjusting the time lag between audio and video by delaying audio output 23 Switching between dual sounds 23 Clear audio at low volume 23 Switching the attenuator 23 Switching the input signal detection setting......24 Reset (factory settings 24 When other equipment (mini component system, AV amp...
... cables to 2. ........15 Adjusting sound quality 21 Adjusting the volume balance of front speakers... 21 Setting distances 22 Setting 7.1-channel virtual surround 22 Reducing standby power consumption (In standby condition (HDMI off mode)) ........ 22 VIERA Link "HDAVI Control" setting 23 Adjusting the time lag between audio and video by delaying audio output 23 Switching between dual sounds 23 Clear audio at low volume 23 Switching the attenuator 23 Switching the input signal detection setting......24 Reset (factory settings 24 When other equipment (mini component system, AV amp...
Home Theater Audio System
Page 5
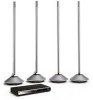
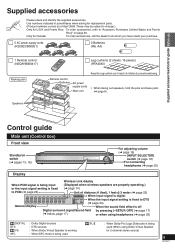
... replacement parts. (Product numbers correct as of children to change.) Only for 2-channel stereo source) 5 RQT9471 and Puerto Rico: To order accessories, refer to DTS (➜ page 24) General display When the sound field effect is off Digital surround signal/Sound field by pressing [-SETUP, OFF] (➜ page 17) (➜ below, page 17) or when using Dolby Virtual Speaker for U.S.A. Control guide Main unit (Control box) Front view Standby...
... replacement parts. (Product numbers correct as of children to change.) Only for 2-channel stereo source) 5 RQT9471 and Puerto Rico: To order accessories, refer to DTS (➜ page 24) General display When the sound field effect is off Digital surround signal/Sound field by pressing [-SETUP, OFF] (➜ page 17) (➜ below, page 17) or when using Dolby Virtual Speaker for U.S.A. Control guide Main unit (Control box) Front view Standby...

Home Theater Audio System
Page 7
.... Remove the batteries if the remote control is incorrectly replaced. Remote control preparation Inserting the batteries Press on button (➜ page 16) Test signal output (➜ pages 14, 21) For using "WHISPER-MODE SURROUND" (➜ page 20) For using "GAME" (➜ page 20) Input mode and remote control code buttons (➜ pages 16, 24) For adjusting speaker output (➜ pages 20, 21) For adjusting the volume (➜ page 16) Muting (➜ page 20) For adjusting/activating settings (➜...
.... Remove the batteries if the remote control is incorrectly replaced. Remote control preparation Inserting the batteries Press on button (➜ page 16) Test signal output (➜ pages 14, 21) For using "WHISPER-MODE SURROUND" (➜ page 20) For using "GAME" (➜ page 20) Input mode and remote control code buttons (➜ pages 16, 24) For adjusting speaker output (➜ pages 20, 21) For adjusting the volume (➜ page 16) Muting (➜ page 20) For adjusting/activating settings (➜...

Home Theater Audio System
Page 8
... there are not magnetically shielded. Installation 8 RQT9471 Connection Installation Setup example • Aim the front face (with a lot of activity. Install this system received Technical Conditions compliance certification based on the base parts to reflect radio waves. This system is not required. Front speaker (left) Front speaker (right) Connected equipment Main unit Surround speaker (left) Approx.120° Surround speaker (right) „ There is...
... there are not magnetically shielded. Installation 8 RQT9471 Connection Installation Setup example • Aim the front face (with a lot of activity. Install this system received Technical Conditions compliance certification based on the base parts to reflect radio waves. This system is not required. Front speaker (left) Front speaker (right) Connected equipment Main unit Surround speaker (left) Approx.120° Surround speaker (right) „ There is...
Home Theater Audio System
Page 9
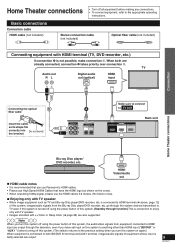
... you use Panasonic's HDMI cables. • Please use High Speed HDMI Cables that have set input on this system to anything other than HDMI input ("BD/DVD " or "AUX 1 ") before turning off all equipment before making any connections. • To connect equipment, refer to the appropriate operating instructions. TV Audio out R L Digital audio out (optical) HDMI input Connection Home Theater connections Connecting the optical fiber cable Insert the cable so its shape fits correctly into Do not bend! Main unit Blu-ray Disc player/ DVD...
... you use Panasonic's HDMI cables. • Please use High Speed HDMI Cables that have set input on this system to anything other than HDMI input ("BD/DVD " or "AUX 1 ") before turning off all equipment before making any connections. • To connect equipment, refer to the appropriate operating instructions. TV Audio out R L Digital audio out (optical) HDMI input Connection Home Theater connections Connecting the optical fiber cable Insert the cable so its shape fits correctly into Do not bend! Main unit Blu-ray Disc player/ DVD...

Home Theater Audio System
Page 10
... the previous display/To cancel during setting operation in steps 2 to use Panasonic TV (VIERA), you select "EXIT " and press [OK], the setting mode finishes in step 3 is displayed only when the unit is connected to the television. HDMI OUT Digital audio out (optical) HDMI Video/ Blu-ray Disc player/ Audio out DVD recorder, etc. Note • "STB AUDIO " in step 3. Home Theater connections Basic connections Connecting STB etc. Preparation: Make sure that this connection so audio from...
... the previous display/To cancel during setting operation in steps 2 to use Panasonic TV (VIERA), you select "EXIT " and press [OK], the setting mode finishes in step 3 is displayed only when the unit is connected to the television. HDMI OUT Digital audio out (optical) HDMI Video/ Blu-ray Disc player/ Audio out DVD recorder, etc. Note • "STB AUDIO " in step 3. Home Theater connections Basic connections Connecting STB etc. Preparation: Make sure that this connection so audio from...

Home Theater Audio System
Page 12
... system consumes approx. 0.5 W when AC power supply cord is not to enjoy deeper bass sounds. Connection To connect audio equipment (CD player, etc.) Main unit Audio out L R CD player etc. To connecting a subwoofer (not included) You can connect a commercially available active subwoofer (with this system off all other cables are for a long time, unplug it from the household AC outlet. Home Theater connections Other connections Connection cable HDMI cable (not included) • Turn off , some of the settings may not be used for use...
... system consumes approx. 0.5 W when AC power supply cord is not to enjoy deeper bass sounds. Connection To connect audio equipment (CD player, etc.) Main unit Audio out L R CD player etc. To connecting a subwoofer (not included) You can connect a commercially available active subwoofer (with this system off all other cables are for a long time, unplug it from the household AC outlet. Home Theater connections Other connections Connection cable HDMI cable (not included) • Turn off , some of the settings may not be used for use...

Home Theater Audio System
Page 13
... 4, turn on the remote control for all equipment has been turned off . „ Prepare the remote control. (➜ page 7) 1. Turn the main unit on the main unit's display, the speaker setting is complete.) „ Connect the AC power supply cords of "Troubleshooting guide". 13 RQT9471 Front speaker (left) Front speaker (right) When the sound is output from the front speaker (left ), press [-SETUP, OFF]. -SETUP, OFF RETURN When the sound is output from the surround speaker (right...
... 4, turn on the remote control for all equipment has been turned off . „ Prepare the remote control. (➜ page 7) 1. Turn the main unit on the main unit's display, the speaker setting is complete.) „ Connect the AC power supply cords of "Troubleshooting guide". 13 RQT9471 Front speaker (left) Front speaker (right) When the sound is output from the front speaker (left ), press [-SETUP, OFF]. -SETUP, OFF RETURN When the sound is output from the surround speaker (right...

Home Theater Audio System
Page 14
... speaker locations. Press [TEST] on the remote control to output the test signal. If the speaker is output from one speaker at a time for 1 speaker) Checking the speaker setting 1. The test signal is repaired or replaced Perform the above "Checking the speaker setting" to 4 of speakers in the order shown below. W (Blinks during detecting operation.) While the wireless speakers operate normally, the Wireless Link display lights, but when radio waves are interrupted (When speakers are detected, the Wireless Link display lights...
... speaker locations. Press [TEST] on the remote control to output the test signal. If the speaker is output from one speaker at a time for 1 speaker) Checking the speaker setting 1. The test signal is repaired or replaced Perform the above "Checking the speaker setting" to 4 of speakers in the order shown below. W (Blinks during detecting operation.) While the wireless speakers operate normally, the Wireless Link display lights, but when radio waves are interrupted (When speakers are detected, the Wireless Link display lights...

Home Theater Audio System
Page 15
... times to select "EXIT " and press [OK] to the previous display/To cancel during setting operation: Press [ RETURN]. 1. Press the remote control button corresponding to select "SPEAKERS " and press [OK]. 3. Press [e][r] to 2" below. 2. Set "2CH " at the main unit for all equipment has been turned off. (When the VIERA Link "HDAVI Control" compatible Panasonic TV (VIERA) and Blu-ray Disc player/DVD recorder (DIGA) are connected, do not turn...
... times to select "EXIT " and press [OK] to the previous display/To cancel during setting operation: Press [ RETURN]. 1. Press the remote control button corresponding to select "SPEAKERS " and press [OK]. 3. Press [e][r] to 2" below. 2. Set "2CH " at the main unit for all equipment has been turned off. (When the VIERA Link "HDAVI Control" compatible Panasonic TV (VIERA) and Blu-ray Disc player/DVD recorder (DIGA) are connected, do not turn...

Home Theater Audio System
Page 16
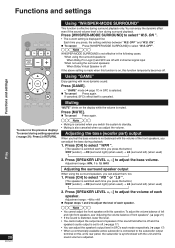
... this system. 1 Press this button to turn off. Adjustment range: 0 (Min) to AUX3): select "AUX 3 ". Press INPUT SELECTOR (The input source switches each time you switch input to "TV ", images (or audio) of the equipment connected to BD/DVD IN terminal or AUX1 terminal are output. • When using the TV's remote control. • Make sure that can be played on this case, you can enjoy a variety of the bass or surround speakers is...
... this system. 1 Press this button to turn off. Adjustment range: 0 (Min) to AUX3): select "AUX 3 ". Press INPUT SELECTOR (The input source switches each time you switch input to "TV ", images (or audio) of the equipment connected to BD/DVD IN terminal or AUX1 terminal are output. • When using the TV's remote control. • Make sure that can be played on this case, you can enjoy a variety of the bass or surround speakers is...

Home Theater Audio System
Page 17
... broader surround effects when using SFC with greater audio impact. WIDE (Wide mode) Broadens the effect to the Dolby Virtual Speaker (➜ above) effect. Best suited for dialogs in a large space such as if another speaker is achieved. Enjoy games with Dolby Digital, DTS and stereo signals (video, CD, etc.). „ Using SFC (Sound Field Control) Press • The mode switches each time you turn the unit off/on, switch input sources or plug...
... broader surround effects when using SFC with greater audio impact. WIDE (Wide mode) Broadens the effect to the Dolby Virtual Speaker (➜ above) effect. Best suited for dialogs in a large space such as if another speaker is achieved. Enjoy games with Dolby Digital, DTS and stereo signals (video, CD, etc.). „ Using SFC (Sound Field Control) Press • The mode switches each time you turn the unit off/on, switch input sources or plug...

Home Theater Audio System
Page 18
...' equipment that supports HDMI CEC cannot be automatically turned on , "TV SPEAKER " is displayed and audio is output from TV (VIERA). • When using the volume control buttons. ✽ "Standby" condition means the condition that offers linked operations of TV (VIERA), this system's input is switched to "BD/DVD " or "AUX 1 ". 18 RQT9471 See the operating instructions for connected equipment for Panasonic's HDAVI Control compatible equipment. This standard is compatible with Panasonic TV (VIERA) supporting HDAVI Control 4 and later...
...' equipment that supports HDMI CEC cannot be automatically turned on , "TV SPEAKER " is displayed and audio is output from TV (VIERA). • When using the volume control buttons. ✽ "Standby" condition means the condition that offers linked operations of TV (VIERA), this system's input is switched to "BD/DVD " or "AUX 1 ". 18 RQT9471 See the operating instructions for connected equipment for Panasonic's HDAVI Control compatible equipment. This standard is compatible with Panasonic TV (VIERA) supporting HDAVI Control 4 and later...

Home Theater Audio System
Page 19
...; when changing the settings for VIERA Link "HDAVI Control" operation of TV (VIERA). 1. Digital audio out (optical) Main unit HDMI Video/Audio OUT VIERA Link "HDAVI Control" compatible equipment HDMI input TV (VIERA) Make sure to connect to "OFF ". (➜ page 23) Play 19 RQT9471 Turn on the TV (VIERA). 3. Ensure that this system. HDMI Video/Audio OUT Blu-ray Disc player/DVD HDMI cable notes recorder (DIGA) • Please use High Speed HDMI Cables that have the HDMI logo (as well. Connect TV...
...; when changing the settings for VIERA Link "HDAVI Control" operation of TV (VIERA). 1. Digital audio out (optical) Main unit HDMI Video/Audio OUT VIERA Link "HDAVI Control" compatible equipment HDMI input TV (VIERA) Make sure to connect to "OFF ". (➜ page 23) Play 19 RQT9471 Turn on the TV (VIERA). 3. Ensure that this system. HDMI Video/Audio OUT Blu-ray Disc player/DVD HDMI cable notes recorder (DIGA) • Please use High Speed HDMI Cables that have the HDMI logo (as well. Connect TV...
Home Theater Audio System
Page 20
... adjust the speaker's output level in SFC's each mode respectively. (➜ page 17) • When a commercially available active subwoofer is connected to 15, MAX Adjusting the surround speaker output When using the surround speakers: When Dolby Virtual Speaker is off with 2-channel signal input When not using the surround speakers, you can enjoy the dynamic effect even if the sound volume level is muted. Adjustment range: MIN, 1 to the subwoofer output terminal on the display while the volume...
... adjust the speaker's output level in SFC's each mode respectively. (➜ page 17) • When a commercially available active subwoofer is connected to 15, MAX Adjusting the surround speaker output When using the surround speakers: When Dolby Virtual Speaker is off with 2-channel signal input When not using the surround speakers, you can enjoy the dynamic effect even if the sound volume level is muted. Adjustment range: MIN, 1 to the subwoofer output terminal on the display while the volume...
Home Theater Audio System
Page 25
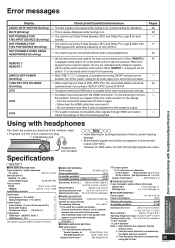
... Input/Output terminal Audio Input Analog Input ( TV, AUX3 ) 2 Optical Digital Input ( TV, AUX2 ) 2 Audio Output Audio Output ( Front L/R, Surround L/R ) 4 Subwoofer Output 1 Headphone Output ( 16 to correct the problem. Specifications are subject to "2 " on the display. - Turn off the system, unplug the AC power supply cord, and consult your dealer if the error code remains on the remote control in step 4 of procedure "When other information Cancel DTS FIX. • The equipment connected by the HDMI cable is not compatible with this system's copyright...
... Input/Output terminal Audio Input Analog Input ( TV, AUX3 ) 2 Optical Digital Input ( TV, AUX2 ) 2 Audio Output Audio Output ( Front L/R, Surround L/R ) 4 Subwoofer Output 1 Headphone Output ( 16 to correct the problem. Specifications are subject to "2 " on the display. - Turn off the system, unplug the AC power supply cord, and consult your dealer if the error code remains on the remote control in step 4 of procedure "When other information Cancel DTS FIX. • The equipment connected by the HDMI cable is not compatible with this system's copyright...
Home Theater Audio System
Page 26
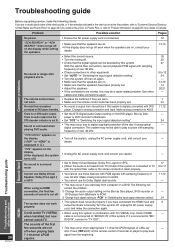
... when playing back 7.1-channel LPCM signals. • Ensure the AC power supply cord is connected. • Make sure that the digital signals can be able to play back again from microphone connected to DVD player (karaoke). The remote control does not work properly. Sound is no DTS audio output. When using this system. Troubleshooting and Troubleshooting guide other equipment. • Set "AUTO " in "Switching the input signal detection setting". • Turn this system off , unplug the AC power supply cord, and make the connection again...
... when playing back 7.1-channel LPCM signals. • Ensure the AC power supply cord is connected. • Make sure that the digital signals can be able to play back again from microphone connected to DVD player (karaoke). The remote control does not work properly. Sound is no DTS audio output. When using this system. Troubleshooting and Troubleshooting guide other equipment. • Set "AUTO " in "Switching the input signal detection setting". • Turn this system off , unplug the AC power supply cord, and make the connection again...

Home Theater Audio System
Page 27
... make the speaker setting again. • You may be played on this system is detected, and turns off the system automatically. Select OFF once and SET again. • When [WIRELESS LINK] indicator is off, check the connection of AC power supply cord of speaker and check the speaker is "ON". • If [WIRELESS LINK] indicator does not change the connections for TV (VIERA).) - Troubleshooting guide/Digital signals that can be using wireless headphones or the wireless...
... make the speaker setting again. • You may be played on this system is detected, and turns off the system automatically. Select OFF once and SET again. • When [WIRELESS LINK] indicator is off, check the connection of AC power supply cord of speaker and check the speaker is "ON". • If [WIRELESS LINK] indicator does not change the connections for TV (VIERA).) - Troubleshooting guide/Digital signals that can be using wireless headphones or the wireless...
Home Theater Audio System
Page 28
... : 1 center speaker, 2 front speakers, and 2 surround speakers at the side of or to reproduce sound, but 5.1-channel surround uses 5 speakers and 1 subwoofer. Images recorded with HDMI cables, image/audio from Bluray Disc player/DVD recorder etc. WHISPER-MODE SURROUND Even when the sound volume level is considered as video cassettes and CDs. This system supports x.v.Color. 1080p This is one channel and two channels respectively to the rear of a signal that constitute the actual screen. The 5 channels are also supported. Sound output of...
... : 1 center speaker, 2 front speakers, and 2 surround speakers at the side of or to reproduce sound, but 5.1-channel surround uses 5 speakers and 1 subwoofer. Images recorded with HDMI cables, image/audio from Bluray Disc player/DVD recorder etc. WHISPER-MODE SURROUND Even when the sound volume level is considered as video cassettes and CDs. This system supports x.v.Color. 1080p This is one channel and two channels respectively to the rear of a signal that constitute the actual screen. The 5 channels are also supported. Sound output of...

Home Theater Audio System
Page 30
... installation, set-up adjustments, misadjustment of consumer controls, improper maintenance, power line surge, lightning damage, modification, or commercial use (such as "the warrantor") will be made by E-mail to: npcparts@us.panasonic.com You may contact your dealer or Service Center. AND PUERTO RICO) Panasonic Consumer Electronics Company, Division of Panasonic Corporation of North America One Panasonic Way, Secaucus, New Jersey 07094 Panasonic Audio Products...
... installation, set-up adjustments, misadjustment of consumer controls, improper maintenance, power line surge, lightning damage, modification, or commercial use (such as "the warrantor") will be made by E-mail to: npcparts@us.panasonic.com You may contact your dealer or Service Center. AND PUERTO RICO) Panasonic Consumer Electronics Company, Division of Panasonic Corporation of North America One Panasonic Way, Secaucus, New Jersey 07094 Panasonic Audio Products...


