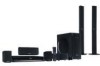

Dvd Theater Receiver
Page 2
.... DO NOT OPEN COVERS AND DO NOT REPAIR YOURSELF. REFER SERVICING TO QUALIFIED PERSONNEL. NO USER-SERVICEABLE PARTS INSIDE. CAUTION RISK OF ELECTRIC SHOCK DO NOT OPEN CAUTION: TO REDUCE THE RISK OF ELECTRIC SHOCK, DO NOT REMOVE SCREWS. For units with the remote control, but you for purchasing this apparatus from the AC Mains, disconnect the power supply cord plug from AC...
.... DO NOT OPEN COVERS AND DO NOT REPAIR YOURSELF. REFER SERVICING TO QUALIFIED PERSONNEL. NO USER-SERVICEABLE PARTS INSIDE. CAUTION RISK OF ELECTRIC SHOCK DO NOT OPEN CAUTION: TO REDUCE THE RISK OF ELECTRIC SHOCK, DO NOT REMOVE SCREWS. For units with the remote control, but you for purchasing this apparatus from the AC Mains, disconnect the power supply cord plug from AC...
Dvd Theater Receiver
Page 3
...; 1 Auto speaker setup microphone (L0CBAB000125) ∏ 8 Screws (XTN5+10FFJK) Reference RQTX0221 3 This device complies with the limits for replacement of the obsolete outlet. 10) Protect the power cord from whom you made your outlet, consult an electrician for a Class B digital device, pursuant to comply with Part 15 of December 2008. Install in a residential installation. Operation is no guarantee that may cause undesired operation. The antenna used , use...
...; 1 Auto speaker setup microphone (L0CBAB000125) ∏ 8 Screws (XTN5+10FFJK) Reference RQTX0221 3 This device complies with the limits for replacement of the obsolete outlet. 10) Protect the power cord from whom you made your outlet, consult an electrician for a Class B digital device, pursuant to comply with Part 15 of December 2008. Install in a residential installation. Operation is no guarantee that may cause undesired operation. The antenna used , use...
Dvd Theater Receiver
Page 4
... supports highdefinition video output (720p, 1080i, 1080p) from stereo (2-channel) audio, these signals can be compatible to use with DVD-Video, codes frames using these fields one tenth of its size without affecting your equipment offers. To enjoy high-definition video, a high-definition compatible TV is a next-generation digital interface for compressing/decoding color still pictures. I - JPEG (Joint Photographic Experts Group) This is made up of your volume control...
... supports highdefinition video output (720p, 1080i, 1080p) from stereo (2-channel) audio, these signals can be compatible to use with DVD-Video, codes frames using these fields one tenth of its size without affecting your equipment offers. To enjoy high-definition video, a high-definition compatible TV is a next-generation digital interface for compressing/decoding color still pictures. I - JPEG (Joint Photographic Experts Group) This is made up of your volume control...
Dvd Theater Receiver
Page 5
...AC power supply cord connections 11 step 5 Preparing the wireless system 11 step 6 Preparing the remote control 11 Setting up the radio 13 Presetting stations automatically 13 Confirming the preset channels 13 Manual tuning 13 Selecting the playback source 15 Selecting the source from the START menu 15 Selecting the source by the remote control 15 Enjoying sound from all speakers and various sound effects Enjoying surround sound effects 16 Selecting sound mode 16 Whisper-mode Surround 16 Adjusting the speaker output level manually . . . . 17 step 7 SMART SETUP 12 Playing Discs...
...AC power supply cord connections 11 step 5 Preparing the wireless system 11 step 6 Preparing the remote control 11 Setting up the radio 13 Presetting stations automatically 13 Confirming the preset channels 13 Manual tuning 13 Selecting the playback source 15 Selecting the source from the START menu 15 Selecting the source by the remote control 15 Enjoying sound from all speakers and various sound effects Enjoying surround sound effects 16 Selecting sound mode 16 Whisper-mode Surround 16 Adjusting the speaker output level manually . . . . 17 step 7 SMART SETUP 12 Playing Discs...
Dvd Theater Receiver
Page 7
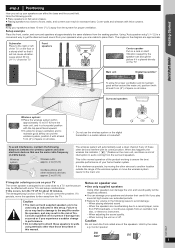
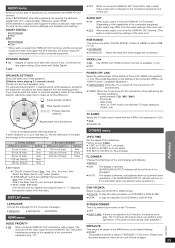
..., position it with its communication. Subwoofer Front Place to floors, walls, and corners can affect the bass and the sound field. When adjusting the sound quality. - When turning the unit on the floor or a sturdy shelf so that use the same radio frequency (2.4 GHz band). e.g. Center speaker RQTX0221 DO NOT DO 7 Using "Auto speaker setup" (B 12) is placed directly on your speakers when you are approximate. The angles...
..., position it with its communication. Subwoofer Front Place to floors, walls, and corners can affect the bass and the sound field. When adjusting the sound quality. - When turning the unit on the floor or a sturdy shelf so that use the same radio frequency (2.4 GHz band). e.g. Center speaker RQTX0221 DO NOT DO 7 Using "Auto speaker setup" (B 12) is placed directly on your speakers when you are approximate. The angles...
Dvd Theater Receiver
Page 9
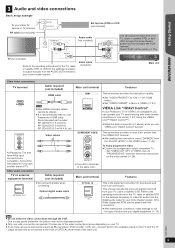
...; Connect to the AUX terminal. Due to copy guard protection, the picture may not be connected to a progressive output compatible TV. - Video cable (included) COMPONENT VIDEO OUT VIDEO OUT Main unit Other video connections TV terminal AV IN COMPONENT VIDEO IN Y PB PR All Panasonic TVs that you have 480p input connectors are compatible. Getting Started Quick Start Guide 3 Audio and video connections Basic setup example To your cable TV service or TV antenna RF cable (not included) Set top box (STB...
...; Connect to the AUX terminal. Due to copy guard protection, the picture may not be connected to a progressive output compatible TV. - Video cable (included) COMPONENT VIDEO OUT VIDEO OUT Main unit Other video connections TV terminal AV IN COMPONENT VIDEO IN Y PB PR All Panasonic TVs that you have 480p input connectors are compatible. Getting Started Quick Start Guide 3 Audio and video connections Basic setup example To your cable TV service or TV antenna RF cable (not included) Set top box (STB...
Dvd Theater Receiver
Page 11
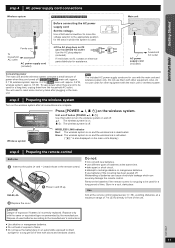
... the household AC outlet. Also, do not use cords for other equipment. C I , B Í] on and off. Getting Started Quick Start Guide step 4 AC power supply cord connections Wireless system [For\areas\except\U.S.A.[and\Canada] Before connecting the AC power AC IN supply cord VOLT ADJ Set the voltage. Press in a cool, dark place. Use Aim at the remote control signal sensor (B 39), avoiding obstacles, at the...
... the household AC outlet. Also, do not use cords for other equipment. C I , B Í] on and off. Getting Started Quick Start Guide step 4 AC power supply cord connections Wireless system [For\areas\except\U.S.A.[and\Canada] Before connecting the AC power AC IN supply cord VOLT ADJ Set the voltage. Press in a cool, dark place. Use Aim at the remote control signal sensor (B 39), avoiding obstacles, at the...

Dvd Theater Receiver
Page 12
...Finish Smart setup. VIDEO 1, AV 1, HDMI, etc.) to suit the connections to this unit. ≥ To change your TV's video input mode, refer to confirm speaker connections. ≥Auto speaker setup Adjust the speaker output level automatically. (B below) ≥Speaker output Make surround sound setting for VIERA Link "HDAVI Control". (B 24) [Note] ≥ If this unit is connected to accommodate your TV. For OPTICAL IN connection (B 9): Select "DIGITAL IN". The speakers output loud test signals during the Auto speaker setup. RQTX0221 12 Preparation Turn on menu screen. ≥TV...
...Finish Smart setup. VIDEO 1, AV 1, HDMI, etc.) to suit the connections to this unit. ≥ To change your TV's video input mode, refer to confirm speaker connections. ≥Auto speaker setup Adjust the speaker output level automatically. (B below) ≥Speaker output Make surround sound setting for VIERA Link "HDAVI Control". (B 24) [Note] ≥ If this unit is connected to accommodate your TV. For OPTICAL IN connection (B 9): Select "DIGITAL IN". The speakers output loud test signals during the Auto speaker setup. RQTX0221 12 Preparation Turn on menu screen. ≥TV...
Dvd Theater Receiver
Page 13
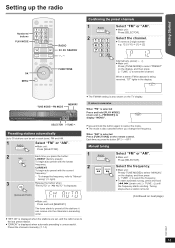
... [PLAY MODE] (main unit: [-FM MODE]) to "Manual tuning" (B right). 3 OK Release the button when "FM AUTO" or "AM AUTO" is being received, "ST" lights in each band, FM and AM. 1 RADIO EXT-IN Select "FM" or "AM". ≥ Main unit: Press [SELECTOR]. 2 MENU Each time you press the button: LOWEST (factory preset): PLAY LIST To begin auto preset with the lowest frequency. Tuning stops when a station is displayed when the stations are set in...
... [PLAY MODE] (main unit: [-FM MODE]) to "Manual tuning" (B right). 3 OK Release the button when "FM AUTO" or "AM AUTO" is being received, "ST" lights in each band, FM and AM. 1 RADIO EXT-IN Select "FM" or "AM". ≥ Main unit: Press [SELECTOR]. 2 MENU Each time you press the button: LOWEST (factory preset): PLAY LIST To begin auto preset with the lowest frequency. Tuning stops when a station is displayed when the stations are set in...
Dvd Theater Receiver
Page 15
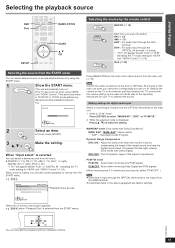
... receiving Dolby Digital and PCM signals. (When receiving true 5.1-channel surround sound, select "PCM OFF".) [Note] ≥ Audio that is input through the OPTICAL IN terminal is low by using VIERA Link "HDAVI Control". e.g. [DVD-V] DVD/CD Playback Disc TOP MENU (DVD) MENU (DVD) Input select Home theater Playback/menu access Press [SELECTOR] on the main unit when you select the corresponding sources (B 9). This works only when in the above paragraph are factory settings. Getting Started Playing Discs Other Operations Selecting the playback source DVD iPod RADIO DVD iPod...
... receiving Dolby Digital and PCM signals. (When receiving true 5.1-channel surround sound, select "PCM OFF".) [Note] ≥ Audio that is input through the OPTICAL IN terminal is low by using VIERA Link "HDAVI Control". e.g. [DVD-V] DVD/CD Playback Disc TOP MENU (DVD) MENU (DVD) Input select Home theater Playback/menu access Press [SELECTOR] on the main unit when you select the corresponding sources (B 9). This works only when in the above paragraph are factory settings. Getting Started Playing Discs Other Operations Selecting the playback source DVD iPod RADIO DVD iPod...

Dvd Theater Receiver
Page 16
... Started Playing Discs Other Operations +, VOL VOL SURROUND SURROUND SOUND SOUND Recommended modes to enjoy TV audio or stereo sources from all speakers with some sources. S.SRND You can enjoy sound from the front speakers, as well as it is effect. FLAT: Cancel (no effect with stereo sources. (Surround output will be in mono.) STEREO Sound will light up when there is effect. Subwoofer level You can select sound quality settings. Each time you press the button: EQ...
... Started Playing Discs Other Operations +, VOL VOL SURROUND SURROUND SOUND SOUND Recommended modes to enjoy TV audio or stereo sources from all speakers with some sources. S.SRND You can enjoy sound from the front speakers, as well as it is effect. FLAT: Cancel (no effect with stereo sources. (Surround output will be in mono.) STEREO Sound will light up when there is effect. Subwoofer level You can select sound quality settings. Each time you press the button: EQ...
Dvd Theater Receiver
Page 24
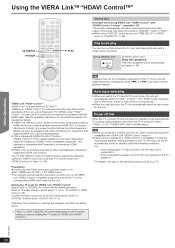
... input mode for this unit will be automatically turned to standby under "HDAVI Control". Other connected equipment compatible with VIERA Link "HDAVI Control" stays on all VIERA Link "HDAVI Control" compatible equipment and set "TIME DELAY" in HDMI menu (B 29). when changing the speaker use this unit, and a Panasonic TV (VIERA) under the following operation: VIERA Link Control only with "HDAVI Control 3 or later" compatible TV) This function automatically provides synchronized audio and video output. (This works...
... input mode for this unit will be automatically turned to standby under "HDAVI Control". Other connected equipment compatible with VIERA Link "HDAVI Control" stays on all VIERA Link "HDAVI Control" compatible equipment and set "TIME DELAY" in HDMI menu (B 29). when changing the speaker use this unit, and a Panasonic TV (VIERA) under the following operation: VIERA Link Control only with "HDAVI Control 3 or later" compatible TV) This function automatically provides synchronized audio and video output. (This works...
Dvd Theater Receiver
Page 25
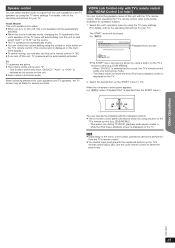
... unit. ≥ Audio output is 2-channel audio. e.g. [DVD-V] DVD/CD Playback Disc TOP MENU (DVD) MENU (DVD) Input select Home theater Playback/menu access OK RETURN ≥ The START menu can also be shown by using the TV menu settings. This works only during stop mode. - This feature does not work while the iPod music playback screen is selected as the source, the TV's remote control works only during "DVD/CD" playback and resume modes or, while the iPod music playback screen is displayed on the TV...
... unit. ≥ Audio output is 2-channel audio. e.g. [DVD-V] DVD/CD Playback Disc TOP MENU (DVD) MENU (DVD) Input select Home theater Playback/menu access OK RETURN ≥ The START menu can also be shown by using the TV menu settings. This works only during stop mode. - This feature does not work while the iPod music playback screen is selected as the source, the TV's remote control works only during "DVD/CD" playback and resume modes or, while the iPod music playback screen is displayed on the TV...
Dvd Theater Receiver
Page 28
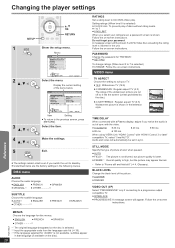
... screen, press [RETURN]. 3 Select the item. TIME DELAY When connected with "HDAVI Control 3 or later" compatible TV, select "0 ms/AUTO". BLACK LEVEL Change the black level of sync with the video. ≥ 0 ms/AUTO ≥ 20 ms ≥ 40 ms ≥ 60 ms ≥ 80 ms ≥ 100 ms When using VIERA Link "HDAVI Control" with a Plasma display, adjust if you select your password. Menu MAIN DISC VIDEO AUDIO D I /P) Select "PROGRESSIVE" only if connecting to limit DVD-Video play...
... screen, press [RETURN]. 3 Select the item. TIME DELAY When connected with "HDAVI Control 3 or later" compatible TV, select "0 ms/AUTO". BLACK LEVEL Change the black level of sync with the video. ≥ 0 ms/AUTO ≥ 20 ms ≥ 40 ms ≥ 60 ms ≥ 80 ms ≥ 100 ms When using VIERA Link "HDAVI Control" with a Plasma display, adjust if you select your password. Menu MAIN DISC VIDEO AUDIO D I /P) Select "PROGRESSIVE" only if connecting to limit DVD-Video play...
Dvd Theater Receiver
Page 29
... works with Dolby Digital) ≥ OFF SPEAKER SETTINGS Select the delay time of the speakers. (Effective when playing 5.1-channel sound) (Center and surround speakers only) For optimum listening with the VIERA Link operations (B 24). ≥ AUX ≥ DIGITAL IN OTHERS menu JPEG TIME Set the speed of the slideshow. audio playback ([CD] [MP3] [WMA]) - iPod mode - radio mode - "AUX" or "D-IN" mode (non-selected TV audio setting for VIERA Link) TV AUDIO Select the TV audio input to the recommended setting. TV). ≥ RESET The password screen...
... works with Dolby Digital) ≥ OFF SPEAKER SETTINGS Select the delay time of the speakers. (Effective when playing 5.1-channel sound) (Center and surround speakers only) For optimum listening with the VIERA Link operations (B 24). ≥ AUX ≥ DIGITAL IN OTHERS menu JPEG TIME Set the speed of the slideshow. audio playback ([CD] [MP3] [WMA]) - iPod mode - radio mode - "AUX" or "D-IN" mode (non-selected TV audio setting for VIERA Link) TV AUDIO Select the TV audio input to the recommended setting. TV). ≥ RESET The password screen...
Dvd Theater Receiver
Page 32
... the remote control signal sensor and operate. (B 39) Other products respond to clear, note the service number and contact a qualified service person. The connected equipment is a power supply problem. General operation No response when any buttons are not displayed correctly. Reset all the settings to the default values. (This does not work during the Auto speaker setup. All settings will automatically follow the information from the TV. Disconnect the AC power supply cord...
... the remote control signal sensor and operate. (B 39) Other products respond to clear, note the service number and contact a qualified service person. The connected equipment is a power supply problem. General operation No response when any buttons are not displayed correctly. Reset all the settings to the default values. (This does not work during the Auto speaker setup. All settings will automatically follow the information from the TV. Disconnect the AC power supply cord...
Dvd Theater Receiver
Page 33
... possible. A low hum is heard during play WMA that the wireless system is plugged into the slot of disc. Select iPod menu (iPod LCD) mode (B 26) and operate video playback from the surround speakers, ensure that the surround selector switch is set at the center position. (B 8) ≥ Ensure that the digital transmitter is fully inserted into the AC outlet and is turned on the rear panel of connected devices. ≥ When using the HDMI AV...
... possible. A low hum is heard during play WMA that the wireless system is plugged into the slot of disc. Select iPod menu (iPod LCD) mode (B 26) and operate video playback from the surround speakers, ensure that the surround selector switch is set at the center position. (B 8) ≥ Ensure that the digital transmitter is fully inserted into the AC outlet and is turned on the rear panel of connected devices. ≥ When using the HDMI AV...
Dvd Theater Receiver
Page 34
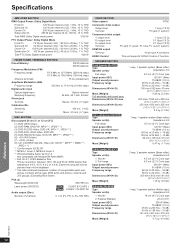
...) Component video output Y output level PB output level PR output level Terminal 1 Vp-p (75 ≠) 0.7 Vp-p (75 ≠) 0.7 Vp-p (75 ≠) Pin jack (Y: green, PB: blue, PR: red) (1 system) HDMI AV output Terminal 19-pin type A connector HDAVI Control This unit supports "HDAVI Control 4" function. Full range Input power (IEC) Output sound pressure Frequency range Dimensions (WtHtD) Mass [Weight] [Subwoofer\SB-HW560] Type Speaker unit(s) 1. Passive Radiator Input power (IEC) Output sound pressure Frequency range Dimensions (WtHtD) Mass [Weight] 2 way, 2 speaker system (Bass...
...) Component video output Y output level PB output level PR output level Terminal 1 Vp-p (75 ≠) 0.7 Vp-p (75 ≠) 0.7 Vp-p (75 ≠) Pin jack (Y: green, PB: blue, PR: red) (1 system) HDMI AV output Terminal 19-pin type A connector HDAVI Control This unit supports "HDAVI Control 4" function. Full range Input power (IEC) Output sound pressure Frequency range Dimensions (WtHtD) Mass [Weight] [Subwoofer\SB-HW560] Type Speaker unit(s) 1. Passive Radiator Input power (IEC) Output sound pressure Frequency range Dimensions (WtHtD) Mass [Weight] 2 way, 2 speaker system (Bass...
Dvd Theater Receiver
Page 38
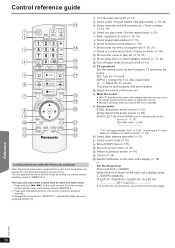
... a disc menu or play mode / Set the repeat mode (B 20) 5 Basic operations for at the Panasonic TV and press the button. [Í]: Turn the TV on/off (B 16) = TV operations Aim the remote control at least 2 seconds. A Select radio stations manually (B 13) B Select sound mode (B 16) C Show START menu (B 15) D Show on-screen menu (B 22) E Return to "REMOTE 1", repeat both steps above by setting the remote control operating mode to standby. @ Source select [DVD]: Select disc as the source (B 12) [iPod]: Select iPod as the source (B 26) [RADIO], [EXT-IN]: Select FM...
... a disc menu or play mode / Set the repeat mode (B 20) 5 Basic operations for at the Panasonic TV and press the button. [Í]: Turn the TV on/off (B 16) = TV operations Aim the remote control at least 2 seconds. A Select radio stations manually (B 13) B Select sound mode (B 16) C Show START menu (B 15) D Show on-screen menu (B 22) E Return to "REMOTE 1", repeat both steps above by setting the remote control operating mode to standby. @ Source select [DVD]: Select disc as the source (B 12) [iPod]: Select iPod as the source (B 26) [RADIO], [EXT-IN]: Select FM...
Dvd Theater Receiver
Page 39
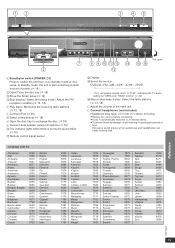
...Playing Discs Other Operations 1 2 POWER OPEN CLOSE Dock for iPod 3 4 5 SMART SETUP TUNE MODE FM MODE MEMORY Dock for iPod 6 SURROUND OUTPUT 12345 5 DISC SELECTOR EXCHANGE SETUP MIC SELECTOR TUNE 7 8 9 10 11 13 14 12 VOLUME 15 16 Pull open 1 Standby/on to exchange the disc. (B 18) 9 Connect Auto speaker setup microphone (B 12) : The indicator lights when there is surround sound effect. (B 16) ; Adjust the volume of the main unit @ Connect headphones (not included) Headphone plug type: ‰3.5 mm (1/8q) stereo mini plug ≥ Reduce the volume before connecting...
...Playing Discs Other Operations 1 2 POWER OPEN CLOSE Dock for iPod 3 4 5 SMART SETUP TUNE MODE FM MODE MEMORY Dock for iPod 6 SURROUND OUTPUT 12345 5 DISC SELECTOR EXCHANGE SETUP MIC SELECTOR TUNE 7 8 9 10 11 13 14 12 VOLUME 15 16 Pull open 1 Standby/on to exchange the disc. (B 18) 9 Connect Auto speaker setup microphone (B 12) : The indicator lights when there is surround sound effect. (B 16) ; Adjust the volume of the main unit @ Connect headphones (not included) Headphone plug type: ‰3.5 mm (1/8q) stereo mini plug ≥ Reduce the volume before connecting...


