
SAPM47 User Guide
Page 2
... CABINET OR IN ANOTHER CONFINED SPACE. Before use Supplied accessories 3 IMPORTANT SAFETY INSTRUCTIONS 4 Placement of speakers 5 The remote control 5 Connections 6 Front panel controls 8 Listening operations The radio: manual tuning 10 The radio: preset tuning 11 CDs 12 Cassette tapes 19 Recording operations Before recording 20 Recording from the radio 21 Recording CDs 21 Timers and others Using the built-in the space provided below and keep for purchasing this product can be found on either the back or...
... CABINET OR IN ANOTHER CONFINED SPACE. Before use Supplied accessories 3 IMPORTANT SAFETY INSTRUCTIONS 4 Placement of speakers 5 The remote control 5 Connections 6 Front panel controls 8 Listening operations The radio: manual tuning 10 The radio: preset tuning 11 CDs 12 Cassette tapes 19 Recording operations Before recording 20 Recording from the radio 21 Recording CDs 21 Timers and others Using the built-in the space provided below and keep for purchasing this product can be found on either the back or...
SAPM47 User Guide
Page 3
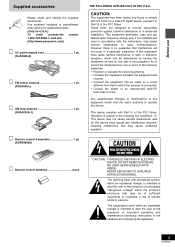
AC power supply cord 1 pc. (RJA0065-A) FM indoor antenna 1 pc. (RSA0006-L) AM loop antenna 1 pc. (RSA0033A-1) Remote control transmitter 1 pc. (EUR648268) THE FOLLOWING APPLIES ONLY IN THE U.S.A. Any unauthorized changes or modifications to this equipment would void the user's authority to operate this equipment does cause harmful interference to radio or television reception, which the receiver is connected. • Consult the dealer or...
AC power supply cord 1 pc. (RJA0065-A) FM indoor antenna 1 pc. (RSA0006-L) AM loop antenna 1 pc. (RSA0033A-1) Remote control transmitter 1 pc. (EUR648268) THE FOLLOWING APPLIES ONLY IN THE U.S.A. Any unauthorized changes or modifications to this equipment would void the user's authority to operate this equipment does cause harmful interference to radio or television reception, which the receiver is connected. • Consult the dealer or...
SAPM47 User Guide
Page 4
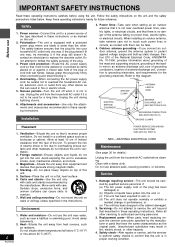
... been dropped or the cabinet damaged. 2. Replacement parts-When parts need replacing ensure the servicer uses parts specified by items placed on the unit. 2. Do not attempt to grounding electrodes, and requirements for a long time. Overloading-When connecting the AC power supply cord, be walked on top of the plug or cord with them can cause carts to replace the obsolete outlet. Avoid exposing the unit...
... been dropped or the cabinet damaged. 2. Replacement parts-When parts need replacing ensure the servicer uses parts specified by items placed on the unit. 2. Do not attempt to grounding electrodes, and requirements for a long time. Overloading-When connecting the AC power supply cord, be walked on top of the plug or cord with them can cause carts to replace the obsolete outlet. Avoid exposing the unit...
SAPM47 User Guide
Page 6
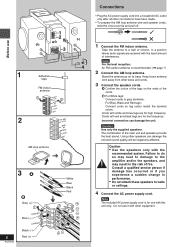
... tape FM indoor antenna 1 2 2 AM loop antenna 3A B White Blue Black Red Gray (+) 1 Red (ª) HIGH(6B)lack (·) Blue (-) 3 LOW(6 ) 2 Black (·) 6 RQT6530 Black (-) Red (+) RL Red (ª) • Plug the AC power supply cord into a household AC outlet only after all other wires and cords. 3 Connect the speaker cords. Consult a qualified service person if damage has occurred or if you experience a sudden change...
... tape FM indoor antenna 1 2 2 AM loop antenna 3A B White Blue Black Red Gray (+) 1 Red (ª) HIGH(6B)lack (·) Blue (-) 3 LOW(6 ) 2 Black (·) 6 RQT6530 Black (-) Red (+) RL Red (ª) • Plug the AC power supply cord into a household AC outlet only after all other wires and cords. 3 Connect the speaker cords. Consult a qualified service person if damage has occurred or if you experience a sudden change...
SAPM47 User Guide
Page 7
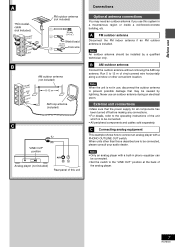
... a PHONO OUT/LINE OUT switch. External unit connections • Make sure that the power supply for all components has been turned off before making any connections. • For details, refer to the operating instructions of the unit which is not in use, disconnect the outdoor antenna to prevent possible damage that may need an outdoor antenna if you use an outdoor antenna during an electrical storm. C Connecting analog equipment...
... a PHONO OUT/LINE OUT switch. External unit connections • Make sure that the power supply for all components has been turned off before making any connections. • For details, refer to the operating instructions of the unit which is not in use, disconnect the outdoor antenna to prevent possible damage that may need an outdoor antenna if you use an outdoor antenna during an electrical storm. C Connecting analog equipment...
SAPM47 User Guide
Page 8
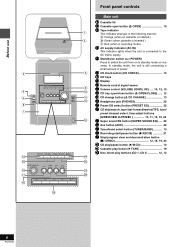
... cassette is inserted.) c Red (when in recording mode.) 4 AC supply indicator (AC IN) This indicator lights when the unit is still consuming a small amount of power. 6 CD check button (CD CHECK 13 7 CD trays 8 Display 9 Remote control signal sensor ! Before use OPEN PRESET EQ 4/REW/g 3/FF/f L/-DEMO [REC/J AC IN POWER f/ 7 CD CHECK SUPER SOUND EQ TUNER/ TAPE AUX BAND £ CD -/ J VOLUME OPEN/CLOSE CD 1 CD 2 CD 3 DOWN CD 4 CD 5 UP CD CHANGE PHONES PRESET EQ 4/REW/g 3/FF/f L/-DEMO [REC/J SUPER SOUND EQ TUNER/ TAPE AUX BAND £ CD -/ J CD 1 CD 2 CD 3 CD 4 CD...
... cassette is inserted.) c Red (when in recording mode.) 4 AC supply indicator (AC IN) This indicator lights when the unit is still consuming a small amount of power. 6 CD check button (CD CHECK 13 7 CD trays 8 Display 9 Remote control signal sensor ! Before use OPEN PRESET EQ 4/REW/g 3/FF/f L/-DEMO [REC/J AC IN POWER f/ 7 CD CHECK SUPER SOUND EQ TUNER/ TAPE AUX BAND £ CD -/ J VOLUME OPEN/CLOSE CD 1 CD 2 CD 3 DOWN CD 4 CD 5 UP CD CHANGE PHONES PRESET EQ 4/REW/g 3/FF/f L/-DEMO [REC/J SUPER SOUND EQ TUNER/ TAPE AUX BAND £ CD -/ J CD 1 CD 2 CD 3 CD 4 CD...
SAPM47 User Guide
Page 10
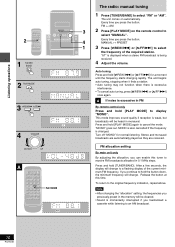
... CLOCK/ -AUTO OFF TIMER PLAY/ REC 1 2 3 DISC 4 5 6 ≥10 7 8 9 0 DISPLAY DIMMER PLAY MODE PROGRAM AUX TUNER TAPE CD / ALBUM /REW/ /FF/ /CLEAR S SOUND EQ PRESET EQ MUTING VOLUME PLAY MODE The radio: manual tuning 1 Press [TUNER/BAND] to the original frequency indication, repeat above. The unit comes on the remote control to receive FM broadcasts allocated in FM By remote control only Press and hold [4/REW/ g] or [3 /FF/ f] for normal listening. Auto tuning Press and hold [PLAY MODE] to a flashing display of the required station. This mode improves sound...
... CLOCK/ -AUTO OFF TIMER PLAY/ REC 1 2 3 DISC 4 5 6 ≥10 7 8 9 0 DISPLAY DIMMER PLAY MODE PROGRAM AUX TUNER TAPE CD / ALBUM /REW/ /FF/ /CLEAR S SOUND EQ PRESET EQ MUTING VOLUME PLAY MODE The radio: manual tuning 1 Press [TUNER/BAND] to the original frequency indication, repeat above. The unit comes on the remote control to receive FM broadcasts allocated in FM By remote control only Press and hold [4/REW/ g] or [3 /FF/ f] for normal listening. Auto tuning Press and hold [PLAY MODE] to a flashing display of the required station. This mode improves sound...
SAPM47 User Guide
Page 11
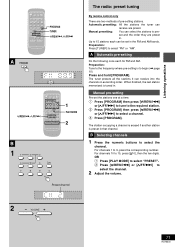
... 1 2 3 DISC 4 5 6 ≥10 7 8 9 0 DISPLAY DIMMER PLAY MODE PROGRAM AUX TUNER TAPE CD / ALBUM /REW/ /FF/ /CLEAR S SOUND EQ PRESET EQ MUTING VOLUME PROGRAM TUNER /REW/ , /FF/ A PROGRAM /REW/ , /FF/ SLEEP CLOCK/ -AUTO OFF TIMER PLAY/ REC 1 2 3 DISC 4 5 6 ≥10 7 8 9 0 DISPLAY DIMMER PLAY MODE PROGRAM AUX TUNER TAPE CD / ALBUM /REW/ /FF/ /CLEAR S SOUND EQ PRESET EQ MUTING VOLUME 1 PLAY MODE 2 B 11 2 3 4 5 6 10 7 8 9 0 Preset channel The radio: preset tuning By remote control only There are preset in. set the stations one at a time.
... 1 2 3 DISC 4 5 6 ≥10 7 8 9 0 DISPLAY DIMMER PLAY MODE PROGRAM AUX TUNER TAPE CD / ALBUM /REW/ /FF/ /CLEAR S SOUND EQ PRESET EQ MUTING VOLUME PROGRAM TUNER /REW/ , /FF/ A PROGRAM /REW/ , /FF/ SLEEP CLOCK/ -AUTO OFF TIMER PLAY/ REC 1 2 3 DISC 4 5 6 ≥10 7 8 9 0 DISPLAY DIMMER PLAY MODE PROGRAM AUX TUNER TAPE CD / ALBUM /REW/ /FF/ /CLEAR S SOUND EQ PRESET EQ MUTING VOLUME 1 PLAY MODE 2 B 11 2 3 4 5 6 10 7 8 9 0 Preset channel The radio: preset tuning By remote control only There are preset in. set the stations one at a time.
SAPM47 User Guide
Page 12
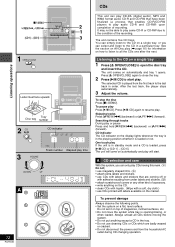
... recording. The selected CD is loaded, press [2/J CD] or [CD 1] ~ [CD 5]. After the last track, the player stops automatically. 3 Adjust the volume. A CD selection and care a With this mark. ( ) b Do not; • use cleaning CDs or CDs which are coming off or with labels available on All-Disc play Press [2/ J CD]. To prevent damage Always observe the following points. • Set the system on automatically and tray 1 opens. One touch play some CD-R or CD...
... recording. The selected CD is loaded, press [2/J CD] or [CD 1] ~ [CD 5]. After the last track, the player stops automatically. 3 Adjust the volume. A CD selection and care a With this mark. ( ) b Do not; • use cleaning CDs or CDs which are coming off or with labels available on All-Disc play Press [2/ J CD]. To prevent damage Always observe the following points. • Set the system on automatically and tray 1 opens. One touch play some CD-R or CD...
SAPM47 User Guide
Page 13
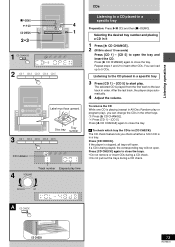
... open . 1 Listening operations CDs DEMO / CD 4 CD CHECK 1 2 3 1 CD CHANGE c 2 CD 1 CD 2 CD 3 CD 4 CD 5 Label must face upward. After the last track, the player stops automatically. 4 Adjust the volume. Press [c CD CHANGE] again to a CD placed in order. Disc tray Tray number 3 CD 1 CD 2 CD 3 CD 4 CD 5 CD indicator Listening to close the tray. Selecting the desired tray number and placing a CD in a tray. To remove the CD While one CD is playing (except in All-Disc Random play or program play time 4 VOLUME DOWN UP A CD CHECK CD CHECK 13 RQT6530 Press [CD...
... open . 1 Listening operations CDs DEMO / CD 4 CD CHECK 1 2 3 1 CD CHANGE c 2 CD 1 CD 2 CD 3 CD 4 CD 5 Label must face upward. After the last track, the player stops automatically. 4 Adjust the volume. Press [c CD CHANGE] again to a CD placed in order. Disc tray Tray number 3 CD 1 CD 2 CD 3 CD 4 CD 5 CD indicator Listening to close the tray. Selecting the desired tray number and placing a CD in a tray. To remove the CD While one CD is playing (except in All-Disc Random play or program play time 4 VOLUME DOWN UP A CD CHECK CD CHECK 13 RQT6530 Press [CD...
SAPM47 User Guide
Page 15
... operations DISPLAY 1 2 SLEEP CLOCK/ -AUTO OFF TIMER PLAY/ REC 1 2 3 DISC 4 5 6 ≥10 7 8 9 0 DISPLAY DIMMER PLAY MODE PROGRAM AUX TUNER TAPE CD / ALBUM /REW/ /FF/ /CLEAR S SOUND EQ PRESET EQ MUTING VOLUME 4 1 3 A Total track number Total album number (in all albums) B 1 ALBUM File format indicator /REW/ /FF/ Specified album number 2 ALBUM 3 /REW/ /FF/ Specified track number 4 CD -/ J C DISPLAY Format of file in play or pause Press [DISPLAY] to select a desired CD display mode. L C Changing the CD display Remote control only During play CDs...
... operations DISPLAY 1 2 SLEEP CLOCK/ -AUTO OFF TIMER PLAY/ REC 1 2 3 DISC 4 5 6 ≥10 7 8 9 0 DISPLAY DIMMER PLAY MODE PROGRAM AUX TUNER TAPE CD / ALBUM /REW/ /FF/ /CLEAR S SOUND EQ PRESET EQ MUTING VOLUME 4 1 3 A Total track number Total album number (in all albums) B 1 ALBUM File format indicator /REW/ /FF/ Specified album number 2 ALBUM 3 /REW/ /FF/ Specified track number 4 CD -/ J C DISPLAY Format of file in play or pause Press [DISPLAY] to select a desired CD display mode. L C Changing the CD display Remote control only During play CDs...

SAPM47 User Guide
Page 16
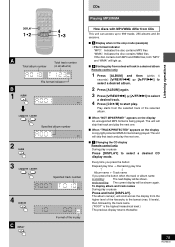
... mode : Plays all loaded discs in random order. 1-Disc mode : Plays one selected disc in random order. 4 5 1 CD -/ J SLEEP CLOCK/ -AUTO OFF TIMER PLAY/ REC 1 2 3 DISC 4 5 6 ≥10 7 8 9 0 DISPLAY DIMMER PLAY MODE PROGRAM AUX TUNER TAPE CD / ALBUM /REW/ /FF/ /CLEAR S SOUND EQ PRESET EQ MUTING L /CLEAR 3 2 16 1 2 PLAY MODE Listening operations 3 DISC 41 2 3 4 5 Specified disc indicator 51 2 3 4 5 6 10 7 8 9 0 Specified track number 6 CD -/ J 16 RQT6530 CDs Listening to specific CDs and tracks (CD Play Mode function) By remote control...
... mode : Plays all loaded discs in random order. 1-Disc mode : Plays one selected disc in random order. 4 5 1 CD -/ J SLEEP CLOCK/ -AUTO OFF TIMER PLAY/ REC 1 2 3 DISC 4 5 6 ≥10 7 8 9 0 DISPLAY DIMMER PLAY MODE PROGRAM AUX TUNER TAPE CD / ALBUM /REW/ /FF/ /CLEAR S SOUND EQ PRESET EQ MUTING L /CLEAR 3 2 16 1 2 PLAY MODE Listening operations 3 DISC 41 2 3 4 5 Specified disc indicator 51 2 3 4 5 6 10 7 8 9 0 Specified track number 6 CD -/ J 16 RQT6530 CDs Listening to specific CDs and tracks (CD Play Mode function) By remote control...

SAPM47 User Guide
Page 17
... specific track to the last track of the current track. Press and hold [PLAY MODE] once again. B DISPLAY Remaining play time B CD display By remote control only This function allows you to display the remaining play with CD Play Mode function Set the desired mode (A page 16), press and hold [PLAY MODE] before or during play By remote control only A Press and hold [PLAY MODE] before or during playback, and make sure "REPEAT ON" and " " are displayed. 3. 2 DISPLAY SLEEP CLOCK/ -AUTO OFF TIMER PLAY/ REC 1 2 3 DISC 4 5 6 ≥10 7 8 9 0 DISPLAY DIMMER PLAY MODE PROGRAM...
... specific track to the last track of the current track. Press and hold [PLAY MODE] once again. B DISPLAY Remaining play time B CD display By remote control only This function allows you to display the remaining play with CD Play Mode function Set the desired mode (A page 16), press and hold [PLAY MODE] before or during play By remote control only A Press and hold [PLAY MODE] before or during playback, and make sure "REPEAT ON" and " " are displayed. 3. 2 DISPLAY SLEEP CLOCK/ -AUTO OFF TIMER PLAY/ REC 1 2 3 DISC 4 5 6 ≥10 7 8 9 0 DISPLAY DIMMER PLAY MODE PROGRAM...

SAPM47 User Guide
Page 21
... interrupted when you press the button: BP1 ↔ BP2 Select the position where there is less noise. Disc play stops automatically. A DEMO 2 2 [ REC/ J B PLAY MODE SLEEP CLOCK/ -AUTO OFF TIMER PLAY/ REC 1 2 3 DISC 4 5 6 ≥10 7 8 9 0 DISPLAY DIMMER PLAY MODE PROGRAM AUX TUNER TAPE CD / ALBUM /REW/ /FF/ /CLEAR S SOUND EQ PRESET EQ MUTING PLAY MODE C DEMO 2 2 2 / REW/ / FF/ 2 [ REC/ J 3 A Recording from the radio Preparation: Do the preparatory steps (\ page 20). 1 Tune to the required station. (\ page 10 or 11...
... interrupted when you press the button: BP1 ↔ BP2 Select the position where there is less noise. Disc play stops automatically. A DEMO 2 2 [ REC/ J B PLAY MODE SLEEP CLOCK/ -AUTO OFF TIMER PLAY/ REC 1 2 3 DISC 4 5 6 ≥10 7 8 9 0 DISPLAY DIMMER PLAY MODE PROGRAM AUX TUNER TAPE CD / ALBUM /REW/ /FF/ /CLEAR S SOUND EQ PRESET EQ MUTING PLAY MODE C DEMO 2 2 2 / REW/ / FF/ 2 [ REC/ J 3 A Recording from the radio Preparation: Do the preparatory steps (\ page 20). 1 Tune to the required station. (\ page 10 or 11...

SAPM47 User Guide
Page 22
... unit connection.) 1 Press [AUX]. 2 Start playback from the external source. (Refer to your equipment's operating instructions.) D Listening with Super Sound EQ. • Changes to prevent hearing damage. B Enhancing the sound quality This feature enhances the bass and treble effect of time to sound quality do not affect recordings. Press the button again to select a setting. Listening operations PRESET EQ SUPER SOUND EQ S.SOUND EQ SLEEP CLOCK/ -AUTO OFF TIMER PLAY/ REC 1 2 3 DISC 4 5 6 ≥10 7 8 9 0 DISPLAY DIMMER PLAY MODE PROGRAM AUX TUNER TAPE CD...
... unit connection.) 1 Press [AUX]. 2 Start playback from the external source. (Refer to your equipment's operating instructions.) D Listening with Super Sound EQ. • Changes to prevent hearing damage. B Enhancing the sound quality This feature enhances the bass and treble effect of time to sound quality do not affect recordings. Press the button again to select a setting. Listening operations PRESET EQ SUPER SOUND EQ S.SOUND EQ SLEEP CLOCK/ -AUTO OFF TIMER PLAY/ REC 1 2 3 DISC 4 5 6 ≥10 7 8 9 0 DISPLAY DIMMER PLAY MODE PROGRAM AUX TUNER TAPE CD...
SAPM47 User Guide
Page 23
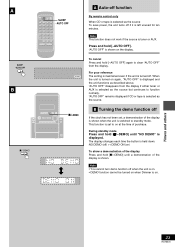
... at the time of the display is shown. Timers and others 23 RQT6530 When the unit is turned on ) To show a demonstration of the display Press and hold [L/-DEMO] until a demonstration of purchase. Listening operations A SLEEP CLOCK/ -AUTO OFF TIMER PLAY/ REC 1 2 3 DISC 4 5 6 ≥10 SLEEP -AUTO OFF 7 8 9 0 DISPLAY DIMMER PLAY MODE PROGRAM AUX TUNER TAPE CD / ALBUM /REW/ /FF/ CLEAR S SOUND EQ PRESET EQ MUTING VOLUME SLEEP -AUTO OFF B DEMO L/-DEMO A Auto-off function By remote control only When CD or tape is...
... at the time of the display is shown. Timers and others 23 RQT6530 When the unit is turned on ) To show a demonstration of the display Press and hold [L/-DEMO] until a demonstration of purchase. Listening operations A SLEEP CLOCK/ -AUTO OFF TIMER PLAY/ REC 1 2 3 DISC 4 5 6 ≥10 SLEEP -AUTO OFF 7 8 9 0 DISPLAY DIMMER PLAY MODE PROGRAM AUX TUNER TAPE CD / ALBUM /REW/ /FF/ CLEAR S SOUND EQ PRESET EQ MUTING VOLUME SLEEP -AUTO OFF B DEMO L/-DEMO A Auto-off function By remote control only When CD or tape is...

SAPM47 User Guide
Page 25
... cassette and tune to the radio station (\ page 10) or select the aux source (\ page 22: C ). 1 Press [CLOCK/TIMER] to set the play /record timer By remote control only The timer has two functions. The unit must be set time with the record timer. 5 21 31 SLEEP CLOCK/ -AUTO OFF TIMER PLAY/ REC 1 2 3 DISC 4 5 6 ≥10 7 8 9 0 DISPLAY DIMMER PLAY MODE PROGRAM AUX TUNER TAPE CD / ALBUM /REW/ /FF/ /CLEAR S SOUND EQ PRESET EQ MUTING VOLUME 1 22 32 4 1 CLOCK/ TIMER FOR PLAY TIMER FOR RECORD TIMER 2 4/REW/g 3/FF/f CLOCK/ TIMER 3 4/REW/g 3/FF/f CLOCK/ TIMER 4 PLAY...
... cassette and tune to the radio station (\ page 10) or select the aux source (\ page 22: C ). 1 Press [CLOCK/TIMER] to set the play /record timer By remote control only The timer has two functions. The unit must be set time with the record timer. 5 21 31 SLEEP CLOCK/ -AUTO OFF TIMER PLAY/ REC 1 2 3 DISC 4 5 6 ≥10 7 8 9 0 DISPLAY DIMMER PLAY MODE PROGRAM AUX TUNER TAPE CD / ALBUM /REW/ /FF/ /CLEAR S SOUND EQ PRESET EQ MUTING VOLUME 1 22 32 4 1 CLOCK/ TIMER FOR PLAY TIMER FOR RECORD TIMER 2 4/REW/g 3/FF/f CLOCK/ TIMER 3 4/REW/g 3/FF/f CLOCK/ TIMER 4 PLAY...

SAPM47 User Guide
Page 26
... finish time setting will not function. Note • If you want to playback or record from a connected unit, set the other unit's timer to put the unit on again while a timer is on the display. If you turn the unit off and on standby. Listening operations SLEEP CLOCK/ -AUTO OFF TIMER PLAY/ REC 1 2 3 DISC 4 5 6 ≥10 7 8 9 0 DISPLAY DIMMER PLAY MODE PROGRAM AUX TUNER TAPE CD / ALBUM /REW/ /FF/ /CLEAR S SOUND EQ PRESET EQ MUTING VOLUME CLOCK/ TIMER Using the timers Using the play timer) and music...
... finish time setting will not function. Note • If you want to playback or record from a connected unit, set the other unit's timer to put the unit on again while a timer is on the display. If you turn the unit off and on standby. Listening operations SLEEP CLOCK/ -AUTO OFF TIMER PLAY/ REC 1 2 3 DISC 4 5 6 ≥10 7 8 9 0 DISPLAY DIMMER PLAY MODE PROGRAM AUX TUNER TAPE CD / ALBUM /REW/ /FF/ /CLEAR S SOUND EQ PRESET EQ MUTING VOLUME CLOCK/ TIMER Using the timers Using the play timer) and music...
SAPM47 User Guide
Page 28
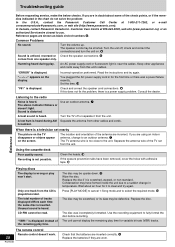
Troubleshooting guide Listening operations Before requesting service, make the below checks. Humming heard during AM Separate the antenna from the unit. "F61" is displayed. Set the time. : Check and correct the speaker cord connections. 6 If this unit's cables. If you . "VBR-" is displayed instead of the antenna are incorrect. The remote control Remote control doesn't work. 28 RQT6530 The disc may be upside down. # Wipe the disc. Press [PLAY MODE] to cancel 1-Song mode and to...
Troubleshooting guide Listening operations Before requesting service, make the below checks. Humming heard during AM Separate the antenna from the unit. "F61" is displayed. Set the time. : Check and correct the speaker cord connections. 6 If this unit's cables. If you . "VBR-" is displayed instead of the antenna are incorrect. The remote control Remote control doesn't work. 28 RQT6530 The disc may be upside down. # Wipe the disc. Press [PLAY MODE] to cancel 1-Song mode and to...
SAPM47 User Guide
Page 29
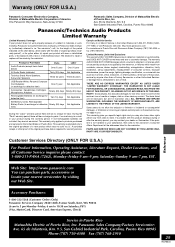
..., mishandling, misapplication, alteration, faulty installation, set-up adjustments, misadjustment of consumer controls, improper maintenance, power line surge, lightning damage, modification, or commercial use (such as in a hotel, office, restaurant, or other business), rental use of the product, service by the warrantor, or failures which are not warranted. Reference Web Site: http://www.panasonic.com You can purchase parts, accessories or locate your...
..., mishandling, misapplication, alteration, faulty installation, set-up adjustments, misadjustment of consumer controls, improper maintenance, power line surge, lightning damage, modification, or commercial use (such as in a hotel, office, restaurant, or other business), rental use of the product, service by the warrantor, or failures which are not warranted. Reference Web Site: http://www.panasonic.com You can purchase parts, accessories or locate your...


