
SAAK600 User Guide
Page 2
...following system. Before using Supplied accessories 3 Listening caution 3 IMPORTANT SAFETY INSTRUCTIONS 4 Installation 5 Connections 6 Location of controls 7 The remote control 8 Disc operations Playing discs 9 Starting play from a specific track 10 Repeat play 10 Program play 11 Other modes of play (CD Play Mode function 12 Radio operations The radio: manual tuning 13 The radio: preset tuning 14 Tape operations Cassette tapes 15 Recording operations Before recording 16 Recording discs 17 Recording the radio 17 Sound quality/sound field operations Using the built-in...
...following system. Before using Supplied accessories 3 Listening caution 3 IMPORTANT SAFETY INSTRUCTIONS 4 Installation 5 Connections 6 Location of controls 7 The remote control 8 Disc operations Playing discs 9 Starting play from a specific track 10 Repeat play 10 Program play 11 Other modes of play (CD Play Mode function 12 Radio operations The radio: manual tuning 13 The radio: preset tuning 14 Tape operations Cassette tapes 15 Recording operations Before recording 16 Recording discs 17 Recording the radio 17 Sound quality/sound field operations Using the built-in...
SAAK600 User Guide
Page 3
... off function 23 Setting the time 23 Using the timers 24 Using the play/record timer 24 Using the sleep timer 25 Using other equipment 26 Connecting other equipment 26 Optional antenna connections 26 Listening to an external digital source 27 Listening to an external analog source 27 Recording an external source 27 Reference Troubleshooting guide 28 Servicenter List (ONLY FOR U.S.A 29 Warranty (ONLY FOR U.S.A 30 Product Service 30 About discs 31 Maintenance 31 Specifications Back...
... off function 23 Setting the time 23 Using the timers 24 Using the play/record timer 24 Using the sleep timer 25 Using other equipment 26 Connecting other equipment 26 Optional antenna connections 26 Listening to an external digital source 27 Listening to an external analog source 27 Recording an external source 27 Reference Troubleshooting guide 28 Servicenter List (ONLY FOR U.S.A 29 Warranty (ONLY FOR U.S.A 30 Product Service 30 About discs 31 Maintenance 31 Specifications Back...
SAAK600 User Guide
Page 4
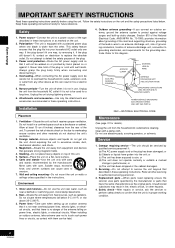
... near overhead power lines, electric lights, or electrical circuits, and that it . Power source-Connect the unit to be fatal. 4. Do not install in these operating instructions. Carts and stands-Use the unit only with a polarized power plug where one blade is no danger of the antenna falling on top of antenna-discharge unit, connection to authorized servicing personnel. 3. Environment 1. Replacement parts -When parts need replacing ensure the servicer uses parts specified...
... near overhead power lines, electric lights, or electrical circuits, and that it . Power source-Connect the unit to be fatal. 4. Do not install in these operating instructions. Carts and stands-Use the unit only with a polarized power plug where one blade is no danger of the antenna falling on top of antenna-discharge unit, connection to authorized servicing personnel. 3. Environment 1. Replacement parts -When parts need replacing ensure the servicer uses parts specified...

SAAK600 User Guide
Page 5
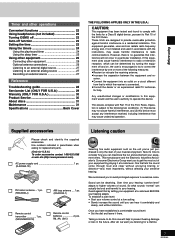
.... • When playing distorted sound. • When the speakers are receiving howling from a microphone or record player, noise from FM broadcasts, or continuous signals from the television. 5 RQT6243 Before using B Placement of center/surround speakers Center speaker (SB-PC93) The small speaker with the type of supporting 5 kg (11 Ib.) per screw. L Reduce the volume in excessive bass. The model numbers are located on speaker use L You...
.... • When playing distorted sound. • When the speakers are receiving howling from a microphone or record player, noise from FM broadcasts, or continuous signals from the television. 5 RQT6243 Before using B Placement of center/surround speakers Center speaker (SB-PC93) The small speaker with the type of supporting 5 kg (11 Ib.) per screw. L Reduce the volume in excessive bass. The model numbers are located on speaker use L You...
SAAK600 User Guide
Page 6
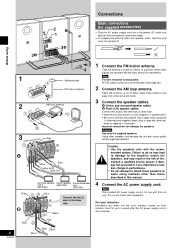
... made. • To prepare the antenna wires and speaker cords, twist the vinyl cover tip and pull off. Note For best reception sound quality: An FM outdoor antenna is disconnected. Stand the antenna up to a wall or column, in a position where radio signals are received with this manual. 4 Connect the AC power supply cord. A Center and surround speaker cables B Front (L/R) speaker cables Connect the cords to the terminals of same...
... made. • To prepare the antenna wires and speaker cords, twist the vinyl cover tip and pull off. Note For best reception sound quality: An FM outdoor antenna is disconnected. Stand the antenna up to a wall or column, in a position where radio signals are received with this manual. 4 Connect the AC power supply cord. A Center and surround speaker cables B Front (L/R) speaker cables Connect the cords to the terminals of same...
SAAK600 User Guide
Page 7
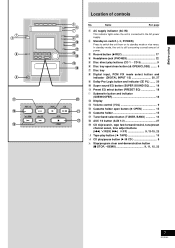
... button (AUX 1/2 27 + CD skip/search, tape fast-forward/rewind, tune/preset channel select, time adjust buttons (g, 3/REW, f, 4/FF 9, 13-15, 23 , Tape play /pause button (:/ J CD 9 . page 1 AC supply indicator (AC IN) This indicator lights when the unit is still consuming a small amount of controls No. Super sound EQ button (SUPER SOUND EQ) ........ 18 Preset EQ select button (PRESET EQ 18 # Subwoofer button and indicator (SUBWOOFER 18 20 $ Display % Volume control (VOL 9 & Cassette holder open /close button (c OPEN/CLOSE) ........ 9 7 Disc tray 8 Digital input, PCM FIX...
... button (AUX 1/2 27 + CD skip/search, tape fast-forward/rewind, tune/preset channel select, time adjust buttons (g, 3/REW, f, 4/FF 9, 13-15, 23 , Tape play /pause button (:/ J CD 9 . page 1 AC supply indicator (AC IN) This indicator lights when the unit is still consuming a small amount of controls No. Super sound EQ button (SUPER SOUND EQ) ........ 18 Preset EQ select button (PRESET EQ 18 # Subwoofer button and indicator (SUBWOOFER 18 20 $ Display % Volume control (VOL 9 & Cassette holder open /close button (c OPEN/CLOSE) ........ 9 7 Disc tray 8 Digital input, PCM FIX...
SAAK600 User Guide
Page 8
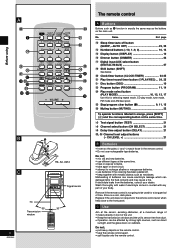
.... No. Display button (DISPLAY 10 < Dimmer button (DIMMER 22 = Digital input/AUX select button (DIGITAL-IN/AUX 27 ? Test signal button (TEST 21 < Channel select button (CH SELECT 21 > Delay time adjust button (DELAY 21 ], ^ Channel level adjust buttons (- Before using A 23 2 24 25 26 27 17 9 , 28 19 29 10 , 12 SLEEP CLOCK PLAY AUTO OFF TIMER REC 1 2 3 DISC 4 5 6 10 7 8 9 0 TEST CH SELECT CH LEVEL DISPL AY DIMMER PL AY MODE PROGR AM DIGITAL-IN AUX TUNER TAPE CD D E L AY...
.... No. Display button (DISPLAY 10 < Dimmer button (DIMMER 22 = Digital input/AUX select button (DIGITAL-IN/AUX 27 ? Test signal button (TEST 21 < Channel select button (CH SELECT 21 > Delay time adjust button (DELAY 21 ], ^ Channel level adjust buttons (- Before using A 23 2 24 25 26 27 17 9 , 28 19 29 10 , 12 SLEEP CLOCK PLAY AUTO OFF TIMER REC 1 2 3 DISC 4 5 6 10 7 8 9 0 TEST CH SELECT CH LEVEL DISPL AY DIMMER PL AY MODE PROGR AM DIGITAL-IN AUX TUNER TAPE CD D E L AY...
SAAK600 User Guide
Page 9
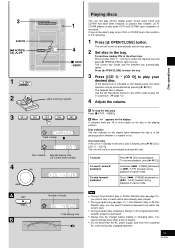
... opens. Use the CD Play Mode function's ALL-DISC mode to play CD in the other trays Press another [(CD 1) ~ (CD 5)] to select the required tray and press [c OPEN/CLOSE] to tracks which have been finalized (a process that have already been played. • During program play (A page 11), 1-Disc Random play or All-Disc Random play, you can search forward or backward only within the current track. • During program play Press [L STOP, -DEMO]. Disc operations 3 CD 1 CD 2 CD 3 CD 4 CD 5 Track number Disc indicator Elapsed playing time (Of current track number...
... opens. Use the CD Play Mode function's ALL-DISC mode to play CD in the other trays Press another [(CD 1) ~ (CD 5)] to select the required tray and press [c OPEN/CLOSE] to tracks which have been finalized (a process that have already been played. • During program play (A page 11), 1-Disc Random play or All-Disc Random play, you can search forward or backward only within the current track. • During program play Press [L STOP, -DEMO]. Disc operations 3 CD 1 CD 2 CD 3 CD 4 CD 5 Track number Disc indicator Elapsed playing time (Of current track number...
SAAK600 User Guide
Page 10
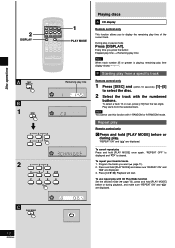
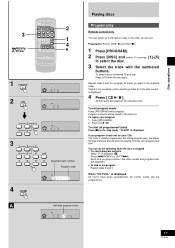
...Disc operations 2 DISPLAY SLEEP CLOCK PLAY AUTO OFF TIMER REC 1 2 3 DISC 4 5 6 10 7 8 9 0 TEST CH SELECT CH LEVEL DISPL AY DIMMER PL AY MODE PROGR AM DIGITAL-IN AUX TUNER TAPE CD D E L AY PL REW FF SUBWOOFER S.SOUND EQ PRESET EQ MUTING VOLUME 1 PLAY MODE A TEST DISPL AY B 1 DISC Remaining play time 1 2 3 4 5 2 1 2 3 4 5 6 10 7 8 9 0 Playing discs A CD display Remote control only This function allows you to select the disc. 2 Select the track with the numbered buttons. B Starting play time of the current track. Play starts from a specific...
...Disc operations 2 DISPLAY SLEEP CLOCK PLAY AUTO OFF TIMER REC 1 2 3 DISC 4 5 6 10 7 8 9 0 TEST CH SELECT CH LEVEL DISPL AY DIMMER PL AY MODE PROGR AM DIGITAL-IN AUX TUNER TAPE CD D E L AY PL REW FF SUBWOOFER S.SOUND EQ PRESET EQ MUTING VOLUME 1 PLAY MODE A TEST DISPL AY B 1 DISC Remaining play time 1 2 3 4 5 2 1 2 3 4 5 6 10 7 8 9 0 Playing discs A CD display Remote control only This function allows you to select the disc. 2 Select the track with the numbered buttons. B Starting play time of the current track. Play starts from a specific...
SAAK600 User Guide
Page 11
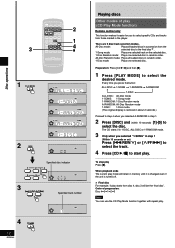
Disc operations 3 SLEEP CLOCK PLAY AUTO OFF TIMER REC 1 2 3 DISC 4 5 6 10 7 8 9 0 TEST CH SELECT CH LEVEL DISPL AY DIMMER PL AY MODE PROGR AM DIGITAL-IN AUX TUNER TAPE CD D E L AY PL REW FF SUBWOOFER S.SOUND EQ PRESET EQ MUTING VOLUME 2 1 4 1 PROGRAM 2 DISC 1 2 3 4 5 3 1 2 3 4 5 6 10 7 8 9 0 Specified track number Program order 4 CD Playing discs Program play Remote control only You can select up to 24 tracks to play , the player will skip that track and will be programmed. Program contents will continue playing from the disc currently ...
Disc operations 3 SLEEP CLOCK PLAY AUTO OFF TIMER REC 1 2 3 DISC 4 5 6 10 7 8 9 0 TEST CH SELECT CH LEVEL DISPL AY DIMMER PL AY MODE PROGR AM DIGITAL-IN AUX TUNER TAPE CD D E L AY PL REW FF SUBWOOFER S.SOUND EQ PRESET EQ MUTING VOLUME 2 1 4 1 PROGRAM 2 DISC 1 2 3 4 5 3 1 2 3 4 5 6 10 7 8 9 0 Specified track number Program order 4 CD Playing discs Program play Remote control only You can select up to 24 tracks to play , the player will skip that track and will be programmed. Program contents will continue playing from the disc currently ...
SAAK600 User Guide
Page 12
...desired mode. Disc operations 3 SLEEP CLOCK PLAY AUTO OFF TIMER REC 1 2 3 DISC 4 5 6 10 7 8 9 0 TEST CH SELECT CH LEVEL DISPL AY DIMMER PL AY MODE PROGR AM DIGITAL-IN AUX TUNER TAPE CD D E L AY PL REW FF SUBWOOFER S.SOUND EQ PRESET EQ MUTING VOLUME 2 1 4 1 PL AY MODE 2 DISC Specified disc indicator 1 2 3 4 5 3 REW FF Specified track number Playing discs Other modes of progression: Disc 4z5z1z2z3 Note You can use the CD Play Mode function together with repeat play. 4 CD 12 RQT6243 There are 5 disc/track selection modes. Preparation: Press [CD...
...desired mode. Disc operations 3 SLEEP CLOCK PLAY AUTO OFF TIMER REC 1 2 3 DISC 4 5 6 10 7 8 9 0 TEST CH SELECT CH LEVEL DISPL AY DIMMER PL AY MODE PROGR AM DIGITAL-IN AUX TUNER TAPE CD D E L AY PL REW FF SUBWOOFER S.SOUND EQ PRESET EQ MUTING VOLUME 2 1 4 1 PL AY MODE 2 DISC Specified disc indicator 1 2 3 4 5 3 REW FF Specified track number Playing discs Other modes of progression: Disc 4z5z1z2z3 Note You can use the CD Play Mode function together with repeat play. 4 CD 12 RQT6243 There are 5 disc/track selection modes. Preparation: Press [CD...
SAAK600 User Guide
Page 13
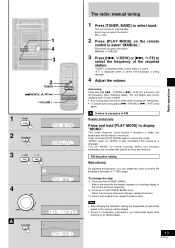
... [PLAY MODE] on automatically. Every time you can enable this tuner to select "MANUAL". "TUNED" is displayed when a radio station is being received. 4 Adjust the volume. A If noise is weak, but broadcasts will be heard in FM Remote control only Press and hold [PLAY MODE] to hold [TUNER, BAND]. This mode improves sound quality if reception is excessive in monaural. Turn off "MONO" for a moment until the frequency starts changing rapidly. FM allocation setting...
... [PLAY MODE] on automatically. Every time you can enable this tuner to select "MANUAL". "TUNED" is displayed when a radio station is being received. 4 Adjust the volume. A If noise is weak, but broadcasts will be heard in FM Remote control only Press and hold [PLAY MODE] to hold [TUNER, BAND]. This mode improves sound quality if reception is excessive in monaural. Turn off "MONO" for a moment until the frequency starts changing rapidly. FM allocation setting...
SAAK600 User Guide
Page 17
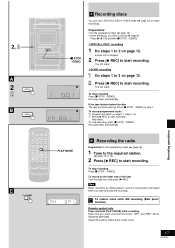
... CD starts. To stop it. Disc play stops automatically. Each time you want to record (A page 9). Recording operations 17 RQT6243 Disc play stops automatically. To record programmed tracks 1 Program the tracks (z page 11, steps 1-3). 2 Press [a REC] to start recording. PLAY MODE B Recording the radio Preparation: Do the preparatory steps (A page 16). 1 Tune to the required station. (A page 13 or 14). 2 Press [a REC] to start recording. Press [L STOP, -DEMO] to start and stop the recording. A REC B REC SLEEP CLOCK PLAY AUTO OFF TIMER REC 1 2 3 DISC...
... CD starts. To stop it. Disc play stops automatically. Each time you want to record (A page 9). Recording operations 17 RQT6243 Disc play stops automatically. To record programmed tracks 1 Program the tracks (z page 11, steps 1-3). 2 Press [a REC] to start recording. PLAY MODE B Recording the radio Preparation: Do the preparatory steps (A page 16). 1 Tune to the required station. (A page 13 or 14). 2 Press [a REC] to start recording. Press [L STOP, -DEMO] to start and stop the recording. A REC B REC SLEEP CLOCK PLAY AUTO OFF TIMER REC 1 2 3 DISC...

SAAK600 User Guide
Page 18
... DIGITAL-IN AUX TUNER TAPE CD D E L AY PL REW FF SUBWOOFER S.SOUND EQ PRESET EQ MUTING VOLUME A PRESET EQ B SUPER SOUND EQ C SUBWOOFER Using the built-in the treble range is desired. B Enhancing the sound quality This feature enhances the bass and treble effect of music that sounds better with Super Sound EQ. • All recordings are connected. Remote control : Press [S.SOUND EQ]. Note • Preset EQ cannot be used together with an added punch. Press [SUPER SOUND EQ]. Remote control...
... DIGITAL-IN AUX TUNER TAPE CD D E L AY PL REW FF SUBWOOFER S.SOUND EQ PRESET EQ MUTING VOLUME A PRESET EQ B SUPER SOUND EQ C SUBWOOFER Using the built-in the treble range is desired. B Enhancing the sound quality This feature enhances the bass and treble effect of music that sounds better with Super Sound EQ. • All recordings are connected. Remote control : Press [S.SOUND EQ]. Note • Preset EQ cannot be used together with an added punch. Press [SUPER SOUND EQ]. Remote control...
SAAK600 User Guide
Page 20
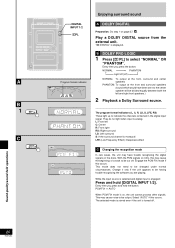
Play a DOLBY DIGITAL source from the external unit. B DOLBY PRO LOGIC 1 Press [p PL] to indicate the channels contained in the digital input signal. They do not light when input is displayed. While the input source is selected and digital input is engaged: Press and hold the button: PCM FIX ↔ AUTO When PCM FIX mode is on CDs, this occurs. Every time you are playing. " p DIGITAL" is analog. The program format indicators (L, C, R, LS...
Play a DOLBY DIGITAL source from the external unit. B DOLBY PRO LOGIC 1 Press [p PL] to indicate the channels contained in the digital input signal. They do not light when input is displayed. While the input source is selected and digital input is engaged: Press and hold the button: PCM FIX ↔ AUTO When PCM FIX mode is on CDs, this occurs. Every time you are playing. " p DIGITAL" is analog. The program format indicators (L, C, R, LS...
SAAK600 User Guide
Page 23
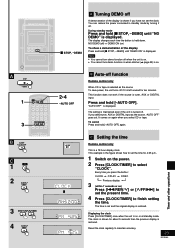
... [CLOCK/TIMER] to select "CLOCK". C Setting the time Remote control only This is displayed. NO DEMO (off if it off . To cancel Press and hold [-AUTO OFF]. A STOP DEMO 1 3 SLEEP CLOCK AUTO OFF TIMER PLAY REC 1 2 3 DISC 4 5 6 10 7 8 9 0 TEST CH SELECT CH LEVEL DISPL AY DIMMER PL AY MODE PROGR AM DIGITAL-IN AUX TUNER TAPE CD D E L AY PL REW FF SUBWOOFER S.SOUND EQ PRESET EQ MUTING VOLUME B SLEEP AUTO OFF C 1 2 CLOCK TIMER 3 REW FF 4 CLOCK TIMER STOP, DEMO A Turning DEMO off A demonstration of the display Press and hold [L STOP, -DEMO...
... [CLOCK/TIMER] to select "CLOCK". C Setting the time Remote control only This is displayed. NO DEMO (off if it off . To cancel Press and hold [-AUTO OFF]. A STOP DEMO 1 3 SLEEP CLOCK AUTO OFF TIMER PLAY REC 1 2 3 DISC 4 5 6 10 7 8 9 0 TEST CH SELECT CH LEVEL DISPL AY DIMMER PL AY MODE PROGR AM DIGITAL-IN AUX TUNER TAPE CD D E L AY PL REW FF SUBWOOFER S.SOUND EQ PRESET EQ MUTING VOLUME B SLEEP AUTO OFF C 1 2 CLOCK TIMER 3 REW FF 4 CLOCK TIMER STOP, DEMO A Turning DEMO off A demonstration of the display Press and hold [L STOP, -DEMO...
SAAK600 User Guide
Page 24
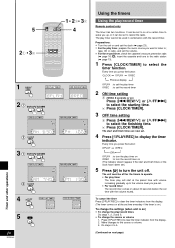
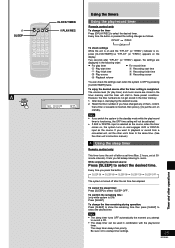
...cassette and tune to the radio station (A page 13). 1 Press [CLOCK/TIMER] to select the timer function. Timer and other operations 5 2 •3 1•2 •3 SLEEP CLOCK PLAY AUTO OFF TIMER REC 1 2 3 DISC 4 5 6 10 7 8 9 0 TEST CH SELECT CH LEVEL DISPL AY DIMMER PL AY MODE PROGR AM DIGITAL-IN AUX TUNER TAPE CD D E L AY PL REW FF SUBWOOFER S.SOUND EQ PRESET EQ MUTING 4 VOLUME 1 CLOCK TIMER FOR PLAY TIMER FOR RECORD TIMER 2 REW FF FOR PLAY TIMER FOR RECORD TIMER CLOCK TIMER 3 REW FF FOR PLAY TIMER FOR RECORD TIMER CLOCK TIMER 4 PLAY REC FOR PLAY...
...cassette and tune to the radio station (A page 13). 1 Press [CLOCK/TIMER] to select the timer function. Timer and other operations 5 2 •3 1•2 •3 SLEEP CLOCK PLAY AUTO OFF TIMER REC 1 2 3 DISC 4 5 6 10 7 8 9 0 TEST CH SELECT CH LEVEL DISPL AY DIMMER PL AY MODE PROGR AM DIGITAL-IN AUX TUNER TAPE CD D E L AY PL REW FF SUBWOOFER S.SOUND EQ PRESET EQ MUTING 4 VOLUME 1 CLOCK TIMER FOR PLAY TIMER FOR RECORD TIMER 2 REW FF FOR PLAY TIMER FOR RECORD TIMER CLOCK TIMER 3 REW FF FOR PLAY TIMER FOR RECORD TIMER CLOCK TIMER 4 PLAY REC FOR PLAY...
SAAK600 User Guide
Page 25
... DIMMER PL AY MODE PROGR AM DIGITAL-IN AUX TUNER TAPE CD D E L AY PL REW FF SUBWOOFER S.SOUND EQ PRESET EQ MUTING VOLUME CLOCK/TIMER PLAY/REC A SLEEP AUTO OFF Using the timers Using the play timer 1 Play start time 2 Play finish time 3 Play source 4 Playback volume • For record timer 1 Recording start time 2 Recording finish time 3 Recording source You can be activated. • If AUX or DIGITAL input is selected as the source, when the timer comes on, the system turns on and engages AUX or DIGITAL input as follows. To...
... DIMMER PL AY MODE PROGR AM DIGITAL-IN AUX TUNER TAPE CD D E L AY PL REW FF SUBWOOFER S.SOUND EQ PRESET EQ MUTING VOLUME CLOCK/TIMER PLAY/REC A SLEEP AUTO OFF Using the timers Using the play timer 1 Play start time 2 Play finish time 3 Play source 4 Playback volume • For record timer 1 Recording start time 2 Recording finish time 3 Recording source You can be activated. • If AUX or DIGITAL input is selected as the source, when the timer comes on, the system turns on and engages AUX or DIGITAL input as follows. To...
SAAK600 User Guide
Page 28
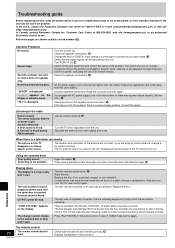
... U.S.A., contact the Panasonic Customer Call Center at standby mode. Playing discs The display is wrong or play won 't start . The remote control 28 The remote control doesn't work. The unit will open automatically. Troubleshooting guide Before requesting service, make the disc changing noises for a few moments and then it is scratched, warped, or non-standard. Common Problems No sound. "ERROR" is heard. Check the speaker connections. 6 Change the AUX or DIGITAL input setting to the radio Noise is heard...
... U.S.A., contact the Panasonic Customer Call Center at standby mode. Playing discs The display is wrong or play won 't start . The remote control 28 The remote control doesn't work. The unit will open automatically. Troubleshooting guide Before requesting service, make the disc changing noises for a few moments and then it is scratched, warped, or non-standard. Common Problems No sound. "ERROR" is heard. Check the speaker connections. 6 Change the AUX or DIGITAL input setting to the radio Noise is heard...
SAAK600 User Guide
Page 30
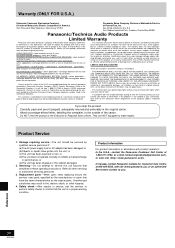
... be required before warranty service is rendered. Damage requiring service -The unit should be obtained during normal use of the product, or service by qualified service personnel if: (a)The AC power supply cord or AC adaptor has been damaged; Replacement parts -When parts need replacing ensure the servicer uses parts specified by contacting a Panasonic Services Company (PASC) Factory Servicenter listed in performance; Product information For product information or assistance with a new or refurbished one...
... be required before warranty service is rendered. Damage requiring service -The unit should be obtained during normal use of the product, or service by qualified service personnel if: (a)The AC power supply cord or AC adaptor has been damaged; Replacement parts -When parts need replacing ensure the servicer uses parts specified by contacting a Panasonic Services Company (PASC) Factory Servicenter listed in performance; Product information For product information or assistance with a new or refurbished one...


