
RXEX1 User Guide
Page 2
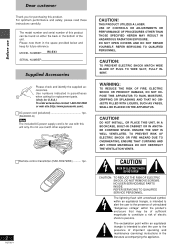
... of the unit. AC power cord (polarized 1pc. (RJA0065-A) Note The included AC power supply cord is intended to alert the user to the presence of electric shock to constitute a risk of important operating and maintenance (servicing) instructions in the literature accompanying the appliance. THIS PRODUCT UTILIZES A LASER. CAUTION: TO PREVENT ELECTRIC SHOCK MATCH WIDE BLADE OF PLUG TO WIDE SLOT, FULLY...
... of the unit. AC power cord (polarized 1pc. (RJA0065-A) Note The included AC power supply cord is intended to alert the user to the presence of electric shock to constitute a risk of important operating and maintenance (servicing) instructions in the literature accompanying the appliance. THIS PRODUCT UTILIZES A LASER. CAUTION: TO PREVENT ELECTRIC SHOCK MATCH WIDE BLADE OF PLUG TO WIDE SLOT, FULLY...
RXEX1 User Guide
Page 3
... INSTRUCTIONS 4 Use of batteries 5 Power Sources 6 Memory Back-up Batteries 6 Location of Controls 7 The Remote Control 8 Setting the Time 9 Using Headphones 9 Maintenance 9 Listening CDs 10 The Radio: manual tuning 13 The Radio: preset tuning 14 Cassettes 15 Recording Before Recording 15 Recording CDs 16 Recording the Radio 18 Sound Quality Harmonic Enhancer Sound 18 3D sound with the Sound Virtualizer 18 Sound Quality 18 Timer Using the Timer 19 The Sleep Timer 20 The Timer Fader 20 Reference Warranty (U.S.A 21 Troubleshooting 22 Specifications 22 Product Service...
... INSTRUCTIONS 4 Use of batteries 5 Power Sources 6 Memory Back-up Batteries 6 Location of Controls 7 The Remote Control 8 Setting the Time 9 Using Headphones 9 Maintenance 9 Listening CDs 10 The Radio: manual tuning 13 The Radio: preset tuning 14 Cassettes 15 Recording Before Recording 15 Recording CDs 16 Recording the Radio 18 Sound Quality Harmonic Enhancer Sound 18 3D sound with the Sound Virtualizer 18 Sound Quality 18 Timer Using the Timer 19 The Sleep Timer 20 The Timer Fader 20 Reference Warranty (U.S.A 21 Troubleshooting 22 Specifications 22 Product Service...
RXEX1 User Guide
Page 4
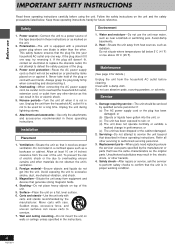
... as this unit. 5. Overloading-When connecting the AC power supply cord, be used for a long time. Stacking-Do not place heavy objects on or against it is not in these operating instructions carefully before cleaning. or (b) Objects or liquids have the same characteristics as the original parts. Magnetism-Situate the unit away from the rear of the plug. 3. Heat-Situate the unit...
... as this unit. 5. Overloading-When connecting the AC power supply cord, be used for a long time. Stacking-Do not place heavy objects on or against it is not in these operating instructions carefully before cleaning. or (b) Objects or liquids have the same characteristics as the original parts. Magnetism-Situate the unit away from the rear of the plug. 3. Heat-Situate the unit...
RXEX1 User Guide
Page 6
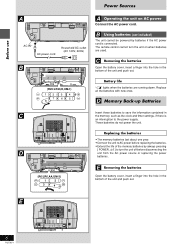
... life of the memory batteries by batteries if the AC power cord is an interruption to turn the unit on AC power Connect the AC power cord. Using batteries (not included) The unit cannot be powered by always pressing [ POWER, ] to the power supply. The remote control cannot turn the unit off before disconnecting the unit from the AC power source or replacing the power batteries. 1 2 3 4 Removing the batteries Open the battery cover, insert a finger...
... life of the memory batteries by batteries if the AC power cord is an interruption to turn the unit on AC power Connect the AC power cord. Using batteries (not included) The unit cannot be powered by always pressing [ POWER, ] to the power supply. The remote control cannot turn the unit off before disconnecting the unit from the AC power source or replacing the power batteries. 1 2 3 4 Removing the batteries Open the battery cover, insert a finger...
RXEX1 User Guide
Page 7
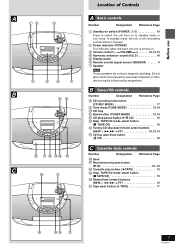
... sound (H.E.S 18 Display panel Remote control signal sensor (SENSOR 8 Speaker These speakers do not have magnetic shielding. Do not place them near televisions, personal computers or other devices easily influenced by magnetism. Tuner/CD controls Number Designation Reference Page CD recording mode button (CD REC MODE 17 Tune mode (TUNE MODE 13,14 CD Tray Band button (TUNER BAND 13,14 CD play/pause button ( CD 10 Stop, TAPE/CD mode select button ( TAPE/CD 10 Tuning/CD skip/search/track select buttons (REW/-/ /+/FF 10,13,14 CD tray open/close button ( CD 10 Cassette...
... sound (H.E.S 18 Display panel Remote control signal sensor (SENSOR 8 Speaker These speakers do not have magnetic shielding. Do not place them near televisions, personal computers or other devices easily influenced by magnetism. Tuner/CD controls Number Designation Reference Page CD recording mode button (CD REC MODE 17 Tune mode (TUNE MODE 13,14 CD Tray Band button (TUNER BAND 13,14 CD play/pause button ( CD 10 Stop, TAPE/CD mode select button ( TAPE/CD 10 Tuning/CD skip/search/track select buttons (REW/-/ /+/FF 10,13,14 CD tray open/close button ( CD 10 Cassette...
RXEX1 User Guide
Page 8
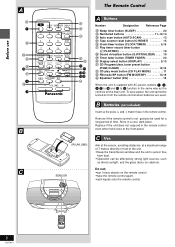
... Page Sleep timer button (SLEEP 20 Numbered buttons 11-12,14 Auto scan button (AUTO SCAN 13 Tape counter reset button (C-RESET 15 Clock/timer button (CLOCK/TIMER 9,19 Play timer/ record timer button ( PLAY/REC 19 Sound virtualizer button (S.VIRTUALIZER) . . . . 18 Timer fader button (TIMER FADER 20 Display select button (DISPLAY 9,15 CD Program/clear, tuner preset button (PGM/-CLEAR 12,14 CD play mode button (CD PLAY MODE 11 FM mode BP button (FM MODE/BP 13,18 Equalizer button (EQ 18 When the unit is not going to be turned on from dust. •Operation can...
... Page Sleep timer button (SLEEP 20 Numbered buttons 11-12,14 Auto scan button (AUTO SCAN 13 Tape counter reset button (C-RESET 15 Clock/timer button (CLOCK/TIMER 9,19 Play timer/ record timer button ( PLAY/REC 19 Sound virtualizer button (S.VIRTUALIZER) . . . . 18 Timer fader button (TIMER FADER 20 Display select button (DISPLAY 9,15 CD Program/clear, tuner preset button (PGM/-CLEAR 12,14 CD play mode button (CD PLAY MODE 11 FM mode BP button (FM MODE/BP 13,18 Equalizer button (EQ 18 When the unit is not going to be turned on from dust. •Operation can...
RXEX1 User Guide
Page 9
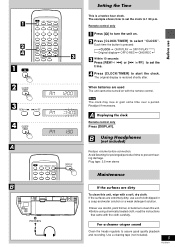
...;Never use Setting the Time This is a twelve hour clock. For a cleaner crisper sound Clean the heads regularly to prevent hearing damage. When batteries are dirty To clean this unit. •Before using chemically treated cloth, read the instructions that came with the remote control. The example shows how to set the Press [CLOCK/TIMER] to start the clock. Remote control only Press [ ] to select "CLOCK". Press [CLOCK/TIMER] to turn the...
...;Never use Setting the Time This is a twelve hour clock. For a cleaner crisper sound Clean the heads regularly to prevent hearing damage. When batteries are dirty To clean this unit. •Before using chemically treated cloth, read the instructions that came with the remote control. The example shows how to set the Press [CLOCK/TIMER] to start the clock. Remote control only Press [ ] to select "CLOCK". Press [CLOCK/TIMER] to turn the...
RXEX1 User Guide
Page 10
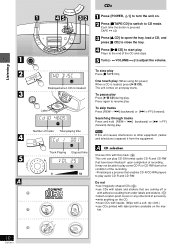
... can play audio CD-R and CD-RW. CD selection Choose CDs with label printers available on and play (When using AC power) When a CD is pressed TAPE CD Press [/ CD] to open the tray, load a CD, and press [/ CD] to CD mode. Turn [- "VOLUME#+] to turn the unit on. One touch play starts. Listening CDs Press [POWER, ] to adjust the volume. Plays to resume play . Press again to the end of accessory. •write anything on the CD. •clean CDs with...
... can play audio CD-R and CD-RW. CD selection Choose CDs with label printers available on and play (When using AC power) When a CD is pressed TAPE CD Press [/ CD] to open the tray, load a CD, and press [/ CD] to CD mode. Turn [- "VOLUME#+] to turn the unit on. One touch play starts. Listening CDs Press [POWER, ] to adjust the volume. Plays to resume play . Press again to the end of accessory. •write anything on the CD. •clean CDs with...
RXEX1 User Guide
Page 11
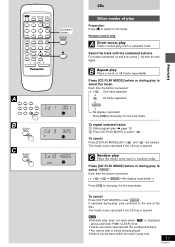
... [ ] to switch to CD mode. To repeat selected tracks Start program play to tracks already played. •Search can be selected with the numbered buttons. If canceled during play ( page 12). Press [CD PLAY MODE] to clear " ". The mode is also cancelled if the CD tray is opened . •Random play does not work when " " is pressed No display (cancelled) Press [CD] to the end of play to select " ". Remote control only Direct access play Starts normal play continues...
... [ ] to switch to CD mode. To repeat selected tracks Start program play to tracks already played. •Search can be selected with the numbered buttons. If canceled during play ( page 12). Press [CD PLAY MODE] to clear " ". The mode is also cancelled if the CD tray is opened . •Random play does not work when " " is pressed No display (cancelled) Press [CD] to the end of play to select " ". Remote control only Direct access play Starts normal play continues...
RXEX1 User Guide
Page 12
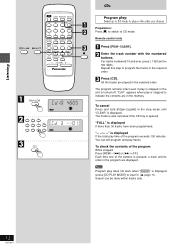
... time one of the buttons is stopped to indicate the contents are played in the order you choose Preparation: Press [ ] to switch to CD mode. For tracks numbered 10 and over, press [ 10] then the two digits. The mode is also canceled if the CD tray is displayed If more than 36 tracks have been programmed. Enter the track number with the numbered buttons. Press [CD]. "FULL" is opened. Program play does not work when...
... time one of the buttons is stopped to indicate the contents are played in the order you choose Preparation: Press [ ] to switch to CD mode. For tracks numbered 10 and over, press [ 10] then the two digits. The mode is also canceled if the CD tray is displayed If more than 36 tracks have been programmed. Enter the track number with the numbered buttons. Press [CD]. "FULL" is opened. Program play does not work when...
RXEX1 User Guide
Page 13
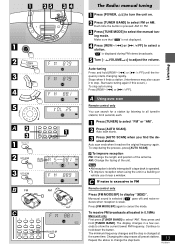
... 7 8 9 0 AUTO SCAN C-RESET FM MODE BP CD PLAY MODE CLOCK TIMER TAPE TUNER CD P 1 PGM FADER SLEEP REC RANDOM EQ ON ALL1-REC ST MONO The Radio: manual tuning Press [POWER, ] to select "FM" or "AM". Each time the button is not displayed. Make sure that " " is pressed: AM FM Press [TUNE MODE] to stop auto-tuning Press [REW/-/ ] or [ /+/FF]. Turn [- Start auto-tuning again if this occurs.) To stop . s1 Press [TUNER] to turn the unit on. Auto scan...
... 7 8 9 0 AUTO SCAN C-RESET FM MODE BP CD PLAY MODE CLOCK TIMER TAPE TUNER CD P 1 PGM FADER SLEEP REC RANDOM EQ ON ALL1-REC ST MONO The Radio: manual tuning Press [POWER, ] to select "FM" or "AM". Each time the button is not displayed. Make sure that " " is pressed: AM FM Press [TUNE MODE] to stop auto-tuning Press [REW/-/ ] or [ /+/FF]. Turn [- Start auto-tuning again if this occurs.) To stop . s1 Press [TUNER] to turn the unit on. Auto scan...
RXEX1 User Guide
Page 14
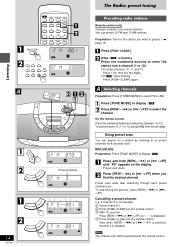
... the remote control. Main unit only Preparation: Press [TUNE MODE] to 12). Select channel 3. With 10 seconds Press [REW/-/ ] or [ /+/FF] so "-- --" is simpler if you preset stations. Press [PGM/ CLEAR] on the remote control. The channel can preset 12 FM and 12 AM stations. To stop during the process, press [REW/-/ ] or [ / +/FF] Cancelling a preset channel e.g. On the remote control Press the numbered button(s) to select the channel (1 to display...
... the remote control. Main unit only Preparation: Press [TUNE MODE] to 12). Select channel 3. With 10 seconds Press [REW/-/ ] or [ /+/FF] so "-- --" is simpler if you preset stations. Press [PGM/ CLEAR] on the remote control. The channel can preset 12 FM and 12 AM stations. To stop during the process, press [REW/-/ ] or [ / +/FF] Cancelling a preset channel e.g. On the remote control Press the numbered button(s) to select the channel (1 to display...
RXEX1 User Guide
Page 15
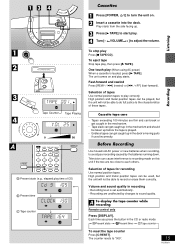
... MONO Recording To stop play , then press [0 TAPE]. Press [3 TAPE] to play . High position and metal position tapes can be used incorrectly. Each time you press the button in the mechanism and should be able to sound quality. Play starts from the side facing up in the CD or radio mode: To reset the tape counter Press [C-RESET]. Selection of these tapes. To display the tape counter while recording Remote control only Press [DISPLAY]. Insert a cassette...
... MONO Recording To stop play , then press [0 TAPE]. Press [3 TAPE] to play . High position and metal position tapes can be used incorrectly. Each time you press the button in the mechanism and should be able to sound quality. Play starts from the side facing up in the CD or radio mode: To reset the tape counter Press [C-RESET]. Selection of these tapes. To display the tape counter while recording Remote control only Press [DISPLAY]. Insert a cassette...
RXEX1 User Guide
Page 16
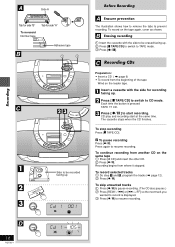
... "B" To re-record Normal tape Tab for recording facing up . Each time the button is displayed. Press [ ] to be recorded facing up PLAY 1 PGM RE FADER SLEEP REC RANDOM EQ ON ALL1-REC ST MONO Before Recording Erasure prevention The illustration shows how to remove the tabs to record is pressed TAPE CD. To stop recording Press [ TAPE/CD]. To record selected tracks Do step and , program the tracks ( page...
... "B" To re-record Normal tape Tab for recording facing up . Each time the button is displayed. Press [ ] to be recorded facing up PLAY 1 PGM RE FADER SLEEP REC RANDOM EQ ON ALL1-REC ST MONO Before Recording Erasure prevention The illustration shows how to remove the tabs to record is pressed TAPE CD. To stop recording Press [ TAPE/CD]. To record selected tracks Do step and , program the tracks ( page...
RXEX1 User Guide
Page 17
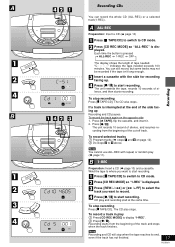
... record, but some tracks may not be recorded if the tape isn't long enough. Press [CD REC MODE] so "ALL-REC" is displayed. "C indicates the tape needed . You can record the whole CD (ALL-REC) or a selected track(1-REC). Insert a cassette with repeat or random play Press [CD REC MODE] to CD mode. To record the track again on page 12). Press [ ]. Press [CD REC MODE] so "1-REC" is displayed. To stop recording Press [ TAPE/CD]. The CD also stops. Recording...
... record, but some tracks may not be recorded if the tape isn't long enough. Press [CD REC MODE] so "ALL-REC" is displayed. "C indicates the tape needed . You can record the whole CD (ALL-REC) or a selected track(1-REC). Insert a cassette with repeat or random play Press [CD REC MODE] to CD mode. To record the track again on page 12). Press [ ]. Press [CD REC MODE] so "1-REC" is displayed. To stop recording Press [ TAPE/CD]. The CD also stops. Recording...
RXEX1 User Guide
Page 18
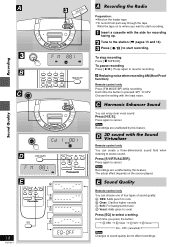
... 7 8 9 0 AUTO SCAN C-RESET FM MODE BP CD PLAY MODE CLOCK TIMER TAPE TUNER CD PLAY REW FF EQ ON ALL1-REC ST MONO Sound Quality Recording PLAY RE FADER SLEEP 1 REC PLAY 1 PGM RE FADER SLEEP REC RANDOM EQ ON ALL1-REC ST MONO EQ ON ALL1-REC ST PLAY REC REW FF H.E.S. S.VIRTUALIZER EQ VOLUME PORTABLE STEREO CD SYSTEM PLAY REC REW FF H.E.S. S.VIRTUALIZER EQ VOLUME PORTABLE STEREO CD SYSTEM RAK-RX979WK 18 RQT5671 Recording the Radio...
... 7 8 9 0 AUTO SCAN C-RESET FM MODE BP CD PLAY MODE CLOCK TIMER TAPE TUNER CD PLAY REW FF EQ ON ALL1-REC ST MONO Sound Quality Recording PLAY RE FADER SLEEP 1 REC PLAY 1 PGM RE FADER SLEEP REC RANDOM EQ ON ALL1-REC ST MONO EQ ON ALL1-REC ST PLAY REC REW FF H.E.S. S.VIRTUALIZER EQ VOLUME PORTABLE STEREO CD SYSTEM PLAY REC REW FF H.E.S. S.VIRTUALIZER EQ VOLUME PORTABLE STEREO CD SYSTEM RAK-RX979WK 18 RQT5671 Recording the Radio...
RXEX1 User Guide
Page 19
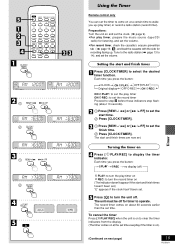
... recording facing up (play timer on REC: to turn the record timer on ). Turning the timer on at a certain time to wake you press the button: CLOCK ON PLAY OFF PLAY Original display OFF REC ON REC ON PLAY: to set the play timer, prepare the music source (tape/CD/ radio) for timer to step before these indicators stop flashing (about 30 seconds earlier than the set . SLEEP TIMER FADER DISPLAY 1 2 3 PGM CLEAR 4 5 6 10 7 8 9 0 AUTO SCAN C-RESET FM MODE BP CD PLAY MODE CLOCK TIMER TAPE TUNER CD PLAY...
... recording facing up (play timer on REC: to turn the record timer on ). Turning the timer on at a certain time to wake you press the button: CLOCK ON PLAY OFF PLAY Original display OFF REC ON REC ON PLAY: to set the play timer, prepare the music source (tape/CD/ radio) for timer to step before these indicators stop flashing (about 30 seconds earlier than the set . SLEEP TIMER FADER DISPLAY 1 2 3 PGM CLEAR 4 5 6 10 7 8 9 0 AUTO SCAN C-RESET FM MODE BP CD PLAY MODE CLOCK TIMER TAPE TUNER CD PLAY...
RXEX1 User Guide
Page 21
... replace this product with this product that is extended only to : Panasonic Services Company - Friday 9 am - 7 pm, EST. Web Site: http://www.panasonic.com You can purchase parts, accessories or locate your satisfaction, then write to you can be responsible for ten consumer controls, improper operation or maintenance, improper antenna, inadequate signal reception or pickup, alteration, modification, power line surge, improper voltage supply...
... replace this product with this product that is extended only to : Panasonic Services Company - Friday 9 am - 7 pm, EST. Web Site: http://www.panasonic.com You can purchase parts, accessories or locate your satisfaction, then write to you can be responsible for ten consumer controls, improper operation or maintenance, improper antenna, inadequate signal reception or pickup, alteration, modification, power line surge, improper voltage supply...
RXEX1 User Guide
Page 22
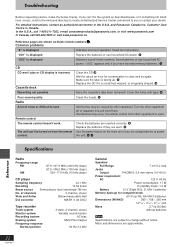
... are subject to change without batteries Specifications are using batteries to power control. Cover the holes with tape. 9 Clean the heads. Common problems "E" is displayed "UO1" is incorrect Cassette deck Recording not possible Poor sound quality 6 Batteries haven't been inserted. Reference Specifications Radio Frequency range FM AM 87.9-107.9 MHz (200 kHz steps) 87.5-108.0 MHz (100 kHz steps) 520-1710 kHz (10 kHz steps) CD player Sampling frequency 44.1 kHz...
... are subject to change without batteries Specifications are using batteries to power control. Cover the holes with tape. 9 Clean the heads. Common problems "E" is displayed "UO1" is incorrect Cassette deck Recording not possible Poor sound quality 6 Batteries haven't been inserted. Reference Specifications Radio Frequency range FM AM 87.9-107.9 MHz (200 kHz steps) 87.5-108.0 MHz (100 kHz steps) 520-1710 kHz (10 kHz steps) CD player Sampling frequency 44.1 kHz...
RXEX1 User Guide
Page 23
...://www.panasonic.com). Damage requiring service-The unit should be reached. or (c) The unit has been exposed to you can be serviced by the manufacturer or parts that described in the continental U.S.A. Replacement parts-When parts need replacing ensure the servicer uses parts specified by qualified service personnel if: (a) The AC power supply cord or AC adaptor has been damaged; Safety check-After repairs or service, ask the servicer to...
...://www.panasonic.com). Damage requiring service-The unit should be reached. or (c) The unit has been exposed to you can be serviced by the manufacturer or parts that described in the continental U.S.A. Replacement parts-When parts need replacing ensure the servicer uses parts specified by qualified service personnel if: (a) The AC power supply cord or AC adaptor has been damaged; Safety check-After repairs or service, ask the servicer to...


