
Digital Video Camera - English/ Spanish
Page 1
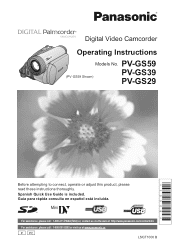
Spanish Quick Use Guide is included. For assistance, please call : 1-800-211-PANA(7262) or, contact us via the web at: http://www.panasonic.com/contactinfo For assistance, please call : 1-800-561-5505 or visit us at www.panasonic.ca P PC LSQT1000 B Guía para rápida consulta en español está incluida. PV-GS59 (PV-GS59 Shown) PV-GS39 PV-GS29 Before attempting to connect, operate or adjust this product, please read these instructions thoroughly. Digital Video Camcorder Operating Instructions Models No.
Spanish Quick Use Guide is included. For assistance, please call : 1-800-211-PANA(7262) or, contact us via the web at: http://www.panasonic.com/contactinfo For assistance, please call : 1-800-561-5505 or visit us at www.panasonic.ca P PC LSQT1000 B Guía para rápida consulta en español está incluida. PV-GS59 (PV-GS59 Shown) PV-GS39 PV-GS29 Before attempting to connect, operate or adjust this product, please read these instructions thoroughly. Digital Video Camcorder Operating Instructions Models No.
Digital Video Camera - English/ Spanish
Page 2
... record and play back in a well ventilated place; Date of the most sophisticated and reliable products on the appliance bottom cover. Your Camcorder is on the tag located on the right. do not install this manual as a bookcase or similar unit. The serial number is ... to retain this equipment in a confined space such as your convenient Camcorder information source. Serial No. Therefore, it in Standard Play (SP) mode and Long (LP) mode. You have been tested and inspected for choosing Panasonic! Model No. Therefore, it will bring you for use , operate...
... record and play back in a well ventilated place; Date of the most sophisticated and reliable products on the appliance bottom cover. Your Camcorder is on the tag located on the right. do not install this manual as a bookcase or similar unit. The serial number is ... to retain this equipment in a confined space such as your convenient Camcorder information source. Serial No. Therefore, it in Standard Play (SP) mode and Long (LP) mode. You have been tested and inspected for choosing Panasonic! Model No. Therefore, it will bring you for use , operate...
Digital Video Camera - English/ Spanish
Page 5
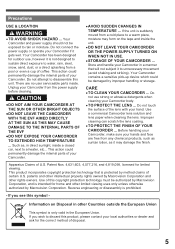
... CAUSE DAMAGE TO THE INTERNAL PARTS OF THE EVF ●DO NOT EXPOSE YOUR CAMCORDER TO EXTENDED HIGH TEMPERATURE ... CARE ● TO CLEAN YOUR CAMCORDER ... Before handling your Camcorder, make sure your Camcorder. ● AVOID SUDDEN CHANGES IN TEMPERATURE ... Reverse engineering or disassembly is suddenly ...hand. There are free from any chemical products, such as suntan lotion, as , in the European Union. Use a commercial Camcorder lens solution and lens paper when cleaning the lens. This product incorporates copyright protection technology that will not subject it to discard ...
... CAUSE DAMAGE TO THE INTERNAL PARTS OF THE EVF ●DO NOT EXPOSE YOUR CAMCORDER TO EXTENDED HIGH TEMPERATURE ... CARE ● TO CLEAN YOUR CAMCORDER ... Before handling your Camcorder, make sure your Camcorder. ● AVOID SUDDEN CHANGES IN TEMPERATURE ... Reverse engineering or disassembly is suddenly ...hand. There are free from any chemical products, such as suntan lotion, as , in the European Union. Use a commercial Camcorder lens solution and lens paper when cleaning the lens. This product incorporates copyright protection technology that will not subject it to discard ...
Digital Video Camera - English/ Spanish
Page 9
...For PV-GS39/PV-GS59 32 Recording Yourself 33 Recording with the Built-in LED Video Light .........33 Quick Start 34 Self-timer Recording (For PV-GS39/PV-GS59)....35 Zoom In/Out Functions 35 Digital Zoom Function 36 Image Stabilizer Function 36 Fade In/Out Functions 37 Backlight Compensation ... VCR (Dubbing 54 Using the DV Cable for Recording (Digital Dubbing 54 PC Connection With DV Interface Cable 55 With a PC Using Camcorder with a PC 56 Using the USB Function 56 To disconnect USB cable safely 59 Using as a Web Camera 60 Using the Motion Picture Editing Software (PV-GS59 Only ...
...For PV-GS39/PV-GS59 32 Recording Yourself 33 Recording with the Built-in LED Video Light .........33 Quick Start 34 Self-timer Recording (For PV-GS39/PV-GS59)....35 Zoom In/Out Functions 35 Digital Zoom Function 36 Image Stabilizer Function 36 Fade In/Out Functions 37 Backlight Compensation ... VCR (Dubbing 54 Using the DV Cable for Recording (Digital Dubbing 54 PC Connection With DV Interface Cable 55 With a PC Using Camcorder with a PC 56 Using the USB Function 56 To disconnect USB cable safely 59 Using as a Web Camera 60 Using the Motion Picture Editing Software (PV-GS59 Only ...
Digital Video Camera - English/ Spanish
Page 10
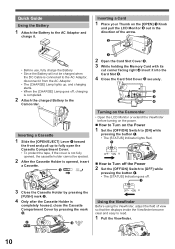
...the [OFF/ON] Switch to [OFF] while pressing the button 1 . • The [STATUS] Indicator goes off , charging is completed. 2 Attach the charged Battery to the Camcorder. Inserting a Cassette 1 Slide the [OPEN/EJECT] Lever 1 toward the front and pull up , and charging starts. • When the [CHARGE] Lamp goes off . 1... with its cut corner facing right 4 insert it into the Card Slot 5 . 4 Close the Card Slot Cover 3 securely. 5 3 4 Turning on the Camcorder • Open the LCD Monitor or extend the Viewfinder before turning on the power. „ How to Turn on the [OPEN] 1 Knob and pull the...
...the [OFF/ON] Switch to [OFF] while pressing the button 1 . • The [STATUS] Indicator goes off , charging is completed. 2 Attach the charged Battery to the Camcorder. Inserting a Cassette 1 Slide the [OPEN/EJECT] Lever 1 toward the front and pull up , and charging starts. • When the [CHARGE] Lamp goes off . 1... with its cut corner facing right 4 insert it into the Card Slot 5 . 4 Close the Card Slot Cover 3 securely. 5 3 4 Turning on the Camcorder • Open the LCD Monitor or extend the Viewfinder before turning on the power. „ How to Turn on the [OPEN] 1 Knob and pull the...

Digital Video Camera - English/ Spanish
Page 12
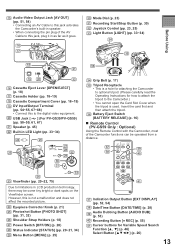
... 3) AV Cable (pp. 51, 54) 4) Shoulder Strap (p. 18) 5) USB Cable and CD-ROM (pp. 56, 58~59, 61, 67) Parts Identification and Handling „ Camcorder 3 2 4 5 6 7 1 89 1 LCD Monitor Open Knob [OPEN] (p. 22) 2 LCD Monitor (pp. 20~22, 75) Due to limitations in , stereo) (pp. ...may be some tiny bright or dark spots on 110/120/220/240 V AC. Before Using Standard Accessories The following accessories are supplied with your Camcorder. 1) PV-DAC14D K2GJ2DC00011 K2CA2CA00025 2) 3) CGA-DU12 (PV-GS59 Canada Only) CGR-DU06 4) 5) K2KC4CB00020 LSFC0018 K1HA05CD0014 LSFT0648 (For PV-GS39...
... 3) AV Cable (pp. 51, 54) 4) Shoulder Strap (p. 18) 5) USB Cable and CD-ROM (pp. 56, 58~59, 61, 67) Parts Identification and Handling „ Camcorder 3 2 4 5 6 7 1 89 1 LCD Monitor Open Knob [OPEN] (p. 22) 2 LCD Monitor (pp. 20~22, 75) Due to limitations in , stereo) (pp. ...may be some tiny bright or dark spots on 110/120/220/240 V AC. Before Using Standard Accessories The following accessories are supplied with your Camcorder. 1) PV-DAC14D K2GJ2DC00011 K2CA2CA00025 2) 3) CGA-DU12 (PV-GS59 Canada Only) CGR-DU06 4) 5) K2KC4CB00020 LSFC0018 K1HA05CD0014 LSFT0648 (For PV-GS39...
Digital Video Camera - English/ Spanish
Page 13
...and then attach the tripod. 36 Battery Eject Switch [BATTERY RELEASE] (p. 16) „ Remote Control (PV-GS59 Only : Optional) Using the Remote Control with the Camcorder, most of the AV Cable to this jack, plug it in as far as it goes. 16 17 30 Mode Dial (p. 23) 31 Recording Start..., 54) • Connecting an AV Cable to this jack activates the Camcorder's built-in speaker. • When connecting the pin plug of the Camcorder functions can be some tiny bright or dark spots on the Viewfinder screen. However, this to the digital video equipment. 20 USB Jack [ ] (For PV-GS39/PV-GS59) (pp. ...
...and then attach the tripod. 36 Battery Eject Switch [BATTERY RELEASE] (p. 16) „ Remote Control (PV-GS59 Only : Optional) Using the Remote Control with the Camcorder, most of the AV Cable to this jack, plug it in as far as it goes. 16 17 30 Mode Dial (p. 23) 31 Recording Start..., 54) • Connecting an AV Cable to this jack activates the Camcorder's built-in speaker. • When connecting the pin plug of the Camcorder functions can be some tiny bright or dark spots on the Viewfinder screen. However, this to the digital video equipment. 20 USB Jack [ ] (For PV-GS39/PV-GS59) (pp. ...

Digital Video Camera - English/ Spanish
Page 14
However, it with a new CR2025 battery. (A battery is exhausted, replace it depends on the Camcorder. • When the button-type battery is normally expected to last about 1 year. Do not allow children to match the poles correctly when inserting the ...;] (p. 46) 53 Enter Button [ENTER] (p. 26) * means that these buttons function in fire. 14 Use of another battery may explode if mistreated. ●As with Panasonic type CR2025 only. CAUTION ●Dispose of used battery promptly. ●Do not recharge, disassemble or dispose of fire or explosion. ●Battery may present...
However, it with a new CR2025 battery. (A battery is exhausted, replace it depends on the Camcorder. • When the button-type battery is normally expected to last about 1 year. Do not allow children to match the poles correctly when inserting the ...;] (p. 46) 53 Enter Button [ENTER] (p. 26) * means that these buttons function in fire. 14 Use of another battery may explode if mistreated. ●As with Panasonic type CR2025 only. CAUTION ●Dispose of used battery promptly. ●Do not recharge, disassemble or dispose of fire or explosion. ●Battery may present...

Digital Video Camera - English/ Spanish
Page 15
...and then securely plug it . 2 Put the Battery on , [CHECK REMOTE MODE] (p. 71) will appear. Outdoors or under strong light, the Camcorder may not operate properly even within the above operating ranges are used . 1 Attach the Battery to the AC Adaptor and the AC Jack. 1 2 ... the Battery Before use . When the Remote Control is operated for indoor use , fully charge the Battery. • We recommend using a Panasonic Battery. • We cannot guarantee the quality of this Camcorder when batteries from the central axis • The above ranges. „ Selecting Remote Control Modes When...
...and then securely plug it . 2 Put the Battery on , [CHECK REMOTE MODE] (p. 71) will appear. Outdoors or under strong light, the Camcorder may not operate properly even within the above operating ranges are used . 1 Attach the Battery to the AC Adaptor and the AC Jack. 1 2 ... the Battery Before use . When the Remote Control is operated for indoor use , fully charge the Battery. • We recommend using a Panasonic Battery. • We cannot guarantee the quality of this Camcorder when batteries from the central axis • The above ranges. „ Selecting Remote Control Modes When...

Digital Video Camera - English/ Spanish
Page 16
...battery is too high or low, the [CHARGE] Lamp blinks and the charging time becomes longer than usual. 3 Attach the charged Battery to the Camcorder. „ Disconnecting the Power Source Set the [OFF/ON] Switch to [OFF], and while sliding the [BATTERY RELEASE] Switch, remove the ...malfunction. • If the [CHARGE] Lamp does not light up although the Battery is charged normally. Notes: • When the Camcorder has been used for a long time, the Camera body becomes warm, but the battery is attached to recordable time when the recording and stopping operations are repeated.) 16
...battery is too high or low, the [CHARGE] Lamp blinks and the charging time becomes longer than usual. 3 Attach the charged Battery to the Camcorder. „ Disconnecting the Power Source Set the [OFF/ON] Switch to [OFF], and while sliding the [BATTERY RELEASE] Switch, remove the ...malfunction. • If the [CHARGE] Lamp does not light up although the Battery is charged normally. Notes: • When the Camcorder has been used for a long time, the Camera body becomes warm, but the battery is attached to recordable time when the recording and stopping operations are repeated.) 16

Digital Video Camera - English/ Spanish
Page 17
... shorter. • The times shown in the table are for intermittent recording.) • The available recording time becomes shorter if you use or charging. The Camcorder being used . Re-attaching the Lens Cap To protect the Lens surface, attach the Lens Cap. • The Lens Cap and Lens Cap Cord come...
... shorter. • The times shown in the table are for intermittent recording.) • The available recording time becomes shorter if you use or charging. The Camcorder being used . Re-attaching the Lens Cap To protect the Lens surface, attach the Lens Cap. • The Lens Cap and Lens Cap Cord come...
Digital Video Camera - English/ Spanish
Page 18
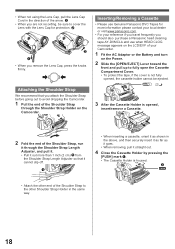
...when HEAD CLOG message appears on the LCD/EVF of the Shoulder Strap to the other end of your Camcorder. 1 Fit the AC Adaptor or the Battery and turn on the Camcorder. 3 After the Cassette Holder is not fully opened, the cassette holder cannot be sure to fully open... For your reference if you travel frequently you should also purchase a Panasonic head cleaning tape AY-DVMCLA and use Genuine Panasonic DVC Tapes for protection. 2 2 1 • When you attach the Shoulder Strap before going out to avoid dropping the Camcorder. 1 Pull the end of the Shoulder Strap through the Shoulder Strap...
...when HEAD CLOG message appears on the LCD/EVF of the Shoulder Strap to the other end of your Camcorder. 1 Fit the AC Adaptor or the Battery and turn on the Camcorder. 3 After the Cassette Holder is not fully opened, the cassette holder cannot be sure to fully open... For your reference if you travel frequently you should also purchase a Panasonic head cleaning tape AY-DVMCLA and use Genuine Panasonic DVC Tapes for protection. 2 2 1 • When you attach the Shoulder Strap before going out to avoid dropping the Camcorder. 1 Pull the end of the Shoulder Strap through the Shoulder Strap...
Digital Video Camera - English/ Spanish
Page 19
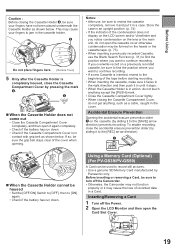
... Cassette Holder 2 , be sure the grip belt stays clear of the cover when opening. Inserting/Removing a Card 1 Turn off the Camcorder. • Otherwise, the Camcorder may not function properly or it again completely. • Check if the battery has run down . • Check if the Cassette ... to find the position where you want to continue recording. • If a new Cassette is completely housed, close the Cassette Compartment Cover by Panasonic only. If you want to [ON] again. • Check if the battery has run down . To enable recording, close the accidental erasure...
... Cassette Holder 2 , be sure the grip belt stays clear of the cover when opening. Inserting/Removing a Card 1 Turn off the Camcorder. • Otherwise, the Camcorder may not function properly or it again completely. • Check if the battery has run down . • Check if the Cassette ... to find the position where you want to continue recording. • If a new Cassette is completely housed, close the Cassette Compartment Cover by Panasonic only. If you want to [ON] again. • Check if the battery has run down . To enable recording, close the accidental erasure...
Digital Video Camera - English/ Spanish
Page 20
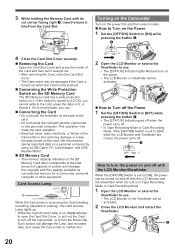
... Cable, PC Card Adaptor, and USB Reader/Writer. „ SD Memory Card • The memory capacity indicated on the card. Card Access Lamp While the Camcorder is accessing the Card (reading, recording, playback or erasing), the Card Access Lamp lights up. • While the Card Access Lamp is moved back, you... turned on it. 3 While holding the Memory Card with its cut corner facing right 1 , insert/remove it into/from the Card Slot. 1 Turning on the Camcorder Turn on the power first and then select modes. „ How to Turn on the Power 1 Set the [OFF/ON] Switch to [ON] while pressing...
... Cable, PC Card Adaptor, and USB Reader/Writer. „ SD Memory Card • The memory capacity indicated on the card. Card Access Lamp While the Camcorder is accessing the Card (reading, recording, playback or erasing), the Card Access Lamp lights up. • While the Card Access Lamp is moved back, you... turned on it. 3 While holding the Memory Card with its cut corner facing right 1 , insert/remove it into/from the Card Slot. 1 Turning on the Camcorder Turn on the power first and then select modes. „ How to Turn on the Power 1 Set the [OFF/ON] Switch to [ON] while pressing...
Digital Video Camera - English/ Spanish
Page 21
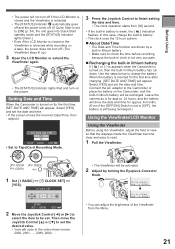
... using the Viewfinder, adjust the field of the Viewfinder from [00] second. • If the built-in lithium battery If [ ] or [--] is appears when the Camcorder is retracted while recording on a tape, the power does not turn on for the first time after charging, [SET DATE AND TIME] will be recharged... place the battery on the Camcorder, and the built-in the order shown below to read. 1 Pull the Viewfinder. (PV-GS39/ (PV-GS29) PV-GS59) 1 Set [ BASIC] >> [ CLOCK SET] >> [YES]. Leave the camera as is for approx. 24 hours, and the battery will drive the date and time for approx...
... using the Viewfinder, adjust the field of the Viewfinder from [00] second. • If the built-in lithium battery If [ ] or [--] is appears when the Camcorder is retracted while recording on a tape, the power does not turn on for the first time after charging, [SET DATE AND TIME] will be recharged... place the battery on the Camcorder, and the built-in the order shown below to read. 1 Pull the Viewfinder. (PV-GS39/ (PV-GS29) PV-GS59) 1 Set [ BASIC] >> [ CLOCK SET] >> [YES]. Leave the camera as is for approx. 24 hours, and the battery will drive the date and time for approx...
Digital Video Camera - English/ Spanish
Page 22
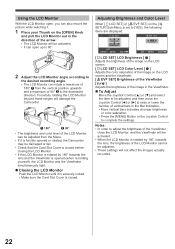
... [◄] or [►] to raise or lower the number of vertical bars in the direction of the arrow. • The LCD Monitor will damage the Camcorder. 1 180° 2 90° • The brightness and color level of the LCD Monitor can rotate a maximum of 180° 1 from the Menu. • If... closing the LCD Monitor. • If the LCD Monitor is rotated by 180° towards the lens and the Viewfinder is opened or rotated, the Camcorder may be adjusted. • These settings will not affect the images actually recorded. 22 LCD SET EVF SET SET SETUP ENTER EXIT SET ENTER EXIT...
... [◄] or [►] to raise or lower the number of vertical bars in the direction of the arrow. • The LCD Monitor will damage the Camcorder. 1 180° 2 90° • The brightness and color level of the LCD Monitor can rotate a maximum of 180° 1 from the Menu. • If... closing the LCD Monitor. • If the LCD Monitor is rotated by 180° towards the lens and the Viewfinder is opened or rotated, the Camcorder may be adjusted. • These settings will not affect the images actually recorded. 22 LCD SET EVF SET SET SETUP ENTER EXIT SET ENTER EXIT...
Digital Video Camera - English/ Spanish
Page 23
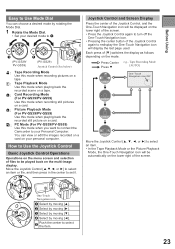
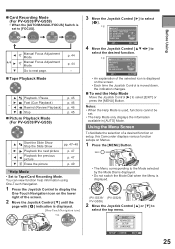
... this mode when recording still pictures on a card. : Picture Playback Mode (For PV-GS39/PV-GS59) Use this mode when you want to connect the Camcorder to your personal computer. Joystick Control and Screen Display Press the center of [▼] switches the display as follows depending on your Personal Computer. You...
... this mode when recording still pictures on a card. : Picture Playback Mode (For PV-GS39/PV-GS59) Use this mode when you want to connect the Camcorder to your personal computer. Joystick Control and Screen Display Press the center of [▼] switches the display as follows depending on your Personal Computer. You...
Digital Video Camera - English/ Spanish
Page 25
... using One-Touch Navigation. 1 Press the Joystick Control to display the One-Touch Navigation icon on the lower right of a desired function or setup, this Camcorder displays various function setups on the screen. • Each time the Joystick Control is moved down, the indication changes. „ To end the Help Mode...
... using One-Touch Navigation. 1 Press the Joystick Control to display the One-Touch Navigation icon on the lower right of a desired function or setup, this Camcorder displays various function setups on the screen. • Each time the Joystick Control is moved down, the indication changes. „ To end the Help Mode...
Digital Video Camera - English/ Spanish
Page 26
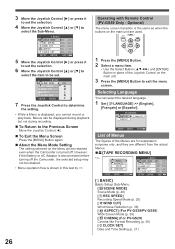
...çais SETUP ENTER EXIT List of Menus The figures of the Joystick Control on the Menu will be retained even when the Camcorder is turned off the Camcorder, the selected setup may not be displayed during playback but not during recording. „ To Return to the Previous Screen Move the Joystick...
...çais SETUP ENTER EXIT List of Menus The figures of the Joystick Control on the Menu will be retained even when the Camcorder is turned off the Camcorder, the selected setup may not be displayed during playback but not during recording. „ To Return to the Previous Screen Move the Joystick...
Digital Video Camera - English/ Spanish
Page 28
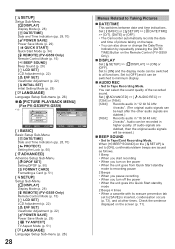
... the Remote Control (PV-GS59 Only). „ DISPLAY Set [ SETUP] >> [ DISPLAY] >> [ON] or [OFF]. Set [ BASIC] or [ SETUP] >> [ DATE/TIME] >> [D/T], [DATE] or [OFF]. • The Camcorder automatically records the date and time of the recorded sound. Set [ ADVANCED] >> [ AUDIO REC] >> [12bit] or [16bit]. [12bit]: Records audio in "12 bit 32 kHz...
... the Remote Control (PV-GS59 Only). „ DISPLAY Set [ SETUP] >> [ DISPLAY] >> [ON] or [OFF]. Set [ BASIC] or [ SETUP] >> [ DATE/TIME] >> [D/T], [DATE] or [OFF]. • The Camcorder automatically records the date and time of the recorded sound. Set [ ADVANCED] >> [ AUDIO REC] >> [12bit] or [16bit]. [12bit]: Records audio in "12 bit 32 kHz...


