

PTF300NTU User Guide
Page 3
... operation and requires minimum 20 cm spacing be determined by turning the equipment off and on, the user is subject to the following measures: - A For permanently connected equipment, a readily accessible disconnect device shall be used in a particular installation. Declaration of Conformity Model Number: PT-F300NTU/PT-F300U Trade Name: Panasonic Responsible party: Panasonic Corporation of North America Address: One Panasonic Way, Secaucus, New...
... operation and requires minimum 20 cm spacing be determined by turning the equipment off and on, the user is subject to the following measures: - A For permanently connected equipment, a readily accessible disconnect device shall be used in a particular installation. Declaration of Conformity Model Number: PT-F300NTU/PT-F300U Trade Name: Panasonic Responsible party: Panasonic Corporation of North America Address: One Panasonic Way, Secaucus, New...

PTF300NTU User Guide
Page 4
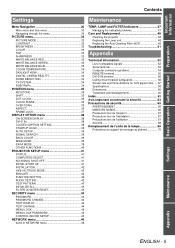
... Power cord 21 Power indicator 22 Switching on the projector 23 Switching off " on page 21. 5. B When you start the projection for the first time, the minimum required setting screen for projection will be displayed. Prepare the Remote control See "Remote control" on page 19. 3. Set up your projector See "Setting up" on /off the projector 23 Projecting an image 24 Selecting the input signal 24 Positioning the image 24 Remote control operation 25 Operating range 25 Setting up 15 Screen size and throw distance...
... Power cord 21 Power indicator 22 Switching on the projector 23 Switching off " on page 21. 5. B When you start the projection for the first time, the minimum required setting screen for projection will be displayed. Prepare the Remote control See "Remote control" on page 19. 3. Set up your projector See "Setting up" on /off the projector 23 Projecting an image 24 Selecting the input signal 24 Positioning the image 24 Remote control operation 25 Operating range 25 Setting up 15 Screen size and throw distance...
PTF300NTU User Guide
Page 5
... DISPLAY 44 TEXT CHANGE 44 MENU LOCK 45 MENU LOCK PASSWORD 45 CONTROL DEVICE SETUP 45 NETWORK menu 46 Items in NETWORK menu 46 TEMP, LAMP and FILTER Indicators 47 Managing the indicated problems 47 Care and Replacement 48 Cleaning the projector 48 Replacing the Lamp unit 48 Replacing the Auto Cleaning Filter (ACF 49 Troubleshooting 51 Appendix Technical Information 52 List of compatible signals 52 Serial terminal 53 Computer connection guidance 54 REMOTE terminal 55 DVI-D IN terminal 56 Ceiling mount bracket safeguards 56 Screen size...
... DISPLAY 44 TEXT CHANGE 44 MENU LOCK 45 MENU LOCK PASSWORD 45 CONTROL DEVICE SETUP 45 NETWORK menu 46 Items in NETWORK menu 46 TEMP, LAMP and FILTER Indicators 47 Managing the indicated problems 47 Care and Replacement 48 Cleaning the projector 48 Replacing the Lamp unit 48 Replacing the Auto Cleaning Filter (ACF 49 Troubleshooting 51 Appendix Technical Information 52 List of compatible signals 52 Serial terminal 53 Computer connection guidance 54 REMOTE terminal 55 DVI-D IN terminal 56 Ceiling mount bracket safeguards 56 Screen size...
PTF300NTU User Guide
Page 8
... new batteries. Disconnect the power plug from the wall outlet as near an air conditioner or lighting equipment. Using chemical treated wipes may result in the remote control for humid weather arrives. If the batteries are subject to sudden temperature changes, such as a safety precaution before the season for an extended period of the lamp unit and check the inside the projector...
... new batteries. Disconnect the power plug from the wall outlet as near an air conditioner or lighting equipment. Using chemical treated wipes may result in the remote control for humid weather arrives. If the batteries are subject to sudden temperature changes, such as a safety precaution before the season for an extended period of the lamp unit and check the inside the projector...
PTF300NTU User Guide
Page 9
... you use . Dishonest operation by shocks or chipping damage. Occasionally, a few stuck pixels may explode if using the projector after using the projector, close the front panel cover. Important Information Precautions with regard to remove it emits internal smoke-like gas. The lamp may appear on page 42. ENGLISH - 9 The brightness of the lamp depends on the duration of blue, green or red. Security instruction The connecting network...
... you use . Dishonest operation by shocks or chipping damage. Occasionally, a few stuck pixels may explode if using the projector after using the projector, close the front panel cover. Important Information Precautions with regard to remove it emits internal smoke-like gas. The lamp may appear on page 42. ENGLISH - 9 The brightness of the lamp depends on the duration of blue, green or red. Security instruction The connecting network...

PTF300NTU User Guide
Page 13
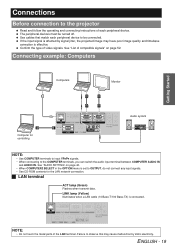
AC IN Connect the power cord to supply electronic power to the projector. (page 21) LAN Connect a LAN cable for input and output by Kensington, to the VARIABLE AUDIO OUT, the built-in speaker will be disabled. COMPUTER1 IN Connect an RGB or component signal cable. Selectable for network connection. ENGLISH - 13 VIDEO IN Connect an RCA composite video cable. Auto cleaning filter (ACF) compartment (page 49) Front leg adjusters Screw up/down to adjust the projection angle. (page...
AC IN Connect the power cord to supply electronic power to the projector. (page 21) LAN Connect a LAN cable for input and output by Kensington, to the VARIABLE AUDIO OUT, the built-in speaker will be disabled. COMPUTER1 IN Connect an RGB or component signal cable. Selectable for network connection. ENGLISH - 13 VIDEO IN Connect an RCA composite video cable. Auto cleaning filter (ACF) compartment (page 49) Front leg adjusters Screw up/down to adjust the projection angle. (page...
PTF300NTU User Guide
Page 14
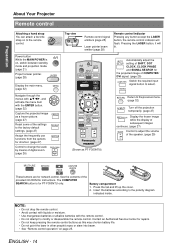
... factory default settings. (page 27) Assign the frequently use functions from the options for shortcut. (page 27) Control to change the scale by means of digital zoom. (page 26) Top view Remote control signal emitters (page 25) Laser pointer beam emitter (page 28) Remote control indicator Pressing any button except the LASER button, the remote control indicator will lit. Return to the previous menu. (page 32) Turn off the projection temporarily. (page 27) Display...
... factory default settings. (page 27) Assign the frequently use functions from the options for shortcut. (page 27) Control to change the scale by means of digital zoom. (page 26) Top view Remote control signal emitters (page 25) Laser pointer beam emitter (page 28) Remote control indicator Pressing any button except the LASER button, the remote control indicator will lit. Return to the previous menu. (page 32) Turn off the projection temporarily. (page 27) Display...
PTF300NTU User Guide
Page 19
... audio input terminal between COMPUTER AUDIO IN and AUDIO IN. If the input signal is connected. LINK lamp (Yellow) Illuminates when a LAN cable (10 Base-T/100 Base-TX) is affected by signal jitter, the projected image may cause malfunction by static electricity. The peripheral devices must be connected. Use cables that match each peripheral device. See "AUDIO SETTING" on page 52. Connections Before connection to the projector Read and follow the operating and connecting instructions...
... audio input terminal between COMPUTER AUDIO IN and AUDIO IN. If the input signal is connected. LINK lamp (Yellow) Illuminates when a LAN cable (10 Base-T/100 Base-TX) is affected by signal jitter, the projected image may cause malfunction by static electricity. The peripheral devices must be connected. Use cables that match each peripheral device. See "AUDIO SETTING" on page 52. Connections Before connection to the projector Read and follow the operating and connecting instructions...

PTF300NTU User Guide
Page 21
... the projector and slide it in orange if the internal cooling fan is still operating by internal power supply. Slide the power cord secure lock up around plugs may take a while to start the projection with the side guide rail of the AC IN terminal of the projector match, then push the plug all the input devices are connected and turned off the power to the projector when...
... the projector and slide it in orange if the internal cooling fan is still operating by internal power supply. Slide the power cord secure lock up around plugs may take a while to start the projection with the side guide rail of the AC IN terminal of the projector match, then push the plug all the input devices are connected and turned off the power to the projector when...
PTF300NTU User Guide
Page 22
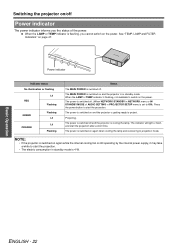
Power indicator Indicator status No illumination or flashing RED Lit Flashing GREEN ORANGE Flashing Lit Lit Flashing Status The MAIN POWER is cooling the lamp. The MAIN POWER is switched on /off Power indicator The power indicator informs you cannot switch on page 47. The power is switched off and the projector is switched off . (When NETWORK STANDBY in NETWORK menu or IN STANDBY MODE of AUDIO SETTING in PROJECTOR SETUP menu is flashing, you the status of the power. When the LAMP or TEMP indicator is flashing, not available to project. Projecting. NOTE: • If...
Power indicator Indicator status No illumination or flashing RED Lit Flashing GREEN ORANGE Flashing Lit Lit Flashing Status The MAIN POWER is cooling the lamp. The MAIN POWER is switched on /off Power indicator The power indicator informs you cannot switch on page 47. The power is switched off and the projector is switched off . (When NETWORK STANDBY in NETWORK menu or IN STANDBY MODE of AUDIO SETTING in PROJECTOR SETUP menu is flashing, you the status of the power. When the LAMP or TEMP indicator is flashing, not available to project. Projecting. NOTE: • If...

PTF300NTU User Guide
Page 23
.... Open the front panel cover. To return to the projection after flashing for the characteristics of the lamp. NOTE: • You can disconnect the power cord or switch off the projector Basic Operation 1. See "INITIAL START UP" on . The power indicator lights up in red. 2. Switching off the MAIN POWER instead of following this procedure. It will be heard, or the display may flicker for a while. The power indicator lights up in orange while...
.... Open the front panel cover. To return to the projection after flashing for the characteristics of the lamp. NOTE: • You can disconnect the power cord or switch off the projector Basic Operation 1. See "INITIAL START UP" on . The power indicator lights up in red. 2. Switching off the MAIN POWER instead of following this procedure. It will be heard, or the display may flicker for a while. The power indicator lights up in orange while...

PTF300NTU User Guide
Page 24
... projected image size. Focus lever Zoom lever 3. See "Front leg adjusters and throwing angle" on the screen. Press the play button of the projector. See "SIGNAL SEARCH" on page 26. You can confirm the adjusted effect with the lens shift lever. Screw down the front leg adjusters and adjust the angle vertically. See "Switching the input signal" on page 39. NOTE: • Do not touch the air exhaust port as default...
... projected image size. Focus lever Zoom lever 3. See "Front leg adjusters and throwing angle" on the screen. Press the play button of the projector. See "SIGNAL SEARCH" on page 26. You can confirm the adjusted effect with the lens shift lever. Screw down the front leg adjusters and adjust the angle vertically. See "Switching the input signal" on page 39. NOTE: • Do not touch the air exhaust port as default...
PTF300NTU User Guide
Page 31
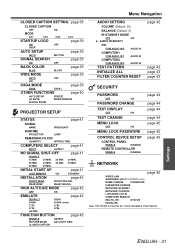
... DISABLE ASPECT PICTURE MODE DAYLIGHT VIEW CLOSED CAPTION AUDIO SETTING VOLUME (Default: 20) BALANCE (Default: 0) IN STANDBY MODE OFF ON AUDIO IN SELECT DVI COM.AUDIO IN 2 AUDIO IN COMPUTER1 COM.AUDIO IN 1 AUDIO IN COMPUTER2 COM.AUDIO IN 2 AUDIO IN TEST PATTERN INITIALIZE ALL FILTER COUNTER RESET page 42 page 43 page 43 page 43 SECURITY PASSWORD OFF ON PASSWORD CHANGE TEXT DISPLAY OFF ON TEXT CHANGE MENU LOCK OFF ON MENU LOCK PASSWORD CONTROL DEVICE SETUP CONTROL PANEL ENABLE DISABLE REMOTE CONTROLLER ENABLE...
... DISABLE ASPECT PICTURE MODE DAYLIGHT VIEW CLOSED CAPTION AUDIO SETTING VOLUME (Default: 20) BALANCE (Default: 0) IN STANDBY MODE OFF ON AUDIO IN SELECT DVI COM.AUDIO IN 2 AUDIO IN COMPUTER1 COM.AUDIO IN 1 AUDIO IN COMPUTER2 COM.AUDIO IN 2 AUDIO IN TEST PATTERN INITIALIZE ALL FILTER COUNTER RESET page 42 page 43 page 43 page 43 SECURITY PASSWORD OFF ON PASSWORD CHANGE TEXT DISPLAY OFF ON TEXT CHANGE MENU LOCK OFF ON MENU LOCK PASSWORD CONTROL DEVICE SETUP CONTROL PANEL ENABLE DISABLE REMOTE CONTROLLER ENABLE...

PTF300NTU User Guide
Page 32
...I H to the menu mode. PICTURE KEYSTONE POSITION SHIFT LANGUAGE OVER SCAN DISPLAY OPTION ASPECT 4:3 PROJECTOR SETUP SECURITY NETWORK SELECT RETURN ENTER 3. Main menu Sub-menu Current settings PICTURE POSITION LANGUAGE DISPLAY OPTION PROJECTOR SETUP SECURITY NETWORK SELECT RETURN ENTER PICTURE MODE CONTRAST BRIGHTNESS COLOR TINT SHARPNESS COLOR TEMPERATURE DAYLIGHT VIEW DIGITAL CINEMA REALITY NOISE REDUCTION TV-SYSTEM STANDARD DEFAULT AUTO ON OFF AUTO Operating guidance Contains the required buttons to display the main menu and the operating guidance. If there...
...I H to the menu mode. PICTURE KEYSTONE POSITION SHIFT LANGUAGE OVER SCAN DISPLAY OPTION ASPECT 4:3 PROJECTOR SETUP SECURITY NETWORK SELECT RETURN ENTER 3. Main menu Sub-menu Current settings PICTURE POSITION LANGUAGE DISPLAY OPTION PROJECTOR SETUP SECURITY NETWORK SELECT RETURN ENTER PICTURE MODE CONTRAST BRIGHTNESS COLOR TINT SHARPNESS COLOR TEMPERATURE DAYLIGHT VIEW DIGITAL CINEMA REALITY NOISE REDUCTION TV-SYSTEM STANDARD DEFAULT AUTO ON OFF AUTO Operating guidance Contains the required buttons to display the main menu and the operating guidance. If there...
PTF300NTU User Guide
Page 34
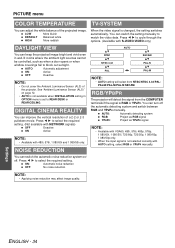
...: Project as RGB signal YPBPR: Project as when a door opens or when window coverings fail to block out sunlight. PICTURE menu COLOR TEMPERATURE TV-SYSTEM You can switch the setting manually to match the video data. DIGITAL CINEMA REALITY You can switch the automatic noise reduction system on page 12. • AUTO is not available when INSTALLATION setting in well-lit rooms where the ambient light sources cannot be controlled, such as YPBPR signal...
...: Project as RGB signal YPBPR: Project as when a door opens or when window coverings fail to block out sunlight. PICTURE menu COLOR TEMPERATURE TV-SYSTEM You can switch the setting manually to match the video data. DIGITAL CINEMA REALITY You can switch the automatic noise reduction system on page 12. • AUTO is not available when INSTALLATION setting in well-lit rooms where the ambient light sources cannot be controlled, such as YPBPR signal...
PTF300NTU User Guide
Page 42
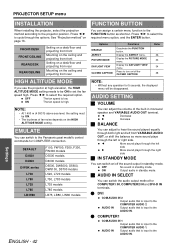
... PICTURE MODE DAYLIGHT VIEW CLOSED CAPTION Functions Deactivate the FUNCTION button. Refer 36 33 34 38 HIGH ALTITUDE MODE If you use the projector at high elevation, the HIGH ALTITUDE MODE setting needs to cycle through the right side J IN STANDBY MODE You can adjust the volume of fan noise depends on page 16. OFF The fan speed is high. EMULATE You can adjust to the Panasonic past model's control commands for COMPUTER connection...
... PICTURE MODE DAYLIGHT VIEW CLOSED CAPTION Functions Deactivate the FUNCTION button. Refer 36 33 34 38 HIGH ALTITUDE MODE If you use the projector at high elevation, the HIGH ALTITUDE MODE setting needs to cycle through the right side J IN STANDBY MODE You can adjust the volume of fan noise depends on page 16. OFF The fan speed is high. EMULATE You can adjust to the Panasonic past model's control commands for COMPUTER connection...

PTF300NTU User Guide
Page 43
... to adjust the focus of STATUS in POSITION menu. Select OK by pressing the power button. 4. Turn off the MAIN POWER button to reset the projector. 5. Press I H to display the test pattern 1. 2. Switch off the power by pressing I , then press the ENTER button. 3. Press the power button. 7. NOTE: • The security system is deactivated by pressing I , then press the ENTER button. 3. PROJECTOR SETUP menu FILTER COUNTER RESET After you replaced the Auto Cleaning Filter (ACF), REMAINING FILTER of the image...
... to adjust the focus of STATUS in POSITION menu. Select OK by pressing the power button. 4. Turn off the MAIN POWER button to reset the projector. 5. Press I H to display the test pattern 1. 2. Switch off the power by pressing I , then press the ENTER button. 3. Press the power button. 7. NOTE: • The security system is deactivated by pressing I , then press the ENTER button. 3. PROJECTOR SETUP menu FILTER COUNTER RESET After you replaced the Auto Cleaning Filter (ACF), REMAINING FILTER of the image...

PTF300NTU User Guide
Page 47
... instruction for replacement. J LAMP indicator Indicator Illuminating red Flashing red Problem Cause Remedy RUNTIME of STATUS in temperature controlled place. The MAIN POWER is switched on again before the lamp unit is normally rolling up. Let the lamp unit cool See "Replacing the Lamp down and turn on page 48. See "Replacing the Lamp unit" on the projector*1 and set the HIGH ALTITUDE MODE to ON. Remove the object(s) from the ventilation openings or clear around the projector...
... instruction for replacement. J LAMP indicator Indicator Illuminating red Flashing red Problem Cause Remedy RUNTIME of STATUS in temperature controlled place. The MAIN POWER is switched on again before the lamp unit is normally rolling up. Let the lamp unit cool See "Replacing the Lamp down and turn on page 48. See "Replacing the Lamp unit" on the projector*1 and set the HIGH ALTITUDE MODE to ON. Remove the object(s) from the ventilation openings or clear around the projector...

PTF300NTU User Guide
Page 49
... screwdriver to red. RUNTIME of STATUS in the PROJECTOR SETUP menu will flash in green. • When the FILTER indicator illuminate in PROJECTOR SETUP menu. Use a Phillips-head screwdriver to purchase a replacement ACF (ET-ACF100). Lamp unit fixing screws Press here 8. Attach the lamp unit cover and tighten the 2 lamp unit cover fixing screws securely with a Phillips-head screwdriver. Replacing the Auto Cleaning Filter (ACF) J Before replacing the ACF Wait until the screws turn to loosen the 2 lamp unit cover fixing screws on ventilation...
... screwdriver to red. RUNTIME of STATUS in the PROJECTOR SETUP menu will flash in green. • When the FILTER indicator illuminate in PROJECTOR SETUP menu. Use a Phillips-head screwdriver to purchase a replacement ACF (ET-ACF100). Lamp unit fixing screws Press here 8. Attach the lamp unit cover and tighten the 2 lamp unit cover fixing screws securely with a Phillips-head screwdriver. Replacing the Auto Cleaning Filter (ACF) J Before replacing the ACF Wait until the screws turn to loosen the 2 lamp unit cover fixing screws on ventilation...
PTF300NTU User Guide
Page 51
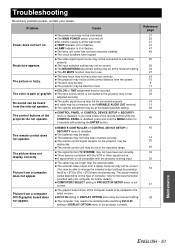
... supply is lit or flashes. The video signal input source may not be connected to the VARIABLE AUDIO OUT terminal. Problem Cause Power does not turn on the type of CONTROL DEVICE SETUP in DISPLAY OPTION menu may be a problem with the projector is disabled. Picture from a computer does not appear. The lamp unit cover has not been securely installed. The input selection setting may not be correct. The lens focus may not have been set...
... supply is lit or flashes. The video signal input source may not be connected to the VARIABLE AUDIO OUT terminal. Problem Cause Power does not turn on the type of CONTROL DEVICE SETUP in DISPLAY OPTION menu may be a problem with the projector is disabled. Picture from a computer does not appear. The lamp unit cover has not been securely installed. The input selection setting may not be correct. The lens focus may not have been set...


