
Lifi Hdtv
Page 2
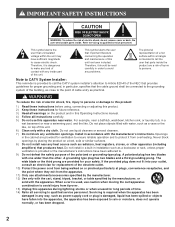
... parts inside . Do not install in a built-in installation such as power-supply cord or plug is required when the apparatus has been damaged in this Operating Instructions manual. 4) Follow all warnings on or pinched particularly at plugs, convenience receptacles, and the point where they exit from tip-over. 13) Unplug this unit. A polarized plug has two blades with the apparatus. A grounding type plug...
... parts inside . Do not install in a built-in installation such as power-supply cord or plug is required when the apparatus has been damaged in this Operating Instructions manual. 4) Follow all warnings on or pinched particularly at plugs, convenience receptacles, and the point where they exit from tip-over. 13) Unplug this unit. A polarized plug has two blades with the apparatus. A grounding type plug...
Lifi Hdtv
Page 7
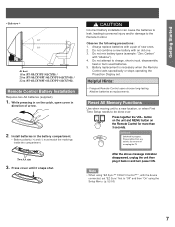
... Time Setup needs to "Off" and then "On" using "EZ Sync™ "HDAVI Control™"", with a pair of arrow. 2. Install batteries in progress. button on the unit and MENU button on the catch, open cover in direction of new ones. 2. While pressing in and turn off or unplug the TV. Battery replacement is necessary when the Remote Control acts sporadically or stops operating the Projection Display set...
... Time Setup needs to "Off" and then "On" using "EZ Sync™ "HDAVI Control™"", with a pair of arrow. 2. Install batteries in progress. button on the unit and MENU button on the catch, open cover in direction of new ones. 2. While pressing in and turn off or unplug the TV. Battery replacement is necessary when the Remote Control acts sporadically or stops operating the Projection Display set...
Lifi Hdtv
Page 9
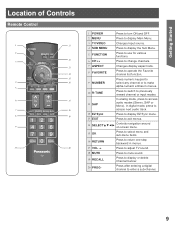
... display Main Menu. 3 TV/VIDEO Changes Input source. 4 SUB MENU Press to display the Sub Menu. 5 FUNCTION Press to use for various functions. 6 CH Press to change channels. 7 ASPECT Changes display aspect ratio. 8 FAVORITE Press to operate the Favorite channel list function. 9 NUMBER Press numeric keypad to select any channel or to make alpha-numeric entries in menus. 17 VOL -+ Press to adjust TV sound. 18 MUTE Press to mute sound. 19 RECALL Press to access audio modes...
... display Main Menu. 3 TV/VIDEO Changes Input source. 4 SUB MENU Press to display the Sub Menu. 5 FUNCTION Press to use for various functions. 6 CH Press to change channels. 7 ASPECT Changes display aspect ratio. 8 FAVORITE Press to operate the Favorite channel list function. 9 NUMBER Press numeric keypad to select any channel or to make alpha-numeric entries in menus. 17 VOL -+ Press to adjust TV sound. 18 MUTE Press to mute sound. 19 RECALL Press to access audio modes...
Lifi Hdtv
Page 12
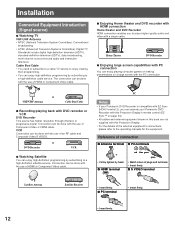
... operating manuals for the equipment. Connection can operate your Panasonic DVD Recorder with the use of the external equipment's connections, please refer to a high-definition cable service. Reference of connection ■ Antenna terminal ■ Pin terminals red blue green green • Firmly tighten by subscribing to enjoy viewing their programming. • You can enjoy high-definition programming by hand. ■ HDMI terminal • Match colors of HDMI or Component Video cable. Cable Box/Cable • You need...
... operating manuals for the equipment. Connection can operate your Panasonic DVD Recorder with the use of the external equipment's connections, please refer to a high-definition cable service. Reference of connection ■ Antenna terminal ■ Pin terminals red blue green green • Firmly tighten by subscribing to enjoy viewing their programming. • You can enjoy high-definition programming by hand. ■ HDMI terminal • Match colors of HDMI or Component Video cable. Cable Box/Cable • You need...
Lifi Hdtv
Page 21
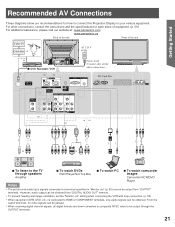
... www.panasonic.ca Back of the unit Front of the unit Cable TV Cable Box or AC 120 V 60 Hz or ■ DVD Recorder/ VCR or or Power Cord (Connect after all digital formats are down-converted to composite NTSC video to be output through speakers Amplifier ■ To watch DVDs DVD Player/Set Top Box ■ To watch PC ■ To watch camcorder images Camcorder/VCR/DVD Player Notes • The picture and audio input signals connected...
... www.panasonic.ca Back of the unit Front of the unit Cable TV Cable Box or AC 120 V 60 Hz or ■ DVD Recorder/ VCR or or Power Cord (Connect after all digital formats are down-converted to composite NTSC video to be output through speakers Amplifier ■ To watch DVDs DVD Player/Set Top Box ■ To watch PC ■ To watch camcorder images Camcorder/VCR/DVD Player Notes • The picture and audio input signals connected...
Lifi Hdtv
Page 22
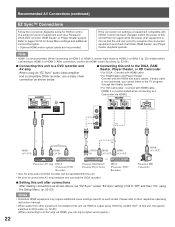
...; HDMI 1 is output using an "EZ Sync" audio-video amplifier • For DIGA : Connect with HDMI cable and a compatible DIGA recorder, use a daisy chain connection as a Panasonic DIGA-DVD recorder, RAM theater, or Player theater system. Refer to pages 52-54 for HDAVI control of a single AV piece of equipment such as shown below. • For RAM theater and Player theater : Connect with HDAVI control has been changed, switch the power...
...; HDMI 1 is output using an "EZ Sync" audio-video amplifier • For DIGA : Connect with HDMI cable and a compatible DIGA recorder, use a daisy chain connection as a Panasonic DIGA-DVD recorder, RAM theater, or Player theater system. Refer to pages 52-54 for HDAVI control of a single AV piece of equipment such as shown below. • For RAM theater and Player theater : Connect with HDAVI control has been changed, switch the power...
Lifi Hdtv
Page 23
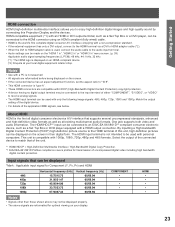
... a DVI output, connect to the HDMI terminal via a DVI to HDMI adapter cable (*2). • When the DVI to HDMI adapter cable is used, connect the audio cable to the audio input terminal. • Audio settings can be made on the "HDMI 1 in", "HDMI 2 in" or "HDMI 3 in their digital form. This unit is compatible with a HDMI output connection. By inputting a High-bandwidth Digital Content Protection (HDCP) high-definition picture source to the HDMI terminal of either "COMPONENT", "S VIDEO", or "VIDEO" to receive analog signals. •...
... a DVI output, connect to the HDMI terminal via a DVI to HDMI adapter cable (*2). • When the DVI to HDMI adapter cable is used, connect the audio cable to the audio input terminal. • Audio settings can be made on the "HDMI 1 in", "HDMI 2 in" or "HDMI 3 in their digital form. This unit is compatible with a HDMI output connection. By inputting a High-bandwidth Digital Content Protection (HDCP) high-definition picture source to the HDMI terminal of either "COMPONENT", "S VIDEO", or "VIDEO" to receive analog signals. •...
Lifi Hdtv
Page 25
... Digital) channels. Program channel ANT in Setup menu. Auto program All channels Analog only Digital only Auto program Scanning digital channel Progress Quit 40% 9. Press ▲▼ to select "Cable" or "Antenna". Basic Operation First Time Setup For your convenience, First Time Setup menu will be displayed on screen when the set is turned on for reception will be set to English as the on-screen display language. If needed , follow the menus and procedures displayed on-screen for the first time or whenever you select the input signal for setting...
... Digital) channels. Program channel ANT in Setup menu. Auto program All channels Analog only Digital only Auto program Scanning digital channel Progress Quit 40% 9. Press ▲▼ to select "Cable" or "Antenna". Basic Operation First Time Setup For your convenience, First Time Setup menu will be displayed on screen when the set is turned on for reception will be set to English as the on-screen display language. If needed , follow the menus and procedures displayed on-screen for the first time or whenever you select the input signal for setting...
Lifi Hdtv
Page 27
... display the Setup menu. Press OK to select "All channels", "Analog only", or "Digital only". 11. Press ▲▼ to enter the Manual program screen. Menu EZ Sync Picture Audio Timer Lock Memory card Setup 4. Press ◄► to display the Auto program menu. Program channel ANT in ". 7. Auto program All channels Analog only Digital only Auto program Scanning digital channel Progress Quit 40% 12. Setup 1/2 Surf mode All Language Program channel External devices CC EZ Sync setting 6. If desired, these channels can be deleted manually using the...
... display the Setup menu. Press OK to select "All channels", "Analog only", or "Digital only". 11. Press ▲▼ to enter the Manual program screen. Menu EZ Sync Picture Audio Timer Lock Memory card Setup 4. Press ◄► to display the Auto program menu. Program channel ANT in ". 7. Auto program All channels Analog only Digital only Auto program Scanning digital channel Progress Quit 40% 12. Setup 1/2 Surf mode All Language Program channel External devices CC EZ Sync setting 6. If desired, these channels can be deleted manually using the...

Lifi Hdtv
Page 28
page G Next page B Y 10. Caption select Caption --- Press OK to display the Caption detail menu. 4. Press OK to display the Caption select menu. 2. Press ▲▼ to enter the edit mode. Yes ... Press OK to select "Caption". 5. Press ▲▼ to select "Apply". 5. Press ▲▼ to select "Caption". 3. Press OK to enter input field. Press OK to "Apply". Manual program Edit Channel 1 2 3 4 5 6 7 8 Caption Apply Cancel Favorite ... Manual program Edit Channel 1 2 3 4 5 6 7 8 Caption Apply Cancel Favorite Add...
page G Next page B Y 10. Caption select Caption --- Press OK to display the Caption detail menu. 4. Press OK to display the Caption select menu. 2. Press ▲▼ to enter the edit mode. Yes ... Press OK to select "Caption". 5. Press ▲▼ to select "Apply". 5. Press ▲▼ to select "Caption". 3. Press OK to enter input field. Press OK to "Apply". Manual program Edit Channel 1 2 3 4 5 6 7 8 Caption Apply Cancel Favorite ... Manual program Edit Channel 1 2 3 4 5 6 7 8 Caption Apply Cancel Favorite Add...

Lifi Hdtv
Page 41
...), TV Parental Guidelines Ratings, Canadian English Language Ratings and Canadian French Language Ratings. Press to remember and record it before you can make any changes in the Lock menu. • This Projection Display is designed to previous level menu. Upon entering the 4 digit password, the Lock menu is the Unlocked state. Lock Mode Off Channel Off Game Off Program Off Change password Note • Use a password that is displayed, pressing MENU will be...
...), TV Parental Guidelines Ratings, Canadian English Language Ratings and Canadian French Language Ratings. Press to remember and record it before you can make any changes in the Lock menu. • This Projection Display is designed to previous level menu. Upon entering the 4 digit password, the Lock menu is the Unlocked state. Lock Mode Off Channel Off Game Off Program Off Change password Note • Use a password that is displayed, pressing MENU will be...
Lifi Hdtv
Page 42
.... Unlocks all channels and video modes from being viewed. Channel lock Mode Channel 1 Channel 2 Channel 3 Channel 4 Channel 5 Channel 6 Channel 7 Custom 14-1 42 Lock Set Select Lock mode to display the Channel lock menu. Press ▲▼ to select the desired Block channel. Press ◄► to select "Mode". 4. Upon entering the 4 digit password, the Lock menu is selected in "Mode". Press ▲▼ to enter your password. Press NUMBER keys to select Channel 1 - 7. 6. Locks all the inputs regardless of the lock setting of "Channel", "Game" and "Program...
.... Unlocks all channels and video modes from being viewed. Channel lock Mode Channel 1 Channel 2 Channel 3 Channel 4 Channel 5 Channel 6 Channel 7 Custom 14-1 42 Lock Set Select Lock mode to display the Channel lock menu. Press ▲▼ to select the desired Block channel. Press ◄► to select "Mode". 4. Upon entering the 4 digit password, the Lock menu is selected in "Mode". Press ▲▼ to enter your password. Press NUMBER keys to select Channel 1 - 7. 6. Locks all the inputs regardless of the lock setting of "Channel", "Game" and "Program...

Lifi Hdtv
Page 43
... (4) Content Advisory Categories: MPAA (Motion Picture Association of America), U.S.TV Program, Canadian English ratings and Canadian French ratings. Lock Mode Channel Game Program Change password Custom Off Off Off 3. Monitor out setting Procedure 1. Press OK to select "On" or "Off". • On - Lock Mode Channel Game Program Change password Custom Off Off Off 3. Press ◄► to display the Program lock menu. Advanced Operation 43 Game Lock Locks Channel 3, Channel 4 and external inputs. Press ◄► to select "On". Press ◄► to...
... (4) Content Advisory Categories: MPAA (Motion Picture Association of America), U.S.TV Program, Canadian English ratings and Canadian French ratings. Lock Mode Channel Game Program Change password Custom Off Off Off 3. Monitor out setting Procedure 1. Press OK to select "On" or "Off". • On - Lock Mode Channel Game Program Change password Custom Off Off Off 3. Press ◄► to display the Program lock menu. Advanced Operation 43 Game Lock Locks Channel 3, Channel 4 and external inputs. Press ◄► to select "On". Press ◄► to...

Lifi Hdtv
Page 50
... to display the Monitor out menu. Input labels Comp.1 Comp.2 HDMI 1 HDMI 2 HDMI 3 Video 1 Video 2 Video 3 PC Monitor out When connecting external equipment to this menu to select each item. 6. Setup 1/2 Surf mode All Language Program channel External devices CC EZ Sync setting 3. Press OK to select "Monitor out". 4. Press ◄► to stop output of picture and audio. (Video 1/Video 2/Video 3) • Comp.1 / Comp.2 / HDMI 1 / HDMI 2 / HDMI 3 cannot output video signals regardless of the picture and sound signals at the AV OUT jacks for the input source selected...
... to display the Monitor out menu. Input labels Comp.1 Comp.2 HDMI 1 HDMI 2 HDMI 3 Video 1 Video 2 Video 3 PC Monitor out When connecting external equipment to this menu to select each item. 6. Setup 1/2 Surf mode All Language Program channel External devices CC EZ Sync setting 3. Press OK to select "Monitor out". 4. Press ◄► to stop output of picture and audio. (Video 1/Video 2/Video 3) • Comp.1 / Comp.2 / HDMI 1 / HDMI 2 / HDMI 3 cannot output video signals regardless of the picture and sound signals at the AV OUT jacks for the input source selected...

Lifi Hdtv
Page 51
... be output in analog format. Press ▲▼ to select "Digital". 2. Press ▲▼ to select "Analog". 2. CC (Closed Caption) The television includes a built-in decoder that display information and blank out a large portion of the picture of the TV screen. CC Mode for the television to view the digital captioning. The program viewed must provide Closed Caption (CC) for Digital The Digital Closed Caption menu lets you configure the way you use HDMI connection. • If analog connected equipment is set "On...
... be output in analog format. Press ▲▼ to select "Digital". 2. Press ▲▼ to select "Analog". 2. CC (Closed Caption) The television includes a built-in decoder that display information and blank out a large portion of the picture of the TV screen. CC Mode for the television to view the digital captioning. The program viewed must provide Closed Caption (CC) for Digital The Digital Closed Caption menu lets you configure the way you use HDMI connection. • If analog connected equipment is set "On...
Lifi Hdtv
Page 52
... service and viewing formats. CC Mode Analog Digital Digital setting CC reset On CC1 Primary EZ Sync™ "HDAVI Control™"* * Simultaneously control all Panasonic "HDAVI Control" equipped components using one button on link, Power off link and Speaker control (p. 53-54) In addition, the equipment with "HDAVI Control 2" function enables the following operation: EZ Sync Control only with HDMI cables allow you use Panasonic's HDMI cable. Press OK to select "CC reset". 2. Press ▲▼ to display the Digital setting menu. Select the input mode to HDMI 1, HDMI...
... service and viewing formats. CC Mode Analog Digital Digital setting CC reset On CC1 Primary EZ Sync™ "HDAVI Control™"* * Simultaneously control all Panasonic "HDAVI Control" equipped components using one button on link, Power off link and Speaker control (p. 53-54) In addition, the equipment with "HDAVI Control 2" function enables the following operation: EZ Sync Control only with HDMI cables allow you use Panasonic's HDMI cable. Press OK to select "CC reset". 2. Press ▲▼ to display the Digital setting menu. Select the input mode to HDMI 1, HDMI...
Lifi Hdtv
Page 53
... Program channel External devices CC EZ Sync setting 3. Control theater speakers with this Projection Display's input automatically switches to the input based on . When "Set" is selected, this Projection Display is turned on automatically and switches to the appropriate HDMI input whenever EZ Sync compatible equipment is initially turned on and Play mode is selected. • While the power lamp is blinking, the picture cannot be seen. • Power on even if this Projection Display is displayed. Sound will not work...
... Program channel External devices CC EZ Sync setting 3. Control theater speakers with this Projection Display's input automatically switches to the input based on . When "Set" is selected, this Projection Display is turned on automatically and switches to the appropriate HDMI input whenever EZ Sync compatible equipment is initially turned on and Play mode is selected. • While the power lamp is blinking, the picture cannot be seen. • Power on even if this Projection Display is displayed. Sound will not work...
Lifi Hdtv
Page 57
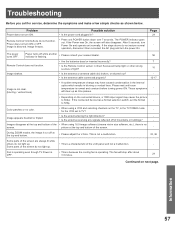
... antenna or antenna cable old, broken, or shorted out? • Is the antenna cable connected properly? 12-17 Image is the TV/VIDEO mode for service, determine the symptoms and make a few simple checks as time passes. • Depending on next page. Remote Control/ Unit buttons do not restore normal operation, disconnect then reconnect the AC plug and turn ON. will also disappear. If the connected device has a format selection switch, set...
... antenna or antenna cable old, broken, or shorted out? • Is the antenna cable connected properly? 12-17 Image is the TV/VIDEO mode for service, determine the symptoms and make a few simple checks as time passes. • Depending on next page. Remote Control/ Unit buttons do not restore normal operation, disconnect then reconnect the AC plug and turn ON. will also disappear. If the connected device has a format selection switch, set...

Lifi Hdtv
Page 58
... No sound is produced. • Change "SAP" settings. 32 • Check "HDMI 1 in", "HDMI 2 in" or "HDMI 3 in" insettings when the equipment is connected via HDMI. 39 • If digital sound connection has problem, select analog sound connection. 21-23, 39 58 Troubleshooting (continued) Problem Possible solution Page Leaving stationary images, such as still video images, web pages, or filler bars (used for an constantly moving pictures which fill the entire screen, or turn them On...
... No sound is produced. • Change "SAP" settings. 32 • Check "HDMI 1 in", "HDMI 2 in" or "HDMI 3 in" insettings when the equipment is connected via HDMI. 39 • If digital sound connection has problem, select analog sound connection. 21-23, 39 58 Troubleshooting (continued) Problem Possible solution Page Leaving stationary images, such as still video images, web pages, or filler bars (used for an constantly moving pictures which fill the entire screen, or turn them On...
Lifi Hdtv
Page 63
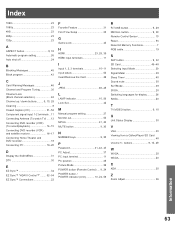
... Lock Set 42 M Manual program setting 27 Monitor out 50 MPAA 41, 43 MUTE button 9, 30 N NUMBER keys 9, 30 P Password 41-42, 45 PC Adjust 37 PC input terminal 11 PC position 29 Picture Mode 36 POWER button (Remote Control) .... 9, 24 POWER button / POWER indicator (Unit 10, 24, 56 R R-TUNE button 9, 29 RECALL button 9, 30 Remote Control Sensor 10 Reset 55 Reset All Memory Functions 7 RGB cable 19 S SAP button 9, 32 SD Card 46-48 Selecting Input Mode 29 Signal Meter 49 Sleep Timer 40 Sound...
... Lock Set 42 M Manual program setting 27 Monitor out 50 MPAA 41, 43 MUTE button 9, 30 N NUMBER keys 9, 30 P Password 41-42, 45 PC Adjust 37 PC input terminal 11 PC position 29 Picture Mode 36 POWER button (Remote Control) .... 9, 24 POWER button / POWER indicator (Unit 10, 24, 56 R R-TUNE button 9, 29 RECALL button 9, 30 Remote Control Sensor 10 Reset 55 Reset All Memory Functions 7 RGB cable 19 S SAP button 9, 32 SD Card 46-48 Selecting Input Mode 29 Signal Meter 49 Sleep Timer 40 Sound...


