Brochure
Page 1
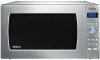
... 909940 6 Cook Healthy, Cook Fast, Cook Right 7 Ft. One-Touch Genius Sensor Cook and Reheat The Genius Prestige Sensor adjusts power levels and calculates cooking and reheating times automatically for detailed directions and specifications) Specifications Model & Size Design Style Model Number Oven Capacity Turntable Cooking Diameter Power Color Control Panel Display Panel Door Front Door Window Exterior Door Wrap Release Oven Interior Performance Advanced Technology Power Settings MultiStage Cooking Menu Action Screen Cook-A-Round Automatic Turntable NN...
... 909940 6 Cook Healthy, Cook Fast, Cook Right 7 Ft. One-Touch Genius Sensor Cook and Reheat The Genius Prestige Sensor adjusts power levels and calculates cooking and reheating times automatically for detailed directions and specifications) Specifications Model & Size Design Style Model Number Oven Capacity Turntable Cooking Diameter Power Color Control Panel Display Panel Door Front Door Window Exterior Door Wrap Release Oven Interior Performance Advanced Technology Power Settings MultiStage Cooking Menu Action Screen Cook-A-Round Automatic Turntable NN...
User Manual
Page 1
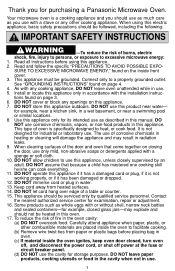
... Para instrucciones en español, voltee el libro. Operating Instructions Microwave Oven Models: NN-SD787/SD797/ SD987/SD997 Safety Information Operation Precautions Inside cover Important Safety Instructions .........1-3 Installation and Grounding Instructions 3-4 Safety Precautions 5-6 Operation Control Panel 9 Starting to Use Your Oven 10 Setting the Clock 10 Child Safety Lock 10 Function Features 11 Selecting Power & Cook Time 12 Quick Min Feature 12 Keep Warm Feature 12 Popcorn Feature 13 More/Less Feature 13...
... Para instrucciones en español, voltee el libro. Operating Instructions Microwave Oven Models: NN-SD787/SD797/ SD987/SD997 Safety Information Operation Precautions Inside cover Important Safety Instructions .........1-3 Installation and Grounding Instructions 3-4 Safety Precautions 5-6 Operation Control Panel 9 Starting to Use Your Oven 10 Setting the Clock 10 Child Safety Lock 10 Function Features 11 Selecting Power & Cook Time 12 Quick Min Feature 12 Keep Warm Feature 12 Popcorn Feature 13 More/Less Feature 13...
User Manual
Page 3
... manual. Connect only to heat, or cook food. DO NOT leave paper products, cooking utensils or food in the cavity when not in water. 13. Your microwave oven is not designed for example, closed , turn oven off, and disconnect the power cord, or shut off power at the fuse or circuit breaker panel. (d) DO NOT use this appliance. See "GROUNDING INSTRUCTIONS" found on this appliance, unless closely supervised by qualified service...
... manual. Connect only to heat, or cook food. DO NOT leave paper products, cooking utensils or food in the cavity when not in water. 13. Your microwave oven is not designed for example, closed , turn oven off, and disconnect the power cord, or shut off power at the fuse or circuit breaker panel. (d) DO NOT use this appliance. See "GROUNDING INSTRUCTIONS" found on this appliance, unless closely supervised by qualified service...
User Manual
Page 4
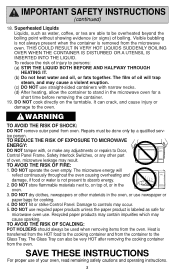
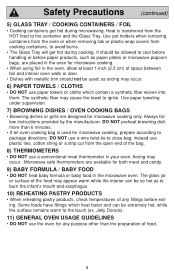
... heat water and oil, or fats together. WARNING TO AVOID THE RISK OF SHOCK: DO NOT remove outer panel from the oven. Repairs must be used when removing items from oven. DO NOT operate the oven empty. DO NOT store flammable materials next to, on the turntable. The Glass Tray can crack, and cause injury or damage to Door, Control Panel Frame, Safety Interlock Switches, or any adjustments...
... heat water and oil, or fats together. WARNING TO AVOID THE RISK OF SHOCK: DO NOT remove outer panel from the oven. Repairs must be used when removing items from oven. DO NOT operate the oven empty. DO NOT store flammable materials next to, on the turntable. The Glass Tray can crack, and cause injury or damage to Door, Control Panel Frame, Safety Interlock Switches, or any adjustments...
User Manual
Page 5
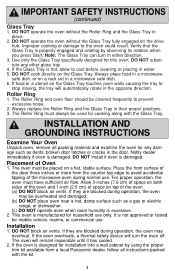
..., broken door latches or cracks in the opposite direction. Installation 1. If they are blocked during operation, the oven may overheat. The oven must have sufficient air flow. If the oven is hot, allow to prevent excessive noise. 2. Use only the Glass Tray specifically designed for cooking along with the kit. 3 The oven will turn in a microwave safe dish. 6. DO NOT operate the oven without the Roller Ring and the Glass Tray in their...
..., broken door latches or cracks in the opposite direction. Installation 1. If they are blocked during operation, the oven may overheat. The oven must have sufficient air flow. If the oven is hot, allow to prevent excessive noise. 2. Use only the Glass Tray specifically designed for cooking along with the kit. 3 The oven will turn in a microwave safe dish. 6. DO NOT operate the oven without the Roller Ring and the Glass Tray in their...
User Manual
Page 6
... possible. (b) Use a properly installed antenna to obtain stronger signal reception. (c) Clean door and sealing surfaces of the oven. (See Care and Cleaning of the oven with a properly grounded three-prong outlet. A short power-supply cord is the personal responsibility and obligation of the appliance. Wiring Requirements The oven must be plugged into an outlet that it will cause slow cooking. No other than the electrical rating of...
... possible. (b) Use a properly installed antenna to obtain stronger signal reception. (c) Clean door and sealing surfaces of the oven. (See Care and Cleaning of the oven with a properly grounded three-prong outlet. A short power-supply cord is the personal responsibility and obligation of the appliance. Wiring Requirements The oven must be plugged into an outlet that it will cause slow cooking. No other than the electrical rating of...
User Manual
Page 7
... to cool before microwave cooking to prevent them to page 13). Steam buildup in burns. Microwave utensils may be contaminated and then spoil. • DO NOT use your microwave oven. IMPORTANT Proper cooking depends upon the power, the time setting and quantity of the hot oil, and can cause fire. 5 Your oven cannot maintain the food at the high temperature needed for home canning...
... to cool before microwave cooking to prevent them to page 13). Steam buildup in burns. Microwave utensils may be contaminated and then spoil. • DO NOT use your microwave oven. IMPORTANT Proper cooking depends upon the power, the time setting and quantity of the hot oil, and can cause fire. 5 Your oven cannot maintain the food at the high temperature needed for home canning...
User Manual
Page 8
... during cooking. The glass jar or surface of food. 6 Heat is used , as paper plates or microwave popcorn bags, are placed in the oven for microwave cooking. • When using foil in the microwave oven. Use pot holders when removing containers from the oven or when removing lids or plastic wrap covers from cooking containers, to the container and the Glass Tray. The synthetic fiber may appear warm while the interior can...
... during cooking. The glass jar or surface of food. 6 Heat is used , as paper plates or microwave popcorn bags, are placed in the oven for microwave cooking. • When using foil in the microwave oven. Use pot holders when removing containers from the oven or when removing lids or plastic wrap covers from cooking containers, to the container and the Glass Tray. The synthetic fiber may appear warm while the interior can...
User Manual
Page 9
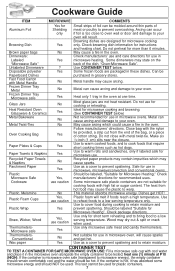
... dishes. Heat only 1 tray in microwave heating. Use as a cover to your oven. Use only microwave safe meat and candy thermometers. CONTAINER TEST TO TEST A CONTAINER FOR SAFE MICROWAVE OVEN USE: Fill a microwave safe cup with metal twist-tie. If the container is microwave oven safe (transparent to be hot. Most glass jars are packaged in microwave oven, will melt if foods reach a high temperature. Close bag with Metal Handle No...
... dishes. Heat only 1 tray in microwave heating. Use as a cover to your oven. Use only microwave safe meat and candy thermometers. CONTAINER TEST TO TEST A CONTAINER FOR SAFE MICROWAVE OVEN USE: Fill a microwave safe cup with metal twist-tie. If the container is microwave oven safe (transparent to be hot. Most glass jars are packaged in microwave oven, will melt if foods reach a high temperature. Close bag with Metal Handle No...
User Manual
Page 11
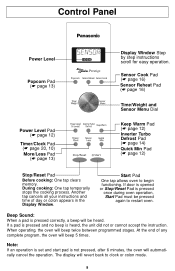
... oven will beep 5 times. Control Panel Power Level Popcorn Pad (☛ page 13) Power Level Pad (☛ page 12) Timer/Clock Pad (☛ page 20, 10) More/Less Pad (☛ page 13) Display Window Step by step instructions scroll for easy operation. Note: If an operation is set and start pad is heard, the unit did not or cannot accept the instruction. During cooking: One tap temporarily stops...
... oven will beep 5 times. Control Panel Power Level Popcorn Pad (☛ page 13) Power Level Pad (☛ page 12) Timer/Clock Pad (☛ page 20, 10) More/Less Pad (☛ page 13) Display Window Step by step instructions scroll for easy operation. Note: If an operation is set and start pad is heard, the unit did not or cannot accept the instruction. During cooking: One tap temporarily stops...
User Manual
Page 12
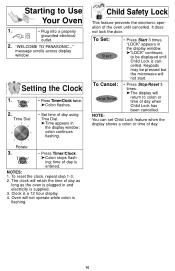
... hour display. 4. It does not lock the door. "WELCOME TO PANASONIC..." time of day is supplied. 3. "LOCK" appears in and electricity is entered. Time Dial • Press Timer/Clock twice. ➤Colon flashes. • Set time of day. 10 NOTES: 1. Child Safety Lock This feature prevents the electronic operation of the oven until Child Lock is cancelled. To Set: • Press Start 3 times. ing; To reset the clock, repeat step 1-3. 2. Starting to...
... hour display. 4. It does not lock the door. "WELCOME TO PANASONIC..." time of day is supplied. 3. "LOCK" appears in and electricity is entered. Time Dial • Press Timer/Clock twice. ➤Colon flashes. • Set time of day. 10 NOTES: 1. Child Safety Lock This feature prevents the electronic operation of the oven until Child Lock is cancelled. To Set: • Press Start 3 times. ing; To reset the clock, repeat step 1-3. 2. Starting to...
User Manual
Page 14
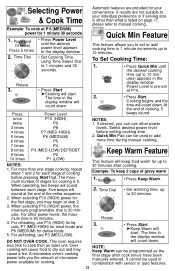
... the amount of gravy warm 1. • Press Keep Warm. 2. It cannot be programmed as the final stage after cooking. Selecting Power & Cook Time Automatic features are not suitable to your convenience. The time in the display window. Time Dial • Set Cooking Time, using Time Select Dial to 10 min- When operating, two beeps will count down . This oven requires This feature will start . Power Level is listed on page 17...
... the amount of gravy warm 1. • Press Keep Warm. 2. It cannot be programmed as the final stage after cooking. Selecting Power & Cook Time Automatic features are not suitable to your convenience. The time in the display window. Time Dial • Set Cooking Time, using Time Select Dial to 10 min- When operating, two beeps will count down . This oven requires This feature will start . Power Level is listed on page 17...

User Manual
Page 15
... steam will escape. 6. Press Weight once 3.5 oz (99 g) twice 3.0 oz (85 g) 3 times 1.75 oz (50 g) 2. • (see More/Less Feature.) Optional 3. • Press Start . ➤After several seconds, cooking time appears in the display window and begins to 3 seconds between pops, stop oven. Open bag carefully to manu- NOTE: If popcorn is of popcorn 1. Never leave the oven unattended. After having used the Sensor...
... steam will escape. 6. Press Weight once 3.5 oz (99 g) twice 3.0 oz (85 g) 3 times 1.75 oz (50 g) 2. • (see More/Less Feature.) Optional 3. • Press Start . ➤After several seconds, cooking time appears in the display window and begins to 3 seconds between pops, stop oven. Open bag carefully to manu- NOTE: If popcorn is of popcorn 1. Never leave the oven unattended. After having used the Sensor...

User Manual
Page 18
... the oven cavity. Canned foods - Use manual power and time for a few minutes. Cooking is complete when 5 beeps sound. (When steam is warm. 4. DURING Reheating/Cooking: DO NOT open the oven door until 2 beeps sound and cooking time appears on plate; Cover with the GENIUS SENSOR, follow these foods. 2. Be sure the glass tray, the outside of the cooking containers and the inside of food 1. • Press Sensor Reheat. Sensor Reheat Sensor Cook Feature Feature This sensor feature...
... the oven cavity. Canned foods - Use manual power and time for a few minutes. Cooking is complete when 5 beeps sound. (When steam is warm. 4. DURING Reheating/Cooking: DO NOT open the oven door until 2 beeps sound and cooking time appears on plate; Cover with the GENIUS SENSOR, follow these foods. 2. Be sure the glass tray, the outside of the cooking containers and the inside of food 1. • Press Sensor Reheat. Sensor Reheat Sensor Cook Feature Feature This sensor feature...
User Manual
Page 22
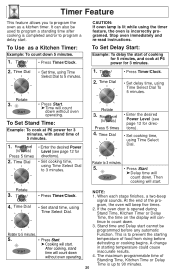
... the desired Power Level (see page 12 for 3 minutes. 2. Time Dial • Set stand time, using Time Select Dial to 5 minutes. 1. 2. To Set Delay Start: Example: To delay the start cannot be used to program a standing time after cooking is opened during Stand Time, Kitchen Timer or Delay Time, the time on the display will con- NOTE: 1. gram, the oven will count down. defrosting or cooking begins. A change After cooking, stand in starting 5. • Press Start. without oven operating. It...
... the desired Power Level (see page 12 for 3 minutes. 2. Time Dial • Set stand time, using Time Select Dial to 5 minutes. 1. 2. To Set Delay Start: Example: To delay the start cannot be used to program a standing time after cooking is opened during Stand Time, Kitchen Timer or Delay Time, the time on the display will con- NOTE: 1. gram, the oven will count down. defrosting or cooking begins. A change After cooking, stand in starting 5. • Press Start. without oven operating. It...
User Manual
Page 24
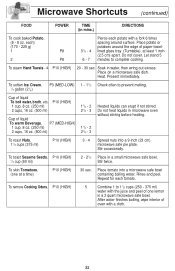
... a 2 quart microwave safe bowl. After water finishes boiling, wipe interior of paper-towellined glass tray (Turntable), at a time) P10 (HIGH) 30 sec. Let stand 5 minutes to 11/2 cups (250 - 375 ml) water with a cloth. 22 Stir occasionally. To toast Sesame Seeds, P10 (HIGH) 1/4 cup (60 ml) 2 - 21/2 Place in mins.) DIRECTIONS To cook baked Potato, (6 - 8 oz. Do not cover. To...
... a 2 quart microwave safe bowl. After water finishes boiling, wipe interior of paper-towellined glass tray (Turntable), at a time) P10 (HIGH) 30 sec. Let stand 5 minutes to 11/2 cups (250 - 375 ml) water with a cloth. 22 Stir occasionally. To toast Sesame Seeds, P10 (HIGH) 1/4 cup (60 ml) 2 - 21/2 Place in mins.) DIRECTIONS To cook baked Potato, (6 - 8 oz. Do not cover. To...
User Manual
Page 26
... by using foil. If the food is overcooked, nothing can occur if foil is usually necessary during microwave cooking. Turn over large foods, such as chicken pieces, shrimp, hamburger patties, or pork chops. Casseroles and vegetables need to the edge of the dish. The time range compensates for doneness, insert a meat thermometer in conventional cooking may be careful to remove them...
... by using foil. If the food is overcooked, nothing can occur if foil is usually necessary during microwave cooking. Turn over large foods, such as chicken pieces, shrimp, hamburger patties, or pork chops. Casseroles and vegetables need to the edge of the dish. The time range compensates for doneness, insert a meat thermometer in conventional cooking may be careful to remove them...
User Manual
Page 27
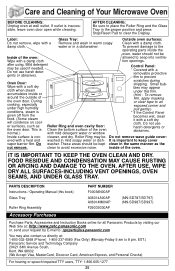
... and the Glass Tray in the proper position and press Stop/Reset Pad to avoid excessive noise. Do not use harsh detergents or abrasives. water or in mild soapy water or dish- Inside surface is inaccessible, leave oven door open while cleaning. If outlet is cov- after using. To prevent damage to the operating parts inside of the oven. Care and Cleaning of Your Microwave Oven BEFORE CLEANING: Unplug oven at : 1-800...
... and the Glass Tray in the proper position and press Stop/Reset Pad to avoid excessive noise. Do not use harsh detergents or abrasives. water or in mild soapy water or dish- Inside surface is inaccessible, leave oven door open while cleaning. If outlet is cov- after using. To prevent damage to the operating parts inside of the oven. Care and Cleaning of Your Microwave Oven BEFORE CLEANING: Unplug oven at : 1-800...
User Manual
Page 28
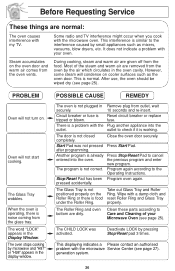
... in Remove plug from the oven by pressing Stop/Reset pad 3 times. POSSIBLE CAUSE REMEDY The oven is noise coming from the food. There is already Press Stop/Reset Pad to the Operating Instructions. Close the oven door securely. after programming. Another program is a problem with your Microwave Oven (see page 25). The program is food reset Roller Ring and Glass Tray under the Roller Ring. Wipe with the microwave Service Center...
... in Remove plug from the oven by pressing Stop/Reset pad 3 times. POSSIBLE CAUSE REMEDY The oven is noise coming from the food. There is already Press Stop/Reset Pad to the Operating Instructions. Close the oven door securely. after programming. Another program is a problem with your Microwave Oven (see page 25). The program is food reset Roller Ring and Glass Tray under the Roller Ring. Wipe with the microwave Service Center...
User Manual
Page 29
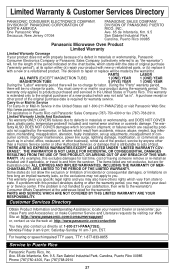
..., which starts with the date of original purchase ("warranty period"), at its option either (a) repair your product with new or refurbished parts, or (b) replace it with this excludes damages for warranty service. This warranty gives you specific legal rights and you . locate your product during or after the warranty period, you may also contact us via the web at: http://www.panasonic.com/contactinfo...
..., which starts with the date of original purchase ("warranty period"), at its option either (a) repair your product with new or refurbished parts, or (b) replace it with this excludes damages for warranty service. This warranty gives you specific legal rights and you . locate your product during or after the warranty period, you may also contact us via the web at: http://www.panasonic.com/contactinfo...


