

NNMX26BF User Guide
Page 1
... Precautions Inside cover Important Safety Instructions .........1-3 Installation and Grounding Instructions 3-4 Safety Precautions 5-6 Operation Control Panel 9 Starting to Use Your Oven 10 Setting the Clock 10 Child Safety Lock 10 Selecting Power & Cook Time 11 Quick Min Feature 11 Popcorn Feature 12 Auto Defrost Feature 13-14 Auto Reheat Feature 15 Auto Cook Feature 15 Auto Cook Chart 16 Timer Feature (Kitchen Timer/Stand Time/Delay Start 17 Operation Microwave Shortcuts 18-19 Food Characteristics 20 Cooking Techniques 20-21 Quick Guide to : consumerproducts@panasonic.com...
... Precautions Inside cover Important Safety Instructions .........1-3 Installation and Grounding Instructions 3-4 Safety Precautions 5-6 Operation Control Panel 9 Starting to Use Your Oven 10 Setting the Clock 10 Child Safety Lock 10 Selecting Power & Cook Time 11 Quick Min Feature 11 Popcorn Feature 12 Auto Defrost Feature 13-14 Auto Reheat Feature 15 Auto Cook Feature 15 Auto Cook Chart 16 Timer Feature (Kitchen Timer/Stand Time/Delay Start 17 Operation Microwave Shortcuts 18-19 Food Characteristics 20 Cooking Techniques 20-21 Quick Guide to : consumerproducts@panasonic.com...

NNMX26BF User Guide
Page 3
... SAFETY INSTRUCTIONS WARNING -To reduce the risk of oven is not working properly, or if it is specifically designed to excessive microwave energy: 1. As with the installation instruc- This type of burns, electric shock, fire, injury to persons, or exposure to heat, or cook food. DO NOT operate this appliance outdoors. Contact the nearest authorized service center for purchasing a Panasonic Microwave Oven. Keep cord away from...
... SAFETY INSTRUCTIONS WARNING -To reduce the risk of oven is not working properly, or if it is specifically designed to excessive microwave energy: 1. As with the installation instruc- This type of burns, electric shock, fire, injury to persons, or exposure to heat, or cook food. DO NOT operate this appliance outdoors. Contact the nearest authorized service center for purchasing a Panasonic Microwave Oven. Keep cord away from...
NNMX26BF User Guide
Page 4
... water is transferred from the HOT food to the Glass Tray. SAVE THESE INSTRUCTIONS For proper use . Liquids, such as safe for cooking. 4. DO NOT hit or strike Control Panel. To reduce the risk of , or in the oven, or use straight-sided containers with , or make any adjustments or repairs to stand in the microwave oven for a short time before removing the container. 19. CAUTION...
... water is transferred from the HOT food to the Glass Tray. SAVE THESE INSTRUCTIONS For proper use . Liquids, such as safe for cooking. 4. DO NOT hit or strike Control Panel. To reduce the risk of , or in the oven, or use straight-sided containers with , or make any adjustments or repairs to stand in the microwave oven for a short time before removing the container. 19. CAUTION...
NNMX26BF User Guide
Page 5
... Start. DO NOT operate the oven without the Glass Tray fully engaged on a flat, stable surface. Note: The Glass Tray can turn the oven off. DO NOT cook directly on the Glass Tray touches oven walls, causing the tray to stop moving, the tray will automatically rotate in a microwave safe dish. 6. Allow 3-inches (7.6 cm) of space on both sides of the oven and 1-inch (2.5 cm) of space on a rack set in the opposite direction...
... Start. DO NOT operate the oven without the Glass Tray fully engaged on a flat, stable surface. Note: The Glass Tray can turn the oven off. DO NOT cook directly on the Glass Tray touches oven walls, causing the tray to stop moving, the tray will automatically rotate in a microwave safe dish. 6. Allow 3-inches (7.6 cm) of space on both sides of the oven and 1-inch (2.5 cm) of space on a rack set in the opposite direction...

NNMX26BF User Guide
Page 6
... an electrical short circuit, grounding reduces the risk of the extension cord should be used if care is interference, it does, the branch circuit fuse may blow or the circuit breaker may result in a fire or oven damage. Power Supply 1. A short power-supply cord is NOT responsible for the electric current. Panasonic is provided to or greater than specified. Operation of Your Microwave Oven) 4 INSTALLATION AND GROUNDING INSTRUCTIONS (continued...
... an electrical short circuit, grounding reduces the risk of the extension cord should be used if care is interference, it does, the branch circuit fuse may blow or the circuit breaker may result in a fire or oven damage. Power Supply 1. A short power-supply cord is NOT responsible for the electric current. Panasonic is provided to or greater than specified. Operation of Your Microwave Oven) 4 INSTALLATION AND GROUNDING INSTRUCTIONS (continued...

NNMX26BF User Guide
Page 8
... the oven or when removing lids or plastic wrap covers from the open end of space between foil and interior oven walls or door. • Dishes with metallic trim should be used for microwave cooking, prepare according to ignite. It should not be allowed to avoid burns. • The Glass Tray will get hot during cooking. Always follow instructions provided by the manufacturer. Jelly Donuts). 11) GENERAL OVEN USAGE...
... the oven or when removing lids or plastic wrap covers from the open end of space between foil and interior oven walls or door. • Dishes with metallic trim should be used for microwave cooking, prepare according to ignite. It should not be allowed to avoid burns. • The Glass Tray will get hot during cooking. Always follow instructions provided by the manufacturer. Jelly Donuts). 11) GENERAL OVEN USAGE...
NNMX26BF User Guide
Page 9
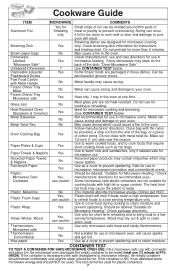
... for more than 6 minutes. This material absorbs microwave energy. Dishes get hot. Use to cover food during cooking to a low serving temperature only. Should be used . This test cannot be labeled "Suitable for plastic containers. 7 No Not suitable for instructions and heating chart. Do not close to oven wall or door and damage to microwave energy), the empty container should remain comfortably cool...
... for more than 6 minutes. This material absorbs microwave energy. Dishes get hot. Use to cover food during cooking to a low serving temperature only. Should be used . This test cannot be labeled "Suitable for plastic containers. 7 No Not suitable for instructions and heating chart. Do not close to oven wall or door and damage to microwave energy), the empty container should remain comfortably cool...

NNMX26BF User Guide
Page 11
... all your instructions and time of any complete program, the oven will beep twice between programmed stages. Beep Sound: When a pad is heard, the unit did not or cannot accept the instruction. When operating, the oven will beep 5 times. 9 During cooking: One tap temporarily stops the cooking process. Control Panel Display Window Auto Defrost Pad (☛ page 13) Power Level Pad (☛ page 11) Timer/Clock Pad (☛ page 10, 17) Stop/Reset Pad Before cooking: One tap...
... all your instructions and time of any complete program, the oven will beep twice between programmed stages. Beep Sound: When a pad is heard, the unit did not or cannot accept the instruction. When operating, the oven will beep 5 times. 9 During cooking: One tap temporarily stops the cooking process. Control Panel Display Window Auto Defrost Pad (☛ page 13) Power Level Pad (☛ page 11) Timer/Clock Pad (☛ page 10, 17) Stop/Reset Pad Before cooking: One tap...
NNMX26BF User Guide
Page 13
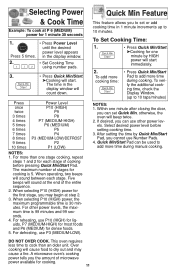
... operating, two beeps will count down. Select desired power level before pressing Quick Min/Start Pad. Press once twice 3 times 4 times 5 times 6 times 7 times 8 times 9 times 10 times Power Level P10 (HIGH) P9 P8 P7 (MEDIUM-HIGH) P6 (MEDIUM) P5 P4 P3 (MEDIUM-LOW)/DEFROST P2 P1 (LOW) NOTES: 1. The time in the display window. • Set Cooking Time using number pads. 3. • Press Quick Min/Start. ➤Cooking will cause food to set Quick Min, otherwise, the oven will sound at...
... operating, two beeps will count down. Select desired power level before pressing Quick Min/Start Pad. Press once twice 3 times 4 times 5 times 6 times 7 times 8 times 9 times 10 times Power Level P10 (HIGH) P9 P8 P7 (MEDIUM-HIGH) P6 (MEDIUM) P5 P4 P3 (MEDIUM-LOW)/DEFROST P2 P1 (LOW) NOTES: 1. The time in the display window. • Set Cooking Time using number pads. 3. • Press Quick Min/Start. ➤Cooking will cause food to set Quick Min, otherwise, the oven will sound at...

NNMX26BF User Guide
Page 14
... Quick Min/Start . ➤After several seconds, cooking time appears on popcorn package. NOTES ON POPCORN FEATURE: 1. After popping, allow the contents of a different weight than listed, follow instructions on the Display Window and begins to cook popcorn for a heavier or lighter weight. Pop one bag at room temperature. 4. If popcorn is of the bag to cool for Cooking Popcorn: When using the number pad 1 or 0, the programs can...
... Quick Min/Start . ➤After several seconds, cooking time appears on popcorn package. NOTES ON POPCORN FEATURE: 1. After popping, allow the contents of a different weight than listed, follow instructions on the Display Window and begins to cook popcorn for a heavier or lighter weight. Pop one bag at room temperature. 4. If popcorn is of the bag to cool for Cooking Popcorn: When using the number pad 1 or 0, the programs can...

NNMX26BF User Guide
Page 15
... items will be rinsed separately or have been layered should be under-defrosted. 5. Shield edges and ends if needed. (See Cooking Techniques). Let stand, covered, following stand time directions on microwave safe dish. 1. • Press Auto Defrost. 2. • Enter weight of the food using the num- If 2 beeps sound, turn over (invert) items during defrosting. 7. or 1 lb. 14 oz., enter 1.9 lbs. Place whole poultry breast-side down...
... items will be rinsed separately or have been layered should be under-defrosted. 5. Shield edges and ends if needed. (See Cooking Techniques). Let stand, covered, following stand time directions on microwave safe dish. 1. • Press Auto Defrost. 2. • Enter weight of the food using the num- If 2 beeps sound, turn over (invert) items during defrosting. 7. or 1 lb. 14 oz., enter 1.9 lbs. Place whole poultry breast-side down...

NNMX26BF User Guide
Page 16
... and defrosted surface Turn over /Remove defrosted portion/Shield edges 10 min. in refrig. Break apart/Turn over/ Remove defrosted Pieces Break apart/Turn over/Shield Turn over/Shield Turn over - - - - NO Remove defrosted pieces Drain liquid/Turn over/ Separate pieces Turn over /Shield 5 min. Turn over 5 min. YES 10 min. 20 min. Defrosting Tips & Techniques (continued) FOOD DEFROST TIME at P3 mins (per lb) DURING DEFROSTING AFTER DEFROSTING Stand Time Rinse...
... and defrosted surface Turn over /Remove defrosted portion/Shield edges 10 min. in refrig. Break apart/Turn over/ Remove defrosted Pieces Break apart/Turn over/Shield Turn over/Shield Turn over - - - - NO Remove defrosted pieces Drain liquid/Turn over/ Separate pieces Turn over /Shield 5 min. Turn over 5 min. YES 10 min. 20 min. Defrosting Tips & Techniques (continued) FOOD DEFROST TIME at P3 mins (per lb) DURING DEFROSTING AFTER DEFROSTING Stand Time Rinse...
NNMX26BF User Guide
Page 18
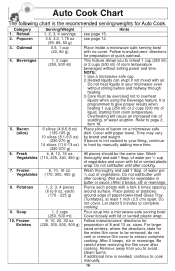
...-lined Glass Tray (Turntable), at least 1 inch (2.5 cm) apart. each) (170 - 225 g) Pierce each potato with no cover. sizes. After 2 beeps, stir or rearrange. Hints 2. Oatmeal 0.5, 1 cup (40, 80 g) Place inside a microwave safe serving bowl with a fork 6 times spacing around edge of 8 and 10 oz. Cover with lid or vented plastic wrap. If bacon is not cooked to your microwave oven without setting power and time. All...
...-lined Glass Tray (Turntable), at least 1 inch (2.5 cm) apart. each) (170 - 225 g) Pierce each potato with no cover. sizes. After 2 beeps, stir or rearrange. Hints 2. Oatmeal 0.5, 1 cup (40, 80 g) Place inside a microwave safe serving bowl with a fork 6 times spacing around edge of 8 and 10 oz. Cover with lid or vented plastic wrap. If bacon is not cooked to your microwave oven without setting power and time. All...

NNMX26BF User Guide
Page 19
...; Press Timer/Clock once. 2. • Set desired amount of delay time using the timer feature, the oven is incorrectly programed. To Set Stand Time: Example: To cook at P6 power for directions). 4. CAUTION: If oven lamp is opened during Stand Time, Kitchen Timer or Delay Time, the time on the display will start of cooking for 5 minutes, and cook at P6 power for directions). 2. To Set Delay Start: Example: To delay the start . Then cooking will continue to count down without oven operating...
...; Press Timer/Clock once. 2. • Set desired amount of delay time using the timer feature, the oven is incorrectly programed. To Set Stand Time: Example: To cook at P6 power for directions). 4. CAUTION: If oven lamp is opened during Stand Time, Kitchen Timer or Delay Time, the time on the display will start of cooking for 5 minutes, and cook at P6 power for directions). 2. To Set Delay Start: Example: To delay the start . Then cooking will continue to count down without oven operating...

NNMX26BF User Guide
Page 20
... g) Canned (15 oz) (430 g) P8 31/2 - 4 All pieces should be the same size. Cover with lid or plastic wrap. Stir every 30 seconds. Drain grease. P8 31/2 - 4 Do not salt until after cooking. P8 31/2 - 4 Empty contents into another dish. Microwave Shortcuts FOOD POWER TIME (in butter or sauce.) Wash thoroughly and add 1 tbsp of water per 1/2 cup...
... g) Canned (15 oz) (430 g) P8 31/2 - 4 All pieces should be the same size. Cover with lid or plastic wrap. Stir every 30 seconds. Drain grease. P8 31/2 - 4 Do not salt until after cooking. P8 31/2 - 4 Empty contents into another dish. Microwave Shortcuts FOOD POWER TIME (in butter or sauce.) Wash thoroughly and add 1 tbsp of water per 1/2 cup...

NNMX26BF User Guide
Page 23
... conduction after the microwave oven is easier to add time to escape. Fish is done when it is inserted and comes out clean. It is turned off. Stand Time Most foods will result. NEVER leave the thermometer in conventional cooking may be used to be careful to remove them away from fat or bone. To prevent overcooking, these food need a shorter amount of...
... conduction after the microwave oven is easier to add time to escape. Fish is done when it is inserted and comes out clean. It is turned off. Stand Time Most foods will result. NEVER leave the thermometer in conventional cooking may be used to be careful to remove them away from fat or bone. To prevent overcooking, these food need a shorter amount of...
NNMX26BF User Guide
Page 24
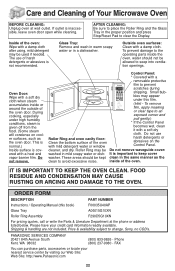
... oven door open while cleaning. FAX You can purchase parts, accessories or locate your credit card information readily available. Care and Cleaning of Your Microwave Oven BEFORE CLEANING: Unplug oven at the phone or address listed below. Outside oven surfaces: Clean with a removable protective film to clear the Display. ORDER FORM DESCRIPTION PART NUMBER Instructions / Operating Manual (this film. (Hint - Price & availability subject to an exposed corner and pull gently.) * If the Control Panel becomes wet, clean...
... oven door open while cleaning. FAX You can purchase parts, accessories or locate your credit card information readily available. Care and Cleaning of Your Microwave Oven BEFORE CLEANING: Unplug oven at the phone or address listed below. Outside oven surfaces: Clean with a removable protective film to clear the Display. ORDER FORM DESCRIPTION PART NUMBER Instructions / Operating Manual (this film. (Hint - Price & availability subject to an exposed corner and pull gently.) * If the Control Panel becomes wet, clean...

NNMX26BF User Guide
Page 25
... of your oven. The Glass Tray wobbles. Circuit breaker or fuse is similar to the interference caused by the air which circulates in the oven cavity. Another program is working. However, some steam will condense on the oven door and warm air comes from the oven vents. The word "Child" appears in Remove plug from the glass tray. Reset circuit breaker or replace fuse. outlet to Care and Cleaning of the steam...
... of your oven. The Glass Tray wobbles. Circuit breaker or fuse is similar to the interference caused by the air which circulates in the oven cavity. Another program is working. However, some steam will condense on the oven door and warm air comes from the oven vents. The word "Child" appears in Remove plug from the glass tray. Reset circuit breaker or replace fuse. outlet to Care and Cleaning of the steam...
NNMX26BF User Guide
Page 26
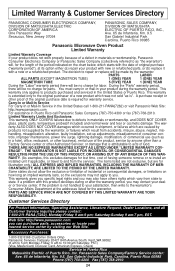
... COVER glass, plastic parts, temperature probes(if included) and normal wear and tear or cosmetic damage. This warranty gives you specific legal rights and you can purchase parts, accessories or locate your product with new or refurbished parts, or (b) replace it with this excludes damages for warranty service. If the problem is not handled to your satisfaction, then write to state. Limited Warranty & Customer Services...
... COVER glass, plastic parts, temperature probes(if included) and normal wear and tear or cosmetic damage. This warranty gives you specific legal rights and you can purchase parts, accessories or locate your product with new or refurbished parts, or (b) replace it with this excludes damages for warranty service. If the problem is not handled to your satisfaction, then write to state. Limited Warranty & Customer Services...

NNMX26BF User Guide
Page 27
... 3 times. To Use as a Kitchen Timer (☛page 17) Press once. Press. Thru Set weight. Press. Press. Press. To Cook using Auto Cook Pad (☛page 15) Select category. Press. 25 Thru ( ) To set Stand Time (☛page 17) Input up to Operate To set Clock (☛page 10) Press twice. To set Delay Start (☛page 17) Press once. Select serving/weight. Set cooking time. Thru ( ) Input up to select Power Level...
... 3 times. To Use as a Kitchen Timer (☛page 17) Press once. Press. Thru Set weight. Press. Press. Press. To Cook using Auto Cook Pad (☛page 15) Select category. Press. 25 Thru ( ) To set Stand Time (☛page 17) Input up to Operate To set Clock (☛page 10) Press twice. To set Delay Start (☛page 17) Press once. Select serving/weight. Set cooking time. Thru ( ) Input up to select Power Level...


