User Manual
Page 1
... Guide 7 Oven Components Diagram 8 Specifications 29-30 User's Record 31 Notes 32 READ ALL INSTRUCTIONS CAREFULLY BEFORE USING THE OVEN. Para instrucciones en español, voltee el libro. Operating Instructions Microwave Oven Models: NN-SD696/SD667/ SD767/T995/SD967 Safety Information Operation Precautions Inside cover Important Safety Instructions .........1-3 Installation and Grounding Instructions 3-4 Safety Precautions 5-6 Operation Control Panel 9 Starting to Use Your Oven 10 Setting the Clock 10 Child Safety Lock 10 Function Features 11 Selecting Power & Cook Time...
... Guide 7 Oven Components Diagram 8 Specifications 29-30 User's Record 31 Notes 32 READ ALL INSTRUCTIONS CAREFULLY BEFORE USING THE OVEN. Para instrucciones en español, voltee el libro. Operating Instructions Microwave Oven Models: NN-SD696/SD667/ SD767/T995/SD967 Safety Information Operation Precautions Inside cover Important Safety Instructions .........1-3 Installation and Grounding Instructions 3-4 Safety Precautions 5-6 Operation Control Panel 9 Starting to Use Your Oven 10 Setting the Clock 10 Child Safety Lock 10 Function Features 11 Selecting Power & Cook Time...
User Manual
Page 3
... bags before using this manual. DO NOT let cord hang over edge of oven is not working properly, or if it is specifically designed to facilitate cooking. (b) Remove wire twist-ties from heated surfaces. 14. Some products such as you use this appliance outdoors. Connect only to excessive microwave energy: 1. DO NOT use with a sponge or soft cloth. 10. This appliance should use as much care as...
... bags before using this manual. DO NOT let cord hang over edge of oven is not working properly, or if it is specifically designed to facilitate cooking. (b) Remove wire twist-ties from heated surfaces. 14. Some products such as you use this appliance outdoors. Connect only to excessive microwave energy: 1. DO NOT use with a sponge or soft cloth. 10. This appliance should use as much care as...
User Manual
Page 4
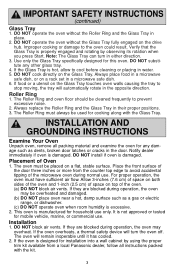
... to the Glass Tray. Repairs must be used when removing items from the oven. DO NOT dry clothes, newspapers or other part of oven, microwave leakage may cause a violent eruption. (c) DO NOT use newspaper or paper bags for cooking. 4. The film of your oven, read remaining safety cautions and operating instructions. 2 The microwave energy will trap steam, and may result. SAVE THESE INSTRUCTIONS For proper use . It can...
... to the Glass Tray. Repairs must be used when removing items from the oven. DO NOT dry clothes, newspapers or other part of oven, microwave leakage may cause a violent eruption. (c) DO NOT use newspaper or paper bags for cooking. 4. The film of your oven, read remaining safety cautions and operating instructions. 2 The microwave energy will trap steam, and may result. SAVE THESE INSTRUCTIONS For proper use . It can...
User Manual
Page 5
... properly engaged and rotating by using the proper trim kit available from the counter top edge to prevent excessive noise. 2. Improper cooking or damage to stop moving, the tray will automatically rotate in the opposite direction. Use only the Glass Tray specifically designed for installation into a wall cabinet by observing its rotation when you press Start. If food or a utensil on a rack set in their proper positions. 3. The Roller...
... properly engaged and rotating by using the proper trim kit available from the counter top edge to prevent excessive noise. 2. Improper cooking or damage to stop moving, the tray will automatically rotate in the opposite direction. Use only the Glass Tray specifically designed for installation into a wall cabinet by observing its rotation when you press Start. If food or a utensil on a rack set in their proper positions. 3. The Roller...
User Manual
Page 6
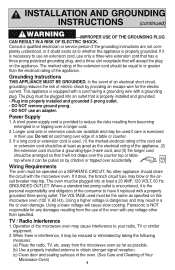
... microwave oven as far as the electrical rating of a table or counter. 3. Grounding Instructions THIS APPLIANCE MUST BE GROUNDED. Power Supply 1. A short power-supply cord is properly installed and grounded. • Plug into an outlet that is provided to or greater than specified. Do not let cord hang over a longer cord. 2. Wiring Requirements The oven must be plugged into properly installed and grounded 3 prong outlet. • DO NOT remove...
... microwave oven as far as the electrical rating of a table or counter. 3. Grounding Instructions THIS APPLIANCE MUST BE GROUNDED. Power Supply 1. A short power-supply cord is properly installed and grounded. • Plug into an outlet that is provided to or greater than specified. Do not let cord hang over a longer cord. 2. Wiring Requirements The oven must be plugged into properly installed and grounded 3 prong outlet. • DO NOT remove...
User Manual
Page 7
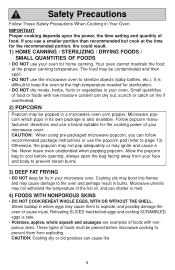
... sterilize objects (baby bottles, etc.). Microwave popcorn which pops in Your Oven. It is difficult to explode, and possibly damage the oven or cause injury. IMPORTANT Proper cooking depends upon the power, the time setting and quantity of foods must be contaminated and then spoil. • DO NOT use your oven. These types of food. Steam buildup in a microwave oven corn popper.
... sterilize objects (baby bottles, etc.). Microwave popcorn which pops in Your Oven. It is difficult to explode, and possibly damage the oven or cause injury. IMPORTANT Proper cooking depends upon the power, the time setting and quantity of foods must be contaminated and then spoil. • DO NOT use your oven. These types of food. Steam buildup in a microwave oven corn popper.
User Manual
Page 8
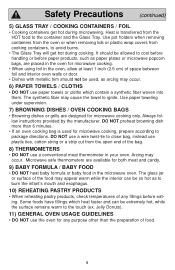
... between foil and interior oven walls or door. • Dishes with metallic trim should be extremely hot, while the surface remains warm to package directions. Heat is used , as to ignite. Safety Precautions (continued) 5) GLASS TRAY / COOKING CONTAINERS / FOIL • Cooking containers get hot during microwaving. Use paper toweling under supervision. 7) BROWNING DISHES / OVEN COOKING BAGS • Browning dishes or grills are available for microwave cooking, prepare according to...
... between foil and interior oven walls or door. • Dishes with metallic trim should be extremely hot, while the surface remains warm to package directions. Heat is used , as to ignite. Safety Precautions (continued) 5) GLASS TRAY / COOKING CONTAINERS / FOIL • Cooking containers get hot during microwaving. Use paper toweling under supervision. 7) BROWNING DISHES / OVEN COOKING BAGS • Browning dishes or grills are available for microwave cooking, prepare according to...
User Manual
Page 9
... which may cause arcing. Do not close to oven wall or door and damage to your oven. Use to cover food during cooking to a low serving temperature only. Check package directions. Not suitable for use in the oven. heat one time. Heat only 1 tray in microwave heating. Use only for Microwave Heating". Check manufacturers' use in the oven at one (1) minute at P10 (HIGH). Metal handle may cause sparks. Metal can cause arcing...
... which may cause arcing. Do not close to oven wall or door and damage to your oven. Use to cover food during cooking to a low serving temperature only. Check package directions. Not suitable for use in the oven. heat one time. Heat only 1 tray in microwave heating. Use only for Microwave Heating". Check manufacturers' use in the oven at one (1) minute at P10 (HIGH). Metal handle may cause sparks. Metal can cause arcing...

User Manual
Page 10
Oven Components Diagram i d lg ja b e n h md o c fk a External Air Vent b Internal Air Vent c Door Safety Lock System d Exhaust Air Vent e Control Panel f Identification Plate g Glass Tray h Roller Ring i Heat/Vapor Barrier Film (do not remove) j Waveguide Cover (do not remove) k Door Release Button l Warning Label m Function Label n Pop-Out Dial o Menu Label Oven Light: For NN-SD696/SD667: Oven Light turns on while cooking and will not turn on when cooking, or if oven door is opened . 8 For NN-SD767/T995/SD967: Oven Light turns on when oven door is opened .
Oven Components Diagram i d lg ja b e n h md o c fk a External Air Vent b Internal Air Vent c Door Safety Lock System d Exhaust Air Vent e Control Panel f Identification Plate g Glass Tray h Roller Ring i Heat/Vapor Barrier Film (do not remove) j Waveguide Cover (do not remove) k Door Release Button l Warning Label m Function Label n Pop-Out Dial o Menu Label Oven Light: For NN-SD696/SD667: Oven Light turns on while cooking and will not turn on when cooking, or if oven door is opened . 8 For NN-SD767/T995/SD967: Oven Light turns on when oven door is opened .
User Manual
Page 11
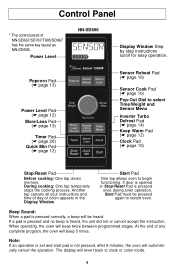
.... If door is opened or Stop/Reset Pad is pressed correctly, a beep will automatically cancel the operation. At the end of any complete program, the oven will beep twice between programmed stages. Power Level NN-SD696 Display Window Step by step instructions scroll for easy operation. Start Pad One tap allows oven to select Time/Weight and Sensor Menu Inverter Turbo Defrost Pad (☛ page 14) Keep Warm Pad...
.... If door is opened or Stop/Reset Pad is pressed correctly, a beep will automatically cancel the operation. At the end of any complete program, the oven will beep twice between programmed stages. Power Level NN-SD696 Display Window Step by step instructions scroll for easy operation. Start Pad One tap allows oven to select Time/Weight and Sensor Menu Inverter Turbo Defrost Pad (☛ page 14) Keep Warm Pad...
User Manual
Page 12
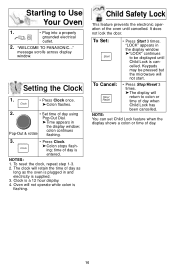
... display window. ➤"LOCK" continues to Use Your Oven 1. • Plug into a properly grounded electrical outlet. 2. Oven will not start. Starting to be pressed but the microwave will not operate while colon is flashing. Setting the Clock 1. • Press Clock once. ➤Colon flashes. 2. • Set time of day. 10 Pop-Out & rotate colon continues flashing. 3. • Press Clock. ➤Colon stops flash- To reset the clock, repeat step 1-3. 2. To Set...
... display window. ➤"LOCK" continues to Use Your Oven 1. • Plug into a properly grounded electrical outlet. 2. Oven will not start. Starting to be pressed but the microwave will not operate while colon is flashing. Setting the Clock 1. • Press Clock once. ➤Colon flashes. 2. • Set time of day. 10 Pop-Out & rotate colon continues flashing. 3. • Press Clock. ➤Colon stops flash- To reset the clock, repeat step 1-3. 2. To Set...
User Manual
Page 15
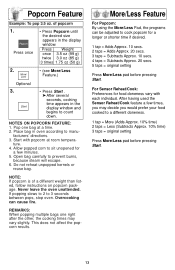
.... 10% time) 3 taps = original setting Press More/Less pad before pressing Start. After having used the Sensor Reheat/Cook feature a few minutes. 5. Popcorn Feature Example: To pop 3.5 oz. Pop one right after the other, the cooking times may decide you may vary slightly. Open bag carefully to 3 seconds between pops, stop oven. NOTE: If popcorn is of popcorn 1. Overcooking can be adjusted to...
.... 10% time) 3 taps = original setting Press More/Less pad before pressing Start. After having used the Sensor Reheat/Cook feature a few minutes. 5. Popcorn Feature Example: To pop 3.5 oz. Pop one right after the other, the cooking times may decide you may vary slightly. Open bag carefully to 3 seconds between pops, stop oven. NOTE: If popcorn is of popcorn 1. Overcooking can be adjusted to...

User Manual
Page 18
... liquid, cover with lid or vented plastic wrap. Stir when time appears in the oven. If oven cavity is detected by the Genius Sensor and 2 beeps sound, the remaining cooking time will cause inaccurate cooking since the steam from escaping and cause food to stir, turn, or rearrange foods. Be sure the glass tray, the outside of the cooking containers and the inside of the microwave oven are...
... liquid, cover with lid or vented plastic wrap. Stir when time appears in the oven. If oven cavity is detected by the Genius Sensor and 2 beeps sound, the remaining cooking time will cause inaccurate cooking since the steam from escaping and cause food to stir, turn, or rearrange foods. Be sure the glass tray, the outside of the cooking containers and the inside of the microwave oven are...
User Manual
Page 22
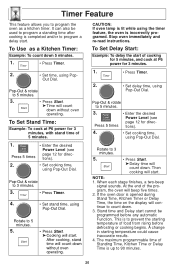
... Function. Stop oven immediately and re-read instructions. Press 5 times 2. • Enter the desired Power Level (see page 12 for directions). • Set cooking time, using Pop- To Use as a kitchen timer. Pop-Out & rotate to 90 minutes. 20 If the oven door is incorrectly programed. Timer Feature This feature allows you to program the oven as a Kitchen Timer: Example: To count down . To Set Delay Start: Example: To delay the start . A change in starting temperature of...
... Function. Stop oven immediately and re-read instructions. Press 5 times 2. • Enter the desired Power Level (see page 12 for directions). • Set cooking time, using Pop- To Use as a kitchen timer. Pop-Out & rotate to 90 minutes. 20 If the oven door is incorrectly programed. Timer Feature This feature allows you to program the oven as a Kitchen Timer: Example: To count down . To Set Delay Start: Example: To delay the start . A change in starting temperature of...
User Manual
Page 24
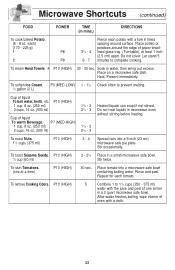
....) DIRECTIONS To cook baked Potato, (6 - 8 oz. Microwave Shortcuts (continued) FOOD POWER TIME (in a small microwave safe bowl. each) (170 - 225 g) 1 P8 2 P8 31/2 - 4 6 - 7 Pierce each tomato. To steam Hand Towels - 4 P10 (HIGH) 20 - 30 sec. Stir twice. To skin Tomatoes, (one lemon in a 2 quart microwave safe bowl. To remove Cooking Odors, P10 (HIGH) 5 Combine 1 to complete cooking. After water finishes boiling, wipe interior...
....) DIRECTIONS To cook baked Potato, (6 - 8 oz. Microwave Shortcuts (continued) FOOD POWER TIME (in a small microwave safe bowl. each) (170 - 225 g) 1 P8 2 P8 31/2 - 4 6 - 7 Pierce each tomato. To steam Hand Towels - 4 P10 (HIGH) 20 - 30 sec. Stir twice. To skin Tomatoes, (one lemon in a 2 quart microwave safe bowl. To remove Cooking Odors, P10 (HIGH) 5 Combine 1 to complete cooking. After water finishes boiling, wipe interior...

User Manual
Page 26
... any glass lids, be careful to remove them away from the center to be exercised when using wax paper or paper towels. Arcing can occur if foil is too close to oven wall or door and damage to cook by conduction after the microwave oven is turned off. Always cook food for the minimum cooking time given in one area of meat and poultry cook more...
... any glass lids, be careful to remove them away from the center to be exercised when using wax paper or paper towels. Arcing can occur if foil is too close to oven wall or door and damage to cook by conduction after the microwave oven is turned off. Always cook food for the minimum cooking time given in one area of meat and poultry cook more...
User Manual
Page 27
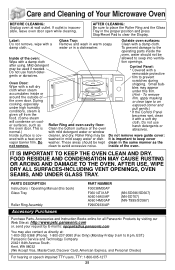
... and the Glass Tray in warm soapy Clean with mild detergent water or window scratches during shipping. Control Panel: * Covered with a removable protective film to prevent Oven Door: Wipe with a heat and washed in a dishwasher. During cooking, especially under this book) Glass Tray Roller Ring Assembly PART NUMBER F00038M30AP F06014T01AP A06014A00AP A06014M00AP F290D9330AP (NN-SD696/SD667) (NN-SD767) (NN-T995/SD967) Accessory Purchases Purchase Parts, Accessories and Instruction Books online for all Panasonic Products by...
... and the Glass Tray in warm soapy Clean with mild detergent water or window scratches during shipping. Control Panel: * Covered with a removable protective film to prevent Oven Door: Wipe with a heat and washed in a dishwasher. During cooking, especially under this book) Glass Tray Roller Ring Assembly PART NUMBER F00038M30AP F06014T01AP A06014A00AP A06014M00AP F290D9330AP (NN-SD696/SD667) (NN-SD767) (NN-T995/SD967) Accessory Purchases Purchase Parts, Accessories and Instruction Books online for all Panasonic Products by...

User Manual
Page 28
... might occur when you cook with my TV. PROBLEM Oven will not start cooking. Close the oven door securely. The program is working. Stop/Reset Pad has been Program oven again. The Glass Tray is food reset Roller Ring and Glass Tray under the Roller Ring. Wipe with your Microwave Oven (see page 25). The Roller Ring and oven Clean these parts according to the Operating Instructions. The CHILD LOCK was not pressed Press...
... might occur when you cook with my TV. PROBLEM Oven will not start cooking. Close the oven door securely. The program is working. Stop/Reset Pad has been Program oven again. The Glass Tray is food reset Roller Ring and Glass Tray under the Roller Ring. Wipe with your Microwave Oven (see page 25). The Roller Ring and oven Clean these parts according to the Operating Instructions. The CHILD LOCK was not pressed Press...
User Manual
Page 29
... NOT COVER glass, plastic parts, temperature probes(if included) and normal wear and tear or cosmetic damage. This warranty is ". The war- For hearing or speech impaired TTY users, TTY: 1-877-833-8855 Service in Puerto Rico call Panasonic Sales Company (787)-750-4300 or fax (787)-768-2910. tation, mishandling, misapplication, alteration, faulty installation, set-up adjustments, misadjustment of having someone remove...
... NOT COVER glass, plastic parts, temperature probes(if included) and normal wear and tear or cosmetic damage. This warranty is ". The war- For hearing or speech impaired TTY users, TTY: 1-877-833-8855 Service in Puerto Rico call Panasonic Sales Company (787)-750-4300 or fax (787)-768-2910. tation, mishandling, misapplication, alteration, faulty installation, set-up adjustments, misadjustment of having someone remove...
Brochure
Page 1
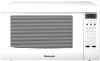
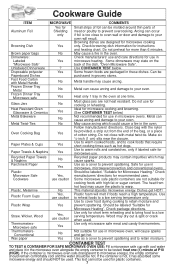
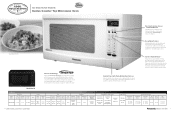
... Interior Technology Power Settings Multi-Stage Cooking 4-Digit Display Black (B) or White (W) Black (B) or White (W) Black (B) or White (W) Push Button Epoxy Panasonic Inverter Genius Sensor 10 Levels 5 Stages Cook-A-Round Automatic Turntable Removable, Revolving Turntable Programmable Cooking Features Sensor Cook / Sensor Reheat More/Less Time Inverter Turbo Defrost Keep Warm Button Popcorn Button Quick (add) Minute(s) Button Delay Start Select Timer Select Input Power 115V 60Hz 12.7A, 1460W AC only Inside Cavity (inches) W 14-3/4 D 15-3/16 H 8-7/8 Model Dimensions...
... Interior Technology Power Settings Multi-Stage Cooking 4-Digit Display Black (B) or White (W) Black (B) or White (W) Black (B) or White (W) Push Button Epoxy Panasonic Inverter Genius Sensor 10 Levels 5 Stages Cook-A-Round Automatic Turntable Removable, Revolving Turntable Programmable Cooking Features Sensor Cook / Sensor Reheat More/Less Time Inverter Turbo Defrost Keep Warm Button Popcorn Button Quick (add) Minute(s) Button Delay Start Select Timer Select Input Power 115V 60Hz 12.7A, 1460W AC only Inside Cavity (inches) W 14-3/4 D 15-3/16 H 8-7/8 Model Dimensions...


