

KXPX10M User Guide
Page 3
...; Connecting the printer to a digital camera 24 • Connecting the printer to a TV 25 • Connecting the printer to a computer 25 Printing PictBridge Printing with a Digital Camera 26 Printing with a TV 28 • Checking the connection to a TV 28 • Inserting a memory card 29 • Turning the power on 29 • Changing the language 30 • Printing single image 32 • Printing multiple images 34 • Printing all images on a memory card 36 • Printing an index 38 • Printing using...
...; Connecting the printer to a digital camera 24 • Connecting the printer to a TV 25 • Connecting the printer to a computer 25 Printing PictBridge Printing with a Digital Camera 26 Printing with a TV 28 • Checking the connection to a TV 28 • Inserting a memory card 29 • Turning the power on 29 • Changing the language 30 • Printing single image 32 • Printing multiple images 34 • Printing all images on a memory card 36 • Printing an index 38 • Printing using...
KXPX10M User Guide
Page 4
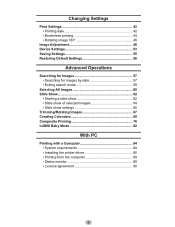
... • Starting a slide show 62 • Slide show of selected images 64 • Slide show settings 65 Trimming/Rotating Images 67 Creating Calendars 69 Composite Printing 76 LUMIX Baby Mode 82 With PC Printing with a Computer 84 • System requirements 84 • Installing the printer driver 85 • Printing from the computer 89 • Status monitor 89 • License agreement 90 4
... • Starting a slide show 62 • Slide show of selected images 64 • Slide show settings 65 Trimming/Rotating Images 67 Creating Calendars 69 Composite Printing 76 LUMIX Baby Mode 82 With PC Printing with a Computer 84 • System requirements 84 • Installing the printer driver 85 • Printing from the computer 89 • Status monitor 89 • License agreement 90 4

KXPX10M User Guide
Page 10
... surface. There is used in a well-ventilated location. „ When ambient temperatures are low To maintain high quality image output, the printer does not begin printing until the internal temperature has warmed up, so it can be sure to operate as far away as benzine, paint thinner, or other location where temperature may take some time before printing starts. This may...
... surface. There is used in a well-ventilated location. „ When ambient temperatures are low To maintain high quality image output, the printer does not begin printing until the internal temperature has warmed up, so it can be sure to operate as far away as benzine, paint thinner, or other location where temperature may take some time before printing starts. This may...

KXPX10M User Guide
Page 12
Photo printer and accessories Photo Printer x 1 Power cord x 1 (Part number: PFJA02A007Z) Postcard size paper cassette x 1 (Part number: PFZCPX1EX) AC adaptor x 1 (Part number: PFAP1016) Remote control x 1 (Part number: PFRM0002) Video cable x 1 (Part number: VJA0815-A) Coin battery (CR2025) x 1 Others Operating Instructions (this manual) x 1 Quick guide (in order to be defective or missing during your check, please contact your dealer. Note that you have all of the following before using the product. Package Contents Check that a Paper and Ink set (sold separately) is ...
Photo printer and accessories Photo Printer x 1 Power cord x 1 (Part number: PFJA02A007Z) Postcard size paper cassette x 1 (Part number: PFZCPX1EX) AC adaptor x 1 (Part number: PFAP1016) Remote control x 1 (Part number: PFRM0002) Video cable x 1 (Part number: VJA0815-A) Coin battery (CR2025) x 1 Others Operating Instructions (this manual) x 1 Quick guide (in order to be defective or missing during your check, please contact your dealer. Note that you have all of the following before using the product. Package Contents Check that a Paper and Ink set (sold separately) is ...
KXPX10M User Guide
Page 27
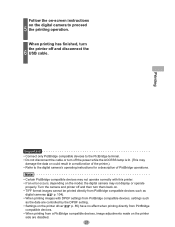
... the DPOF setting. • Settings on the printer driver ( p. 85) have no effect when printing directly from PictBridge compatible devices. • When printing from PictBridge compatible devices such as digital cameras ( p. 104). • When printing images with this printer. • If an error occurs, depending on the printer side are disabled. 27 When printing has finished, turn off and disconnect the 6 USB cable. Important • Connect only PictBridge compatible devices to proceed 5 the printing operation.
... the DPOF setting. • Settings on the printer driver ( p. 85) have no effect when printing directly from PictBridge compatible devices. • When printing from PictBridge compatible devices such as digital cameras ( p. 104). • When printing images with this printer. • If an error occurs, depending on the printer side are disabled. 27 When printing has finished, turn off and disconnect the 6 USB cable. Important • Connect only PictBridge compatible devices to proceed 5 the printing operation.
KXPX10M User Guide
Page 28
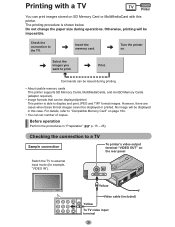
... "Compatible Memory Card" on page 104. • You can set number of copies. Before operation Perform the procedures in this printer. No image will be displayed in "Preparation" ( p. 15 - 25). For details, refer to print. Yellow Video cable (included) Yellow To TV video input terminal 28 Printing with a TV Printer You can print images stored on SD Memory Card or MultiMediaCard with this case. Do not change the paper size during printing. • About usable memory cards...
... "Compatible Memory Card" on page 104. • You can set number of copies. Before operation Perform the procedures in this printer. No image will be displayed in "Preparation" ( p. 15 - 25). For details, refer to print. Yellow Video cable (included) Yellow To TV video input terminal 28 Printing with a TV Printer You can print images stored on SD Memory Card or MultiMediaCard with this case. Do not change the paper size during printing. • About usable memory cards...

KXPX10M User Guide
Page 31
Press to the right is restarted. Press to select the language to be enabled after the printer is displayed, press to select [Yes] 7 and press (OK). • Settings will not be If a screen shown to select [OK] and press (OK). 6 • If you select [Cancel] and press (OK) or press applied. (RETURN), changes will be used and press 5 (OK). Printing 31
Press to the right is restarted. Press to select the language to be enabled after the printer is displayed, press to select [Yes] 7 and press (OK). • Settings will not be If a screen shown to select [OK] and press (OK). 6 • If you select [Cancel] and press (OK) or press applied. (RETURN), changes will be used and press 5 (OK). Printing 31

KXPX10M User Guide
Page 32
"Print" screen 32 Printing with a TV (continued) Printer Printing single image • Printer Direction buttons PRINT RETURN DISPLAY OK MENU Same operations are also possible using the remote control. (For the button names on [Zoom/Rotate], refer to print. 1 2 Press (PRINT). Then press (PRINT). Or press to select [Print] and 3 press (OK). • Printing begins. • For details on [Print Settings], refer to page 42, 82. • For details on [Image Adjustment], refer to page 48. •...
"Print" screen 32 Printing with a TV (continued) Printer Printing single image • Printer Direction buttons PRINT RETURN DISPLAY OK MENU Same operations are also possible using the remote control. (For the button names on [Zoom/Rotate], refer to print. 1 2 Press (PRINT). Then press (PRINT). Or press to select [Print] and 3 press (OK). • Printing begins. • For details on [Print Settings], refer to page 42, 82. • For details on [Image Adjustment], refer to page 48. •...

KXPX10M User Guide
Page 40
... the images to be made using a DPOF compatible digital video camera or digital camera. When you have inserted a memory card containing DPOF settings into the printer ( p. 29). 1 Press (MENU). Before operation Insert the memory card containing images with a TV (continued) Printer Printing using the settings (number of copies to the setting. Press to select [Yes] and press (OK). 4 • Printing begins. • Images are printed using DPOF settings You can print images according to be printed and the number of copies, date...
... the images to be made using a DPOF compatible digital video camera or digital camera. When you have inserted a memory card containing DPOF settings into the printer ( p. 29). 1 Press (MENU). Before operation Insert the memory card containing images with a TV (continued) Printer Printing using the settings (number of copies to the setting. Press to select [Yes] and press (OK). 4 • Printing begins. • Images are printed using DPOF settings You can print images according to be printed and the number of copies, date...

KXPX10M User Guide
Page 42
Press to select [Date] and press (OK). 2 Press to select [Print Settings] on the lower right corner of the image. Print Settings Printer • Printer Direction buttons PRINT RETURN OK Same operations are also possible using the remote control. (For the button names on the remote control, refer to page 14.) Printing date You can print image date information (including the shooting date) on the "Print" screen and press 1 (OK). Press to select [ON] and press (OK). 3 42
Press to select [Date] and press (OK). 2 Press to select [Print Settings] on the lower right corner of the image. Print Settings Printer • Printer Direction buttons PRINT RETURN OK Same operations are also possible using the remote control. (For the button names on the remote control, refer to page 14.) Printing date You can print image date information (including the shooting date) on the "Print" screen and press 1 (OK). Press to select [ON] and press (OK). 3 42

KXPX10M User Guide
Page 62
... (MENU). Slide Show display • Printer Direction buttons PRINT RETURN DISPLAY OK MENU Same operations are also possible using the remote control. (For the button names on the memory card one-by-one for each . You can start a slide show features is used to select [Slide Show] and (OK). 62 Press press 2 to display images on the remote control, refer to page 14.) Starting a slide show You can change the display time...
... (MENU). Slide Show display • Printer Direction buttons PRINT RETURN DISPLAY OK MENU Same operations are also possible using the remote control. (For the button names on the memory card one-by-one for each . You can start a slide show features is used to select [Slide Show] and (OK). 62 Press press 2 to display images on the remote control, refer to page 14.) Starting a slide show You can change the display time...

KXPX10M User Guide
Page 67
... printout image displayed. Cancels editing. • Use the remote control to select [Zoom/Rotate] on the "Print" screen ( p. 32). • Printer Direction buttons PRINT RETURN OK • Remote control Direction buttons MENU ROTATE TRIMMING Press to reduce/enlarge or rotate an image. Advanced Operations 67 Continued on the main unit. These settings are available on the "Print" screen and press 1 (OK). • [Zoom/Rotate] is not displayed when multiple images have...
... printout image displayed. Cancels editing. • Use the remote control to select [Zoom/Rotate] on the "Print" screen ( p. 32). • Printer Direction buttons PRINT RETURN OK • Remote control Direction buttons MENU ROTATE TRIMMING Press to reduce/enlarge or rotate an image. Advanced Operations 67 Continued on the main unit. These settings are available on the "Print" screen and press 1 (OK). • [Zoom/Rotate] is not displayed when multiple images have...

KXPX10M User Guide
Page 69
Advanced Operations 69 Continued on next page Do not change the paper size during operations. Otherwise, printing will become impossible. • Printer Direction buttons PRINT RETURN OK • Remote control Direction buttons MENU ROTATE TRIMMING Select layout. 1 Press (MENU). Creating Calendars Printer You can create original calendars with your favorite images. Press to select [Printing Options] and press 2 (OK).
Advanced Operations 69 Continued on next page Do not change the paper size during operations. Otherwise, printing will become impossible. • Printer Direction buttons PRINT RETURN OK • Remote control Direction buttons MENU ROTATE TRIMMING Select layout. 1 Press (MENU). Creating Calendars Printer You can create original calendars with your favorite images. Press to select [Printing Options] and press 2 (OK).

KXPX10M User Guide
Page 76
Press to select [Printing Options] and press 2 (OK). 76 Otherwise, printing will become impossible. • Printer Direction buttons PRINT RETURN OK • Remote control Direction buttons MENU ROTATE TRIMMING Select layout. 1 Press (MENU). Do not change the paper size during operations. Composite Printing Printer You can create composite images, by adding a frame and clip art.
Press to select [Printing Options] and press 2 (OK). 76 Otherwise, printing will become impossible. • Printer Direction buttons PRINT RETURN OK • Remote control Direction buttons MENU ROTATE TRIMMING Select layout. 1 Press (MENU). Do not change the paper size during operations. Composite Printing Printer You can create composite images, by adding a frame and clip art.
KXPX10M User Guide
Page 82
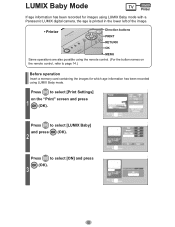
... 1 (OK). Press to page 14.) Before operation Insert a memory card containing the images for images using LUMIX Baby mode with a Panasonic LUMIX digital camera, the age is printed in the lower left of the image. • Printer Direction buttons PRINT RETURN OK MENU Same operations are also possible using LUMIX Baby mode. Press to select [LUMIX Baby] and press 2 (OK). Press to select [Print Settings] on the remote control, refer to select [ON...
... 1 (OK). Press to page 14.) Before operation Insert a memory card containing the images for images using LUMIX Baby mode with a Panasonic LUMIX digital camera, the age is printed in the lower left of the image. • Printer Direction buttons PRINT RETURN OK MENU Same operations are also possible using LUMIX Baby mode. Press to select [LUMIX Baby] and press 2 (OK). Press to select [Print Settings] on the remote control, refer to select [ON...

KXPX10M User Guide
Page 85
... computer as system administrator or have a similar level of the software contained on the CD-ROM. • For Windows XP and Windows 2000, log on as follows. Also, be sure to turn off the printer's power before installing the printer driver. Doing so prevents the printer from the computer, you must first install the printer driver to your computer while printing is not displayed... 1. Start the computer...
... computer as system administrator or have a similar level of the software contained on the CD-ROM. • For Windows XP and Windows 2000, log on as follows. Also, be sure to turn off the printer's power before installing the printer driver. Doing so prevents the printer from the computer, you must first install the printer driver to your computer while printing is not displayed... 1. Start the computer...

KXPX10M User Guide
Page 89
... the application software's operating instructions for details on the printing operation. 1 Open the image file to print from application software, a status monitor showing the progress of 2 the paper and ink cassette in the print queue Ÿ Delete any unwanted print jobs. Status monitor When attempting to be displayed. The status monitor will be printed using the application software. Print the image file. • Make sure that printer paper size setting on the application software matches the size of the current print job will not...
... the application software's operating instructions for details on the printing operation. 1 Open the image file to print from application software, a status monitor showing the progress of 2 the paper and ink cassette in the print queue Ÿ Delete any unwanted print jobs. Status monitor When attempting to be displayed. The status monitor will be printed using the application software. Print the image file. • Make sure that printer paper size setting on the application software matches the size of the current print job will not...
KXPX10M User Guide
Page 96
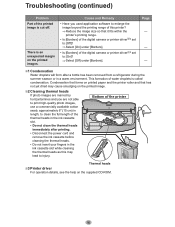
... printed paper and the printer roller and that has not yet dried may cause smudging on the printed image. 2 Cleaning thermal heads If photo images are marred by horizontal lines and you used application software to enlarge the image beyond the printing range of the digital camera or printer driver 3 set to injury. This formation of the printed image is cut off. Page - - - 1 Condensation Water droplets will form after printing. • Disconnect the power...
... printed paper and the printer roller and that has not yet dried may cause smudging on the printed image. 2 Cleaning thermal heads If photo images are marred by horizontal lines and you used application software to enlarge the image beyond the printing range of the digital camera or printer driver 3 set to injury. This formation of the printed image is cut off. Page - - - 1 Condensation Water droplets will form after printing. • Disconnect the power...

KXPX10M User Guide
Page 103
... the SD card or Multimedia card. (U39) Remedy • You are dirty Clear prints may become impossible if the feed roller or paper support lever become dirty. Then wipe off the ink sheet using a FAT32 formatted by a digital camera. Memory cards using a vacuum cleaner. 103 Others As dust builds up any dust with this printer. Page 104 Maintenance • When the feed roller and/or paper support lever are using a memory card that is not compatible.
... the SD card or Multimedia card. (U39) Remedy • You are dirty Clear prints may become impossible if the feed roller or paper support lever become dirty. Then wipe off the ink sheet using a FAT32 formatted by a digital camera. Memory cards using a vacuum cleaner. 103 Others As dust builds up any dust with this printer. Page 104 Maintenance • When the feed roller and/or paper support lever are using a memory card that is not compatible.

KXPX10M User Guide
Page 104
... sheets of wide size paper) Image Quality 256 levels/color Printing Resolution 300 x 300 dpi Number of Images Displayable Maximum of 20,000 Maximum Pixels 6144 x 4096 pixels of printing the overcoat. Specifications Power Source AC adaptor Input voltage: 100 V to the end of Image Print Head Thermal Input Terminal PictBridge: PictBridge terminal (front panel: 1) For personal computer: USB port (Type B) (rear panel: 1) Output Terminal Video: RCA pin jack (rear panel: 1) 1.0 Vp-p, 75 ohms Compatible Memory Card...
... sheets of wide size paper) Image Quality 256 levels/color Printing Resolution 300 x 300 dpi Number of Images Displayable Maximum of 20,000 Maximum Pixels 6144 x 4096 pixels of printing the overcoat. Specifications Power Source AC adaptor Input voltage: 100 V to the end of Image Print Head Thermal Input Terminal PictBridge: PictBridge terminal (front panel: 1) For personal computer: USB port (Type B) (rear panel: 1) Output Terminal Video: RCA pin jack (rear panel: 1) 1.0 Vp-p, 75 ohms Compatible Memory Card...