Fax
Page 3
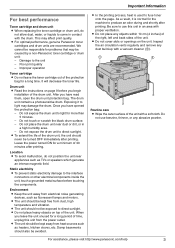
...L Do not cover slots or openings on the unit. For assistance, please visit http://www.panasonic.com/help For best performance Toner cartridge and drum unit L When replacing the toner cartridge or drum unit, do not position the unit near dust or dirt, or in contact ...right, left and back sides of the unit with proper ventilation. L Do not place any abrasive powder. L For optimal performance, genuine Panasonic toner cartridges and drum units are recommended. Damp basements should never be kept away from dust, high temperature and vibration. L The unit should ...
...L Do not cover slots or openings on the unit. For assistance, please visit http://www.panasonic.com/help For best performance Toner cartridge and drum unit L When replacing the toner cartridge or drum unit, do not position the unit near dust or dirt, or in contact ...right, left and back sides of the unit with proper ventilation. L Do not place any abrasive powder. L For optimal performance, genuine Panasonic toner cartridges and drum units are recommended. Damp basements should never be kept away from dust, high temperature and vibration. L The unit should ...
Fax
Page 4
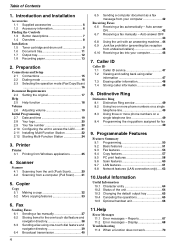
... 57 9.5 PC print features 58 9.6 Scan features 60 9.7 LAN features 61 9.8 Network features (LAN connection only)......63 10.Useful Information Useful Information 10.1 Character entry 64 ... 2.11 Installing Multi-Function Station 22 2.12 Starting Multi-Function Station 24 3. Printer Printer 3.1 Printing from undesired callers 45 6.10 Receiving a fax into your computer 42... 1.2 Accessory information 6 Finding the Controls 1.3 Button descriptions 7 1.4 Overview 8 Installation 1.5 Toner cartridge and drum unit 9 1.6 Document tray 11 1.7 Output tray 12 1.8 Recording paper 13 2....
... 57 9.5 PC print features 58 9.6 Scan features 60 9.7 LAN features 61 9.8 Network features (LAN connection only)......63 10.Useful Information Useful Information 10.1 Character entry 64 ... 2.11 Installing Multi-Function Station 22 2.12 Starting Multi-Function Station 24 3. Printer Printer 3.1 Printing from undesired callers 45 6.10 Receiving a fax into your computer 42... 1.2 Accessory information 6 Finding the Controls 1.3 Button descriptions 7 1.4 Overview 8 Installation 1.5 Toner cartridge and drum unit 9 1.6 Document tray 11 1.7 Output tray 12 1.8 Recording paper 13 2....

Fax
Page 6
...we recommend the use of the unit. 6 For assistance, please visit http://www.panasonic.com/help 1.1 Supplied accessories 1 Power cord 2 CD-ROM 3 Output tray 4 Document tray 5 Drum unit 6 Starter toner cartridge*1 7 Quick reference guide 8 Quick installation guide 9 Telephone line cord 1.2 ...your name, shipping address and telephone number - your signature - 1. Replacement toner cartridge*1 L Model No. (Part No.): KX-FA87/KX-FA85 - To place an order online (for future shipping and transportation of Panasonic toner cartridge and drum unit. Friday 9 am to 9 pm, EST.) *1...
...we recommend the use of the unit. 6 For assistance, please visit http://www.panasonic.com/help 1.1 Supplied accessories 1 Power cord 2 CD-ROM 3 Output tray 4 Document tray 5 Drum unit 6 Starter toner cartridge*1 7 Quick reference guide 8 Quick installation guide 9 Telephone line cord 1.2 ...your name, shipping address and telephone number - your signature - 1. Replacement toner cartridge*1 L Model No. (Part No.): KX-FA87/KX-FA85 - To place an order online (for future shipping and transportation of Panasonic toner cartridge and drum unit. Friday 9 am to 9 pm, EST.) *1...

Fax
Page 9
...near dust or dirt, or in a high humidity area. - L We cannot be responsible for any damage to the unit or degradation of a non-Panasonic toner cartridge and drum unit. The drum unit contains a photosensitive drum. Do not expose the drum unit to light may occur from the protection bags. 1 ... opened the protection bag: - For assistance, please visit http://www.panasonic.com/help 9 Do not expose the drum unit to snap into position. 5 Turn the two green levers (1) on the toner cartridge firmly. 1 2 Remove the toner cartridge and drum unit from the use of print quality which may ...
...near dust or dirt, or in a high humidity area. - L We cannot be responsible for any damage to the unit or degradation of a non-Panasonic toner cartridge and drum unit. The drum unit contains a photosensitive drum. Do not expose the drum unit to light may occur from the protection bags. 1 ... opened the protection bag: - For assistance, please visit http://www.panasonic.com/help 9 Do not expose the drum unit to snap into position. 5 Turn the two green levers (1) on the toner cartridge firmly. 1 2 Remove the toner cartridge and drum unit from the use of print quality which may ...
Fax
Page 10
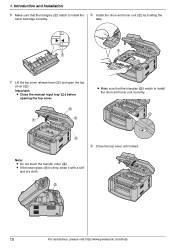
Introduction and Installation 6 Make sure that the triangles (2) match to install the toner cartridge correctly. 8 Install the drum and toner unit (1) by holding the tabs. 1 1 7 Lift the top cover release lever (1) and open the top cover (2). Important: L Close the manual ...input tray (3) before opening the top cover. 2 1 4 L Make sure that the triangles (1) match to install the drum and toner unit correctly. 2 3 9 Close the top cover until locked. Note: L Do not touch the transfer roller (4). L If the lower glass (5) is dirty, clean it...
Introduction and Installation 6 Make sure that the triangles (2) match to install the toner cartridge correctly. 8 Install the drum and toner unit (1) by holding the tabs. 1 1 7 Lift the top cover release lever (1) and open the top cover (2). Important: L Close the manual ...input tray (3) before opening the top cover. 2 1 4 L Make sure that the triangles (1) match to install the drum and toner unit correctly. 2 3 9 Close the top cover until locked. Note: L Do not touch the transfer roller (4). L If the lower glass (5) is dirty, clean it...

Fax
Page 11
... poor or "REPLACE DRUM" appears on the drum life. For assistance, please visit http://www.panasonic.com/help 11 TONER LOW TONER EMPTY L To check the drum life and quality, please print the printer test list (page 88) and refer to clean slots and openings (page 3) and the inside... of Panasonic toner cartridge (Model No. Introduction and Installation Caution: L To prevent injuries, be disposed of under the top cover. 1.6 Document ...
... poor or "REPLACE DRUM" appears on the drum life. For assistance, please visit http://www.panasonic.com/help 11 TONER LOW TONER EMPTY L To check the drum life and quality, please print the printer test list (page 88) and refer to clean slots and openings (page 3) and the inside... of Panasonic toner cartridge (Model No. Introduction and Installation Caution: L To prevent injuries, be disposed of under the top cover. 1.6 Document ...
Fax
Page 25
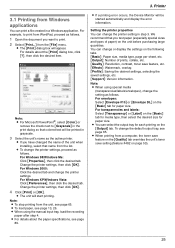
...applications You can change or display the settings on the unit before purchasing large quantities. Printer 3PrPinrtienrter 3.1 Printing from a computer, the toner save feature on the [Quality] tab overrides the unit's toner save feature, etc. [Effects]: Watermark, overlay. [Profile]: Saving the desired settings,... the name of prints, collate, etc. [Quality]: Resolution, contrast, toner save setting (feature #482 on the [Output] tab. For Windows 98/Windows Me: Click [Properties], then click the desired tab. Change the printer settings, then click [OK]. 4 Click [Print] or [OK]. ...
...applications You can change or display the settings on the unit before purchasing large quantities. Printer 3PrPinrtienrter 3.1 Printing from a computer, the toner save feature on the [Quality] tab overrides the unit's toner save feature, etc. [Effects]: Watermark, overlay. [Profile]: Saving the desired settings,... the name of prints, collate, etc. [Quality]: Resolution, contrast, toner save setting (feature #482 on the [Output] tab. For Windows 98/Windows Me: Click [Properties], then click the desired tab. Change the printer settings, then click [OK]. 4 Click [Print] or [OK]. ...
Fax
Page 53
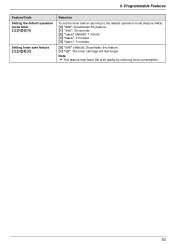
9. Note: L This feature may lower the print quality by reducing toner consumption. 53 Programmable Features Feature/Code Setting the default operation mode timer {#}{4}{6}{4} Setting toner save feature {#}{4}{8}{2} Selection To set the timer before returning to the default operation mode (feature #463). {0} "OFF": Deactivates this feature. {1} "30s": 30 seconds {2} "1min" (default): 1 minute {3} "2min": 2 minutes {4} "5min": 5 minutes {0} "OFF" (default): Deactivates this feature. {1} "ON": The toner cartridge will last longer.
9. Note: L This feature may lower the print quality by reducing toner consumption. 53 Programmable Features Feature/Code Setting the default operation mode timer {#}{4}{6}{4} Setting toner save feature {#}{4}{8}{2} Selection To set the timer before returning to the default operation mode (feature #463). {0} "OFF": Deactivates this feature. {1} "30s": 30 seconds {2} "1min" (default): 1 minute {3} "2min": 2 minutes {4} "5min": 5 minutes {0} "OFF" (default): Deactivates this feature. {1} "ON": The toner cartridge will last longer.
Fax
Page 65
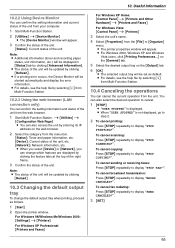
... [Settings] i [Printers] For Windows XP Professional: [Printers and Faxes] For Windows XP Home: [Control Panel] i [Printers and Other Hardware] i [Printers and Faxes] For Windows Vista: [Control Panel] i [Printers] 3 Select the unit's name. 4 Select [Properties] from the menu bar. [Status]: Toner and paper information, ... Information 10.2.2 Using Device Monitor You can confirm the setting information and status of the unit, etc. [Network]: Network information, etc. L The printer properties window will be updated by clicking the feature tabs at the top of the right frame. 3 Confirm...
... [Settings] i [Printers] For Windows XP Professional: [Printers and Faxes] For Windows XP Home: [Control Panel] i [Printers and Other Hardware] i [Printers and Faxes] For Windows Vista: [Control Panel] i [Printers] 3 Select the unit's name. 4 Select [Properties] from the menu bar. [Status]: Toner and paper information, ... Information 10.2.2 Using Device Monitor You can confirm the setting information and status of the unit, etc. [Network]: Network information, etc. L The printer properties window will be updated by clicking the feature tabs at the top of the right frame. 3 Confirm...
Fax
Page 68
...of the unit is something wrong with the unit's modem. Help 11.2 Error messages - Contact our service personnel. Replace the drum unit and the toner cartridge. Remove the document, then press {STOP} to "ALWAYS" (page 56), check the connection between the computer and the unit. Re-insert ... the document. While the unit cannot be printed out automatically when the unit warms up. Try again. 68 For assistance, please visit http://www.panasonic.com/help Contact our service personnel. Re-insert it . Close it correctly (page 9). Erase unnecessary items (page 39). See the other displayed...
...of the unit is something wrong with the unit's modem. Help 11.2 Error messages - Contact our service personnel. Replace the drum unit and the toner cartridge. Remove the document, then press {STOP} to "ALWAYS" (page 56), check the connection between the computer and the unit. Re-insert ... the document. While the unit cannot be printed out automatically when the unit warms up. Try again. 68 For assistance, please visit http://www.panasonic.com/help Contact our service personnel. Re-insert it . Close it correctly (page 9). Erase unnecessary items (page 39). See the other displayed...
Fax
Page 69
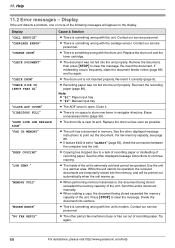
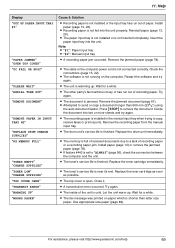
..."PLEASE WAIT" "REDIAL TIME OUT" "REMOVE DOCUMENT" "REMOVE PAPER IN INPUT TRAY #2" "REPLACE DRUM CHANGE SUPPLIES" "RX MEMORY FULL" "TONER EMPTY" "CHANGE SUPPLIES" "TONER LOW" "CHANGE SUPPLIES" "TOP COVER OPEN" "TRANSMIT ERROR" "WARMING UP" "WRONG PAPER" Cause & Solution L Recording paper is installed ... the connection between the computer and the unit. L Attempted to remove the document. Replace the toner cartridge immediately. Wait for a while. For assistance, please visit http://www.panasonic.com/help 69 Replace the drum unit immediately. L The drum unit's service life is finished....
..."PLEASE WAIT" "REDIAL TIME OUT" "REMOVE DOCUMENT" "REMOVE PAPER IN INPUT TRAY #2" "REPLACE DRUM CHANGE SUPPLIES" "RX MEMORY FULL" "TONER EMPTY" "CHANGE SUPPLIES" "TONER LOW" "CHANGE SUPPLIES" "TOP COVER OPEN" "TRANSMIT ERROR" "WARMING UP" "WRONG PAPER" Cause & Solution L Recording paper is installed ... the connection between the computer and the unit. L Attempted to remove the document. Replace the toner cartridge immediately. Wait for a while. For assistance, please visit http://www.panasonic.com/help 69 Replace the drum unit immediately. L The drum unit's service life is finished....

Fax
Page 71
... longer than the paper size which you set. L The recording paper is required. L To check the drum life and quality, please print the printer test list (page 88). Please do not insert a document before correction fluid has dried completely. Cause & Solution L When scanning at a high resolution...more details, refer to be found in the auto document feeder and re-insert it. I cannot scan. Replace the toner cartridge. For assistance, please visit http://www.panasonic.com/help 71 Clean them (page 83, 86). L Please wait. Change the setting or divide the document into...
... longer than the paper size which you set. L The recording paper is required. L To check the drum life and quality, please print the printer test list (page 88). Please do not insert a document before correction fluid has dried completely. Cause & Solution L When scanning at a high resolution...more details, refer to be found in the auto document feeder and re-insert it. I cannot scan. Replace the toner cartridge. For assistance, please visit http://www.panasonic.com/help 71 Clean them (page 83, 86). L Please wait. Change the setting or divide the document into...
Fax
Page 79
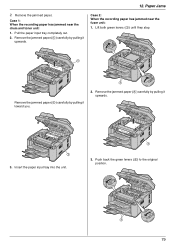
... (1) carefully by pulling it toward you. 2. Insert the paper input tray into the unit. 1 3. Case 2: When the recording paper has jammed near the drum and toner unit: 1. Case 1: When the recording paper has jammed near the fuser unit: 1. Lift both green levers (1) until they stop. 1 1 Remove the jammed paper (1) carefully by...
... (1) carefully by pulling it toward you. 2. Insert the paper input tray into the unit. 1 3. Case 2: When the recording paper has jammed near the drum and toner unit: 1. Case 1: When the recording paper has jammed near the fuser unit: 1. Lift both green levers (1) until they stop. 1 1 Remove the jammed paper (1) carefully by...
Fax
Page 83
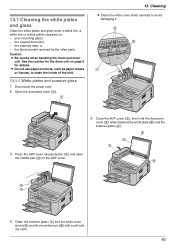
... line or a dirty pattern appears on page 9 for details. the fax document received by the other party. Caution: L Be careful when handling the drum and toner unit. Cleaning L Clean the white cover sheet carefully to clean the inside of the ADF cover. 5 Close the ADF cover (1), then hold the document cover...
... line or a dirty pattern appears on page 9 for details. the fax document received by the other party. Caution: L Be careful when handling the drum and toner unit. Cleaning L Clean the white cover sheet carefully to clean the inside of the ADF cover. 5 Close the ADF cover (1), then hold the document cover...
Fax
Page 85
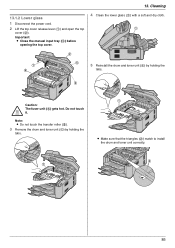
... (1) by holding the tabs. 1 L Make sure that the triangles (2) match to install the drum and toner unit correctly. 2 1 85 Cleaning 13.1.2 Lower glass 1 Disconnect the power cord. 2 Lift the top cover release lever (1) and open the top cover (2). Do not touch ...it. Important: L Close the manual input tray (3) before opening the top cover. 4 Clean the lower glass (1) with a soft and dry cloth. 1 2 1 4 5 5 Reinstall the drum and toner unit (1) by holding the tabs. 3 Caution: The fuser unit (4) gets hot. 13.
... (1) by holding the tabs. 1 L Make sure that the triangles (2) match to install the drum and toner unit correctly. 2 1 85 Cleaning 13.1.2 Lower glass 1 Disconnect the power cord. 2 Lift the top cover release lever (1) and open the top cover (2). Do not touch ...it. Important: L Close the manual input tray (3) before opening the top cover. 4 Clean the lower glass (1) with a soft and dry cloth. 1 2 1 4 5 5 Reinstall the drum and toner unit (1) by holding the tabs. 3 Caution: The fuser unit (4) gets hot. 13.
Fax
Page 88
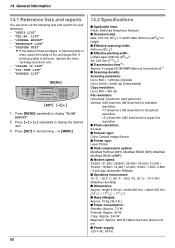
...: Public Switched Telephone Network ■ Document size: Max. 216 mm (81/2") in width, Max. 600 mm (235/8") in super fine resolution ■ Photo resolution: 64-level ■ Scanner type: Color Contact Image Sensor ■ Printer type: Laser Printer ■ Data compression... system: Modified Huffman (MH), Modified READ (MR), Modified Modified READ (MMR) ■ Modem speed: 33,600 / 31,200 / 28,800 / 26,400 / 24,000 / 21,600 / 19,200 / 16,800 / 14,400 / 12,000 / 9,600 / 7,200 / 4,800 / 2,400 bps; If printing quality is still poor, replace the toner...
...: Public Switched Telephone Network ■ Document size: Max. 216 mm (81/2") in width, Max. 600 mm (235/8") in super fine resolution ■ Photo resolution: 64-level ■ Scanner type: Color Contact Image Sensor ■ Printer type: Laser Printer ■ Data compression... system: Modified Huffman (MH), Modified READ (MR), Modified Modified READ (MMR) ■ Modem speed: 33,600 / 31,200 / 28,800 / 26,400 / 24,000 / 21,600 / 19,200 / 16,800 / 14,400 / 12,000 / 9,600 / 7,200 / 4,800 / 2,400 bps; If printing quality is still poor, replace the toner...
Fax
Page 90
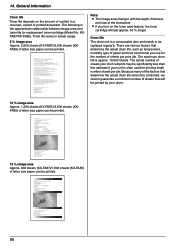
...4.3 Starting Multi-Function Station Printing 4.4 Using the unit as a printer Scanning 4.5 Using the unit as a copy machine. TAM (External Telephone Answering Machine) Table of Contents1. 1. Things you for purchasing a Panasonic fax machine. Preparation 2.1 Connections 2.2 Turning the power switch ON ... you turn on the amount of Attach your sales receipt here. General Information Toner life Toner life depends on the toner save feature, the toner cartridge will last approx. 40 % longer. Toner life varies in a received, copied or printed document. Table of Contents /...
...4.3 Starting Multi-Function Station Printing 4.4 Using the unit as a printer Scanning 4.5 Using the unit as a copy machine. TAM (External Telephone Answering Machine) Table of Contents1. 1. Things you for purchasing a Panasonic fax machine. Preparation 2.1 Connections 2.2 Turning the power switch ON ... you turn on the amount of Attach your sales receipt here. General Information Toner life Toner life depends on the toner save feature, the toner cartridge will last approx. 40 % longer. Toner life varies in a received, copied or printed document. Table of Contents /...
Fax
Page 98
... #464 Mode timer: 53 #466 Output tray setting for copying: 57 #467 Page layout hold: 57 #468 Zoom hold: 57 #469 Collate hold: 57 #482 Toner save: 11, 53 #493 Scan mode: 60 #494 Scan parameter hold: 60 #500 DHCP mode: 61 #501 IP address: 61 #502 Subnet mask: 61 #503...
... #464 Mode timer: 53 #466 Output tray setting for copying: 57 #467 Page layout hold: 57 #468 Zoom hold: 57 #469 Collate hold: 57 #482 Toner save: 11, 53 #493 Scan mode: 60 #494 Scan parameter hold: 60 #500 DHCP mode: 61 #501 IP address: 61 #502 Subnet mask: 61 #503...
Fax
Page 100
...: 40 Navigator directory: 38 One-touch dial: 38 Subnet mask (Feature #502): 61 T Telephone number list: 88 TEL mode: 43 Time adjustment (Feature #226): 52 Toner cartridge: 9 Toner life: 90 Toner save (Feature #482): 11, 53 Transparency: 26 V Volume: 19 Z Zoom hold (Feature #468): 57 100
...: 40 Navigator directory: 38 One-touch dial: 38 Subnet mask (Feature #502): 61 T Telephone number list: 88 TEL mode: 43 Time adjustment (Feature #226): 52 Toner cartridge: 9 Toner life: 90 Toner save (Feature #482): 11, 53 Transparency: 26 V Volume: 19 Z Zoom hold (Feature #468): 57 100
Fax - Spanish
Page 91
...Setup 4.1 Connecting to a computer 4.2 Installing Multi-Function Station 4.3 Starting Multi-Function Station Printing 4.4 Using the unit as a printer Scanning 4.5 Using the unit as a scannerRemote Control 4.6 Operating the unit from your computer. 4.7 Fax sending/receiving using Multi...machine. 3.2 Making a copy 3.3 More copying features 4. Things you for purchasing a Panasonic fax machine. Thank you for purchasing a Panasonic fax machine. Table of buttons.1.4 Overview Installation 1.5 Toner cartridge and drum unit 1.6 Document tray 1.7 Output tray1.8 Recording paper2. Table of...
...Setup 4.1 Connecting to a computer 4.2 Installing Multi-Function Station 4.3 Starting Multi-Function Station Printing 4.4 Using the unit as a printer Scanning 4.5 Using the unit as a scannerRemote Control 4.6 Operating the unit from your computer. 4.7 Fax sending/receiving using Multi...machine. 3.2 Making a copy 3.3 More copying features 4. Things you for purchasing a Panasonic fax machine. Thank you for purchasing a Panasonic fax machine. Table of buttons.1.4 Overview Installation 1.5 Toner cartridge and drum unit 1.6 Document tray 1.7 Output tray1.8 Recording paper2. Table of...


