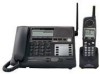
Telephone Equipment
Page 2
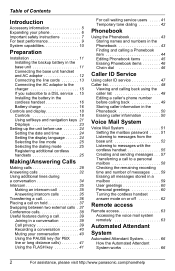
... 12 Connecting the line cords 13 Connecting the AC adaptor to the charger 15 If you subscribe to a DSL service . . 15 Installing the battery in the cordless handset 16 Battery charge 16 Controls and display 18 Controls 18 Using softkeys and navigation keys 21 Displays 23 Setting-up the unit before use 24 Setting the date and time 24 Setting the display language 24 Selecting the line mode 25 Selecting the dialing mode 25 Registering additional cordless handsets 25 Making/Answering Calls Making calls 28 Answering calls 32 Using additional lines...
... 12 Connecting the line cords 13 Connecting the AC adaptor to the charger 15 If you subscribe to a DSL service . . 15 Installing the battery in the cordless handset 16 Battery charge 16 Controls and display 18 Controls 18 Using softkeys and navigation keys 21 Displays 23 Setting-up the unit before use 24 Setting the date and time 24 Setting the display language 24 Selecting the line mode 25 Selecting the dialing mode 25 Registering additional cordless handsets 25 Making/Answering Calls Making calls 28 Answering calls 32 Using additional lines...
Telephone Equipment
Page 3
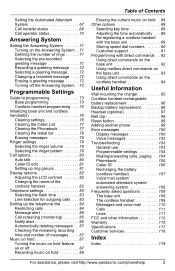
...89 Storing speed dial numbers 90 Customer support 91 Programming with direct commands . . 92 Using direct commands on the base unit 92 Using mailbox direct commands on the base unit 93 Using direct commands on the cordless handset 94 Useful Information Wall mounting the charger 95 Cordless handset rechargeable battery replacement 96 Backup battery replacement 96 Headset (optional 97 Belt clip 98 Reset button 99 Adding another phone 99 Error messages 100 Display messages 100 Voice messages 102 Troubleshooting 103 General use 103 Programmable settings 104 Making/answering calls...
...89 Storing speed dial numbers 90 Customer support 91 Programming with direct commands . . 92 Using direct commands on the base unit 92 Using mailbox direct commands on the base unit 93 Using direct commands on the cordless handset 94 Useful Information Wall mounting the charger 95 Cordless handset rechargeable battery replacement 96 Backup battery replacement 96 Headset (optional 97 Belt clip 98 Reset button 99 Adding another phone 99 Error messages 100 Display messages 100 Voice messages 102 Troubleshooting 103 General use 103 Programmable settings 104 Making/answering calls...
Telephone Equipment
Page 25
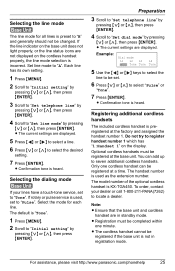
... dialing mode Base Unit If your dealer or call 1-800-211-PANA(7262) to "Set dial mode" by pressing {}, then press {ENTER}. If rotary or pulse service is used as the extension number. Example: Dial mode L1 L2 L3 L4 Tone Tone Tone Tone 5 Use the {f} or {g} keys to select the line to be changed. Do not try to register handset number 1 which has "1:Handset 1" on the cordless handset properly, the line mode selection is incorrect. Optional cordless handsets must be registered if the base unit...
... dialing mode Base Unit If your dealer or call 1-800-211-PANA(7262) to "Set dial mode" by pressing {}, then press {ENTER}. If rotary or pulse service is used as the extension number. Example: Dial mode L1 L2 L3 L4 Tone Tone Tone Tone 5 Use the {f} or {g} keys to select the line to be changed. Do not try to register handset number 1 which has "1:Handset 1" on the cordless handset properly, the line mode selection is incorrect. Optional cordless handsets must be registered if the base unit...

Telephone Equipment
Page 27
De-registering a cordless handset Base Unit Note: L De-registering a cordless handset clears all data on the base unit for the selected cordless handset (for example, Alert phone number, Alert on/off, greeting messages, etc.). 1 While the base unit is in standby mode, press {MENU}. 2 Scroll to "Initial setting" by pressing {}, then press {ENTER}. 3 Scroll to "Registration" by pressing {}, then press {ENTER}. 4 Scroll to confirm the operation. ENTER=Select L The numbers of the currently registered cordless handsets are no cordless handsets registered, an error beep is...
De-registering a cordless handset Base Unit Note: L De-registering a cordless handset clears all data on the base unit for the selected cordless handset (for example, Alert phone number, Alert on/off, greeting messages, etc.). 1 While the base unit is in standby mode, press {MENU}. 2 Scroll to "Initial setting" by pressing {}, then press {ENTER}. 3 Scroll to "Registration" by pressing {}, then press {ENTER}. 4 Scroll to confirm the operation. ENTER=Select L The numbers of the currently registered cordless handsets are no cordless handsets registered, an error beep is...
Telephone Equipment
Page 28
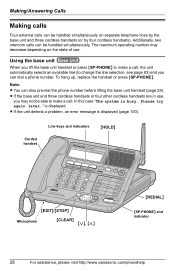
.... L If the base unit and three cordless handsets or four other cordless handsets are in use . Line keys and indicators {HOLD} Corded handset AUTOMATED ATTENDANT LINE 1 LINE 2 LINE 3 LINE 4 CONF HOLD 1 2 GHI 74 85 963 PQRS ABC JKL TUV OPER DEF BATTERY MNO REDIAL WXYZ PAUSE/EDIT TONE 0 CALL WAIT/FLASH ANSWER ON INTERCOM / TRANSFER 1 2 3 4LINE 4 VOICE MAIL SYSMTE EXIT/STOP CLEAR BACK SEALORCUHD/ FWD ME NU SSPP--PPHONEE ENTER HEADSET MUTE VOICE MAIL ALL 5 6 7 8 {EXIT}/{STOP} Microphone {CLEAR} {} {REDIAL} {SP-PHONE} and indicator 28 For...
.... L If the base unit and three cordless handsets or four other cordless handsets are in use . Line keys and indicators {HOLD} Corded handset AUTOMATED ATTENDANT LINE 1 LINE 2 LINE 3 LINE 4 CONF HOLD 1 2 GHI 74 85 963 PQRS ABC JKL TUV OPER DEF BATTERY MNO REDIAL WXYZ PAUSE/EDIT TONE 0 CALL WAIT/FLASH ANSWER ON INTERCOM / TRANSFER 1 2 3 4LINE 4 VOICE MAIL SYSMTE EXIT/STOP CLEAR BACK SEALORCUHD/ FWD ME NU SSPP--PPHONEE ENTER HEADSET MUTE VOICE MAIL ALL 5 6 7 8 {EXIT}/{STOP} Microphone {CLEAR} {} {REDIAL} {SP-PHONE} and indicator 28 For...
Telephone Equipment
Page 32
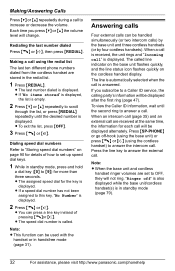
... a line key instead of how to set to "Storing speed dial numbers" on the cordless handset display. Press the line key to answer the external call to answer the intercom call will not ring. "Ringer off -hook (using the base unit) or press {C} or {s} (using the redial list The last ten different phone numbers dialed from the cordless handset are received at the same time, the information for each call . Each time you subscribe to this key, "No Number" is displayed. Making a call using the cordless handset) to...
... a line key instead of how to set to "Storing speed dial numbers" on the cordless handset display. Press the line key to answer the external call to answer the intercom call will not ring. "Ringer off -hook (using the base unit) or press {C} or {s} (using the redial list The last ten different phone numbers dialed from the cordless handset are received at the same time, the information for each call . Each time you subscribe to this key, "No Number" is displayed. Making a call using the cordless handset) to...
Telephone Equipment
Page 35
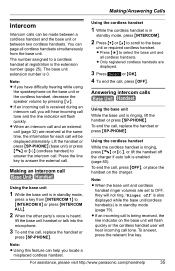
The base unit extension number is the extension number (page 25). Making/Answering Calls Intercom Intercom calls can page all cordless handsets simultaneously from the base unit. Note: L If you have difficulty hearing while using the speakerphone on the base unit or the cordless handset, decrease the speaker volume by pressing { You can be made between a cordless handset and the base unit or between two cordless handsets. The number assigned to a cordless handset at registration is 0.
The base unit extension number is the extension number (page 25). Making/Answering Calls Intercom Intercom calls can page all cordless handsets simultaneously from the base unit. Note: L If you have difficulty hearing while using the speakerphone on the base unit or the cordless handset, decrease the speaker volume by pressing { You can be made between a cordless handset and the base unit or between two cordless handsets. The number assigned to a cordless handset at registration is 0.
Telephone Equipment
Page 51
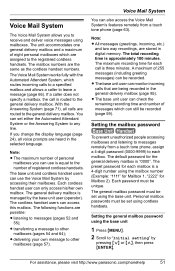
... mailbox numbers are possible: L listening to "Initial setting" by accessing their mailboxes. Note: L All messages (greetings, incoming, etc.) and two way recordings, are stored in digital memory. The default password for Mailbox 2). Each cordless handset user can also access the Voice Mail System's features remotely from a touch tone phone, assign a 4-digit password (0000-9999) to the general delivery mailbox. A maximum of messages which routes incoming calls to a specified mailbox and allows a caller to any line. The Voice Mail System works fully...
... mailbox numbers are possible: L listening to "Initial setting" by accessing their mailboxes. Note: L All messages (greetings, incoming, etc.) and two way recordings, are stored in digital memory. The default password for Mailbox 2). Each cordless handset user can also access the Voice Mail System's features remotely from a touch tone phone, assign a 4-digit password (0000-9999) to the general delivery mailbox. A maximum of messages which routes incoming calls to a specified mailbox and allows a caller to any line. The Voice Mail System works fully...

Telephone Equipment
Page 58
... Auto Attendant ON, calls are selected. L "Message record" is displayed against the selected cordless handset(s)/base. Voice Mail System 3 Scroll to {8}). If the cordless handset answer mode of the second ring, then he/she can press the extension number ({1} to select the highlighted recipient. L Alternatively, key-in the desired mailbox number using the keypad keys ({0} to the required mailbox number by the recorded message. L Press {*} to select all recipients are directed to the auto...
... Auto Attendant ON, calls are selected. L "Message record" is displayed against the selected cordless handset(s)/base. Voice Mail System 3 Scroll to {8}). If the cordless handset answer mode of the second ring, then he/she can press the extension number ({1} to select the highlighted recipient. L Alternatively, key-in the desired mailbox number using the keypad keys ({0} to the required mailbox number by the recorded message. L Press {*} to select all recipients are directed to the auto...
Telephone Equipment
Page 62
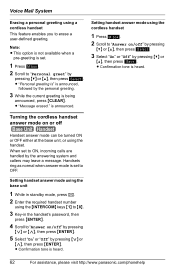
... {CLEAR}. Setting handset answer mode using the base unit 1 While in standby mode, press F. 2 Enter the required handset number using the {INTERCOM} keys {1} to {8}. 3 Key-in the handset's password, then press {ENTER}. 4 Scroll to "Answer on /off Base Unit Handset Handset answer mode can be turned ON or OFF either at the base unit, or using a cordless handset This feature enables you to erase a user-defined greeting. is heard. When set to OFF. L "Personal greeting is" is heard. 62 For assistance, please visit http://www.panasonic...
... {CLEAR}. Setting handset answer mode using the base unit 1 While in standby mode, press F. 2 Enter the required handset number using the {INTERCOM} keys {1} to {8}. 3 Key-in the handset's password, then press {ENTER}. 4 Scroll to "Answer on /off Base Unit Handset Handset answer mode can be turned ON or OFF either at the base unit, or using a cordless handset This feature enables you to erase a user-defined greeting. is heard. When set to OFF. L "Personal greeting is" is heard. 62 For assistance, please visit http://www.panasonic...

Telephone Equipment
Page 67
... more time for English. Press 1 for recording new messages. L The current user greeting message is played. Recording a user greeting message 1 Press the line's {ANSWER ON} key. Selecting/changing the recorded message 1 Press the line's {ANSWER ON} key. 2 Scroll to "Setup" by pressing {}, then press {ENTER}. 3 Scroll to "User greetings" by pressing {}, then press {ENTER}. 4 Select "Greeting 1" to "Greeting 5" by #. Turning on the line." You can be assigned to any line. Automated Attendant System Setting the Automated Attendant System Base Unit The...
... more time for English. Press 1 for recording new messages. L The current user greeting message is played. Recording a user greeting message 1 Press the line's {ANSWER ON} key. Selecting/changing the recorded message 1 Press the line's {ANSWER ON} key. 2 Scroll to "Setup" by pressing {}, then press {ENTER}. 3 Scroll to "User greetings" by pressing {}, then press {ENTER}. 4 Select "Greeting 1" to "Greeting 5" by #. Turning on the line." You can be assigned to any line. Automated Attendant System Setting the Automated Attendant System Base Unit The...

Telephone Equipment
Page 69
... the cordless handset answer mode is ON, the caller can call the operator or another extension, or leave a message in the mailbox. To call the operator, press 0." 1 2 0 * If the memory is full, three beeps sound and "Sorry, there is announced. Caller specifies an extension. Incomplete Call Handling Status * Records a message The Incomplete Call Handling Menu is announced up to guide the caller. is no -one is available to answer the call" The personal greeting message...
... the cordless handset answer mode is ON, the caller can call the operator or another extension, or leave a message in the mailbox. To call the operator, press 0." 1 2 0 * If the memory is full, three beeps sound and "Sorry, there is announced. Caller specifies an extension. Incomplete Call Handling Status * Records a message The Incomplete Call Handling Menu is announced up to guide the caller. is no -one is available to answer the call" The personal greeting message...

Telephone Equipment
Page 81
... "Ringer setting" by pressing {}, then press {ENTER}. 3 Scroll to "Ring group" by pressing {}, then press {ENTER}. 4 Press {} to select "On" or "Off". 5 Press Save . L Confirmation tone is in standby mode before attempting to set up ring groups Base Unit This feature allows you to 4). Programmable Settings Caller ID edit Handset Base Unit You can make calls using a line even when they have been removed from the ring group for incoming calls on a specific line, remove...
... "Ringer setting" by pressing {}, then press {ENTER}. 3 Scroll to "Ring group" by pressing {}, then press {ENTER}. 4 Press {} to select "On" or "Off". 5 Press Save . L Confirmation tone is in standby mode before attempting to set up ring groups Base Unit This feature allows you to 4). Programmable Settings Caller ID edit Handset Base Unit You can make calls using a line even when they have been removed from the ring group for incoming calls on a specific line, remove...

Telephone Equipment
Page 92
... {0} {6} {6} {0} {7} Feature Add an item to access/set-up ring groups Set the date and time Display the customer support screen Speed dial 1 Speed dial 2 Speed dial 3 Speed dial 4 Speed dial 5 Speed dial 6 Speed dial 7 Speed dial 8 Speed dial 9 Speed dial 10 Set the mailbox password Set the call monitoring feature Set an alert number Turn the alert feature on the base unit Base Unit 1 Press {MENU}. 2 Press {#}. 3 Enter the feature code from the table below. Using direct commands on and off Test the alert number (calling alert) Set the automatic message delete feature Page page 43 page 79...
... {0} {6} {6} {0} {7} Feature Add an item to access/set-up ring groups Set the date and time Display the customer support screen Speed dial 1 Speed dial 2 Speed dial 3 Speed dial 4 Speed dial 5 Speed dial 6 Speed dial 7 Speed dial 8 Speed dial 9 Speed dial 10 Set the mailbox password Set the call monitoring feature Set an alert number Turn the alert feature on the base unit Base Unit 1 Press {MENU}. 2 Press {#}. 3 Enter the feature code from the table below. Using direct commands on and off Test the alert number (calling alert) Set the automatic message delete feature Page page 43 page 79...

Telephone Equipment
Page 104
... telephone service you have been set-up . L Make sure that the cordless handset is not possible during a call . Answer the call and re-start programming from other electrical units. L Move the cordless handset(s) and the base unit away from the beginning after hanging up to be set to ring. L The ringer volume is heard, sound cuts in standby mode. Add to the base unit. L The dialed number is off the cradle or the {SP-PHONE} indicator lights. While programming, the unit/cordless handset...
... telephone service you have been set-up . L Make sure that the cordless handset is not possible during a call . Answer the call and re-start programming from other electrical units. L Move the cordless handset(s) and the base unit away from the beginning after hanging up to be set to ring. L The ringer volume is heard, sound cuts in standby mode. Add to the base unit. L The dialed number is off the cradle or the {SP-PHONE} indicator lights. While programming, the unit/cordless handset...
Telephone Equipment
Page 110
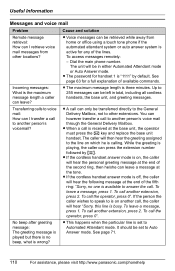
... call another person's voicemail? Dial the main phone number. L If the cordless handset answer mode is three minutes. Useful Information Messages and voice mail Problem Cause and solution Remote message retrieval: How can I retrieve voice mail messages from home or office using a touch tone phone if the automated attendant system or auto answer system is received at the end of the fifth ring: "Sorry, no beep, what is busy. To access messages remotely: - L The maximum message length is on another extension, press 2. The unit...
... call another person's voicemail? Dial the main phone number. L If the cordless handset answer mode is three minutes. Useful Information Messages and voice mail Problem Cause and solution Remote message retrieval: How can I retrieve voice mail messages from home or office using a touch tone phone if the automated attendant system or auto answer system is received at the end of the fifth ring: "Sorry, no beep, what is busy. To access messages remotely: - L The maximum message length is on another extension, press 2. The unit...
Telephone Equipment
Page 119
... Calling: 66 Changing a recorded greeting: 67 Changing the greeting: 67 Erasing a greeting message: 68 Recording a greeting message: 67 Selecting a recorded greeting: 67 Setting: 67 Turning off: 68 Turning on: 67 Auto message delete: 87 Auto talk: 33, 80 B Backlit display: 23 Backup battery Installing: 11 Replacing: 96 Base unit: 18 Battery indicator: 11 Controls: 18-20 Display: 23 Handset volume: 29 Initializing: 76 Installing backup battery: 11 Location: 9 Navigator key: 22 Programming: 73 Battery, cordless handset. See Cordless handset battery Battery indicator: 11 Battery installation...
... Calling: 66 Changing a recorded greeting: 67 Changing the greeting: 67 Erasing a greeting message: 68 Recording a greeting message: 67 Selecting a recorded greeting: 67 Setting: 67 Turning off: 68 Turning on: 67 Auto message delete: 87 Auto talk: 33, 80 B Backlit display: 23 Backup battery Installing: 11 Replacing: 96 Base unit: 18 Battery indicator: 11 Controls: 18-20 Display: 23 Handset volume: 29 Initializing: 76 Installing backup battery: 11 Location: 9 Navigator key: 22 Programming: 73 Battery, cordless handset. See Cordless handset battery Battery indicator: 11 Battery installation...
Telephone Equipment
Page 120
...: 76 Installing battery: 16 Joystick: 22 Key tones: 89 Lighted keypad: 31 Programming: 75 Registering: 25 Setting mailbox password: 52 Softkeys: 21 Volume: 31 Cordless handset battery Charging: 16 Installing: 16 Performance: 17 Replacing: 96 Strength: 17 Creating voice mail messages: 57 Customer services directory: 118 Customer support: 91 D Date and time, setting: 24 Delivering voice mail messages: 57 De-registering a handset: 27 Dialing mode: 25 Direct commands: 92 Direct handset access: 52 Display Backlit: 23 Base unit: 23 Contrast: 82 Cordless handset: 23 Error messages: 100 Language: 24...
...: 76 Installing battery: 16 Joystick: 22 Key tones: 89 Lighted keypad: 31 Programming: 75 Registering: 25 Setting mailbox password: 52 Softkeys: 21 Volume: 31 Cordless handset battery Charging: 16 Installing: 16 Performance: 17 Replacing: 96 Strength: 17 Creating voice mail messages: 57 Customer services directory: 118 Customer support: 91 D Date and time, setting: 24 Delivering voice mail messages: 57 De-registering a handset: 27 Dialing mode: 25 Direct commands: 92 Direct handset access: 52 Display Backlit: 23 Base unit: 23 Contrast: 82 Cordless handset: 23 Error messages: 100 Language: 24...

Telephone Equipment
Page 121
... Making calls: 28 Message alert: 85 Messages Checking remaining recording time: 59 Creating: 57 Deleting automatically: 87 Erasing: 59 Listening to voice mail messages: 52, 55 Location of rings before answering system answers: 71 P Paging device, alerting: 85 Passwords Setting cordless handset mailbox: 52 Setting general delivery mailbox: 51 PAUSE key: 41 Personal greetings: 60 Personalized name display: 47 Personal mailbox password: 52 Phonebook Chain dialing: 46 Character table: 44 Clearing: 77 Dialing from: 44 Editing items: 45 Erasing items: 46 Searching...
... Making calls: 28 Message alert: 85 Messages Checking remaining recording time: 59 Creating: 57 Deleting automatically: 87 Erasing: 59 Listening to voice mail messages: 52, 55 Location of rings before answering system answers: 71 P Paging device, alerting: 85 Passwords Setting cordless handset mailbox: 52 Setting general delivery mailbox: 51 PAUSE key: 41 Personal greetings: 60 Personalized name display: 47 Personal mailbox password: 52 Phonebook Chain dialing: 46 Character table: 44 Clearing: 77 Dialing from: 44 Editing items: 45 Erasing items: 46 Searching...
Telephone Equipment
Page 122
... Replacing Backup battery: 96 Handset battery: 96 Re-registering handset: 89 Reset button: 99 Restricting calls: 84 Ringer Off: 33-34, 79 Pattern: 79 Volume: 79 Ring group: 81 Rotary dialing: 25, 42 Routine care: 9 S Safety instructions: 7 Screening calls: 85 Searching Phonebook: 44 Selecting Greeting message: 72 Pre-recorded greeting message: 67, 71 Recorded greeting message: 67, 72 Setting Automated attendant system: 67 Date and time: 24 Direct handset access: 52 Display language: 24 Setting-up Mailbox: 51 Telephone line: 13, 84 Softkeys: 21 Speaker volume: 31 Specifications: 115 Speed dial...
... Replacing Backup battery: 96 Handset battery: 96 Re-registering handset: 89 Reset button: 99 Restricting calls: 84 Ringer Off: 33-34, 79 Pattern: 79 Volume: 79 Ring group: 81 Rotary dialing: 25, 42 Routine care: 9 S Safety instructions: 7 Screening calls: 85 Searching Phonebook: 44 Selecting Greeting message: 72 Pre-recorded greeting message: 67, 71 Recorded greeting message: 67, 72 Setting Automated attendant system: 67 Date and time: 24 Direct handset access: 52 Display language: 24 Setting-up Mailbox: 51 Telephone line: 13, 84 Softkeys: 21 Speaker volume: 31 Specifications: 115 Speed dial...


