KXTG4025 User Guide
Page 2
... Answering system settings 31 Voice Mail Service Voice mail service 33 Intercom/Locator Intercom 34 Handset locator 34 Transferring calls, conference calls . 34 Useful Information Wall mounting 35 Error messages 37 Troubleshooting 37 FCC and other information 42 Guía Rápida Española Guía Rápida Española...
... Answering system settings 31 Voice Mail Service Voice mail service 33 Intercom/Locator Intercom 34 Handset locator 34 Transferring calls, conference calls . 34 Useful Information Wall mounting 35 Error messages 37 Troubleshooting 37 FCC and other information 42 Guía Rápida Española Guía Rápida Española...
KXTG4025 User Guide
Page 5
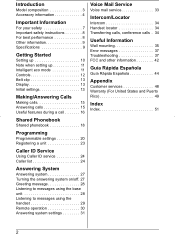
.../Order number 7 Wall mounting adaptor/PNKL1010Z3 Quantity 1 *1 KX-TG4021/KX-TG4022/KX-TG4023/KX-TG4024/KX-TG4025/KX-TG4073/ KX-TG4074 ■ For KX-TG4071 series*1 No. Expanding your phone system Handset feature overview You can expand your nearest Panasonic dealer for sales information (page 48). Accessory item/Order number 8 Range extender/KX-TGA405B 9 AC adaptor for each handset KX-J66 KX-TCA230 *1 Replacement...
.../Order number 7 Wall mounting adaptor/PNKL1010Z3 Quantity 1 *1 KX-TG4021/KX-TG4022/KX-TG4023/KX-TG4024/KX-TG4025/KX-TG4073/ KX-TG4074 ■ For KX-TG4071 series*1 No. Expanding your phone system Handset feature overview You can expand your nearest Panasonic dealer for sales information (page 48). Accessory item/Order number 8 Range extender/KX-TGA405B 9 AC adaptor for each handset KX-J66 KX-TCA230 *1 Replacement...
KXTG4025 User Guide
Page 35
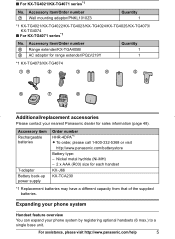
...assistance, please visit http://www.panasonic.com/help 35 Base unit ■ KX-TG4011 series: page 3 Drive the screws (not supplied) into holes 1 and 2 on the wall mounting adaptor into the wall. 30 mm (13/16 inches) 2 Tuck the telephone line cord inside the wall mounting adaptor (A). Connect the AC ...adaptor cord and telephone line cord (B). Wall mounting Note: L Make sure that the wall is strong enough to support the weight of the unit. ■ KX-TG4021/KX-TG4071 series: page 3 1 Lead the AC...
...assistance, please visit http://www.panasonic.com/help 35 Base unit ■ KX-TG4011 series: page 3 Drive the screws (not supplied) into holes 1 and 2 on the wall mounting adaptor into the wall. 30 mm (13/16 inches) 2 Tuck the telephone line cord inside the wall mounting adaptor (A). Connect the AC ...adaptor cord and telephone line cord (B). Wall mounting Note: L Make sure that the wall is strong enough to support the weight of the unit. ■ KX-TG4021/KX-TG4071 series: page 3 1 Lead the AC...

KXTG4025 User Guide
Page 36
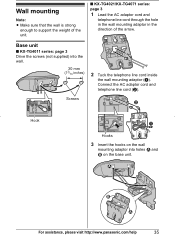
4 Adjust the adaptor to secure in the direction of the arrow until it in place. 1 83 mm (31/4 inches) or 102 mm (4 inches) 2 (120 V AC, 60 Hz) Wall phone plate 83 mm 102 mm (31/4 inches) 1 (4 inches) Charger Drive the screws (not supplied) into place. A A B 5 Mount the unit on a wall then slide down the release levers (A), remove the adaptor (B). To remove the wall mounting adaptor While pushing down to hold the base unit, then push it clicks into the wall. 25.4 mm (1 inch) Screws (120 V AC, 60 Hz) 2 36 For assistance, please visit http://www.panasonic.com/help
4 Adjust the adaptor to secure in the direction of the arrow until it in place. 1 83 mm (31/4 inches) or 102 mm (4 inches) 2 (120 V AC, 60 Hz) Wall phone plate 83 mm 102 mm (31/4 inches) 1 (4 inches) Charger Drive the screws (not supplied) into place. A A B 5 Mount the unit on a wall then slide down the release levers (A), remove the adaptor (B). To remove the wall mounting adaptor While pushing down to hold the base unit, then push it clicks into the wall. 25.4 mm (1 inch) Screws (120 V AC, 60 Hz) 2 36 For assistance, please visit http://www.panasonic.com/help
KXTG4025 User Guide
Page 51
...: 34 Troubleshooting: 37 TTY: 48 V Voice guidance language: 14 Voice mail: 32, 33 Volume Receiver: 15 Ringer (Base unit): 16 Ringer (Handset): 16 Speaker: 15 W Wall mounting: 35 51
...: 34 Troubleshooting: 37 TTY: 48 V Voice guidance language: 14 Voice mail: 32, 33 Volume Receiver: 15 Ringer (Base unit): 16 Ringer (Handset): 16 Speaker: 15 W Wall mounting: 35 51


