

2.4 Ghz Cordles Phon
Page 2
...) KX-TG2382B: 2 KX-TG2383B: 3 (p. 12) PQKE10352Z5 (Pearl White) KX-TG2382PW: 2 PQKE10352Z4 (Silver) KX-TG2383S: 3 Charger Unit (p. 9) Charger PQLV30017ZB (Black) KX-TG2382B: 1 KX-TG2383B: 2 PQLV30017ZPW (Pearl White) KX-TG2382PW: 1 PQLV30017ZS (Silver) KX-TG2383S: 2 AC Adaptor PQLV2Z (PQLV2) KX-TG2382B: 1 KX-TG2382PW: 1 KX-TG2383B: 2 KX-TG2383S: 2 2 Accessories (included) For extra orders, call 1-800-332-5368. Attach your new Panasonic cordless telephone. Please read IMPORTANT SAFETY INSTRUCTIONS on the phone...
...) KX-TG2382B: 2 KX-TG2383B: 3 (p. 12) PQKE10352Z5 (Pearl White) KX-TG2382PW: 2 PQKE10352Z4 (Silver) KX-TG2383S: 3 Charger Unit (p. 9) Charger PQLV30017ZB (Black) KX-TG2382B: 1 KX-TG2383B: 2 PQLV30017ZPW (Pearl White) KX-TG2382PW: 1 PQLV30017ZS (Silver) KX-TG2383S: 2 AC Adaptor PQLV2Z (PQLV2) KX-TG2382B: 1 KX-TG2382PW: 1 KX-TG2383B: 2 KX-TG2383S: 2 2 Accessories (included) For extra orders, call 1-800-332-5368. Attach your new Panasonic cordless telephone. Please read IMPORTANT SAFETY INSTRUCTIONS on the phone...
2.4 Ghz Cordles Phon
Page 3
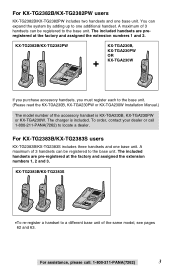
... is KX-TGA230B, KX-TGA230PW or KX-TGA230W. A maximum of the accessory handset is included. For KX-TG2383B/KX-TG2383S users KX-TG2383B/KX-TG2383S includes three handsets and one base unit. For KX-TG2382B/KX-TG2382PW users KX-TG2382B/KX-TG2382PW includes two handsets and one base unit. The included handsets are pre... The included handsets are preregistered at the factory and assigned the extension numbers 1, 2 and 3. For assistance, please call 1-800-211-PANA(7262) to one additional handset. A maximum of the same model, see pages 62 and 63. You can expand the system by adding...
... is KX-TGA230B, KX-TGA230PW or KX-TGA230W. A maximum of the accessory handset is included. For KX-TG2383B/KX-TG2383S users KX-TG2383B/KX-TG2383S includes three handsets and one base unit. For KX-TG2382B/KX-TG2382PW users KX-TG2382B/KX-TG2382PW includes two handsets and one base unit. The included handsets are pre... The included handsets are preregistered at the factory and assigned the extension numbers 1, 2 and 3. For assistance, please call 1-800-211-PANA(7262) to one additional handset. A maximum of the same model, see pages 62 and 63. You can expand the system by adding...

2.4 Ghz Cordles Phon
Page 4
...Talk Feature 18 Ringer Volume 19 LCD Contrast 20 Preparing the Answering System 21 Greeting Message 21 Caller's Recording Time 23 Number of Rings 24 Cordless Telephone Making Calls 25 System Capabilities (Operating More Than One Handset 25 Answering Calls 29 Caller ID Service 30 Using the Caller ...List 31 Viewing the Caller List 31 Calling Back from the Caller List 32 Editing the Caller's Phone Number 33 The Caller ID Number ...
...Talk Feature 18 Ringer Volume 19 LCD Contrast 20 Preparing the Answering System 21 Greeting Message 21 Caller's Recording Time 23 Number of Rings 24 Cordless Telephone Making Calls 25 System Capabilities (Operating More Than One Handset 25 Answering Calls 29 Caller ID Service 30 Using the Caller ...List 31 Viewing the Caller List 31 Calling Back from the Caller List 32 Editing the Caller's Phone Number 33 The Caller ID Number ...
2.4 Ghz Cordles Phon
Page 5
...Tone 48 Incoming Call Tone 48 Answering System Automatic Answering Operation 49 Setting the Unit to Answer Calls 49 Listening to Messages 50 Erasing Messages 51 Remote Operation with the Handset 52 Remote Operation from a Touch Tone Phone 54 Remote Code 55 Voice Menu 56... Direct Remote Operation 57 Useful Information Wall Mounting 58 Adding Another Phone 60 Battery Replacement 61 Canceling Registration/Re-registration 62 Canceling the Handset Registration 62 Re-registering the Handset 63 If the Following Appear 64 Troubleshooting 66 Important Safety Instructions 71 ...
...Tone 48 Incoming Call Tone 48 Answering System Automatic Answering Operation 49 Setting the Unit to Answer Calls 49 Listening to Messages 50 Erasing Messages 51 Remote Operation with the Handset 52 Remote Operation from a Touch Tone Phone 54 Remote Code 55 Voice Menu 56... Direct Remote Operation 57 Useful Information Wall Mounting 58 Adding Another Phone 60 Battery Replacement 61 Canceling Registration/Re-registration 62 Canceling the Handset Registration 62 Re-registering the Handset 63 If the Following Appear 64 Troubleshooting 66 Important Safety Instructions 71 ...
2.4 Ghz Cordles Phon
Page 6
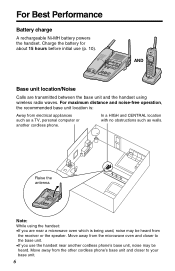
...no obstructions such as a TV, personal computer or another cordless phone's base unit, noise may be heard from the microwave oven and closer to your base unit. 6 Charge the battery for about 15 hours before initial use the handset near a microwave oven which is : Away from the other ...cordless phone's base unit and closer to the base unit. •If you are near another cordless...
...no obstructions such as a TV, personal computer or another cordless phone's base unit, noise may be heard from the microwave oven and closer to your base unit. 6 Charge the battery for about 15 hours before initial use the handset near a microwave oven which is : Away from the other ...cordless phone's base unit and closer to the base unit. •If you are near another cordless...

2.4 Ghz Cordles Phon
Page 7
... USE/HOLD Indicator (p. 28, 29) K X-TG2382 Charge Contacts (p. 11) REC GREETING CHECK ERASE REPEAT SKIP VOLUME STOP MESSAGE PLAYBACK 1 IN CHARGE USE HOLD EXPANDABLE TO 3 HANDSET 2 LOCATOR 3 INTERCOM ALL MIC (ANSWER!ON) Button and Indicator (p. 49) (MESSAGEÒPLAYBACK) Button (p. 50) MIC (Microphone) (p. 21, 42) VOLUME Buttons...
... USE/HOLD Indicator (p. 28, 29) K X-TG2382 Charge Contacts (p. 11) REC GREETING CHECK ERASE REPEAT SKIP VOLUME STOP MESSAGE PLAYBACK 1 IN CHARGE USE HOLD EXPANDABLE TO 3 HANDSET 2 LOCATOR 3 INTERCOM ALL MIC (ANSWER!ON) Button and Indicator (p. 49) (MESSAGEÒPLAYBACK) Button (p. 50) MIC (Microphone) (p. 21, 42) VOLUME Buttons...

2.4 Ghz Cordles Phon
Page 8
... and your menu choices. The up and down arrows are indicated by the arrows Ö, Ñ, Ü or á. 8 Location of Controls Handset Back side Speaker Antenna Receiver (TALK) Button (p. 25, 29) Headset Jack (p. 12) (Speakerphone) Button (p. 26, 29) (*) (TONE) Button ...(p. 46) (MUTE/FUNCTION) Button (p. 13, 15, 46) (FLASH/CALL!WAIT) Button (p. 46, 47) Display TALK SP-PHONE 1 4 7 OFF EDIT HOLD 3 INTERCOM CLEAR 2 6 5 9 8 TONE 0 MUTE FUNCTION FLASH CALL WAIT PAUSE REDIAL (OFF) Button (p. 13, 25, 31, 39) Navigator Key (...
... and your menu choices. The up and down arrows are indicated by the arrows Ö, Ñ, Ü or á. 8 Location of Controls Handset Back side Speaker Antenna Receiver (TALK) Button (p. 25, 29) Headset Jack (p. 12) (Speakerphone) Button (p. 26, 29) (*) (TONE) Button ...(p. 46) (MUTE/FUNCTION) Button (p. 13, 15, 46) (FLASH/CALL!WAIT) Button (p. 46, 47) Display TALK SP-PHONE 1 4 7 OFF EDIT HOLD 3 INTERCOM CLEAR 2 6 5 9 8 TONE 0 MUTE FUNCTION FLASH CALL WAIT PAUSE REDIAL (OFF) Button (p. 13, 25, 31, 39) Navigator Key (...

2.4 Ghz Cordles Phon
Page 10
...on the base unit or the charger will light, a beep will sound and "Charging" will be displayed on the handset. •Each handset's extension number is shown in the Handset Insert the battery into the compartment ($). Extension number 1 [1] Charging OR AND CHARGE Indicator 10 CHARGE Indicator Installation Installing the... Battery in the top right of its display ("[1]", "[2]" or "[3]") (p. 3). •You can charge either handset on the base unit or the charger. Press the battery down until it fits securely into the...
...on the base unit or the charger will light, a beep will sound and "Charging" will be displayed on the handset. •Each handset's extension number is shown in the Handset Insert the battery into the compartment ($). Extension number 1 [1] Charging OR AND CHARGE Indicator 10 CHARGE Indicator Installation Installing the... Battery in the top right of its display ("[1]", "[2]" or "[3]") (p. 3). •You can charge either handset on the base unit or the charger. Press the battery down until it fits securely into the...

2.4 Ghz Cordles Phon
Page 11
...the handset battery for more often if the unit is in use (Standby) Up to 4 hours Up to place the handset on ...usage conditions and ambient temperature. •Clean the charge contacts of the handset, the base unit..." is displayed on the handset, -" " flashes on the display, or -the handset beeps intermittently while it is...charger. •If the battery has been discharged, the handset will maximize the battery life. •The battery cannot be...and/or " " will flash when the handset is as shown in use . Display prompt (flashing) ...
...the handset battery for more often if the unit is in use (Standby) Up to 4 hours Up to place the handset on ...usage conditions and ambient temperature. •Clean the charge contacts of the handset, the base unit..." is displayed on the handset, -" " flashes on the display, or -the handset beeps intermittently while it is...charger. •If the battery has been discharged, the handset will maximize the battery life. •The battery cannot be...and/or " " will flash when the handset is as shown in use . Display prompt (flashing) ...
2.4 Ghz Cordles Phon
Page 12
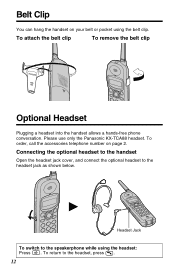
Please use only the Panasonic KX-TCA88 headset. Connecting the optional headset to the handset Open the headset jack cover, and connect the optional headset to the headset, press . 12 To return to the headset jack as shown below. To ... on your belt or pocket using the headset: Press . To attach the belt clip To remove the belt clip Optional Headset Plugging a headset into the handset allows a hands-free phone conversation. H Headset Jack To switch to the speakerphone while using the belt clip. Belt Clip You can hang the...
Please use only the Panasonic KX-TCA88 headset. Connecting the optional headset to the handset Open the headset jack cover, and connect the optional headset to the headset, press . 12 To return to the headset jack as shown below. To ... on your belt or pocket using the headset: Press . To attach the belt clip To remove the belt clip Optional Headset Plugging a headset into the handset allows a hands-free phone conversation. H Headset Jack To switch to the speakerphone while using the belt clip. Belt Clip You can hang the...

2.4 Ghz Cordles Phon
Page 13
... menu, press (OFF). Navigator key has four active areas that are selected from the menu Make sure the unit is not being used and the handset is in the sub-menu II). Scroll to select the item. Preparation Programmable Settings Programming Guidelines This unit has programmable functions. Press á to the...
... menu, press (OFF). Navigator key has four active areas that are selected from the menu Make sure the unit is not being used and the handset is in the sub-menu II). Scroll to select the item. Preparation Programmable Settings Programming Guidelines This unit has programmable functions. Press á to the...

2.4 Ghz Cordles Phon
Page 14
Main menu Sub-menu I . Programmable Settings Useful information indicates the beginning or end of the handsets, you will not need to program the same function using one of the function menu. •You can go back to the previous display by ... time, the line mode, the number of rings, the recording time or the remote code using the other handsets. 14 Most items in the main menu. See the corresponding pages for 60 seconds, the handset will exit the programming mode. •If the unit detects a problem, an error message will be displayed...
Main menu Sub-menu I . Programmable Settings Useful information indicates the beginning or end of the handsets, you will not need to program the same function using one of the function menu. •You can go back to the previous display by ... time, the line mode, the number of rings, the recording time or the remote code using the other handsets. 14 Most items in the main menu. See the corresponding pages for 60 seconds, the handset will exit the programming mode. •If the unit detects a problem, an error message will be displayed...

2.4 Ghz Cordles Phon
Page 15
... voice will announce the day and time that each message was recorded. Base unit display Make sure the unit is not being used and the handset is not correct. Time:12:00 AM Set time=0-9 IH =AM/PM G=Next 6 #Enter the time (hour and minute) using 4-digit numbers. (Ex...
... voice will announce the day and time that each message was recorded. Base unit display Make sure the unit is not being used and the handset is not correct. Time:12:00 AM Set time=0-9 IH =AM/PM G=Next 6 #Enter the time (hour and minute) using 4-digit numbers. (Ex...
2.4 Ghz Cordles Phon
Page 16
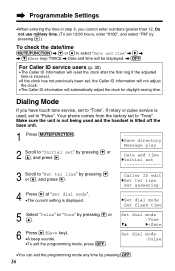
... or Ñ, and press á. Dialing Mode If you cannot enter numbers greater than 12. Make sure the unit is not being used and the handset is used, set to "Pulse". Set dial mode :Tone GF H=Save Set dial mode :Pulse •You can exit the programming mode any time ...by pressing Ö or Ñ. 6 Press á (Save key). •A beep sounds. •To exit the programming mode, press (OFF). Your phone comes from the factory set to "Tone". If rotary or pulse service is lifted off the base unit. 1 Press (MUTE/FUNCTION). 2 Scroll to "Tone". Caller...
... or Ñ, and press á. Dialing Mode If you cannot enter numbers greater than 12. Make sure the unit is not being used and the handset is used, set to "Pulse". Set dial mode :Tone GF H=Save Set dial mode :Pulse •You can exit the programming mode any time ...by pressing Ö or Ñ. 6 Press á (Save key). •A beep sounds. •To exit the programming mode, press (OFF). Your phone comes from the factory set to "Tone". If rotary or pulse service is lifted off the base unit. 1 Press (MUTE/FUNCTION). 2 Scroll to "Tone". Caller...

2.4 Ghz Cordles Phon
Page 17
...;. 8 Press á (Save key). •A beep sounds. •To exit the programming mode, press (OFF). Make sure the unit is not being used and the handset is lifted off the base unit. 1 Press (MUTE/FUNCTION). 2 Scroll to "Set line mode" by pressing Ö or Ñ. 6 Press á. •The current setting...
...;. 8 Press á (Save key). •A beep sounds. •To exit the programming mode, press (OFF). Make sure the unit is not being used and the handset is lifted off the base unit. 1 Press (MUTE/FUNCTION). 2 Scroll to "Set line mode" by pressing Ö or Ñ. 6 Press á. •The current setting...

2.4 Ghz Cordles Phon
Page 18
... Date and time HInitial set to answer a call , leave the Auto Talk feature OFF. 18 Make sure the unit is not being used and the handset is displayed. 6 Select "On" or "Off" by pressing Ö or Ñ. 7 Press á (Save key). •A beep sounds. •To exit the programming mode..., press (OFF). Your phone comes from the factory set HLCD contrast Auto talk LCD contrast HAuto talk Caller ID edit Auto talk :Off GF H=Save Auto talk :On GF...
... Date and time HInitial set to answer a call , leave the Auto Talk feature OFF. 18 Make sure the unit is not being used and the handset is displayed. 6 Select "On" or "Off" by pressing Ö or Ñ. 7 Press á (Save key). •A beep sounds. •To exit the programming mode..., press (OFF). Your phone comes from the factory set HLCD contrast Auto talk LCD contrast HAuto talk Caller ID edit Auto talk :Off GF H=Save Auto talk :On GF...

2.4 Ghz Cordles Phon
Page 19
... sound at the LOW level. "Ringer off " will be displayed while the handset is not in step 4. •The ringer will be displayed while the handset is displayed. 5 Press á (Save key). •A beep sounds. Your phone comes from the base unit or the charger. •You can change and ...ring. •To turn the ringer ON: Press Ñ in use . For assistance, please call is being used and the handset is not being received. Press Ö or Ñ ...
... sound at the LOW level. "Ringer off " will be displayed while the handset is not in step 4. •The ringer will be displayed while the handset is displayed. 5 Press á (Save key). •A beep sounds. Your phone comes from the base unit or the charger. •You can change and ...ring. •To turn the ringer ON: Press Ñ in use . For assistance, please call is being used and the handset is not being received. Press Ö or Ñ ...

2.4 Ghz Cordles Phon
Page 20
Your phone comes from the factory set 3 Press á at "LCD contrast". 4 Select the desired ...8226;A beep sounds. •To exit the programming mode, press (OFF). Make sure the unit is not being used and the handset is lifted off the base unit. 1 Press (MUTE/FUNCTION). 2 Scroll to level 3. HLCD contrast Auto talk Level 6 LCD contrast...High GF H=Save Level 4 LCD contrast Low High Level 1 LCD contrast Low High •You can program the handset LCD contrast (6 levels). Date and time HInitial set to "Initial set" by pressing (OFF). 20 Programmable Settings LCD...
Your phone comes from the factory set 3 Press á at "LCD contrast". 4 Select the desired ...8226;A beep sounds. •To exit the programming mode, press (OFF). Make sure the unit is not being used and the handset is lifted off the base unit. 1 Press (MUTE/FUNCTION). 2 Scroll to level 3. HLCD contrast Auto talk Level 6 LCD contrast...High GF H=Save Level 4 LCD contrast Low High Level 1 LCD contrast Low High •You can program the handset LCD contrast (6 levels). Date and time HInitial set to "Initial set" by pressing (OFF). 20 Programmable Settings LCD...

2.4 Ghz Cordles Phon
Page 23
... time Remote code 5 Press á. •The current setting is lifted off the base unit. 1 Press (MUTE/FUNCTION). 2 Scroll to "3 minutes". Your phone comes from the factory set 3 Scroll to "Recording time" by pressing Ö or Ñ. No. Preparation Caller's Recording Time You can also select the recording...á (Save key). •A beep sounds. •To exit the programming mode, press (OFF). Make sure the unit is not being used and the handset is displayed. Recording time :Greeting only GF H=Save •You can exit the programming mode any incoming messages.
... time Remote code 5 Press á. •The current setting is lifted off the base unit. 1 Press (MUTE/FUNCTION). 2 Scroll to "3 minutes". Your phone comes from the factory set 3 Scroll to "Recording time" by pressing Ö or Ñ. No. Preparation Caller's Recording Time You can also select the recording...á (Save key). •A beep sounds. •To exit the programming mode, press (OFF). Make sure the unit is not being used and the handset is displayed. Recording time :Greeting only GF H=Save •You can exit the programming mode any incoming messages.

2.4 Ghz Cordles Phon
Page 24
The Answering System needs to be on the 4th ring, there are no new messages. Make sure the unit is not being used and the handset is lifted off the base unit. 1 Press (MUTE/FUNCTION). 2 Scroll to "7" or "Toll saver"*. If the unit answers on . of rings Recording time Number ...Answering System answers a call, from outside: If the unit answers on the 2nd ring, there is at "No. This will save you hear the 3rd ring. Date and time HInitial set " by pressing Ö or Ñ, and press á. 3 Scroll to "Set answering" by pressing (0) (Toll saver*), or (2) to "4". Your phone ...
The Answering System needs to be on the 4th ring, there are no new messages. Make sure the unit is not being used and the handset is lifted off the base unit. 1 Press (MUTE/FUNCTION). 2 Scroll to "7" or "Toll saver"*. If the unit answers on . of rings Recording time Number ...Answering System answers a call, from outside: If the unit answers on the 2nd ring, there is at "No. This will save you hear the 3rd ring. Date and time HInitial set " by pressing Ö or Ñ, and press á. 3 Scroll to "Set answering" by pressing (0) (Toll saver*), or (2) to "4". Your phone ...

