User Guide
Page 1
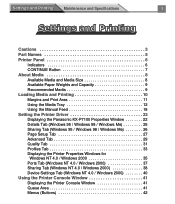
Settings and Printing Maintenance and Specifications 1 Cautions 3 Part Names 5 Printer Panel 6 Indicators 6 CONTINUE Button 7 About Media 8 Available Media and Media Size 8 Available Paper Weights and Capacity 9 Recommended Media 9 Loading Media and Printing 10 Margins and Print Area 11 Using the Media Tray 12 Using the Manual Feed 18 Setting the Printer Driver 22 Displaying the Panasonic KX-P7100 Properties Window 22 Details Tab (Windows 95 / Windows 98 / Windows Me 25 Sharing Tab (Windows 95 / Windows 98 / Windows Me 26 Page Setup Tab 27 Advanced Tab 29 Quality Tab 31 ...
Settings and Printing Maintenance and Specifications 1 Cautions 3 Part Names 5 Printer Panel 6 Indicators 6 CONTINUE Button 7 About Media 8 Available Media and Media Size 8 Available Paper Weights and Capacity 9 Recommended Media 9 Loading Media and Printing 10 Margins and Print Area 11 Using the Media Tray 12 Using the Manual Feed 18 Setting the Printer Driver 22 Displaying the Panasonic KX-P7100 Properties Window 22 Details Tab (Windows 95 / Windows 98 / Windows Me 25 Sharing Tab (Windows 95 / Windows 98 / Windows Me 26 Page Setup Tab 27 Advanced Tab 29 Quality Tab 31 ...

User Guide
Page 4
... if more than one KX-P7100 printers are connected in radio interference with data. s Ventilation Space The ventilation space is needed more than 20 mm (0.8″) between the printer and a wall. Settings and Printing Maintenance and Specifications 4 Cautions s Static Electricity Damage To prevent static electricity damage to any of those printers will perform print out job. Use of an unshielded cable can result in a USB tree, only one of...
... if more than one KX-P7100 printers are connected in radio interference with data. s Ventilation Space The ventilation space is needed more than 20 mm (0.8″) between the printer and a wall. Settings and Printing Maintenance and Specifications 4 Cautions s Static Electricity Damage To prevent static electricity damage to any of those printers will perform print out job. Use of an unshielded cable can result in a USB tree, only one of...

User Guide
Page 5
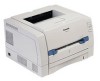
Settings and Printing Part Names Front Side View Front cover Maintenance and Specifications 5 Part Names Paper support (see pages 16, 18) Output tray Manual feed (see pages 8 , 18) Media tray (see pages 8, 12) Rear Side View Printer panel (see page 6) Paper level indicator (see page 14) Parallel interface connector (see page 49 in "Maintenance and Specifications") USB interface connector (see page 51 in "Maintenance and Specifications") AC inlet Rear cover (see pages 10, 16, 18) Jam release pan (see "Clearing a Jam" on page 10...
Settings and Printing Part Names Front Side View Front cover Maintenance and Specifications 5 Part Names Paper support (see pages 16, 18) Output tray Manual feed (see pages 8 , 18) Media tray (see pages 8, 12) Rear Side View Printer panel (see page 6) Paper level indicator (see page 14) Parallel interface connector (see page 49 in "Maintenance and Specifications") USB interface connector (see page 51 in "Maintenance and Specifications") AC inlet Rear cover (see pages 10, 16, 18) Jam release pan (see "Clearing a Jam" on page 10...

User Guide
Page 6
... sleep mode. Change the drum unit. Drum unit is not installed in the memory. Drum unit is ready for the troubleshooting. Drum unit: KX-PDP8 (For other .) Internal Error occurs. - - ->Turn the printer off . Toner may be empty. Toner cartridge: KX-PDP7 (For U.S.A) : Indicator is varied depending on your printer. D1 Printer is lit. Printer recoverable errors (media jam, media empty, etc.) occurred. Toner is low. : Indicator is receiving data printing or data remains in the printer. Settings and Printing Maintenance and Specifications Printer Panel...
... sleep mode. Change the drum unit. Drum unit is not installed in the memory. Drum unit is ready for the troubleshooting. Drum unit: KX-PDP8 (For other .) Internal Error occurs. - - ->Turn the printer off . Toner may be empty. Toner cartridge: KX-PDP7 (For U.S.A) : Indicator is varied depending on your printer. D1 Printer is lit. Printer recoverable errors (media jam, media empty, etc.) occurred. Toner is low. : Indicator is receiving data printing or data remains in the printer. Settings and Printing Maintenance and Specifications Printer Panel...

User Guide
Page 7
Printer recovers from the sleep mode (power save mode). TONER/ READY ERROR DRUM UNIT Printer Status Printer wakes up from the error status after paper empty or paper feed error is restored. : Indicator is lit. : Indicator is blinking fast (with an interval of 1 second). : Indicator is turned off. Settings and Printing Maintenance and Specifications CONTINUE Button 7 Printer Panel The printer executes the following action depending on the printer status by pressing this button.
Printer recovers from the sleep mode (power save mode). TONER/ READY ERROR DRUM UNIT Printer Status Printer wakes up from the error status after paper empty or paper feed error is restored. : Indicator is lit. : Indicator is blinking fast (with an interval of 1 second). : Indicator is turned off. Settings and Printing Maintenance and Specifications CONTINUE Button 7 Printer Panel The printer executes the following action depending on the printer status by pressing this button.

User Guide
Page 10
... the Setup Guide for the following instructions. • Installing the Toner Cartridge and Drum Unit • Connecting Cables • Intalling the Printer Software The media is straightly printed out. However, it is needed to remove every time the media is printed, it by opening the rear cover because the media is printed out on the output tray (top of the printer). When the thick paper [106-165 g/m2 (29-44 lbs.)] or envelope is printed out to use manual feed when printing a document on page 8.
... the Setup Guide for the following instructions. • Installing the Toner Cartridge and Drum Unit • Connecting Cables • Intalling the Printer Software The media is straightly printed out. However, it is needed to remove every time the media is printed, it by opening the rear cover because the media is printed out on the output tray (top of the printer). When the thick paper [106-165 g/m2 (29-44 lbs.)] or envelope is printed out to use manual feed when printing a document on page 8.

User Guide
Page 18
... size from 76.2 mm x 127 mm to 216 mm x 356 mm (3″ x 5″ to the approximate width of the media. Settings and Printing Maintenance and Specifications 18 Loading Media and Printing Using the Manual Feed The manual feed serves as an additional tray for loading any type of the printer to avoid the curl or wrinkles if you print a document on a thick paper or envelope.) 2 Separate the media guides to 8.5″ x 14″). Paper support Rear cover (Open...
... size from 76.2 mm x 127 mm to 216 mm x 356 mm (3″ x 5″ to the approximate width of the media. Settings and Printing Maintenance and Specifications 18 Loading Media and Printing Using the Manual Feed The manual feed serves as an additional tray for loading any type of the printer to avoid the curl or wrinkles if you print a document on a thick paper or envelope.) 2 Separate the media guides to 8.5″ x 14″). Paper support Rear cover (Open...
User Guide
Page 20
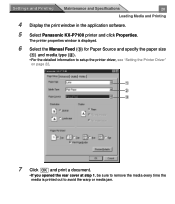
Settings and Printing Maintenance and Specifications 20 Loading Media and Printing 4 Display the print window in the application software. 5 Select Panasonic KX-P7100 printer and click Properties. The printer properties window is displayed. 6 Select the Manual Feed (%) for Paper Source and specify the paper size (#) and media type ($). • For the detailed information to setup the printer driver, see "Setting the Printer Driver" on page 22. # $ % 7 Click OK and print a document. • If you opened the rear cover at step 1, be sure to remove the media every time the media is...
Settings and Printing Maintenance and Specifications 20 Loading Media and Printing 4 Display the print window in the application software. 5 Select Panasonic KX-P7100 printer and click Properties. The printer properties window is displayed. 6 Select the Manual Feed (%) for Paper Source and specify the paper size (#) and media type ($). • For the detailed information to setup the printer driver, see "Setting the Printer Driver" on page 22. # $ % 7 Click OK and print a document. • If you opened the rear cover at step 1, be sure to remove the media every time the media is...

User Guide
Page 22
... can be displayed from Windows®*1 (see page 24). Settings and Printing Maintenance and Specifications 22 Setting the Printer Driver Setting the Printer Driver Displaying the Panasonic KX-P7100 Properties Window It is possible to Settings, then click Printers. The Printers window is displayed. *1 Microsoft® Windows® operating system (hereafter Windows) *2 Microsoft® Windows® 95 operating system (hereafter Windows 95) *3 Microsoft® Windows® 98 operating system (hereafter Windows 98) *4 Microsoft® Windows® Millennium Edition operating system...
... can be displayed from Windows®*1 (see page 24). Settings and Printing Maintenance and Specifications 22 Setting the Printer Driver Setting the Printer Driver Displaying the Panasonic KX-P7100 Properties Window It is possible to Settings, then click Printers. The Printers window is displayed. *1 Microsoft® Windows® operating system (hereafter Windows) *2 Microsoft® Windows® 95 operating system (hereafter Windows 95) *3 Microsoft® Windows® 98 operating system (hereafter Windows 98) *4 Microsoft® Windows® Millennium Edition operating system...
User Guide
Page 24
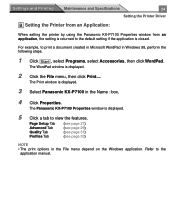
... page 29) (see page 31) (see page 33) NOTE • The print options in Windows 98, perform the following steps. 1 Click Start , select Programs, select Accessories, then click WordPad. Settings and Printing Maintenance and Specifications 24 Setting the Printer Driver B Setting the Printer from an Application: When setting the printer by using the Panasonic KX-P7100 Properties window from an application, the setting is returned to the default setting if the application is displayed. 3 Select Panasonic KX-P7100...
... page 29) (see page 31) (see page 33) NOTE • The print options in Windows 98, perform the following steps. 1 Click Start , select Programs, select Accessories, then click WordPad. Settings and Printing Maintenance and Specifications 24 Setting the Printer Driver B Setting the Printer from an Application: When setting the printer by using the Panasonic KX-P7100 Properties window from an application, the setting is returned to the default setting if the application is displayed. 3 Select Panasonic KX-P7100...

User Guide
Page 28
... Defaults Resets the Page Setup tab's settings to the default settings. The page border will be set to print on both sides of paper. Settings and Printing Maintenance and Specifications 28 Setting the Printer Driver % Paper Source Enables to print on one piece of paper. Their media can be printed using the manual feed. & Orientation Selects Portrait or Landscape. Paper Size: Media Type: Paper Source: A4, Letter, B5, Executive or Legal Plain Paper Media Tray ( Pages Per Sheet Specifies how many pages of your document to select the Media Tray...
... Defaults Resets the Page Setup tab's settings to the default settings. The page border will be set to print on both sides of paper. Settings and Printing Maintenance and Specifications 28 Setting the Printer Driver % Paper Source Enables to print on one piece of paper. Their media can be printed using the manual feed. & Orientation Selects Portrait or Landscape. Paper Size: Media Type: Paper Source: A4, Letter, B5, Executive or Legal Plain Paper Media Tray ( Pages Per Sheet Specifies how many pages of your document to select the Media Tray...
User Guide
Page 39
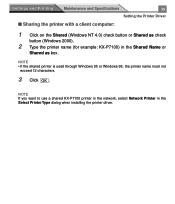
... to use a shared KX-P7100 printer in the network, select Network Printer in the Shared Name or Shared as check button (Windows 2000). 2 Type the printer name (for example: KX-P7100) in the Select Printer Type dialog when installing the printer driver. Settings and Printing Maintenance and Specifications 39 Setting the Printer Driver s Sharing the printer with a client computer: 1 Click on the Shared (Windows NT 4.0) check button or Shared as box. NOTE • If the shared printer is used through Windows 95 or Windows...
... to use a shared KX-P7100 printer in the network, select Network Printer in the Shared Name or Shared as check button (Windows 2000). 2 Type the printer name (for example: KX-P7100) in the Select Printer Type dialog when installing the printer driver. Settings and Printing Maintenance and Specifications 39 Setting the Printer Driver s Sharing the printer with a client computer: 1 Click on the Shared (Windows NT 4.0) check button or Shared as box. NOTE • If the shared printer is used through Windows 95 or Windows...

User Guide
Page 41
... the format (GDI) of the print job the size of the print job the time that the print job is connected through the network, the Printer Console cannot be used. Displaying the Printer Console Window 1 Click Start , move the pointer to your computer using the parallel interface or USB interface cable. The Panasonic KX-P7100 Printer Console window appears. Settings and Printing Maintenance and Specifications 41 Using the Printer Console Window Using the Printer Console Window The KX-P7100 Printer Console window provides an easy means to...
... the format (GDI) of the print job the size of the print job the time that the print job is connected through the network, the Printer Console cannot be used. Displaying the Printer Console Window 1 Click Start , move the pointer to your computer using the parallel interface or USB interface cable. The Panasonic KX-P7100 Printer Console window appears. Settings and Printing Maintenance and Specifications 41 Using the Printer Console Window Using the Printer Console Window The KX-P7100 Printer Console window provides an easy means to...

User Guide
Page 42
... on to exit the Panasonic KX-P7100 Printer Console window. s Settings Menu Density ( ) The Density setting allows you to delete the selected print job (highlighted) from the print queue. Settings and Printing Maintenance and Specifications 42 Using the Printer Console Window Menus (Buttons) s File Menu Pause Printer ( ) Enables to the print queue. Add Document ( ) Enables to add a print job file (GDI format) to pause printing a document. Power Saving ( ) To conserve energy and operating cost, this printer is provided with the power save feature. Exit...
... on to exit the Panasonic KX-P7100 Printer Console window. s Settings Menu Density ( ) The Density setting allows you to delete the selected print job (highlighted) from the print queue. Settings and Printing Maintenance and Specifications 42 Using the Printer Console Window Menus (Buttons) s File Menu Pause Printer ( ) Enables to the print queue. Add Document ( ) Enables to add a print job file (GDI format) to pause printing a document. Power Saving ( ) To conserve energy and operating cost, this printer is provided with the power save feature. Exit...
User Guide
Page 43
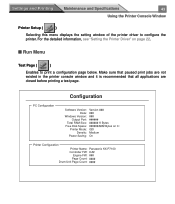
... Software Version: Date: Windows Version: Output Port: Total RAM Size: Free Disk Space: Printer Mode: Density: Power Saving: Version K Bytes ########## Bytes on page 22. For the detailed information, see "Setting the Printer Driver" on C: GDI Medium On Printer Configuration Printer Name: Panasonic KX-P7100 Controller FW: #.## Engine FW: ### Page Count: #### Drum Unit Page Count: #### s Run Menu Test Page ( ) Enables to configure the printer. Settings and Printing Maintenance and Specifications 43 Using the Printer Console Window Printer Setup ( ) Selecting this menu...
... Software Version: Date: Windows Version: Output Port: Total RAM Size: Free Disk Space: Printer Mode: Density: Power Saving: Version K Bytes ########## Bytes on page 22. For the detailed information, see "Setting the Printer Driver" on C: GDI Medium On Printer Configuration Printer Name: Panasonic KX-P7100 Controller FW: #.## Engine FW: ### Page Count: #### Drum Unit Page Count: #### s Run Menu Test Page ( ) Enables to configure the printer. Settings and Printing Maintenance and Specifications 43 Using the Printer Console Window Printer Setup ( ) Selecting this menu...
User Guide
Page 44
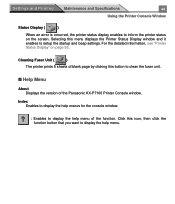
Cleaning Fuser Unit ( ) The printer prints 5 sheets of blank page by clicking this icon, then click the function button that you want to display the help menu of the Panasonic KX-P7100 Printer Console window. Click this button to display the help menu. For the detailed information, see "Printer Status Display" on the screen. s Help Menu About Displays the version of the function. Settings and Printing Maintenance and Specifications 44 Using the Printer Console Window Status Display ( ) When an error is occurred, the printer status display enables to setup the startup ...
Cleaning Fuser Unit ( ) The printer prints 5 sheets of blank page by clicking this icon, then click the function button that you want to display the help menu of the Panasonic KX-P7100 Printer Console window. Click this button to display the help menu. For the detailed information, see "Printer Status Display" on the screen. s Help Menu About Displays the version of the function. Settings and Printing Maintenance and Specifications 44 Using the Printer Console Window Status Display ( ) When an error is occurred, the printer status display enables to setup the startup ...

User Guide
Page 53
... bar or a Printer Status Display window is set to exit the Printer Status Display program, click the Printer Status Display icon with the right mouse button, then select Exit. If you want to Stay, the Printer Status Display icon ( ) will show the printer status, error message or recovery information of the local printer connected to your computer using the parallel interface or USB interface cable. Settings and Printing Maintenance and Specifications Printer Status Display 53 Printer Status Display The Printer Status Display will be used. The Printer Status Display icon is...
... bar or a Printer Status Display window is set to exit the Printer Status Display program, click the Printer Status Display icon with the right mouse button, then select Exit. If you want to Stay, the Printer Status Display icon ( ) will show the printer status, error message or recovery information of the local printer connected to your computer using the parallel interface or USB interface cable. Settings and Printing Maintenance and Specifications Printer Status Display 53 Printer Status Display The Printer Status Display will be used. The Printer Status Display icon is...

User Guide
Page 54
Clear jam and clicking Resume resumes printing. ) This box shows an error or status message. Settings and Printing Maintenance and Specifications Function of the Printer Status Display (see "Recovery Information" on page 56). ( This button is activated when a media feed error has occurred. If the printer is not printing, the Cancel is cancelled by pressing the Cancel . enables the start up and beep settings of the Status Display 54 Printer Status Display # ) $ ( %& ' # This box shows the printer status. $ The recovery...
Clear jam and clicking Resume resumes printing. ) This box shows an error or status message. Settings and Printing Maintenance and Specifications Function of the Printer Status Display (see "Recovery Information" on page 56). ( This button is activated when a media feed error has occurred. If the printer is not printing, the Cancel is cancelled by pressing the Cancel . enables the start up and beep settings of the Status Display 54 Printer Status Display # ) $ ( %& ' # This box shows the printer status. $ The recovery...

User Guide
Page 55
..., the start button is changed to button. Clicking button will stops the animation. & Clicking the button steps backwards. ' Clicking the button exits the animation. ( Clicking the button steps forward. Settings and Printing Maintenance and Specifications Recovery Information 55 Printer Status Display Recovery information shows the corrective instruction with animation when a printer error has occurred. # $ %& ' ( # Shows corrective action for the printer error with animation. $ Shows corrective instructions or status. % Clicking this button starts the...
..., the start button is changed to button. Clicking button will stops the animation. & Clicking the button steps backwards. ' Clicking the button exits the animation. ( Clicking the button steps forward. Settings and Printing Maintenance and Specifications Recovery Information 55 Printer Status Display Recovery information shows the corrective instruction with animation when a printer error has occurred. # $ %& ' ( # Shows corrective action for the printer error with animation. $ Shows corrective instructions or status. % Clicking this button starts the...

User Guide
Page 58
... menu 43 Settings menu 42 Printer driver 22 Printer panel 5, 6 Printer properties window 22, 35 Printer Setting 22 Printer Setup 43 Printer Status Display 53 Function 54 Recovery information 55 Setup 56 Printing Duplex 45 Overlay 47 Test page 43 Using manual feed 18 Using media tray 12 Profiles tab 33 Index R READY indicator 6 Rear cover 5, 10, 16, 18 Recovery information 55 S Scaling 29, 30 Sharing tab 26, 38 Sharing the printer 39 Status Display 44, 53 T Test Page 43 Toner Save 31, 32 TONER/DRUM UNIT...
... menu 43 Settings menu 42 Printer driver 22 Printer panel 5, 6 Printer properties window 22, 35 Printer Setting 22 Printer Setup 43 Printer Status Display 53 Function 54 Recovery information 55 Setup 56 Printing Duplex 45 Overlay 47 Test page 43 Using manual feed 18 Using media tray 12 Profiles tab 33 Index R READY indicator 6 Rear cover 5, 10, 16, 18 Recovery information 55 S Scaling 29, 30 Sharing tab 26, 38 Sharing the printer 39 Status Display 44, 53 T Test Page 43 Toner Save 31, 32 TONER/DRUM UNIT...