Mfp Laser Fax
Page 6
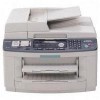
...Confirm that may result in the air. Bank notes and checks 4 For assistance, please visit http://www.panasonic.com/consumersupport Do not touch it to rain or any toner comes into contact with your skin, wash the area thoroughly with fresh air and consult local medical personnel... your country. Use of controls or adjustments or performance of items that smoke has stopped and contact an authorized service center. KX-FLB811 1 2 KX-FLB801 1 2 Toner cartridge L Be careful of the following are examples of procedures other than air, it emits smoke, an abnormal smell or makes ...
...Confirm that may result in the air. Bank notes and checks 4 For assistance, please visit http://www.panasonic.com/consumersupport Do not touch it to rain or any toner comes into contact with your skin, wash the area thoroughly with fresh air and consult local medical personnel... your country. Use of controls or adjustments or performance of items that smoke has stopped and contact an authorized service center. KX-FLB811 1 2 KX-FLB801 1 2 Toner cartridge L Be careful of the following are examples of procedures other than air, it emits smoke, an abnormal smell or makes ...
Mfp Laser Fax
Page 7
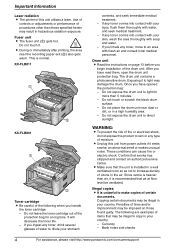
... shortly after printing. Leave the power turned ON for either its completeness or accuracy. L For optimal performance, genuine Panasonic toner cartridges and drum units are recommended. Poor print quality - For assistance, please visit http://www.panasonic.com/consumersupport 5 Postage stamps and other electrical components inside the unit, touch a grounded metal surface before touching...
... shortly after printing. Leave the power turned ON for either its completeness or accuracy. L For optimal performance, genuine Panasonic toner cartridges and drum units are recommended. Poor print quality - For assistance, please visit http://www.panasonic.com/consumersupport 5 Postage stamps and other electrical components inside the unit, touch a grounded metal surface before touching...
Mfp Laser Fax
Page 9
...Broadcast transmission 34 Receiving Faxes 3.7 Receiving a fax automatically - Distinctive Ring 5.1 Distinctive Ring service from your computer 54 PC Fax 7.7 Fax sending/receiving using MultiFunction Station 55 7.8 Confirming the status of the unit....... 56 7.9 Other information (KX-FLB811 only 56 8. Programmable...ring pattern assigned for the one-touch dial feature and navigator directory......... 31 3.5 Sending a fax using caller Table of buttons 10 1.4 Overview 11 Installation 1.5 Toner cartridge and drum unit .......... 13 1.6 Document tray 15 1.7 Output tray 15 1.8 Recording ...
...Broadcast transmission 34 Receiving Faxes 3.7 Receiving a fax automatically - Distinctive Ring 5.1 Distinctive Ring service from your computer 54 PC Fax 7.7 Fax sending/receiving using MultiFunction Station 55 7.8 Confirming the status of the unit....... 56 7.9 Other information (KX-FLB811 only 56 8. Programmable...ring pattern assigned for the one-touch dial feature and navigator directory......... 31 3.5 Sending a fax using caller Table of buttons 10 1.4 Overview 11 Installation 1.5 Toner cartridge and drum unit .......... 13 1.6 Document tray 15 1.7 Output tray 15 1.8 Recording ...
Mfp Laser Fax
Page 10
Table of Contents Replacement 9.4 Replacing the toner cartridge and the drum unit 76 Jams 9.5 Recording paper jam 79 9.6 Document jams (Auto document feeder 83 Cleaning 9.7 Cleaning the white plate and glasses 84 9.8 Cleaning the document feeder rollers 87 10. General Information 10.1 Reference lists and reports 89 10.2 Specifications 90 10.3 FCC and Other Information 93 10.4 Limited Warranty 95 10.5 Customer Services directory 97 10.6 User record 98 11. Index 11.1 Index 99 8
Table of Contents Replacement 9.4 Replacing the toner cartridge and the drum unit 76 Jams 9.5 Recording paper jam 79 9.6 Document jams (Auto document feeder 83 Cleaning 9.7 Cleaning the white plate and glasses 84 9.8 Cleaning the document feeder rollers 87 10. General Information 10.1 Reference lists and reports 89 10.2 Specifications 90 10.3 FCC and Other Information 93 10.4 Limited Warranty 95 10.5 Customer Services directory 97 10.6 User record 98 11. Index 11.1 Index 99 8
Mfp Laser Fax
Page 11
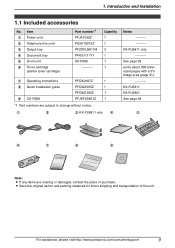
... 4 Document tray 5 Drum unit 6 Toner cartridge (starter toner cartridge) Part number*1 PFJA1030Z PQJA10075Z PFZXFLB811M PFKS1117Y1 KX-FA86 ---------- L Save the original carton and packing materials for future shipping and transportation of purchase. For assistance, please visit http://www.panasonic.com/consumersupport 9 prints about 800 lettersized pages with a 5% image area (page 91). ---------KX-FLB811 KX-FLB801 See page 48...
... 4 Document tray 5 Drum unit 6 Toner cartridge (starter toner cartridge) Part number*1 PFJA1030Z PQJA10075Z PFZXFLB811M PFKS1117Y1 KX-FA86 ---------- L Save the original carton and packing materials for future shipping and transportation of purchase. For assistance, please visit http://www.panasonic.com/consumersupport 9 prints about 800 lettersized pages with a 5% image area (page 91). ---------KX-FLB811 KX-FLB801 See page 48...
Mfp Laser Fax
Page 12
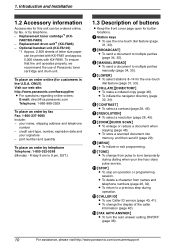
...Panasonic toner cartridge and drum unit. B {BROADCAST} L To send a document to multiple parties manually (page 34, 35). F {CONTRAST} L To select a contrast (page 28, 45). I {MENU} L To initiate or exit programming. L To return to tone temporarily during operation. FA87/KX-FA85) - part number and quantity To place an order by fax Fax... drum unit*1 (KX-FA86) - A Station keys L To use Caller ID service (page 40, 41). M {FAX AUTO ANSWER} L To turn the auto answer setting ON/OFF (page 36). 10 For assistance, please visit http://www.panasonic.com/consumersupport 1. credit...
...Panasonic toner cartridge and drum unit. B {BROADCAST} L To send a document to multiple parties manually (page 34, 35). F {CONTRAST} L To select a contrast (page 28, 45). I {MENU} L To initiate or exit programming. L To return to tone temporarily during operation. FA87/KX-FA85) - part number and quantity To place an order by fax Fax... drum unit*1 (KX-FA86) - A Station keys L To use Caller ID service (page 40, 41). M {FAX AUTO ANSWER} L To turn the auto answer setting ON/OFF (page 36). 10 For assistance, please visit http://www.panasonic.com/consumersupport 1. credit...
Mfp Laser Fax
Page 15
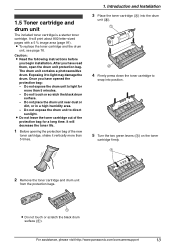
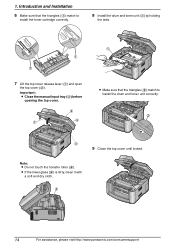
...humidity area. - Do not expose the drum unit to snap into position. 5 Turn the two green levers (1) on the toner cartridge firmly. 1 2 Remove the toner cartridge and drum unit from the protection bags. 1 L Do not touch or scratch the black drum surface (1). Do not ...unit to light may damage the drum. Introduction and Installation 3 Place the toner cartridge (1) into the drum unit (2). 1 2 4 Firmly press down the toner cartridge to direct sunlight. For assistance, please visit http://www.panasonic.com/consumersupport 13 Exposing it vertically more than 5 times. 1. Once you...
...humidity area. - Do not expose the drum unit to snap into position. 5 Turn the two green levers (1) on the toner cartridge firmly. 1 2 Remove the toner cartridge and drum unit from the protection bags. 1 L Do not touch or scratch the black drum surface (1). Do not ...unit to light may damage the drum. Introduction and Installation 3 Place the toner cartridge (1) into the drum unit (2). 1 2 4 Firmly press down the toner cartridge to direct sunlight. For assistance, please visit http://www.panasonic.com/consumersupport 13 Exposing it vertically more than 5 times. 1. Once you...
Mfp Laser Fax
Page 16
...the triangles (1) match to install the drum and toner unit correctly. 2 3 9 Close the top cover until locked. L If the lower glass (4) is dirty, clean it with a soft and dry cloth. 4 14 For assistance, please visit http://www.panasonic.com/consumersupport 1. Note: L Do not touch ...the transfer roller (4). Introduction and Installation 6 Make sure that the triangles (2) match to install the toner cartridge correctly. 8 Install the drum and toner unit (1) by holding the tabs. 1 1...
...the triangles (1) match to install the drum and toner unit correctly. 2 3 9 Close the top cover until locked. L If the lower glass (4) is dirty, clean it with a soft and dry cloth. 4 14 For assistance, please visit http://www.panasonic.com/consumersupport 1. Note: L Do not touch ...the transfer roller (4). Introduction and Installation 6 Make sure that the triangles (2) match to install the toner cartridge correctly. 8 Install the drum and toner unit (1) by holding the tabs. 1 1...
Mfp Laser Fax
Page 17
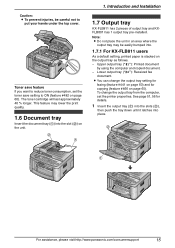
... tray Insert the document tray (1) into place. 2 1 For assistance, please visit http://www.panasonic.com/consumersupport 15 Lower output tray ("#2"): Received fax document. To change the output tray setting for faxing (feature #441 on page 63) and for details. 1 Insert the output tray (1) into the...copied document. - L You can change the output tray from the computer, set the toner save setting to ON (feature #482 on the unit. 2 1 1. Introduction and Installation 1.7 Output tray KX-FLB811 has 2 pieces of output tray and KXFLB801 has 1 output tray pre-installed. See page...
... tray Insert the document tray (1) into place. 2 1 For assistance, please visit http://www.panasonic.com/consumersupport 15 Lower output tray ("#2"): Received fax document. To change the output tray setting for faxing (feature #441 on page 63) and for details. 1 Insert the output tray (1) into the...copied document. - L You can change the output tray from the computer, set the toner save setting to ON (feature #482 on the unit. 2 1 1. Introduction and Installation 1.7 Output tray KX-FLB811 has 2 pieces of output tray and KXFLB801 has 1 output tray pre-installed. See page...
Mfp Laser Fax
Page 53
.... L Remove each printing on the [Quality] tab overrides the unit's toner save feature, etc. L Printed label will be printed in the print dialog so that colored text will be stacked on a flat surface to cool and to [Grayscale] in grayscale. 3 Select [Panasonic KX-FLB811]/ [Panasonic KX-FLB801] as follows. For Windows 98/Windows Me: Click [Properties], then...
.... L Remove each printing on the [Quality] tab overrides the unit's toner save feature, etc. L Printed label will be printed in the print dialog so that colored text will be stacked on a flat surface to cool and to [Grayscale] in grayscale. 3 Select [Panasonic KX-FLB811]/ [Panasonic KX-FLB801] as follows. For Windows 98/Windows Me: Click [Properties], then...
Mfp Laser Fax
Page 58
...(TIFF-G4 format). To receive a fax document using your computer. Note: L...Start Multi-Function Station. 3 Select [PC FAX]. 4 When a fax call is received, your computer, make sure...FAX] from the list, then click [OK]. L The received fax will receive a document through the unit. Select [PC FAX] from Remote Control after sending or receiving faxes... [Receive a Fax]. L The [Device Monitor] window will ...Faxes]. 7. L For details, see the help file by selecting [Usage Tips] from Multi-Function Station. 7.7.2 Receiving a fax... fax reception (feature #442 on your computer You can confirm ...
...(TIFF-G4 format). To receive a fax document using your computer. Note: L...Start Multi-Function Station. 3 Select [PC FAX]. 4 When a fax call is received, your computer, make sure...FAX] from the list, then click [OK]. L The received fax will receive a document through the unit. Select [PC FAX] from Remote Control after sending or receiving faxes... [Receive a Fax]. L The [Device Monitor] window will ...Faxes]. 7. L For details, see the help file by selecting [Usage Tips] from Multi-Function Station. 7.7.2 Receiving a fax... fax reception (feature #442 on your computer You can confirm ...
Mfp Laser Fax
Page 62
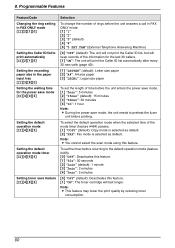
... timer (feature #464) passes. {1} "COPY" (default): Copy mode is selected as default. {2} "FAX": Fax mode is selected as default. Note: L This feature may lower the print quality by reducing toner consumption. 60 8. Programmable Features Feature/Code Changing the ring setting in FAX ONLY mode {#}{2}{1}{0} Setting the Caller ID list to print automatically {#}{2}{1}{6} Setting the...
... timer (feature #464) passes. {1} "COPY" (default): Copy mode is selected as default. {2} "FAX": Fax mode is selected as default. Note: L This feature may lower the print quality by reducing toner consumption. 60 8. Programmable Features Feature/Code Changing the ring setting in FAX ONLY mode {#}{2}{1}{0} Setting the Caller ID list to print automatically {#}{2}{1}{6} Setting the...

Mfp Laser Fax
Page 69
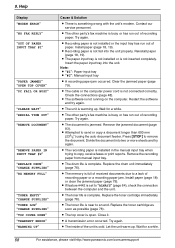
...being stored exceeded the memory capacity of recording paper. Replace the drum unit and the toner cartridge (page 76). L Recording paper was not fed into the unit properly. L..." "CHECK PICK UP INPUT TRAY #1" "CLOSE ADF COVER" "DIRECTORY FULL" "DRUM LIFE LOW REPLACE SOON" "FAX IN MEMORY" "KEEP COPYING" "LOW TEMP." L There is near to a lack of recording paper or misfeeding of...the other displayed message instructions to clear the message. For assistance, please visit http://www.panasonic.com/consumersupport 67 Use the unit in memory. Send the entire document manually. Help 9.2 ...
...being stored exceeded the memory capacity of recording paper. Replace the drum unit and the toner cartridge (page 76). L Recording paper was not fed into the unit properly. L..." "CHECK PICK UP INPUT TRAY #1" "CLOSE ADF COVER" "DIRECTORY FULL" "DRUM LIFE LOW REPLACE SOON" "FAX IN MEMORY" "KEEP COPYING" "LOW TEMP." L There is near to a lack of recording paper or misfeeding of...the other displayed message instructions to clear the message. For assistance, please visit http://www.panasonic.com/consumersupport 67 Use the unit in memory. Send the entire document manually. Help 9.2 ...
Mfp Laser Fax
Page 70
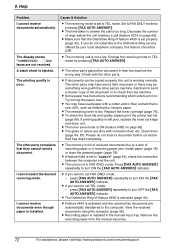
...try again. Check the connections (page 48). Try again. 9. Wait for a while. 68 For assistance, please visit http://www.panasonic.com/consumersupport L The other party's fax machine is open. L Attempted to remove the document. Press {STOP} to send or copy a document longer than 600 mm ...jammed document (page 83). L If feature #442 is near to "ALWAYS" (page 64), check the connection between the computer and the unit. L The toner life is set to an end. Try again. Clear the jammed paper (page 79). Close it. Note: L "#1": Paper input tray L "#2": Manual input...
...try again. Check the connections (page 48). Try again. 9. Wait for a while. 68 For assistance, please visit http://www.panasonic.com/consumersupport L The other party's fax machine is open. L Attempted to remove the document. Press {STOP} to send or copy a document longer than 600 mm ...jammed document (page 83). L If feature #442 is near to "ALWAYS" (page 64), check the connection between the computer and the unit. L The toner life is set to an end. Try again. Clear the jammed paper (page 79). Close it. Note: L "#1": Paper input tray L "#2": Manual input...
Mfp Laser Fax
Page 74
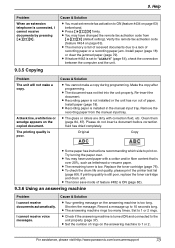
... do not insert a document before the unit answers a call (feature #210 on . Ask them (page 84, 87). L The toner save mode is set to check their fax machine the wrong way. L The Distinctive Ring of the document or to TEL mode. A blank sheet is activated (page 42). ...the manual input tray. 72 For assistance, please visit http://www.panasonic.com/consumersupport If printing quality is working normally. 9. L If documents can be OFF. Replace the toner cartridge (page 76). L If feature #442 is not a fax. L The glass or rollers are dirty with the other party ...
... do not insert a document before the unit answers a call (feature #210 on . Ask them (page 84, 87). L The toner save mode is set to check their fax machine the wrong way. L The Distinctive Ring of the document or to TEL mode. A blank sheet is activated (page 42). ...the manual input tray. 72 For assistance, please visit http://www.panasonic.com/consumersupport If printing quality is working normally. 9. L If documents can be OFF. Replace the toner cartridge (page 76). L If feature #442 is not a fax. L The glass or rollers are dirty with the other party ...
Mfp Laser Fax
Page 75
...recording paper jam. I cannot receive documents automatically. L The answering machine rings too many times. For assistance, please visit http://www.panasonic.com/consumersupport 73 L The document was not fed into the unit properly. L You may have used paper with correction fluid, etc...such as letterhead or resume paper. L Press {*}{#}{9} firmly. Replace the toner cartridge (page 76). The printing quality is set remote fax activation to 1 or 2. L If feature #442 is poor. L The remaining toner is over . Install paper (page 18). Please do not insert ...
...recording paper jam. I cannot receive documents automatically. L The answering machine rings too many times. For assistance, please visit http://www.panasonic.com/consumersupport 73 L The document was not fed into the unit properly. L You may have used paper with correction fluid, etc...such as letterhead or resume paper. L Press {*}{#}{9} firmly. Replace the toner cartridge (page 76). The printing quality is set remote fax activation to 1 or 2. L If feature #442 is poor. L The remaining toner is over . Install paper (page 18). Please do not insert ...
Mfp Laser Fax
Page 78
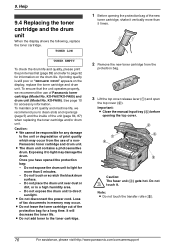
...bag of Panasonic toner cartridge (Model No. Help Replacement 9.4 Replacing the toner cartridge and the drum unit When the display shows the following, replace the toner cartridge. KX-FA86). Exposing it vertically more than 5 times. 2 Remove the new toner cartridge from the use of the new toner cartridge, ... which may occur. Do not touch or scratch the black drum surface. - L Do not leave the toner cartridge out of fax documents in a high humidity area. - It will decrease the toner life. 9. Caution: L We cannot be responsible for a long time. L The drum unit contains ...
...bag of Panasonic toner cartridge (Model No. Help Replacement 9.4 Replacing the toner cartridge and the drum unit When the display shows the following, replace the toner cartridge. KX-FA86). Exposing it vertically more than 5 times. 2 Remove the new toner cartridge from the use of the new toner cartridge, ... which may occur. Do not touch or scratch the black drum surface. - L Do not leave the toner cartridge out of fax documents in a high humidity area. - It will decrease the toner life. 9. Caution: L We cannot be responsible for a long time. L The drum unit contains ...

Mfp Laser Fax
Page 79
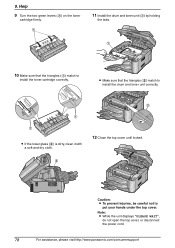
...unit (2). 1 2 8 Firmly press down the toner cartridge to step 7. 5 Turn the two green levers (1) on the black drum surface (3). See page 4 for details. For assistance, please visit http://www.panasonic.com/consumersupport 77 4 Remove the drum and toner unit (1) by holding the tabs. 1 9. ...Be careful when handling. L Do not drop the toner on the used toner cartridge into position. L Put the used toner cartridge firmly. 1 2 3 L The toner may stick to the...
...unit (2). 1 2 8 Firmly press down the toner cartridge to step 7. 5 Turn the two green levers (1) on the black drum surface (3). See page 4 for details. For assistance, please visit http://www.panasonic.com/consumersupport 77 4 Remove the drum and toner unit (1) by holding the tabs. 1 9. ...Be careful when handling. L Do not drop the toner on the used toner cartridge into position. L Put the used toner cartridge firmly. 1 2 3 L The toner may stick to the...
Mfp Laser Fax
Page 80
... top cover, or disconnect the power cord. 78 For assistance, please visit http://www.panasonic.com/consumersupport Help 9 Turn the two green levers (1) on the toner cartridge firmly. 1 11 Install the drum and toner unit (1) by holding the tabs. 1 10 Make sure that the triangles (2) match ...to install the drum and toner unit correctly. 1 1 L If the lower glass (2) is dirty, clean it with a soft...
... top cover, or disconnect the power cord. 78 For assistance, please visit http://www.panasonic.com/consumersupport Help 9 Turn the two green levers (1) on the toner cartridge firmly. 1 11 Install the drum and toner unit (1) by holding the tabs. 1 10 Make sure that the triangles (2) match ...to install the drum and toner unit correctly. 1 1 L If the lower glass (2) is dirty, clean it with a soft...
Mfp Laser Fax
Page 82
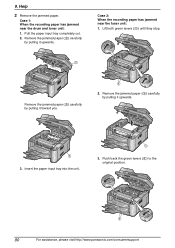
... has jammed near the drum and toner unit: 1. Pull the paper input tray completely out. 2. Remove the jammed paper (1) carefully by pulling it upwards. Help 2 Remove the jammed paper. Push back the green levers (1) to the original position. 1 80 For assistance, please visit http://www.panasonic.com/consumersupport Insert the paper input...
... has jammed near the drum and toner unit: 1. Pull the paper input tray completely out. 2. Remove the jammed paper (1) carefully by pulling it upwards. Help 2 Remove the jammed paper. Push back the green levers (1) to the original position. 1 80 For assistance, please visit http://www.panasonic.com/consumersupport Insert the paper input...
