
Mfp Laser Fax
Page 5
...adjust to reduce the risk of outlet, please have this unit near water, for wet locations. B. E. L Use caution when installing or modifying telephone lines. Read and understand all warnings and instructions marked on the unit. 12. Do not place objects on the... and protection against overheating. Opening or removing covers may result if the unit falls. 6. For assistance, please visit http://www.panasonic.com/consumersupport 3 L Never touch uninsulated telephone wires or terminals unless the telephone line has been disconnected at the network interface. ...
...adjust to reduce the risk of outlet, please have this unit near water, for wet locations. B. E. L Use caution when installing or modifying telephone lines. Read and understand all warnings and instructions marked on the unit. 12. Do not place objects on the... and protection against overheating. Opening or removing covers may result if the unit falls. 6. For assistance, please visit http://www.panasonic.com/consumersupport 3 L Never touch uninsulated telephone wires or terminals unless the telephone line has been disconnected at the network interface. ...
Mfp Laser Fax
Page 6
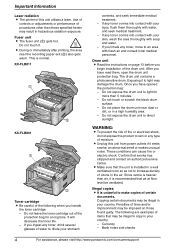
...installation of procedures other than air, it to dilute your skin, wash the area thoroughly with your stomach contents, and seek immediate medical treatment. - Do not place the drum unit near the recording paper exit (2) also gets warm. Copying certain documents may be illegal in hazardous radiation exposure. KX-FLB811 1 2 KX...center. Bank notes and checks 4 For assistance, please visit http://www.panasonic.com/consumersupport Use of controls or adjustments or performance of the drum unit. This is installed in a well ventilated room so as not to increase density of ...
...installation of procedures other than air, it to dilute your skin, wash the area thoroughly with your stomach contents, and seek immediate medical treatment. - Do not place the drum unit near the recording paper exit (2) also gets warm. Copying certain documents may be illegal in hazardous radiation exposure. KX-FLB811 1 2 KX...center. Bank notes and checks 4 For assistance, please visit http://www.panasonic.com/consumersupport Use of controls or adjustments or performance of the drum unit. This is installed in a well ventilated room so as not to increase density of ...
Mfp Laser Fax
Page 7
...without the consent of 30 minutes after printing. This may be turned OFF immediately after printing. L For optimal performance, genuine Panasonic toner cartridges and drum units are recommended. Be sure to prevent illegal copies from electrical noise generating devices, such as fluorescent ...a vacuum cleaner (1). Leave the power turned ON for either its completeness or accuracy. For assistance, please visit http://www.panasonic.com/consumersupport 5 Notice: L Install your legal counsel. - Damage to fuse toner onto the page. L When replacing the toner cartridge or drum unit,...
...without the consent of 30 minutes after printing. This may be turned OFF immediately after printing. L For optimal performance, genuine Panasonic toner cartridges and drum units are recommended. Be sure to prevent illegal copies from electrical noise generating devices, such as fluorescent ...a vacuum cleaner (1). Leave the power turned ON for either its completeness or accuracy. For assistance, please visit http://www.panasonic.com/consumersupport 5 Notice: L Install your legal counsel. - Damage to fuse toner onto the page. L When replacing the toner cartridge or drum unit,...
Mfp Laser Fax
Page 9
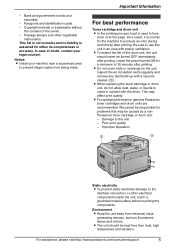
...Station 55 7.8 Confirming the status of the unit....... 56 7.9 Other information (KX-FLB811 only 56 8. Help Error Messages 9.1 Error messages - Auto answer ON 36 3.8 Receiving a fax manually - Fax Sending Faxes 3.1 Using the unit as a scanner 53 Remote Control 7.6 Operating the unit...36 3.9 Using the unit with an answering machine 37 3.10 Junk fax prohibitor (preventing fax reception from your computer 54 PC Fax 7.7 Fax sending/receiving using caller Table of buttons 10 1.4 Overview 11 Installation 1.5 Toner cartridge and drum unit .......... 13 1.6 Document tray 15 ...
...Station 55 7.8 Confirming the status of the unit....... 56 7.9 Other information (KX-FLB811 only 56 8. Help Error Messages 9.1 Error messages - Auto answer ON 36 3.8 Receiving a fax manually - Fax Sending Faxes 3.1 Using the unit as a scanner 53 Remote Control 7.6 Operating the unit...36 3.9 Using the unit with an answering machine 37 3.10 Junk fax prohibitor (preventing fax reception from your computer 54 PC Fax 7.7 Fax sending/receiving using caller Table of buttons 10 1.4 Overview 11 Installation 1.5 Toner cartridge and drum unit .......... 13 1.6 Document tray 15 ...
Mfp Laser Fax
Page 11
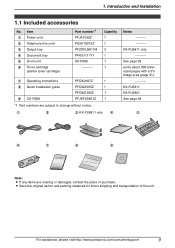
... (page 91). ---------KX-FLB811 KX-FLB801 See page 48. 5 6 7 8 9 Note: L If any items are subject to change without notice. 1 2 3 KX-FLB811 only 4 Notes KX-FLB811 only ---------- For assistance, please visit http://www.panasonic.com/consumersupport 9 See page 92. 1. L Save the original carton and packing materials for future shipping and transportation of purchase. Introduction and Installation 1 Introduction and Installation 1.1 Included accessories...
... (page 91). ---------KX-FLB811 KX-FLB801 See page 48. 5 6 7 8 9 Note: L If any items are subject to change without notice. 1 2 3 KX-FLB811 only 4 Notes KX-FLB811 only ---------- For assistance, please visit http://www.panasonic.com/consumersupport 9 See page 92. 1. L Save the original carton and packing materials for future shipping and transportation of purchase. Introduction and Installation 1 Introduction and Installation 1.1 Included accessories...
Mfp Laser Fax
Page 12
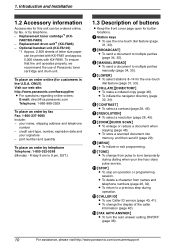
...step during dialing when your line has rotary pulse service. Introduction and Installation 1.2 Accessory information Accessories for button locations. K {STOP} L To stop an operation or programming session. Optional handset unit (KX-FA103) *1 Approx. 2,500 sheets of the caller information (page ...{FAX AUTO ANSWER} L To turn the auto answer setting ON/OFF (page 36). 10 For assistance, please visit http://www.panasonic.com/consumersupport part number and quantity To place an order by telephone Telephone: 1-800-332-5368 (Monday - Replacement toner cartridge*1 (KX-...
...step during dialing when your line has rotary pulse service. Introduction and Installation 1.2 Accessory information Accessories for button locations. K {STOP} L To stop an operation or programming session. Optional handset unit (KX-FA103) *1 Approx. 2,500 sheets of the caller information (page ...{FAX AUTO ANSWER} L To turn the auto answer setting ON/OFF (page 36). 10 For assistance, please visit http://www.panasonic.com/consumersupport part number and quantity To place an order by telephone Telephone: 1-800-332-5368 (Monday - Replacement toner cartridge*1 (KX-...

Mfp Laser Fax
Page 13
... settings during dialing. T {REDIAL}{PAUSE} L To redial the last number dialed. L To copy a document (page 44). Introduction and Installation 1.4 Overview 1.4.1 Front view KX-FLB811 1 23 4 5 6 l 7 89 jk KX-FLB801 1 23 4 5 6 l 7 8 9 jk 1 Top cover 2 ADF (Auto Document Feeder) cover release button 3 ADF ...www.panasonic.com/consumersupport 11 L To search for quick reference (page 23). When you press {MONITOR} during programming. S Navigator key L To adjust volume (page 23). L To insert a pause during programming (page 58). W {START} L To start sending or receiving a fax. ...
... settings during dialing. T {REDIAL}{PAUSE} L To redial the last number dialed. L To copy a document (page 44). Introduction and Installation 1.4 Overview 1.4.1 Front view KX-FLB811 1 23 4 5 6 l 7 89 jk KX-FLB801 1 23 4 5 6 l 7 8 9 jk 1 Top cover 2 ADF (Auto Document Feeder) cover release button 3 ADF ...www.panasonic.com/consumersupport 11 L To search for quick reference (page 23). When you press {MONITOR} during programming. S Navigator key L To adjust volume (page 23). L To insert a pause during programming (page 58). W {START} L To start sending or receiving a fax. ...
Mfp Laser Fax
Page 14
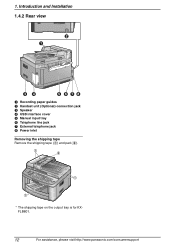
FLB801. 12 For assistance, please visit http://www.panasonic.com/consumersupport 1. Introduction and Installation 1.4.2 Rear view B A CD E FGH A Recording paper guides B Handset unit (Optional) connection jack C Speaker D USB interface cover E Manual input tray F Telephone line jack G External telephone jack H Power inlet Removing the shipping tape Remove the shipping tape (1) and pad (2). 1 2 1 1 * The shipping tape on the output tray is for KX-
FLB801. 12 For assistance, please visit http://www.panasonic.com/consumersupport 1. Introduction and Installation 1.4.2 Rear view B A CD E FGH A Recording paper guides B Handset unit (Optional) connection jack C Speaker D USB interface cover E Manual input tray F Telephone line jack G External telephone jack H Power inlet Removing the shipping tape Remove the shipping tape (1) and pad (2). 1 2 1 1 * The shipping tape on the output tray is for KX-
Mfp Laser Fax
Page 15
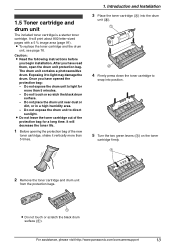
Installation 1.5 Toner cartridge and drum unit The included toner cartridge is a starter toner cartridge. Once you have read them, open the drum unit protection bag. Do not touch or scratch the black drum surface. - For assistance, please visit http://www.panasonic.com/consumersupport 13 ... cartridge, shake it to direct sunlight. The drum unit contains a photosensitive drum. Exposing it vertically more than 5 times. 1. After you begin installation. Do not place the drum unit near dust or dirt, or in a high humidity area. - It will print about 800 letter-sized pages...
Installation 1.5 Toner cartridge and drum unit The included toner cartridge is a starter toner cartridge. Once you have read them, open the drum unit protection bag. Do not touch or scratch the black drum surface. - For assistance, please visit http://www.panasonic.com/consumersupport 13 ... cartridge, shake it to direct sunlight. The drum unit contains a photosensitive drum. Exposing it vertically more than 5 times. 1. After you begin installation. Do not place the drum unit near dust or dirt, or in a high humidity area. - It will print about 800 letter-sized pages...
Mfp Laser Fax
Page 16
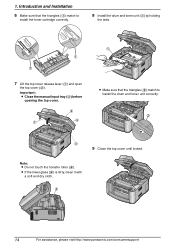
... assistance, please visit http://www.panasonic.com/consumersupport Note: L Do not touch the transfer roller (4). 1. Important: L Close the manual input tray (3) before opening the top cover. 2 1 4 1 L Make sure that the triangles (1) match to install the drum and toner unit correctly.... 2 3 9 Close the top cover until locked. Introduction and Installation 6 Make sure that the triangles (2) match to install the toner cartridge correctly. 8 Install the drum and toner unit (1) by holding the tabs...
... assistance, please visit http://www.panasonic.com/consumersupport Note: L Do not touch the transfer roller (4). 1. Important: L Close the manual input tray (3) before opening the top cover. 2 1 4 1 L Make sure that the triangles (1) match to install the drum and toner unit correctly.... 2 3 9 Close the top cover until locked. Introduction and Installation 6 Make sure that the triangles (2) match to install the toner cartridge correctly. 8 Install the drum and toner unit (1) by holding the tabs...
Mfp Laser Fax
Page 17
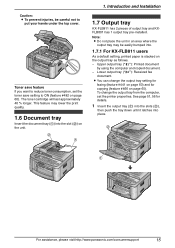
... follows. - Lower output tray ("#2"): Received fax document. The toner cartridge will last approximately 40 % longer. Upper output tray ("#1"): Printed document by using the computer and copied document. - Toner save feature If you want to reduce toner consumption, set the printer properties. Introduction and Installation 1.7 Output tray KX-FLB811 has 2 pieces of output tray and...
... follows. - Lower output tray ("#2"): Received fax document. The toner cartridge will last approximately 40 % longer. Upper output tray ("#1"): Printed document by using the computer and copied document. - Toner save feature If you want to reduce toner consumption, set the printer properties. Introduction and Installation 1.7 Output tray KX-FLB811 has 2 pieces of output tray and...
Mfp Laser Fax
Page 18
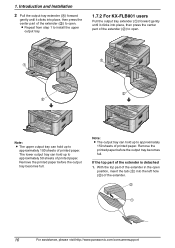
... up to approximately 150 sheets of printed paper. If the top part of the extender. 2 1 16 For assistance, please visit http://www.panasonic.com/consumersupport Note: L The output tray can hold up to approximately 50 sheets of the extender (2) to open position, insert the tab (1)... into place, then press the center part of printed paper. L Repeat from step 1 to install the upper output tray. 1.7.2 For KX-FLB801 users Pull the output tray extender (1) forward gently until it clicks into place, then press the center part of the extender...
... up to approximately 150 sheets of printed paper. If the top part of the extender. 2 1 16 For assistance, please visit http://www.panasonic.com/consumersupport Note: L The output tray can hold up to approximately 50 sheets of the extender (2) to open position, insert the tab (1)... into place, then press the center part of printed paper. L Repeat from step 1 to install the upper output tray. 1.7.2 For KX-FLB801 users Pull the output tray extender (1) forward gently until it clicks into place, then press the center part of the extender...
Mfp Laser Fax
Page 19
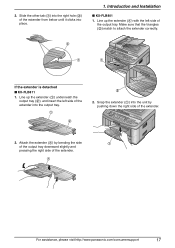
.... 2 1 1 If the extender is detached ■ KX-FLB811 1. Attach the extender (1) by pushing down the right side of the extender. 2. Introduction and Installation ■ KX-FLB801 1. 2. Line up the extender (1) underneath the output tray (2), and insert the left side of the extender. 1 For assistance, please visit http://www.panasonic.com/consumersupport 17 Slide the other...
.... 2 1 1 If the extender is detached ■ KX-FLB811 1. Attach the extender (1) by pushing down the right side of the extender. 2. Introduction and Installation ■ KX-FLB801 1. 2. Line up the extender (1) underneath the output tray (2), and insert the left side of the extender. 1 For assistance, please visit http://www.panasonic.com/consumersupport 17 Slide the other...

Mfp Laser Fax
Page 20
... (1), then slide it to 230 sheets of paper, fan the paper to 20 lb.) paper. - L The unit is under the paper limit mark (2). Introduction and Installation 1.8 Recording paper 1.8.1 Using the paper input tray A4, letter or legal size recording paper can hold: - LGL LTR A4 2 L Make sure that the recording paper... 80 g/m2 (21 lb.) paper. - 1. The paper input tray unit can be over the snubbers (3). 3 1 2 1 LGL A4 LTR 2 3 1 18 For assistance, please visit http://www.panasonic.com/consumersupport
... (1), then slide it to 230 sheets of paper, fan the paper to 20 lb.) paper. - L The unit is under the paper limit mark (2). Introduction and Installation 1.8 Recording paper 1.8.1 Using the paper input tray A4, letter or legal size recording paper can hold: - LGL LTR A4 2 L Make sure that the recording paper... 80 g/m2 (21 lb.) paper. - 1. The paper input tray unit can be over the snubbers (3). 3 1 2 1 LGL A4 LTR 2 3 1 18 For assistance, please visit http://www.panasonic.com/consumersupport

Mfp Laser Fax
Page 21
... multiple pages, add a next page after you start printing with both hands when removing or installing. Push the paper and check that the paper is not loaded correctly, re-adjust the paper...L If the paper input tray does not close, the plate in the paper input tray. Introduction and Installation 1.8.2 Using the manual input tray You can hold one page at a time. The input tray weights approximately...then raise the extender (2) gently until it clicks into place. Note: L If the paper is flat in the paper input tray may jam. Caution for printing with the computer (page 50) and can...
... multiple pages, add a next page after you start printing with both hands when removing or installing. Push the paper and check that the paper is not loaded correctly, re-adjust the paper...L If the paper input tray does not close, the plate in the paper input tray. Introduction and Installation 1.8.2 Using the manual input tray You can hold one page at a time. The input tray weights approximately...then raise the extender (2) gently until it clicks into place. Note: L If the paper is flat in the paper input tray may jam. Caution for printing with the computer (page 50) and can...

Mfp Laser Fax
Page 22
The display shows the following. 1. L Adjust the width of the guides (2) to the size of the recording paper. 1 2 Note: L If the paper is heard. Introduction and Installation 2 Insert the paper, print-side down (1) until the unit grasps the paper and a single beep is not inserted correctly, re-adjust the paper, or the paper may jam. L Make sure the unit grasps the recording paper in step 2. PAPER IN TRAY #2 FOR PC PRINTING 20 For assistance, please visit http://www.panasonic.com/consumersupport
The display shows the following. 1. L Adjust the width of the guides (2) to the size of the recording paper. 1 2 Note: L If the paper is heard. Introduction and Installation 2 Insert the paper, print-side down (1) until the unit grasps the paper and a single beep is not inserted correctly, re-adjust the paper, or the paper may jam. L Make sure the unit grasps the recording paper in step 2. PAPER IN TRAY #2 FOR PC PRINTING 20 For assistance, please visit http://www.panasonic.com/consumersupport
Mfp Laser Fax
Page 23
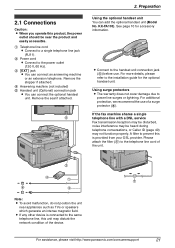
... If any other device is provided from your DSL provider. For more details, please refer to the installation guide for accessory information. Please attach the filter (7) to the telephone line cord of the unit. ...page 40) may not function properly. If the fax machine shares a single telephone line with a DSL service Fax transmission/reception may be disturbed, noise interference may ...jack L You can add the optional handset unit (Model No. KX-FA103). For assistance, please visit http://www.panasonic.com/consumersupport 21 L Connect to power line surges or lightning. ...
... If any other device is provided from your DSL provider. For more details, please refer to the installation guide for accessory information. Please attach the filter (7) to the telephone line cord of the unit. ...page 40) may not function properly. If the fax machine shares a single telephone line with a DSL service Fax transmission/reception may be disturbed, noise interference may ...jack L You can add the optional handset unit (Model No. KX-FA103). For assistance, please visit http://www.panasonic.com/consumersupport 21 L Connect to power line surges or lightning. ...
Mfp Laser Fax
Page 50
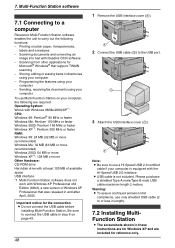
...Storing, editing or erasing items in directories using your computer - Sending, receiving fax documents using your computer is not included. Scanning documents and converting an image ... 2 meters. Multi-Function Station software 7SeMtuuplti-Function Station software 7.1 Connecting to a computer Panasonic Multi-Function Station software enables the unit to use a Hi-Speed USB 2.0 certified cable...your computer To use only shielded USB cable (2 m or less in length). 7.2 Installing MultiFunction Station L The screenshots shown in these instructions are for Microsoft® Windows&#...
...Storing, editing or erasing items in directories using your computer - Sending, receiving fax documents using your computer is not included. Scanning documents and converting an image ... 2 meters. Multi-Function Station software 7SeMtuuplti-Function Station software 7.1 Connecting to a computer Panasonic Multi-Function Station software enables the unit to use a Hi-Speed USB 2.0 certified cable...your computer To use only shielded USB cable (2 m or less in length). 7.2 Installing MultiFunction Station L The screenshots shown in these instructions are for Microsoft® Windows&#...
Mfp Laser Fax
Page 51
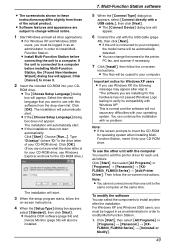
...[Start], then select [All Programs] or [Programs] → [Panasonic] → [KXFLB800_FLM650 Series] → [Add Printer Driver]. L The [Choose Setup Language] dialog box will be installed. 7. You can continue the installation with this hardware has not passed Windows Logo testing to verify its ... components to the same computer at the same time. L The files will appear. Important notice for the printer, PC fax, and scanner if necessary. 7 Click [Install], then follow the on -screen instructions. 4 When the [Setup Type] dialog box appears, select [Standard], then click...
...[Start], then select [All Programs] or [Programs] → [Panasonic] → [KXFLB800_FLM650 Series] → [Add Printer Driver]. L The [Choose Setup Language] dialog box will be installed. 7. You can continue the installation with this hardware has not passed Windows Logo testing to verify its ... components to the same computer at the same time. L The files will appear. Important notice for the printer, PC fax, and scanner if necessary. 7 Click [Install], then follow the on -screen instructions. 4 When the [Setup Type] dialog box appears, select [Standard], then click...
Mfp Laser Fax
Page 53
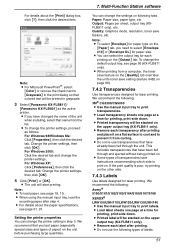
... Remove each transparency after printing and place it on the upper output tray (KX-FLB811 only). L Some types of the unit when installing, select that have instructions recommending which side to print transparencies. For Windows XP... details about the paper specifications, see page 51, 91. L The unit will be stacked on a flat surface to cool and to print labels. L Do not use transparencies that have changed the name of .... L To change the printer setting in grayscale. 3 Select [Panasonic KX-FLB811]/ [Panasonic KX-FLB801] as follows. We recommend the following tabs.
... Remove each transparency after printing and place it on the upper output tray (KX-FLB811 only). L Some types of the unit when installing, select that have instructions recommending which side to print transparencies. For Windows XP... details about the paper specifications, see page 51, 91. L The unit will be stacked on a flat surface to cool and to print labels. L Do not use transparencies that have changed the name of .... L To change the printer setting in grayscale. 3 Select [Panasonic KX-FLB811]/ [Panasonic KX-FLB801] as follows. We recommend the following tabs.

