
HXWA03 User Guide
Page 2
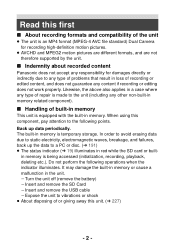
... or cause a malfunction in memory is equipped with the built-in red while the SD card or built- j Turn the unit off (remove the battery) j Insert and remove the SD Card j Insert and remove the USB cable j Expose the unit to the following operations when the indicator illuminates..... ≥ AVCHD and MPEG2 motion pictures are different formats, and are not therefore supported by the unit. ∫ Indemnity about recorded content Panasonic does not accept any responsibility for damages directly or indirectly due to any content if recording or editing does not work properly. Do not perform...
... or cause a malfunction in memory is equipped with the built-in red while the SD card or built- j Turn the unit off (remove the battery) j Insert and remove the SD Card j Insert and remove the USB cable j Expose the unit to the following operations when the indicator illuminates..... ≥ AVCHD and MPEG2 motion pictures are different formats, and are not therefore supported by the unit. ∫ Indemnity about recorded content Panasonic does not accept any responsibility for damages directly or indirectly due to any content if recording or editing does not work properly. Do not perform...

HXWA03 User Guide
Page 4
... 14 When using in a cold climate or at low temperatures 18 Names and Functions of Main Parts 19 Power supply 22 Inserting/removing the battery 22 Charging the battery 25 Charging and recording time 27 Recording to a card 30 Cards that you can use with this unit 30 Inserting/removing an SD...
... 14 When using in a cold climate or at low temperatures 18 Names and Functions of Main Parts 19 Power supply 22 Inserting/removing the battery 22 Charging the battery 25 Charging and recording time 27 Recording to a card 30 Cards that you can use with this unit 30 Inserting/removing an SD...
HXWA03 User Guide
Page 9
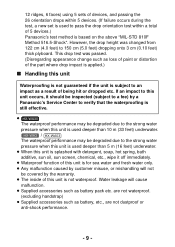
...subject to a fee) by customer misuse, or mishandling will cause malfunction. ≥ Supplied accessories such as battery, etc., are not waterproof. (excluding handstrap) ≥ Supplied accessories such as battery pack etc. HX-WA3 / HX-WA03 The waterproof performance may be degraded due to 150 cm (5.0 feet... immediately. ≥ Waterproof function of this unit is for sea water and fresh water only. ≥ Any malfunction caused by a Panasonic's Service Center to verify that the waterproofing is still effective. ≥ HX-WA30 The waterproof performance may be degraded due to an ...
...subject to a fee) by customer misuse, or mishandling will cause malfunction. ≥ Supplied accessories such as battery, etc., are not waterproof. (excluding handstrap) ≥ Supplied accessories such as battery pack etc. HX-WA3 / HX-WA03 The waterproof performance may be degraded due to 150 cm (5.0 feet... immediately. ≥ Waterproof function of this unit is for sea water and fresh water only. ≥ Any malfunction caused by a Panasonic's Service Center to verify that the waterproofing is still effective. ≥ HX-WA30 The waterproof performance may be degraded due to an ...

HXWA03 User Guide
Page 12
Check before using underwater Do not open /close to water, or with sand and dust, close lever. 3 Open the rear door. 2 Check that there are no foreign objects on the inner side of the rear door. ≥ If there are any foreign objects, such as lint, hair, sand, etc., on the surrounding area, water will leak within a few seconds causing malfunction. - 12 - Sand or dust adhering may cause water leaks. 1 Open the rear door. SD CARD/ BATTERY LOCK 1 Unlock the LOCK lever. 2 Slide the open or close the rear door in places with wet hands.
Check before using underwater Do not open /close to water, or with sand and dust, close lever. 3 Open the rear door. 2 Check that there are no foreign objects on the inner side of the rear door. ≥ If there are any foreign objects, such as lint, hair, sand, etc., on the surrounding area, water will leak within a few seconds causing malfunction. - 12 - Sand or dust adhering may cause water leaks. 1 Open the rear door. SD CARD/ BATTERY LOCK 1 Unlock the LOCK lever. 2 Slide the open or close the rear door in places with wet hands.

HXWA03 User Guide
Page 13
... 3 If foreign objects are no longer visible. ≥ To prevent water seeping into this unit, be replaced once each year. Please contact Panasonic's Service Center for cracks and deformation of the rubber seal on the rear door. ≥ The integrity of the open/close lever. 3 Lock...To avoid permanently damaging this unit with liquid adhered. 4 Check for related costs and other information. 5 Close the rear door securely. SD CARD/ BATTERY 1 Close the rear door. 2 Slide the open/close lever and LOCK lever are present, wipe them off with a lint-free cloth...
... 3 If foreign objects are no longer visible. ≥ To prevent water seeping into this unit, be replaced once each year. Please contact Panasonic's Service Center for cracks and deformation of the rubber seal on the rear door. ≥ The integrity of the open/close lever. 3 Lock...To avoid permanently damaging this unit with liquid adhered. 4 Check for related costs and other information. 5 Close the rear door securely. SD CARD/ BATTERY 1 Close the rear door. 2 Slide the open/close lever and LOCK lever are present, wipe them off with a lint-free cloth...

HXWA03 User Guide
Page 15
SD CARD/ BATTERY ≥ Do not directly rinse this unit with the rear door closed. ≥ After use at the seaside or underwater, soak the unit in fresh water pooled in the illustration, and shake it gently several times to drain the water. ≥ Fasten the strap firmly to prevent this unit as shown in a shallow container for 10 minutes or less. LOCK 1 Rinse with water with tap water. 2 Hold this unit from dropping. - 15 -
SD CARD/ BATTERY ≥ Do not directly rinse this unit with the rear door closed. ≥ After use at the seaside or underwater, soak the unit in fresh water pooled in the illustration, and shake it gently several times to drain the water. ≥ Fasten the strap firmly to prevent this unit as shown in a shallow container for 10 minutes or less. LOCK 1 Rinse with water with tap water. 2 Hold this unit from dropping. - 15 -

HXWA03 User Guide
Page 16
... drops on the microphones or speaker of this unit with a dry soft cloth and dry this unit in the gap around the card compartment, the battery compartment or the terminal connector. Dry for approximately 1 hour. ≥ Do not dry this unit, it on a dry cloth. ≥ If water collects on this...
... drops on the microphones or speaker of this unit with a dry soft cloth and dry this unit in the gap around the card compartment, the battery compartment or the terminal connector. Dry for approximately 1 hour. ≥ Do not dry this unit, it on a dry cloth. ≥ If water collects on this...

HXWA03 User Guide
Page 18
...temporarily drop immediately after turning the power on the LCD monitor being slightly darker than 0 oC (32 oF). (The Status indicator blinks when the battery cannot be recharged.) ≥ Power cannot be supplied to the device via an electric wall socket using the AC adaptor when the temperature is under... 0 oC (32 oF), such as ski resorts or places at high altitude] for long periods. ≥ The performance of the battery (recording time/operating time) may decrease temporarily when using in a temperature between j10 oC and 0 oC (14 oF and 32 oF) (cold places such...
...temporarily drop immediately after turning the power on the LCD monitor being slightly darker than 0 oC (32 oF). (The Status indicator blinks when the battery cannot be recharged.) ≥ Power cannot be supplied to the device via an electric wall socket using the AC adaptor when the temperature is under... 0 oC (32 oF), such as ski resorts or places at high altitude] for long periods. ≥ The performance of the battery (recording time/operating time) may decrease temporarily when using in a temperature between j10 oC and 0 oC (14 oF and 32 oF) (cold places such...
HXWA03 User Guide
Page 19
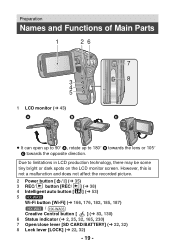
...] (l 166, 176, 182, 185, 187) HX-WA3 / HX-WA03 Creative Control button [ ] (l 83, 130) 6 Status indicator (l 2, 25, 32, 165, 230) 7 Open/close lever [SD CARD/BATTERY] (l 22, 32) 8 Lock lever [LOCK] (l 22, 32) - 19 - Preparation Names and Functions of Main Parts 1 26 3 4 5 1 LCD monitor (l 43) 7 8 ≥ It can open up...
...] (l 166, 176, 182, 185, 187) HX-WA3 / HX-WA03 Creative Control button [ ] (l 83, 130) 6 Status indicator (l 2, 25, 32, 165, 230) 7 Open/close lever [SD CARD/BATTERY] (l 22, 32) 8 Lock lever [LOCK] (l 22, 32) - 19 - Preparation Names and Functions of Main Parts 1 26 3 4 5 1 LCD monitor (l 43) 7 8 ≥ It can open up...
HXWA03 User Guide
Page 20
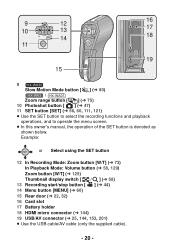
... [W/T] (l 125) Thumbnail display switch [ / ] (l 58) 13 Recording start/stop button [ ] (l 44) 14 Menu button [MENU] (l 60) 15 Rear door (l 22, 32) 16 Card slot 17 Battery holder 18 HDMI micro connector (l 144) 19 USB/AV connector (l 25, 144, 153, 201) ≥ Use the USB cable/AV cable (only the supplied cable...
... [W/T] (l 125) Thumbnail display switch [ / ] (l 58) 13 Recording start/stop button [ ] (l 44) 14 Menu button [MENU] (l 60) 15 Rear door (l 22, 32) 16 Card slot 17 Battery holder 18 HDMI micro connector (l 144) 19 USB/AV connector (l 25, 144, 153, 201) ≥ Use the USB cable/AV cable (only the supplied cable...

HXWA03 User Guide
Page 22
...with this unit is used with this unit The battery that can use of appropriate safety standards. Preparation Power supply ∫ About batteries that you can be advised that we are used we would recommend that a genuine Panasonic battery pack is VW-VBX090. Please be used . Inserting.../removing the battery ≥ Press the power button to purchase in some markets. To ensure that these battery packs are made available to turn off the unit. (l 35...
...with this unit is used with this unit The battery that can use of appropriate safety standards. Preparation Power supply ∫ About batteries that you can be advised that we are used we would recommend that a genuine Panasonic battery pack is VW-VBX090. Please be used . Inserting.../removing the battery ≥ Press the power button to purchase in some markets. To ensure that these battery packs are made available to turn off the unit. (l 35...

HXWA03 User Guide
Page 23
2 (To insert the battery pack) Confirm the orientation of the terminal markings and insert the battery. A terminal markings ≥ Confirm that lever B is locked on to the battery. ≥ It is possible to mistakenly insert the battery upside down, so be sure to check the orientation carefully. (To remove the battery pack) Push the lever B toward the direction of arrow, and pull the battery straight out. - 23 -
2 (To insert the battery pack) Confirm the orientation of the terminal markings and insert the battery. A terminal markings ≥ Confirm that lever B is locked on to the battery. ≥ It is possible to mistakenly insert the battery upside down, so be sure to check the orientation carefully. (To remove the battery pack) Push the lever B toward the direction of arrow, and pull the battery straight out. - 23 -

HXWA03 User Guide
Page 24
Open/close lever Lock lever Unlocked state SD CARD/ BATTERY LOCK LOCK Locked state SD CARD/ BATTERY ≥ Lock securely to the points where the red portion C of the open /close lever and LOCK lever are no longer visible. - 24 - 3 Close the rear door. SD CARD/ BATTERY LOCK 1 Close the rear door. 2 Slide the open /close lever. 3 Lock the LOCK lever.
Open/close lever Lock lever Unlocked state SD CARD/ BATTERY LOCK LOCK Locked state SD CARD/ BATTERY ≥ Lock securely to the points where the red portion C of the open /close lever and LOCK lever are no longer visible. - 24 - 3 Close the rear door. SD CARD/ BATTERY LOCK 1 Close the rear door. 2 Slide the open /close lever. 3 Lock the LOCK lever.

HXWA03 User Guide
Page 25
... standby condition when the AC adaptor is connected. The unit is in a temperature between 10 oC and 30 oC (50 oF and 86 oF). (The battery temperature should also be the same.) A Status indicator B AC adaptor C To the AC ...outlet D Turn the side with this unit is purchased, the battery is connected to connect. ≥ Insert the plugs as far as they will go. - 25 - The primary circuit is always "live" as long as the...
... standby condition when the AC adaptor is connected. The unit is in a temperature between 10 oC and 30 oC (50 oF and 86 oF). (The battery temperature should also be the same.) A Status indicator B AC adaptor C To the AC ...outlet D Turn the side with this unit is purchased, the battery is connected to connect. ≥ Insert the plugs as far as they will go. - 25 - The primary circuit is always "live" as long as the...

HXWA03 User Guide
Page 26
... other AC adaptors except the supplied one. ≥ Do not use any other USB cables except the supplied one. ≥ We recommend using Panasonic batteries (l 27). ≥ If you use other batteries, we cannot guarantee the quality of this product. ≥ Do not heat or expose to flame. ≥ Do not leave the... battery(ies) in the wrong direction may cause damage to the USB/AV connector of time with doors and windows closed. ≥ For charging by connecting ...
... other AC adaptors except the supplied one. ≥ Do not use any other USB cables except the supplied one. ≥ We recommend using Panasonic batteries (l 27). ≥ If you use other batteries, we cannot guarantee the quality of this product. ≥ Do not heat or expose to flame. ≥ Do not leave the... battery(ies) in the wrong direction may cause damage to the USB/AV connector of time with doors and windows closed. ≥ For charging by connecting ...

HXWA03 User Guide
Page 27
... - Charging and recording time ∫ Charging/Recording time ≥ Temperature: 25 oC (77 oF)/humidity: 60%RH (When using AC adaptor) HX-WA30 Battery model number [Voltage/Capacity (minimum)] Charging Recording time Mode Maximum continuous recordable time 1 h 5 min Actual recordable time 40 min Supplied... battery/ VW-VBX090 (optional) [3.7 V/880 mAh] 2h 30 min 1 h 15 min 1 h 10 min 1 h 25 min 1 h 50 min 1 h 25 min 1 h 55 min 45...
... - Charging and recording time ∫ Charging/Recording time ≥ Temperature: 25 oC (77 oF)/humidity: 60%RH (When using AC adaptor) HX-WA30 Battery model number [Voltage/Capacity (minimum)] Charging Recording time Mode Maximum continuous recordable time 1 h 5 min Actual recordable time 40 min Supplied... battery/ VW-VBX090 (optional) [3.7 V/880 mAh] 2h 30 min 1 h 15 min 1 h 10 min 1 h 25 min 1 h 50 min 1 h 25 min 1 h 55 min 45...

HXWA03 User Guide
Page 28
...temperature below 0 oC (32 oF) will drastically shorten the usable time due to a characteristic of use or charging. In particular, using the battery at low temperatures, the indicator may not be considered as an approximate guide. - 28 - Because the status of the charge remaining indicator changes... up after use , etc., the indicator should be possible to correctly display the charge remaining on the usage conditions such as the battery capacity reduces. # # # # (red) When the charge is low, is displayed. ≥ Due to the recordable time when repeatedly starting...
...temperature below 0 oC (32 oF) will drastically shorten the usable time due to a characteristic of use or charging. In particular, using the battery at low temperatures, the indicator may not be considered as an approximate guide. - 28 - Because the status of the charge remaining indicator changes... up after use , etc., the indicator should be possible to correctly display the charge remaining on the usage conditions such as the battery capacity reduces. # # # # (red) When the charge is low, is displayed. ≥ Due to the recordable time when repeatedly starting...
HXWA03 User Guide
Page 29
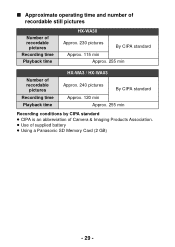
∫ Approximate operating time and number of recordable still pictures Number of recordable pictures Recording time Playback time HX-WA30 Approx. 230 pictures By CIPA standard Approx. 115 min Approx. 255 min Number of recordable pictures Recording time Playback time HX-WA3 / HX-WA03 Approx. 240 pictures By CIPA standard Approx. 120 min Approx. 255 min Recording conditions by CIPA standard ≥ CIPA is an abbreviation of Camera & Imaging Products Association. ≥ Use of supplied battery ≥ Using a Panasonic SD Memory Card (2 GB) - 29 -
∫ Approximate operating time and number of recordable still pictures Number of recordable pictures Recording time Playback time HX-WA30 Approx. 230 pictures By CIPA standard Approx. 115 min Approx. 255 min Number of recordable pictures Recording time Playback time HX-WA3 / HX-WA03 Approx. 240 pictures By CIPA standard Approx. 120 min Approx. 255 min Recording conditions by CIPA standard ≥ CIPA is an abbreviation of Camera & Imaging Products Association. ≥ Use of supplied battery ≥ Using a Panasonic SD Memory Card (2 GB) - 29 -

HXWA03 User Guide
Page 32
Caution: Check that the status indicator has gone off. 1 Open the rear door. SD CARD/ BATTERY LOCK Status indicator A ≥ When this unit, format the SD card. (l 68) When the SD card is formatted, all of the recorded data ...is deleted. Inserting/removing an SD card When using an SD card not from Panasonic, or one previously used on other equipment, for the first time on this unit is accessing the SD card or built-in memory, the status...
Caution: Check that the status indicator has gone off. 1 Open the rear door. SD CARD/ BATTERY LOCK Status indicator A ≥ When this unit, format the SD card. (l 68) When the SD card is formatted, all of the recorded data ...is deleted. Inserting/removing an SD card When using an SD card not from Panasonic, or one previously used on other equipment, for the first time on this unit is accessing the SD card or built-in memory, the status...

HXWA03 User Guide
Page 33
LOCK 2 Insert (remove) the SD card into (from) the card slot. ≥ Face the label side A in the direction shown in the illustration and press it straight in as far as it will go. ≥ Press the center of the SD card and then pull it straight out. 3 Close the rear door. SD CARD/ BATTERY 1 Close the rear door. 2 Slide the open/close lever. 3 Lock the LOCK lever. ≥ Lock securely to the points where the red portion of the open/close lever and LOCK lever are no longer visible. - 33 -
LOCK 2 Insert (remove) the SD card into (from) the card slot. ≥ Face the label side A in the direction shown in the illustration and press it straight in as far as it will go. ≥ Press the center of the SD card and then pull it straight out. 3 Close the rear door. SD CARD/ BATTERY 1 Close the rear door. 2 Slide the open/close lever. 3 Lock the LOCK lever. ≥ Lock securely to the points where the red portion of the open/close lever and LOCK lever are no longer visible. - 33 -


