
HXWA03 User Guide
Page 2
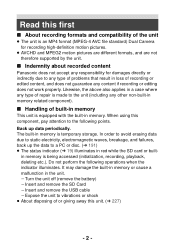
... to the following operations when the indicator illuminates. Do not perform the following points. j Turn the unit off (remove the battery) j Insert and remove the SD Card j Insert and remove the USB cable j Expose the unit to vibrations or shock ≥ About disposing of or giving away this unit. (l 227) - 2 - The built-in memory is being accessed (initialization, recording, playback, deleting etc.). Likewise, the...
... to the following operations when the indicator illuminates. Do not perform the following points. j Turn the unit off (remove the battery) j Insert and remove the SD Card j Insert and remove the USB cable j Expose the unit to vibrations or shock ≥ About disposing of or giving away this unit. (l 227) - 2 - The built-in memory is being accessed (initialization, recording, playback, deleting etc.). Likewise, the...

HXWA03 User Guide
Page 6
Manual recording 115 White Balance 115 Manual shutter speed/iris adjustment [HX-WA30 117 Setting the focus and recording 120 Advanced (Playback) Playback Operations 121 Playback using operation icon 121 Creating still picture from motion picture 123 Cutting out a section of a panorama still picture 124 Zooming in on a still picture during playback (Playback zoom 125 Various playback functions 127 Changing the playback settings and playing back the slide show 127 Playing back with a filter effect 130 Displaying file information 131 Using the playback menu 133 PLAYBACK MENU 1 133 ...
Manual recording 115 White Balance 115 Manual shutter speed/iris adjustment [HX-WA30 117 Setting the focus and recording 120 Advanced (Playback) Playback Operations 121 Playback using operation icon 121 Creating still picture from motion picture 123 Cutting out a section of a panorama still picture 124 Zooming in on a still picture during playback (Playback zoom 125 Various playback functions 127 Changing the playback settings and playing back the slide show 127 Playing back with a filter effect 130 Displaying file information 131 Using the playback menu 133 PLAYBACK MENU 1 133 ...

HXWA03 User Guide
Page 7
... SETUP] Menu [HX-WA30 187 With a PC What you can do with a PC 191 End User License Agreement 194 Operating environment 196 Installation 200 Connecting to a PC 201 Use as a card reader 202 Using the unit as a web camera 205 Starting HD Writer VE 3.0 207 Reading the operating instructions of the software applications 207 If using Mac 208 Others LCD Display Indications 210 Messages 214 Troubleshooting 215 Cautions for use...
... SETUP] Menu [HX-WA30 187 With a PC What you can do with a PC 191 End User License Agreement 194 Operating environment 196 Installation 200 Connecting to a PC 201 Use as a card reader 202 Using the unit as a web camera 205 Starting HD Writer VE 3.0 207 Reading the operating instructions of the software applications 207 If using Mac 208 Others LCD Display Indications 210 Messages 214 Troubleshooting 215 Cautions for use...

HXWA03 User Guide
Page 18
..., playback may cause injury to the unit, some parts of the unit may become dim with snow or water droplets freezing in the gap of time. Preparation When using in a cold climate or at low temperatures ≥ It may not be supplied to move or the sound may temporarily drop immediately after turning the power on the LCD...
..., playback may cause injury to the unit, some parts of the unit may become dim with snow or water droplets freezing in the gap of time. Preparation When using in a cold climate or at low temperatures ≥ It may not be supplied to move or the sound may temporarily drop immediately after turning the power on the LCD...
HXWA03 User Guide
Page 29
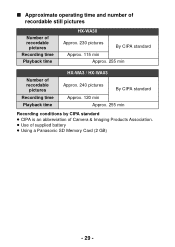
∫ Approximate operating time and number of recordable still pictures Number of recordable pictures Recording time Playback time HX-WA30 Approx. 230 pictures By CIPA standard Approx. 115 min Approx. 255 min Number of recordable pictures Recording time Playback time HX-WA3 / HX-WA03 Approx. 240 pictures By CIPA standard Approx. 120 min Approx. 255 min Recording conditions by CIPA standard ≥ CIPA is an abbreviation of Camera & Imaging Products Association. ≥ Use of supplied battery ≥ Using a Panasonic SD Memory Card (2 GB) - 29 -
∫ Approximate operating time and number of recordable still pictures Number of recordable pictures Recording time Playback time HX-WA30 Approx. 230 pictures By CIPA standard Approx. 115 min Approx. 255 min Number of recordable pictures Recording time Playback time HX-WA3 / HX-WA03 Approx. 240 pictures By CIPA standard Approx. 120 min Approx. 255 min Recording conditions by CIPA standard ≥ CIPA is an abbreviation of Camera & Imaging Products Association. ≥ Use of supplied battery ≥ Using a Panasonic SD Memory Card (2 GB) - 29 -
HXWA03 User Guide
Page 45
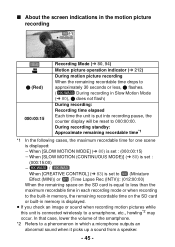
...:15 Recording Mode (l 80, 94) Motion picture operation indicator (l 212) During motion picture recording When the remaining recordable time drops to approximately 30 seconds or less, μ flashes. ( HX-WA30 During recording in Slow Motion Mode (l 80), μ does not flash) During recording: Recording time elapsed Each time the unit is connected wirelessly to a phenomenon in memory is displayed. ≥ If you check an image or sound when recording motion pictures while this unit is put into recording pause, the counter display...
...:15 Recording Mode (l 80, 94) Motion picture operation indicator (l 212) During motion picture recording When the remaining recordable time drops to approximately 30 seconds or less, μ flashes. ( HX-WA30 During recording in Slow Motion Mode (l 80), μ does not flash) During recording: Recording time elapsed Each time the unit is connected wirelessly to a phenomenon in memory is displayed. ≥ If you check an image or sound when recording motion pictures while this unit is put into recording pause, the counter display...

HXWA03 User Guide
Page 63
... A flashes green and the unit goes into Quick Start standby mode. ≥ Pressing the power button B for a short time will be reduced. ≥ Set to Quick Start Standby Mode. - 63 - Basic Using the Option Menu Select the menu. [MENU]: 1 , 2 or 3 # desired setting 1 OPTION MENU 1 [CLOCK SET] Please refer to page 39. [QUICK START] Opening the LCD monitor will switch from Standby Mode to Recording Standby Status in approximately 0.5 seconds (in Recording Mode...
... A flashes green and the unit goes into Quick Start standby mode. ≥ Pressing the power button B for a short time will be reduced. ≥ Set to Quick Start Standby Mode. - 63 - Basic Using the Option Menu Select the menu. [MENU]: 1 , 2 or 3 # desired setting 1 OPTION MENU 1 [CLOCK SET] Please refer to page 39. [QUICK START] Opening the LCD monitor will switch from Standby Mode to Recording Standby Status in approximately 0.5 seconds (in Recording Mode...
HXWA03 User Guide
Page 95
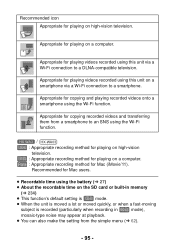
...-type noise may appear at playback. ≥ You can also make the setting from a smartphone to an SNS using the Wi-Fi function. HX-WA3 / HX-WA03 : Appropriate recording method for playing on high-vision television. : Appropriate recording method for playing on high-vision television. Recommended for Mac users. ≥ Recordable time using this unit via a Wi-Fi connection to a DLNA-compatible television. Appropriate for copying and playing recorded videos...
...-type noise may appear at playback. ≥ You can also make the setting from a smartphone to an SNS using the Wi-Fi function. HX-WA3 / HX-WA03 : Appropriate recording method for playing on high-vision television. : Appropriate recording method for playing on high-vision television. Recommended for Mac users. ≥ Recordable time using this unit via a Wi-Fi connection to a DLNA-compatible television. Appropriate for copying and playing recorded videos...

HXWA03 User Guide
Page 102
... function (l 111) to the SET button, you can change the flash setting from the recording screen. - 102 - [ZOOM MODE] Please refer to page 76. 2 RECORDING MENU 2 [BURST] Please refer to page 87. [PANORAMA] Please refer to page 89. [FLASH] When the button is pressed, the flash is set to ßA (AUTO) or ß (ON) while the [SCENE MODE] (l 97) is activated and the picture will be recorded. The unit emits a flash...
... function (l 111) to the SET button, you can change the flash setting from the recording screen. - 102 - [ZOOM MODE] Please refer to page 76. 2 RECORDING MENU 2 [BURST] Please refer to page 87. [PANORAMA] Please refer to page 89. [FLASH] When the button is pressed, the flash is set to ßA (AUTO) or ß (ON) while the [SCENE MODE] (l 97) is activated and the picture will be recorded. The unit emits a flash...

HXWA03 User Guide
Page 112
... shutter speed and the iris value. (l 117) (PHOTO VIEW): Sets photo view. (l 104) [OFF]: Shortcut functions are not registered. * HX-WA30 only ≥ To continue and register other functions, repeat Steps 1 and 2. 3 Press the MENU button. ≥ A confirmation screen for the shortcut settings appears. 4 Press the MENU button to complete the settings. 5 Tilt the SET button in the direction in which you registered the function. ≥ Each tip of the SET button changes...
... shutter speed and the iris value. (l 117) (PHOTO VIEW): Sets photo view. (l 104) [OFF]: Shortcut functions are not registered. * HX-WA30 only ≥ To continue and register other functions, repeat Steps 1 and 2. 3 Press the MENU button. ≥ A confirmation screen for the shortcut settings appears. 4 Press the MENU button to complete the settings. 5 Tilt the SET button in the direction in which you registered the function. ≥ Each tip of the SET button changes...
HXWA03 User Guide
Page 120
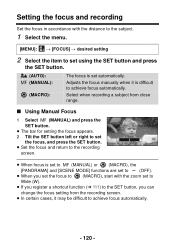
Setting the focus and recording Set the focus in accordance with the zoom set to Wide (W). ≥ If you register a shortcut function (l 111) to the SET button, you can change the focus setting from the recording screen. ≥ In certain cases, it is set using the SET button and press the SET button. (AUTO): (MANUAL): (MACRO): The focus is difficult to achieve focus automatically. Select when recording a subject from close range. ∫ Using Manual Focus 1 Select (MANUAL) and press the SET button. ≥...
Setting the focus and recording Set the focus in accordance with the zoom set to Wide (W). ≥ If you register a shortcut function (l 111) to the SET button, you can change the focus setting from the recording screen. ≥ In certain cases, it is set using the SET button and press the SET button. (AUTO): (MANUAL): (MACRO): The focus is difficult to achieve focus automatically. Select when recording a subject from close range. ∫ Using Manual Focus 1 Select (MANUAL) and press the SET button. ≥...

HXWA03 User Guide
Page 133
Advanced (Playback) Using the playback menu ≥ Set to Playback Mode. (l 38) 1 PLAYBACK MENU 1 [SLIDESHOW] Please refer to page 127. [CREATIVE CONTROL] Please refer to page 130. [PLAY VOLUME] Sets the playback volume for scene and audio files. 1 Select the menu. [MENU]: 1 # [PLAY VOLUME] 2 Tilt the SET button right or left and press the SET button. ≥ Play volume can also be set with the volume lever. (l 58) [PROTECT] Please refer to page 143. [DELETE] Please refer to page 140. - 133 -
Advanced (Playback) Using the playback menu ≥ Set to Playback Mode. (l 38) 1 PLAYBACK MENU 1 [SLIDESHOW] Please refer to page 127. [CREATIVE CONTROL] Please refer to page 130. [PLAY VOLUME] Sets the playback volume for scene and audio files. 1 Select the menu. [MENU]: 1 # [PLAY VOLUME] 2 Tilt the SET button right or left and press the SET button. ≥ Play volume can also be set with the volume lever. (l 58) [PROTECT] Please refer to page 143. [DELETE] Please refer to page 140. - 133 -

HXWA03 User Guide
Page 150
... are using are compatible with VIERA Link. 3 Operate with the remote control for the TV. (When selecting scenes) (When playing back) A Display operation icons B Cancel operation icons ∫ Other linked operations Turning the unit off . Automatic input switching: If you connect with an HDMI micro cable and then turn off the power, this unit's screen. In this case, use the remote control for the TV to the operating instructions of Panasonic TVs...
... are using are compatible with VIERA Link. 3 Operate with the remote control for the TV. (When selecting scenes) (When playing back) A Display operation icons B Cancel operation icons ∫ Other linked operations Turning the unit off . Automatic input switching: If you connect with an HDMI micro cable and then turn off the power, this unit's screen. In this case, use the remote control for the TV to the operating instructions of Panasonic TVs...

HXWA03 User Guide
Page 154
... the connected device. ≥ To stop recording (dubbing), stop playback on this case, refer to the operating instruction of the device you are played back on a wide-screen TV, the images may be stretched vertically. In this unit after stopping recording on the recorder. ≥ Even when [DISPLAY] is connected to a video device using an AV cable, the screen of the wide-screen TV and set to [OFF], the battery icon will not display images when in Playback Mode. 1 Connect...
... the connected device. ≥ To stop recording (dubbing), stop playback on this case, refer to the operating instruction of the device you are played back on a wide-screen TV, the images may be stretched vertically. In this unit after stopping recording on the recorder. ≥ Even when [DISPLAY] is connected to a video device using an AV cable, the screen of the wide-screen TV and set to [OFF], the battery icon will not display images when in Playback Mode. 1 Connect...
HXWA03 User Guide
Page 171
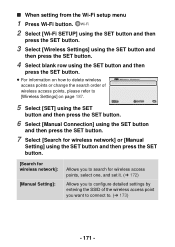
... SETUP] using the SET button and then press the SET button. 3 Select [Wireless Settings] using the SET button and then press the SET button. 4 Select blank row using the SET button and then press the SET button. ≥ For information on how to delete wireless access points or change the search order of wireless access points, please refer to [Wireless Settings] on page 187. 5 Select [SET] using the SET button and then press the SET button. 6 Select [Manual Connection] using the SET button...
... SETUP] using the SET button and then press the SET button. 3 Select [Wireless Settings] using the SET button and then press the SET button. 4 Select blank row using the SET button and then press the SET button. ≥ For information on how to delete wireless access points or change the search order of wireless access points, please refer to [Wireless Settings] on page 187. 5 Select [SET] using the SET button and then press the SET button. 6 Select [Manual Connection] using the SET button...

HXWA03 User Guide
Page 184
...; Recording motion pictures/still pictures ≥ Using the zoom (Available in iFrame cannot playback ≥ Delete ≥ Save (Copy) j Only iOS devices can transfer iFrame scenes ≥ Smart Home Network j It is possible to post to SNS or perform playback operation when this unit is turned off the Intelligent Auto Mode ≥ White Balance ≥ HDR Backlight Comp. ≥ REC MODE ≥ PICTURE SIZE ≥ SELF TIMER ≥ PHOTO VIEW ≥ FLASH ∫ When Playback Mode ≥ Playback j The scenes recorded...
...; Recording motion pictures/still pictures ≥ Using the zoom (Available in iFrame cannot playback ≥ Delete ≥ Save (Copy) j Only iOS devices can transfer iFrame scenes ≥ Smart Home Network j It is possible to post to SNS or perform playback operation when this unit is turned off the Intelligent Auto Mode ≥ White Balance ≥ HDR Backlight Comp. ≥ REC MODE ≥ PICTURE SIZE ≥ SELF TIMER ≥ PHOTO VIEW ≥ FLASH ∫ When Playback Mode ≥ Playback j The scenes recorded...

HXWA03 User Guide
Page 192
...3.0 Copying data to a PC Copying to a Blu-ray disc ≥ Motion pictures are converted to conventional standard quality (MPEG2 format). Data type Motion picture and still picture Motion picture - 192 - Do not format the disc, since deleted data cannot be copied. ≥ HX-WA30 Motion pictures recorded using an SDXC Memory Card, check the following support site. What can upload motion/still picture data on a PC: Play back the motion picture data in DVD-Video format: ≥ Converted to high-definition (H.264) motion pictures. ≥ Motion pictures recorded using...
...3.0 Copying data to a PC Copying to a Blu-ray disc ≥ Motion pictures are converted to conventional standard quality (MPEG2 format). Data type Motion picture and still picture Motion picture - 192 - Do not format the disc, since deleted data cannot be copied. ≥ HX-WA30 Motion pictures recorded using an SDXC Memory Card, check the following support site. What can upload motion/still picture data on a PC: Play back the motion picture data in DVD-Video format: ≥ Converted to high-definition (H.264) motion pictures. ≥ Motion pictures recorded using...

HXWA03 User Guide
Page 202
During access, do not disconnect the USB cable or remove the battery. ≥ Do not use any other USB cables except the supplied one is inserted or the built-in red. ∫ To disconnect USB cable safely Select the icon in task tray displayed on the PC, and then click [Eject Panasonic Video Camera]. ≥ Depending on , power is also supplied from the SD card if one . (Operation is not...
During access, do not disconnect the USB cable or remove the battery. ≥ Do not use any other USB cables except the supplied one is inserted or the built-in red. ∫ To disconnect USB cable safely Select the icon in task tray displayed on the PC, and then click [Eject Panasonic Video Camera]. ≥ Depending on , power is also supplied from the SD card if one . (Operation is not...

HXWA03 User Guide
Page 203
...; About the PC display When the unit is connected to a PC, it is recognized as an external drive. ≥ Removable disk (Example: ) is displayed in memory or SD card on this new folder. If you record further images/audio, a 101CDPFP folder is impossible to write data to copy motion picture data. It is created and the files are numbered 102CDPFP, 103CDPFP...and so on. 2 Recorded scenes 3 JPEG format pictures 4 Recorded audio - 203 - The folders...
...; About the PC display When the unit is connected to a PC, it is recognized as an external drive. ≥ Removable disk (Example: ) is displayed in memory or SD card on this new folder. If you record further images/audio, a 101CDPFP folder is impossible to write data to copy motion picture data. It is created and the files are numbered 102CDPFP, 103CDPFP...and so on. 2 Recorded scenes 3 JPEG format pictures 4 Recorded audio - 203 - The folders...

HXWA03 User Guide
Page 219
... recording and deletion. Recording Check points ≥ The battery temperature or unit internal temperature (excluding battery) rises. At time of the recording standby screen to photo view, set to (MANUAL), do the above, then reconfigure the Manual Focus. ≥ When the [ISO] setting is too high, noise may have shortened due to photo view. Press the button halfway to (ON). (l 104) ≥ Use an SD card that can be used for motion picture recording and still picture recording. Problem...
... recording and deletion. Recording Check points ≥ The battery temperature or unit internal temperature (excluding battery) rises. At time of the recording standby screen to photo view, set to (MANUAL), do the above, then reconfigure the Manual Focus. ≥ When the [ISO] setting is too high, noise may have shortened due to photo view. Press the button halfway to (ON). (l 104) ≥ Use an SD card that can be used for motion picture recording and still picture recording. Problem...


