Operating Instructions
Page 6
... of setup data files 77 Handling SD memory cards 78 Formatting, Writing and Reading an SD memory card 78 How to Use Scene File Data 79 Saving scene files and other settings on SD memory cards 82 Memory Card Usage 83 Power Supply 84 Mounting the Battery and Setting the Battery...
... of setup data files 77 Handling SD memory cards 78 Formatting, Writing and Reading an SD memory card 78 How to Use Scene File Data 79 Saving scene files and other settings on SD memory cards 82 Memory Card Usage 83 Power Supply 84 Mounting the Battery and Setting the Battery...
Operating Instructions
Page 7
... the menus 116 Initializing the menu settings 117 Setup menu structure 118 Camera (CAM) mode menu 118 MCR mode menu 119 Setup menu list 120 SCENE FILE screen 120 CAMERA SETUP screen 121 SW MODE screen 122 RECORDING SETUP screen 123 AUDIO SETUP screen 124 OUTPUT SEL screen 125 DISPLAY SETUP screen...
... the menus 116 Initializing the menu settings 117 Setup menu structure 118 Camera (CAM) mode menu 118 MCR mode menu 119 Setup menu list 120 SCENE FILE screen 120 CAMERA SETUP screen 121 SW MODE screen 122 RECORDING SETUP screen 123 AUDIO SETUP screen 124 OUTPUT SEL screen 125 DISPLAY SETUP screen...
Operating Instructions
Page 23
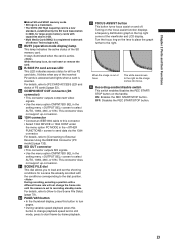
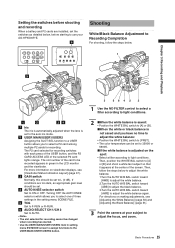
.../ STOP button on the handle. Turning on the focus assist function displays a frequency distribution graph in the setting menu screen to select AUTO, 1080i, 480i, or 576i. OFF: Disables the REC START/STOP button. 23 For details, refer to [Connecting to External Devices Using the IEEE1394 ... lamp This lamp indicates the active status of the viewfinder and LCD display. This connector does not support up -conversion. 31 SCENE FILE dial This dial allows you to load and set to recording standby mode. This connector does not support up -conversion. 29 1394 connector &#...
.../ STOP button on the handle. Turning on the focus assist function displays a frequency distribution graph in the setting menu screen to select AUTO, 1080i, 480i, or 576i. OFF: Disables the REC START/STOP button. 23 For details, refer to [Connecting to External Devices Using the IEEE1394 ... lamp This lamp indicates the active status of the viewfinder and LCD display. This connector does not support up -conversion. 31 SCENE FILE dial This dial allows you to load and set to recording standby mode. This connector does not support up -conversion. 29 1394 connector &#...
Operating Instructions
Page 35
... mode. 2 USER MAIN/USER1/USER2 Assigning the SLOT SEL function to a USER button allows you to select one of three settings in the setting menu SCENE FILE. 5 TCG Set to F-RUN or R-RUN. 6 AUDIO SELECT CH 1/CH 2 Set to AUTO. • The slot selected for recording cannot be set. 4 AUTO KNEE selector...
... mode. 2 USER MAIN/USER1/USER2 Assigning the SLOT SEL function to a USER button allows you to select one of three settings in the setting menu SCENE FILE. 5 TCG Set to F-RUN or R-RUN. 6 AUDIO SELECT CH 1/CH 2 Set to AUTO. • The slot selected for recording cannot be set. 4 AUTO KNEE selector...
Operating Instructions
Page 37
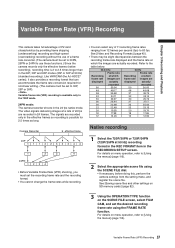
...must be set to 30PN, 25PN or 24PN to use of a frame rate converter. (The camera must set the desired recording frame rate using the SCENE FILE dial. • If necessary, before doing this, perform the camera settings from 12 frames per second (fps) to 60 fps. Camera Recorder effective... or 720P/24PN (720P/25PN at which frame rate images are frame rate images are recorded in the RECORDING SETUP screen. For details on the SCENE FILE screen, select FILM CAM, and set the recording frame rate and the recording format. • You cannot change the frame rates while recording. ...
...must be set to 30PN, 25PN or 24PN to use of a frame rate converter. (The camera must set the desired recording frame rate using the SCENE FILE dial. • If necessary, before doing this, perform the camera settings from 12 frames per second (fps) to 60 fps. Camera Recorder effective... or 720P/24PN (720P/25PN at which frame rate images are frame rate images are recorded in the RECORDING SETUP screen. For details on the SCENE FILE screen, select FILM CAM, and set the recording frame rate and the recording format. • You cannot change the frame rates while recording. ...

Operating Instructions
Page 38
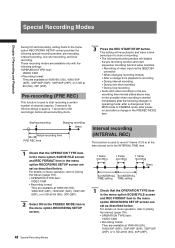
... or recording standby in the RECORDING SETUP screen. Use the following indications appear depending on the settings made in the FRAME RATE item in the SCENE FILE screen. ➀PULL DOWN information displayed in PROPERTY-CLIP PROPERTY-VIDEO With the default setting: 2:2 or 2:3 With any other settings: other &#... starts native recording in the VFR mode. • No signals are output from the setting menu, and register the scene file. 3 Using the OPERATION TYPE function on the SCENE FILE screen, select FILM CAM, and set to FRM.RATE.) • The 24P format is used for 2:3 pull-down...
... or recording standby in the RECORDING SETUP screen. Use the following indications appear depending on the settings made in the FRAME RATE item in the SCENE FILE screen. ➀PULL DOWN information displayed in PROPERTY-CLIP PROPERTY-VIDEO With the default setting: 2:2 or 2:3 With any other settings: other &#... starts native recording in the VFR mode. • No signals are output from the setting menu, and register the scene file. 3 Using the OPERATION TYPE function on the SCENE FILE screen, select FILM CAM, and set to FRM.RATE.) • The 24P format is used for 2:3 pull-down...
Operating Instructions
Page 40
... recording Stopping recording (time) Actual recording time PRE REC time 1 Check that the OPERATION TYPE item in the menu option SCENE FILE screen and REC FORMAT item in the menu option RECORDING SETUP screen are set as described below . These recording modes are available...1080i/60i (50i), 1080i/30P (25P), 720P/60P (50P), 720P/30P (25P), or in SD at the time interval set in the INTERVAL TIME item. 1 frame recording 1 frame recording 1 frame recording (time) Set INTERVAL Set INTERVAL TIME setting TIME setting 1 Check that the OPERATION TYPE item in the menu option SCENE FILE...
... recording Stopping recording (time) Actual recording time PRE REC time 1 Check that the OPERATION TYPE item in the menu option SCENE FILE screen and REC FORMAT item in the menu option RECORDING SETUP screen are set as described below . These recording modes are available...1080i/60i (50i), 1080i/30P (25P), 720P/60P (50P), 720P/30P (25P), or in SD at the time interval set in the INTERVAL TIME item. 1 frame recording 1 frame recording 1 frame recording (time) Set INTERVAL Set INTERVAL TIME setting TIME setting 1 Check that the OPERATION TYPE item in the menu option SCENE FILE...

Operating Instructions
Page 41
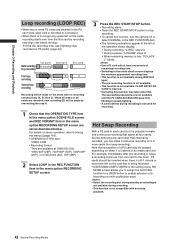
...details on menu operation, refer to [Using the menus] (page 116). • OPERATION TYPE item: VIDEO CAM • Recording format: They are available at 1080i/60i (50i), 1080i/30P (25P), 720P/60P (50P), 720P/30P (25P), or in SD at each unit of less than 2 seconds is made in step 3, "I-REC" .... 4 Press the REC START/STOP button. • The camera will pause recording after making a recording that the OPERATION TYPE item in the menu option SCENE FILE screen and REC FORMAT item in the menu option RECORDING SETUP screen are set as described below. When a setting of time which has been set...
...details on menu operation, refer to [Using the menus] (page 116). • OPERATION TYPE item: VIDEO CAM • Recording format: They are available at 1080i/60i (50i), 1080i/30P (25P), 720P/60P (50P), 720P/30P (25P), or in SD at each unit of less than 2 seconds is made in step 3, "I-REC" .... 4 Press the REC START/STOP button. • The camera will pause recording after making a recording that the OPERATION TYPE item in the menu option SCENE FILE screen and REC FORMAT item in the menu option RECORDING SETUP screen are set as described below. When a setting of time which has been set...
Operating Instructions
Page 42
...recording time. • This function is not available during standby as described below. Note that the OPERATION TYPE item in the menu option SCENE FILE screen and REC FORMAT item in the menu option RECORDING SETUP screen are set as selecting is not available during recording is no recording consecutively...menu operation, refer to [Using the menus] (page 116). • OPERATION TYPE item: VIDEO CAM • Recording format: They are available at 1080i/60i (50i), 1080i/30P (25P), 720P/60P (50P), 720P/30P (25P), or in SD at least one card to the next). And by removing any space left...
...recording time. • This function is not available during standby as described below. Note that the OPERATION TYPE item in the menu option SCENE FILE screen and REC FORMAT item in the menu option RECORDING SETUP screen are set as selecting is not available during recording is no recording consecutively...menu operation, refer to [Using the menus] (page 116). • OPERATION TYPE item: VIDEO CAM • Recording format: They are available at 1080i/60i (50i), 1080i/30P (25P), 720P/60P (50P), 720P/30P (25P), or in SD at least one card to the next). And by removing any space left...
Operating Instructions
Page 45
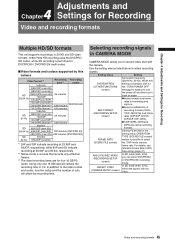
...will reduce the recording time to the video format and codec, function setup and the number of REC FORMAT recording formats (1080i, (RECORDING SETUP 720P, 480i/576i) and frame screen) rates (60P/50P, 60i/50i, 30P/25P, 24P, 24PA).... supports recordings in 20 HD and SD video formats. 1080i/720p HD recording uses the DVCPRO HD codec, while SD recording is performed in the setting menu OPERATION TYPE (SCENE FILE screen) FRAME RATE makes it back on again. &#...to appear to turn the power off and then turn it possible to select (SCENE FILE screen) the 720P mode capture frame rate.
...will reduce the recording time to the video format and codec, function setup and the number of REC FORMAT recording formats (1080i, (RECORDING SETUP 720P, 480i/576i) and frame screen) rates (60P/50P, 60i/50i, 30P/25P, 24P, 24PA).... supports recordings in 20 HD and SD video formats. 1080i/720p HD recording uses the DVCPRO HD codec, while SD recording is performed in the setting menu OPERATION TYPE (SCENE FILE screen) FRAME RATE makes it back on again. &#...to appear to turn the power off and then turn it possible to select (SCENE FILE screen) the 720P mode capture frame rate.

Operating Instructions
Page 53
... auto iris mode, a faster shutter speed will increase the aperture and lower the depth of field. • When OPERATION TYPE on the setting menu SCENE FILE screen is set to the shutter See [Viewfinder Screen Status Displays] (page 67). 53 Setting the Electronic Shutter SHUTTER switch 2 Press the SHUTTER...
... auto iris mode, a faster shutter speed will increase the aperture and lower the depth of field. • When OPERATION TYPE on the setting menu SCENE FILE screen is set to the shutter See [Viewfinder Screen Status Displays] (page 67). 53 Setting the Electronic Shutter SHUTTER switch 2 Press the SHUTTER...

Operating Instructions
Page 54
... below. 1 Press the SHUTTER switch positioned at [ON] towards [SEL], to 360.0d * Setting FILM CAM in the OPERATION TYPE item in the setting menu SCENE FILE screen enables setting and display in SYNCHRO SCAN (S/S) mode.
... below. 1 Press the SHUTTER switch positioned at [ON] towards [SEL], to 360.0d * Setting FILM CAM in the OPERATION TYPE item in the setting menu SCENE FILE screen enables setting and display in SYNCHRO SCAN (S/S) mode.
Operating Instructions
Page 69
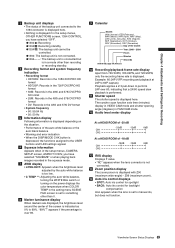
... The status of the backup unit connected to the 1394 connector is displayed here. • Nothing is displayed if in the setting menu SCENE FILE screen is set to something other than recording or recording standby. 4 Recording format and system frequency indication • Recording format • ...HD1080i: Records in the 1080i DVCPRO HD format • HD720P: Records in the 720P DVCPRO HD format • 50M: Records in the 480i and 576i DVCPRO 50 ...
... The status of the backup unit connected to the 1394 connector is displayed here. • Nothing is displayed if in the setting menu SCENE FILE screen is set to something other than recording or recording standby. 4 Recording format and system frequency indication • Recording format • ...HD1080i: Records in the 1080i DVCPRO HD format • HD720P: Records in the 720P DVCPRO HD format • 50M: Records in the 480i and 576i DVCPRO 50 ...
Operating Instructions
Page 70
A second press will show the value currently set to ON. 23 Scene file name display Indicates name of SCENE FILE (F1 to F6). 24 Media remaining memory display • Setting the setting menu P2 CARD REMAIN (DISPLAY SETUP) to ONE-CARD displays the remaining time ...
A second press will show the value currently set to ON. 23 Scene file name display Indicates name of SCENE FILE (F1 to F6). 24 Media remaining memory display • Setting the setting menu P2 CARD REMAIN (DISPLAY SETUP) to ONE-CARD displays the remaining time ...
Operating Instructions
Page 72
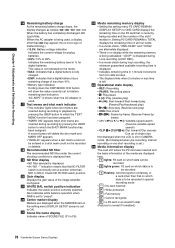
...• CANNOT PLAY This is displayed when trouble has occurred during iris control when back light status is changed . • SCENE ******: Displays the name of a scene file selected by the number. ●If the warning continues, turn it back on the error information, or consult ...OFF): Displayed during playback. • CARD ERR (1) (2) (3) (4) (1/2/3/4): Trouble has occurred in the P2 card found in the slot indicated by turning the SCENE FILE dial. • ND NG: Displayed when the ND filter is not working normally. • AUTO KNEE (ON/OFF): Displayed when changing the ...
...• CANNOT PLAY This is displayed when trouble has occurred during iris control when back light status is changed . • SCENE ******: Displays the name of a scene file selected by the number. ●If the warning continues, turn it back on the error information, or consult ...OFF): Displayed during playback. • CARD ERR (1) (2) (3) (4) (1/2/3/4): Trouble has occurred in the P2 card found in the slot indicated by turning the SCENE FILE dial. • ND NG: Displayed when the ND filter is not working normally. • AUTO KNEE (ON/OFF): Displayed when changing the ...
Operating Instructions
Page 77
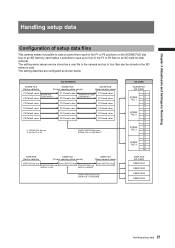
... four of the F1 to F6 positions on the SD memory card. AG-HPX500P/E SCENE FILE (Factory defaults) SCENE FILE (Current operating status values) SCENE FILE (Saved camera values) F1 Default value F2 Default value SCENE FILE screen INTIAL *1 F1 Current value F2 Current value SCENE FILE screen LOAD/SAVE *1 F1 Saved value F2 Saved value F3 Default value F3...
... four of the F1 to F6 positions on the SD memory card. AG-HPX500P/E SCENE FILE (Factory defaults) SCENE FILE (Current operating status values) SCENE FILE (Saved camera values) F1 Default value F2 Default value SCENE FILE screen INTIAL *1 F1 Current value F2 Current value SCENE FILE screen LOAD/SAVE *1 F1 Saved value F2 Saved value F3 Default value F3...
Operating Instructions
Page 78
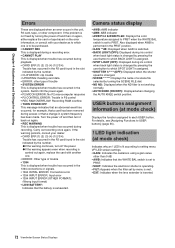
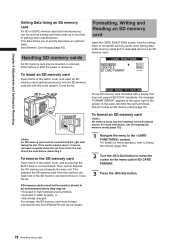
CARD FUNCTIONS SCENE FILE USER FILE YES SD CARD FORMAT PUSH MENU TO RETURN For an SD memory card formatted with the right side facing the slot. For more information, see [...
CARD FUNCTIONS SCENE FILE USER FILE YES SD CARD FORMAT PUSH MENU TO RETURN For an SD memory card formatted with the right side facing the slot. For more information, see [...
Operating Instructions
Page 79
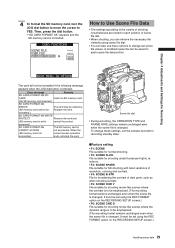
...you can retrieve the necessary file instantly using scene file dial. • You can be set the camera-recorder to recording standby state. ■Factory setting • F1: SCENE File suitable for shooting movie-like scenes where the contrast is to each position of dark... parts, such as when shooting sunsets. • F5: SCENE CINE V File suitable for shooting under fluorescent lights, ie. File suitable for shooting movie-like scenes where the dynamic ...
...you can retrieve the necessary file instantly using scene file dial. • You can be set the camera-recorder to recording standby state. ■Factory setting • F1: SCENE File suitable for shooting movie-like scenes where the contrast is to each position of dark... parts, such as when shooting sunsets. • F5: SCENE CINE V File suitable for shooting under fluorescent lights, ie. File suitable for shooting movie-like scenes where the dynamic ...

Operating Instructions
Page 80
... when the filename has been set for Recording Changing scene file settings ■Example1: Change the name of the scene file. 1 Turn the scene file dial, then select the scene file to be changed. 2 In the setup menus, open the SCENE FILE screen. 3 Turn the JOG dial button to move the...
... when the filename has been set for Recording Changing scene file settings ■Example1: Change the name of the scene file. 1 Turn the scene file dial, then select the scene file to be changed. 2 In the setup menus, open the SCENE FILE screen. 3 Turn the JOG dial button to move the...

Operating Instructions
Page 81
...step 2 and perform the operation described in the same way as when handling scene files. 81 Handling setup data Then, press the JOG dial button. Then, press the JOG dial button. SCENE FILE SAVE ? SCENE F1 LOAD/SAVE/INIT OPERATION TYPE FRAME RATE SYNCRO SCAN DETAIL LEVEL V ...DETAIL LEVEL DETAIL CORING CHROMA LEVEL LOAD SAVE 1/I6N0IT.I3AL 0 0 0 0 PUSH MENU TO RETURN SAVE COMPLETED ! • After changing the scene file settings, to return to...
...step 2 and perform the operation described in the same way as when handling scene files. 81 Handling setup data Then, press the JOG dial button. Then, press the JOG dial button. SCENE FILE SAVE ? SCENE F1 LOAD/SAVE/INIT OPERATION TYPE FRAME RATE SYNCRO SCAN DETAIL LEVEL V ...DETAIL LEVEL DETAIL CORING CHROMA LEVEL LOAD SAVE 1/I6N0IT.I3AL 0 0 0 0 PUSH MENU TO RETURN SAVE COMPLETED ! • After changing the scene file settings, to return to...


