
Operating Instructions
Page 2
...PLACE ANY LIQUID CONTAINERS ON TOP OF THE EQUIPMENT. CAUTION: Do not jar, swing, or shake the unit by its handle while the conversion lens or another accessory is intended to alert the user to the presence of uninsulated "dangerous voltage" within the product's enclosure that curtains and any ...LOSS. For Battery Pack • Replace only with doors and windows closed. • Use specified charger. Due to the added weight of the conversion lens, any other confined space. When using the equipment for a long period of electric shock to direct sunlight for long periods of time, make use ...
...PLACE ANY LIQUID CONTAINERS ON TOP OF THE EQUIPMENT. CAUTION: Do not jar, swing, or shake the unit by its handle while the conversion lens or another accessory is intended to alert the user to the presence of uninsulated "dangerous voltage" within the product's enclosure that curtains and any ...LOSS. For Battery Pack • Replace only with doors and windows closed. • Use specified charger. Due to the added weight of the conversion lens, any other confined space. When using the equipment for a long period of electric shock to direct sunlight for long periods of time, make use ...
Operating Instructions
Page 6
Contents Read this first 2 IMPORTANT SAFETY INSTRUCTIONS 4 Recommendation for Use of Genuine Panasonic Battery Pack (Rechargeable Battery 4 Software information for this product 5 Before use Outline of operations 8 Precaution for use 9 Accessories 10 Optional units 10 About this ...removing the battery 16 Connecting and disconnecting the power cord 16 Adjusting the hand strap 17 Attaching the shoulder strap 17 Detaching and attaching the lens hood........... 17 The remote control 18 Insert the battery 18 Remote control setup 18 Turn on/off the camera 19 Tally lamp 19 Viewfinder ...
Contents Read this first 2 IMPORTANT SAFETY INSTRUCTIONS 4 Recommendation for Use of Genuine Panasonic Battery Pack (Rechargeable Battery 4 Software information for this product 5 Before use Outline of operations 8 Precaution for use 9 Accessories 10 Optional units 10 About this ...removing the battery 16 Connecting and disconnecting the power cord 16 Adjusting the hand strap 17 Attaching the shoulder strap 17 Detaching and attaching the lens hood........... 17 The remote control 18 Insert the battery 18 Remote control setup 18 Turn on/off the camera 19 Tally lamp 19 Viewfinder ...
Operating Instructions
Page 9
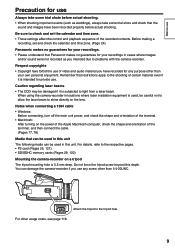
... weddings), always take some trial shots and check that restrictions apply to problems with the camera-recorder. Attach the tripod to shine directly on the lens. Notes when connecting a 1394 cable • Windows: Before connecting, turn off the main unit power, and check the shape and orientation of... shape and orientation of video and audio material you use of the terminal, and then connect the cable. (Pages 77, 78) Media that Panasonic makes no guarantees for your recordings. • Please understand that can be used , be damaged if it is subjected to light from a laser beam...
... weddings), always take some trial shots and check that restrictions apply to problems with the camera-recorder. Attach the tripod to shine directly on the lens. Notes when connecting a 1394 cable • Windows: Before connecting, turn off the main unit power, and check the shape and orientation of... shape and orientation of video and audio material you use of the terminal, and then connect the cable. (Pages 77, 78) Media that Panasonic makes no guarantees for your recordings. • Please understand that can be used , be damaged if it is subjected to light from a laser beam...
Operating Instructions
Page 10
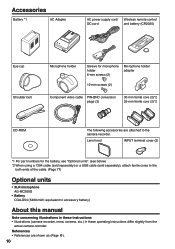
Lens hood INPUT terminal cover (2) *1 For part numbers for microphone holder 6-mm screws (2) Microphone holder adapter 12-mm screws (2) Component video cable PIN-BNC conversion plugs (3) ...
Lens hood INPUT terminal cover (2) *1 For part numbers for microphone holder 6-mm screws (2) Microphone holder adapter 12-mm screws (2) Component video cable PIN-BNC conversion plugs (3) ...

Operating Instructions
Page 17
Attaching the shoulder strap Attach the shoulder strap and use it . Attaching the lens hood • Turn the lens hood clockwise until it clicks to secure it in position. • Be sure to attach the lens hood cap to detach it as a precaution against dropping the camera. 20 mm or more... 20 mm or more Detaching and attaching the lens hood Detaching the lens hood • Turn the lens hood counterclockwise to protect the lens when not in use. 17 Preparation Adjusting the hand strap Adjust the hand strap to suit your hand. 1...
Attaching the shoulder strap Attach the shoulder strap and use it . Attaching the lens hood • Turn the lens hood clockwise until it clicks to secure it in position. • Be sure to attach the lens hood cap to detach it as a precaution against dropping the camera. 20 mm or more... 20 mm or more Detaching and attaching the lens hood Detaching the lens hood • Turn the lens hood counterclockwise to protect the lens when not in use. 17 Preparation Adjusting the hand strap Adjust the hand strap to suit your hand. 1...
Operating Instructions
Page 20
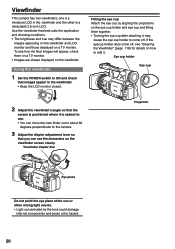
... them on a TV monitor. • Images are always displayed on a TV monitor. Viewfinder diopter dial Fitting the eye cup Attach the eye cup by the lens could damage internal components and poses a fire hazard. 20 Use the viewfinder that the screen is positioned where it is a retractable 3.5-inch LCD. To see...
... them on a TV monitor. • Images are always displayed on a TV monitor. Viewfinder diopter dial Fitting the eye cup Attach the eye cup by the lens could damage internal components and poses a fire hazard. 20 Use the viewfinder that the screen is positioned where it is a retractable 3.5-inch LCD. To see...

Operating Instructions
Page 21
... the screen for about 2 seconds. Emphasizing outlines Emphasizing the outlines of the images you see . • The monitor can be rotated 180 degrees toward the lens and 90 degrees toward you shoot. 1 In CAM mode, press EVF DTL. Emphasizing the outlines does not effect the images you . • Do not apply...
... the screen for about 2 seconds. Emphasizing outlines Emphasizing the outlines of the images you see . • The monitor can be rotated 180 degrees toward the lens and 90 degrees toward you shoot. 1 In CAM mode, press EVF DTL. Emphasizing the outlines does not effect the images you . • Do not apply...

Operating Instructions
Page 36
...the top right in the viewfinder and LCD monitor. Turn the focus ring on the lens to place the graph further to the right as the image comes into focus. To return to adjust the ...aperture of lens. When set to the EXPANDED mode, the focus assist function does not work when the digital zoom...F1.6 at full WIDE and F3.0 at the top right of lens when in auto mode, use the FOCUS ASSIST setting on the lens. In the auto iris mode, the lens iris can use the AUTO/MANUAL switch to switch to manual mode....
...the top right in the viewfinder and LCD monitor. Turn the focus ring on the lens to place the graph further to the right as the image comes into focus. To return to adjust the ...aperture of lens. When set to the EXPANDED mode, the focus assist function does not work when the digital zoom...F1.6 at full WIDE and F3.0 at the top right of lens when in auto mode, use the FOCUS ASSIST setting on the lens. In the auto iris mode, the lens iris can use the AUTO/MANUAL switch to switch to manual mode....
Operating Instructions
Page 99
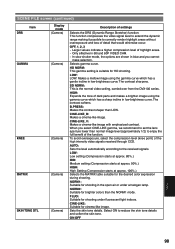
... the NORM1 mode. When you cannot make selection. FLUO: Suitable for shooting in blue and you select CINE-LIKE gamma, we recommend to set the lens aperture lower than normal image level (approximately 1/2) to correctly render highlight areas without overexposure and loss of the high intensity video signals received through CCD...
... the NORM1 mode. When you cannot make selection. FLUO: Suitable for shooting in blue and you select CINE-LIKE gamma, we recommend to set the lens aperture lower than normal image level (approximately 1/2) to correctly render highlight areas without overexposure and loss of the high intensity video signals received through CCD...

Operating Instructions
Page 117
... fix this by leaving the camera off for several hours. • The liquid crystal parts are not being used. 117 Reference Do not point the lens or viewfinder at the sun. Doing so may remain on their memory cards. This leaves less than 0.01% of pixels that are highly precise with...
... fix this by leaving the camera off for several hours. • The liquid crystal parts are not being used. 117 Reference Do not point the lens or viewfinder at the sun. Doing so may remain on their memory cards. This leaves less than 0.01% of pixels that are highly precise with...
Operating Instructions
Page 125
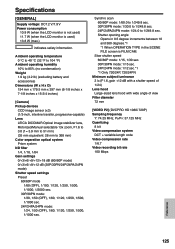
...sec.*1 *1 Only 720/24P, 720/24PN Minimum subject luminance 3 lx (F1.6, gain +12 dB with a shutter speed of 1/24) Lens hood Large-sized lens hood with wide angle of view Filter diameter 72 mm [VIDEO P2] (DVCPRO HD 1080i 720P) Sampling frequency Y: 74.25 MHz, ...179.5 mm x 397 mm (6-1/8 inches x 7-1/8 inches x 15-3/4 inches) [Camera] Pickup devices CCD image sensor (x3) (1/3-inch, interline transfer, progressive-capable) Lens LEICA DICOMAR Optical image stabilizer lens, Motorized/Manual selectable 13x zoom, F1.6 to 3.0 (f = 3.9 mm to 51 mm) (35 mm equivalent: 28 mm to 1/249.8 sec. Synchro scan 60i...
...sec.*1 *1 Only 720/24P, 720/24PN Minimum subject luminance 3 lx (F1.6, gain +12 dB with a shutter speed of 1/24) Lens hood Large-sized lens hood with wide angle of view Filter diameter 72 mm [VIDEO P2] (DVCPRO HD 1080i 720P) Sampling frequency Y: 74.25 MHz, ...179.5 mm x 397 mm (6-1/8 inches x 7-1/8 inches x 15-3/4 inches) [Camera] Pickup devices CCD image sensor (x3) (1/3-inch, interline transfer, progressive-capable) Lens LEICA DICOMAR Optical image stabilizer lens, Motorized/Manual selectable 13x zoom, F1.6 to 3.0 (f = 3.9 mm to 51 mm) (35 mm equivalent: 28 mm to 1/249.8 sec. Synchro scan 60i...


