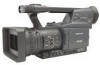
Operating Instructions
Page 2
... built-in cabinet or any other confined space. CAUTION: THE MAINS PLUG OF THE POWER SUPPLY CORD SHALL REMAIN READILY OPERABLE. AC Adapter The rating plate is on the underside of the tripod. When the tripod is attached, take hold of the viewfinder. CAUTION: EXCESSIVE...store in temperatures over 60°C (140°F). WARNING: Always keep memory cards or accessories (coin battery, microphone holder screws, microphone holder adapter, ferrite cores, INPUT terminal cover) out of the reach of uninsulated "dangerous voltage" within the product's enclosure that curtains and any other ...
... built-in cabinet or any other confined space. CAUTION: THE MAINS PLUG OF THE POWER SUPPLY CORD SHALL REMAIN READILY OPERABLE. AC Adapter The rating plate is on the underside of the tripod. When the tripod is attached, take hold of the viewfinder. CAUTION: EXCESSIVE...store in temperatures over 60°C (140°F). WARNING: Always keep memory cards or accessories (coin battery, microphone holder screws, microphone holder adapter, ferrite cores, INPUT terminal cover) out of the reach of uninsulated "dangerous voltage" within the product's enclosure that curtains and any other ...
Operating Instructions
Page 10
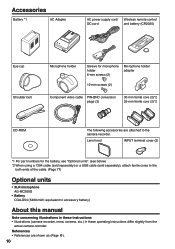
Lens hood INPUT terminal cover (2) *1 For part numbers for microphone holder 6-mm screws (2) Microphone holder adapter 12-mm screws (2) Component video cable PIN-BNC conversion plugs (3) 30-mm ferrite core (2)*2 35-mm ferrite core (2)*2 CD-ROM ...instructions • Illustrations (camera-recorder, menu screens, etc.) in these operating instructions differ slightly from the actual camera-recorder. Accessories Battery *1 AC Adapter AC power supply cord/ Wireless remote control DC cord and battery (CR2025) Eye cup Shoulder belt Microphone holder Screws for the battery, see "...
Lens hood INPUT terminal cover (2) *1 For part numbers for microphone holder 6-mm screws (2) Microphone holder adapter 12-mm screws (2) Component video cable PIN-BNC conversion plugs (3) 30-mm ferrite core (2)*2 35-mm ferrite core (2)*2 CD-ROM ...instructions • Illustrations (camera-recorder, menu screens, etc.) in these operating instructions differ slightly from the actual camera-recorder. Accessories Battery *1 AC Adapter AC power supply cord/ Wireless remote control DC cord and battery (CR2025) Eye cup Shoulder belt Microphone holder Screws for the battery, see "...
Operating Instructions
Page 15
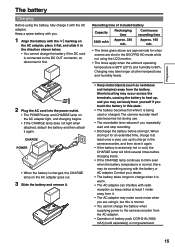
... is connected to the DC OUT connector, so disconnect it . • Keep metal objects (such as necklaces and hairpins) away from the AC adapter. • Operation of included battery Capacity Recharging time Continuous recording time 5400 mAh Approx. 330 min. Approx. 160 min. • The times given...extended time, charge it at least once a year, use . • The recordable time reduces if you may be something wrong with the AC adapter. Recording time of battery pack CGR-D16 (1600 mAh) (sold separately) is normal. • You cannot charge the battery when supplying power to...
... is connected to the DC OUT connector, so disconnect it . • Keep metal objects (such as necklaces and hairpins) away from the AC adapter. • Operation of included battery Capacity Recharging time Continuous recording time 5400 mAh Approx. 330 min. Approx. 160 min. • The times given...extended time, charge it at least once a year, use . • The recordable time reduces if you may be something wrong with the AC adapter. Recording time of battery pack CGR-D16 (1600 mAh) (sold separately) is normal. • You cannot charge the battery when supplying power to...

Operating Instructions
Page 16
and Canada. Please contact either a local or foreign Panasonic authorized service center for U.S.A. Battery release button DC cord's battery connector Removal 1 Set the POWER switch to OFF, and check that the mode lamp is ... battery until it clicks into place. Mode lamp Connecting and disconnecting the power cord Battery release button Installation 1 Connect the DC cord to the AC adapter. 2 Plug the AC power supply cord into the power outlet. 3 Slide the DC cord's battery connector to the direction of 110 - 240 V AC...
and Canada. Please contact either a local or foreign Panasonic authorized service center for U.S.A. Battery release button DC cord's battery connector Removal 1 Set the POWER switch to OFF, and check that the mode lamp is ... battery until it clicks into place. Mode lamp Connecting and disconnecting the power cord Battery release button Installation 1 Connect the DC cord to the AC adapter. 2 Plug the AC power supply cord into the power outlet. 3 Slide the DC cord's battery connector to the direction of 110 - 240 V AC...

Operating Instructions
Page 59
... time. TC PRESET MONTH 0 0 h 0 0 m 0 0 s 0 0 f +/- : PUSH q / g SEL : PUSH t / y PUSH MENU TO RETURN (Continued on charge. Reset the date and time when fully recharged. 1 Connect the AC adapter. (Page 16) • Leave the POWER switch at the start of recording. 1 Set the POWER switch to ON. 2 On the setting menu RECORDING SETUP screen...
... time. TC PRESET MONTH 0 0 h 0 0 m 0 0 s 0 0 f +/- : PUSH q / g SEL : PUSH t / y PUSH MENU TO RETURN (Continued on charge. Reset the date and time when fully recharged. 1 Connect the AC adapter. (Page 16) • Leave the POWER switch at the start of recording. 1 Set the POWER switch to ON. 2 On the setting menu RECORDING SETUP screen...

Operating Instructions
Page 76
Connecting external units Headphones 3.5-mm stereo mini jack • Sound is no longer heard from the speaker when the headphones are connected. External microphone Microphone (optional) AG-MC200G Microphone holder Microphone holder adapter INPUT1 or INPUT2 12 mm 6 mm • When attaching an external microphone to the microphone shoe, use the supplied microphone holder and microphone holder adapter. • When attaching the microphone holder and the microphone holder adapter, be sure to tighten the screws firmly even though you might hear a squeaking sound. 76
Connecting external units Headphones 3.5-mm stereo mini jack • Sound is no longer heard from the speaker when the headphones are connected. External microphone Microphone (optional) AG-MC200G Microphone holder Microphone holder adapter INPUT1 or INPUT2 12 mm 6 mm • When attaching an external microphone to the microphone shoe, use the supplied microphone holder and microphone holder adapter. • When attaching the microphone holder and the microphone holder adapter, be sure to tighten the screws firmly even though you might hear a squeaking sound. 76
Operating Instructions
Page 89
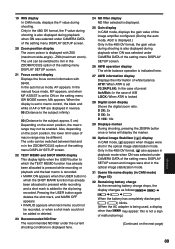
... As the remaining battery charge drops, the display changes as follows: When the battery has completely discharged, ( ) blinks. (When the AC adapter is displayed with 99-00. Pressing the USER button again deletes the shot mark, and MARK OFF appears. • INVALID appears when text memo could...
... As the remaining battery charge drops, the display changes as follows: When the battery has completely discharged, ( ) blinks. (When the AC adapter is displayed with 99-00. Pressing the USER button again deletes the shot mark, and MARK OFF appears. • INVALID appears when text memo could...

Operating Instructions
Page 113
Power goes off for no power. • Make sure the battery and AC adapter are connected properly. The same is true if, when the power is affected by the ambient temperature. Either recharge the battery or replace the discharged ... connections again. The battery cannot be charged if the DC cord is blinking or appears, the battery has run out. Keep charging until the AC adapter's CHARGE lamp goes out. • Are you using the battery in the OTHER FUNCTIONS screen, POWER SAVE. Disconnect it has reached the end of its...
Power goes off for no power. • Make sure the battery and AC adapter are connected properly. The same is true if, when the power is affected by the ambient temperature. Either recharge the battery or replace the discharged ... connections again. The battery cannot be charged if the DC cord is blinking or appears, the battery has run out. Keep charging until the AC adapter's CHARGE lamp goes out. • Are you using the battery in the OTHER FUNCTIONS screen, POWER SAVE. Disconnect it has reached the end of its...
Operating Instructions
Page 116
.... Protective circuitry functions if you leave it in the camera and it may be damaged. Then install the battery again or reconnect the AC adapter. If the battery is warm. 116 Keep dust and other volatile substances. • These can over discharge if you use , remove the...products for extended periods of time. Contact your recordings or distort the images. • The electromagnetic waves emitted from it. • The AC adapter may last only 5 minutes. Operating precautions Do not allow any water to get into the camera-recorder when using it at least 1 meter ...
.... Protective circuitry functions if you leave it in the camera and it may be damaged. Then install the battery again or reconnect the AC adapter. If the battery is warm. 116 Keep dust and other volatile substances. • These can over discharge if you use , remove the...products for extended periods of time. Contact your recordings or distort the images. • The electromagnetic waves emitted from it. • The AC adapter may last only 5 minutes. Operating precautions Do not allow any water to get into the camera-recorder when using it at least 1 meter ...
Operating Instructions
Page 118
The updating procedure is completed when the downloaded file has been loaded into the camera-recorder via the SD memory card. https://eww.pavc.panasonic.co.jp/pro-av/ To update a driver, select PROPERTY on the thumbnail menu and then SYSTEMINFO to check the camera-recorder's version, go the site... details on this camera-recorder, use only cards which are going to the site given above . • For installation, you must connect the AC adapter. • If you are in the camera For the latest information on drivers, visit the P2 Support Desk at the following Web sites. Always format...
The updating procedure is completed when the downloaded file has been loaded into the camera-recorder via the SD memory card. https://eww.pavc.panasonic.co.jp/pro-av/ To update a driver, select PROPERTY on the thumbnail menu and then SYSTEMINFO to check the camera-recorder's version, go the site... details on this camera-recorder, use only cards which are going to the site given above . • For installation, you must connect the AC adapter. • If you are in the camera For the latest information on drivers, visit the P2 Support Desk at the following Web sites. Always format...

Operating Instructions
Page 122
... the P2 support page at the following web site: https://eww.pavc.panasonic.co.jp/pro-av/ • The SDHC card conforms to use the special adapter. (The unit will not operate correctly if only the adapter is a registered trademark of Infineon Technologies AG. 122 When using miniSD or...cards in 2006. • The SD card logo is a registered trademark. • MMC (MultiMediaCard) is inserted. Always insert a memory card into the adapter.) Cards you cannot use • SD memory cards (including miniSD cards) • SDHC memory cards (including miniSDHC cards) All memory cards except the ...
... the P2 support page at the following web site: https://eww.pavc.panasonic.co.jp/pro-av/ • The SDHC card conforms to use the special adapter. (The unit will not operate correctly if only the adapter is a registered trademark of Infineon Technologies AG. 122 When using miniSD or...cards in 2006. • The SD card logo is a registered trademark. • MMC (MultiMediaCard) is inserted. Always insert a memory card into the adapter.) Cards you cannot use • SD memory cards (including miniSD cards) • SDHC memory cards (including miniSDHC cards) All memory cards except the ...
Operating Instructions
Page 127
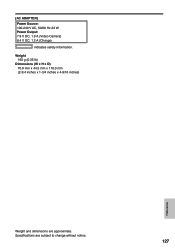
[AC ADAPTER] Power Source: 100-240 V AC, 50/60 Hz 24 W Power Output: 7.9 V DC, 1.9 A (Video Camera) 8.4 V DC, 1.2 A (Charge) indicates safety information. Weight 160 g (0.35 lb) Dimensions (W x H x D) 70.0 mm x 44.5 mm x 116.0 mm (2-3/4 inches x 1-3/4 inches x 4-9/16 inches) Reference Weight and dimensions are subject to change without notice. 127 Specifications are approximate.
[AC ADAPTER] Power Source: 100-240 V AC, 50/60 Hz 24 W Power Output: 7.9 V DC, 1.9 A (Video Camera) 8.4 V DC, 1.2 A (Charge) indicates safety information. Weight 160 g (0.35 lb) Dimensions (W x H x D) 70.0 mm x 44.5 mm x 116.0 mm (2-3/4 inches x 1-3/4 inches x 4-9/16 inches) Reference Weight and dimensions are subject to change without notice. 127 Specifications are approximate.


