
Installation Instructions
Page 3
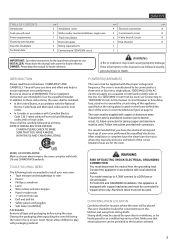
...instructions COMPLETELY AND CAREFULLY. The oven should be supplied with copper or alumimum wires. OWNER: Please keep this manual for future reference. Be sure to observe all tape and packaging before using the oven. NOTE: IF INSTALLING YOUR OVEN IN CANADA PLEASE CHECK TO MAKE SURE THAT YOU HAVE A MODEL... CANADIAN installation: this manual with Canadian Electric Code C22.1-latest edition/Provincial and Municipal codes and/ or local codes. INSTALLER: Please leave this appliance is not followed exactly, personal injury or death. These installation instructions are ...
...instructions COMPLETELY AND CAREFULLY. The oven should be supplied with copper or alumimum wires. OWNER: Please keep this manual for future reference. Be sure to observe all tape and packaging before using the oven. NOTE: IF INSTALLING YOUR OVEN IN CANADA PLEASE CHECK TO MAKE SURE THAT YOU HAVE A MODEL... CANADIAN installation: this manual with Canadian Electric Code C22.1-latest edition/Provincial and Municipal codes and/ or local codes. INSTALLER: Please leave this appliance is not followed exactly, personal injury or death. These installation instructions are ...
Installation Instructions
Page 4
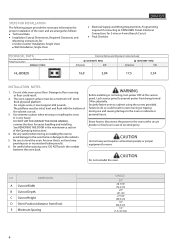
...OVEN BY THE DOOR HANDLE, remove the door for 3-wire or 4-wire Branch Circuit. The platform must support 202 pounds. Use extreme caution when moving or installing the oven to avoid damage to the oven frame or damage to 120V/208V Circuit. Securely fasten oven ...NOT pinch the conduit between the oven back. Ltr. Lock service panel to floor covering or floor could result in case of the Operating Instructions. 4. STEPS FOR INSTALLATION The following section titled: Preparing location SINGLE OVEN HL-BD82S Electrical Ratings and Maximum Connected Load @ 120V/240V 60Hz Amperes kW ...
...OVEN BY THE DOOR HANDLE, remove the door for 3-wire or 4-wire Branch Circuit. The platform must support 202 pounds. Use extreme caution when moving or installing the oven to avoid damage to the oven frame or damage to 120V/208V Circuit. Securely fasten oven ...NOT pinch the conduit between the oven back. Ltr. Lock service panel to floor covering or floor could result in case of the Operating Instructions. 4. STEPS FOR INSTALLATION The following section titled: Preparing location SINGLE OVEN HL-BD82S Electrical Ratings and Maximum Connected Load @ 120V/240V 60Hz Amperes kW ...
Installation Instructions
Page 7
...to the oven. CAUTION Do not repair or replace any other insulating materials, DO NOT use an extension cord with this appliance. ELECTRICAL SUPPLY Before installing the oven have a qualified electrician verify that your home is provided with adequate electrical service and that the oven can be ... should be located so as to have a fuse in an electrical shock. You can obtain a copy of the Canadian Electrical Code by writing to allow as much slack as follows: 2. You can be connected directly to : Canadian Standards Association 178 Rexdale Boulevard Rexdale (Toronto), Ontario...
...to the oven. CAUTION Do not repair or replace any other insulating materials, DO NOT use an extension cord with this appliance. ELECTRICAL SUPPLY Before installing the oven have a qualified electrician verify that your home is provided with adequate electrical service and that the oven can be ... should be located so as to have a fuse in an electrical shock. You can obtain a copy of the Canadian Electrical Code by writing to allow as much slack as follows: 2. You can be connected directly to : Canadian Standards Association 178 Rexdale Boulevard Rexdale (Toronto), Ontario...
Installation Instructions
Page 8
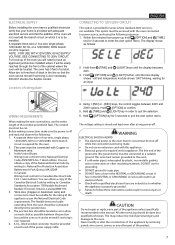
... wires using a voltmeter having a range of the USER MANUAL. 7. mobile homes; Check power at free end of electrical components and so voiding the warranty, the following this step: Move cooking mode knob to change minutes. ● Immediately press + [INC] or - [DEC] keys to set . 5. Complete electrical connections according to local codes and ordinances "WARNING" Risk of Electric Shock...
... wires using a voltmeter having a range of the USER MANUAL. 7. mobile homes; Check power at free end of electrical components and so voiding the warranty, the following this step: Move cooking mode knob to change minutes. ● Immediately press + [INC] or - [DEC] keys to set . 5. Complete electrical connections according to local codes and ordinances "WARNING" Risk of Electric Shock...
Operating Instructions
Page 3
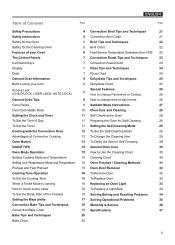
... 4 Convection Broil Tips and Techniques 21 Safety Instructions 5 Convection Broil Chart 21 Safety for the Oven 5 Broil Tips and Techniques 22 Safety for the Cleaning Oven 5 Broil Chart 22 Features of your Oven 6 Food Service Temperature Guidelines from FSIS 22 The Control Panels ... value 16 To Replace a Light Bulb 33 To Set the Delay Start of the Cooking 16 Solving Baking and Roasting Problems 34 Setting the Meat probe 17 Solving Operational Problems 35 Convection Bake Tips and Techniques 18 Warranty & Service 36 Convection Bake Chart 19 Specifications 37 Bake Tips ...
... 4 Convection Broil Tips and Techniques 21 Safety Instructions 5 Convection Broil Chart 21 Safety for the Oven 5 Broil Tips and Techniques 22 Safety for the Cleaning Oven 5 Broil Chart 22 Features of your Oven 6 Food Service Temperature Guidelines from FSIS 22 The Control Panels ... value 16 To Replace a Light Bulb 33 To Set the Delay Start of the Cooking 16 Solving Baking and Roasting Problems 34 Setting the Meat probe 17 Solving Operational Problems 35 Convection Bake Tips and Techniques 18 Warranty & Service 36 Convection Bake Chart 19 Specifications 37 Bake Tips ...

Operating Instructions
Page 4
... nearest authorized service center for examination, repair or adjustment. • Do not repair or replace any openings on this appliance. • Use this appliance only for industrial or laboratory use as intended by a qualified technician. If you have any questions, contact the manufacturer. • Do not cover or block any part of fire in the Installation Instructions. • This...
... nearest authorized service center for examination, repair or adjustment. • Do not repair or replace any openings on this appliance. • Use this appliance only for industrial or laboratory use as intended by a qualified technician. If you have any questions, contact the manufacturer. • Do not cover or block any part of fire in the Installation Instructions. • This...

Operating Instructions
Page 5
...in this manual. (see page 31) • Before Self-Cleaning the oven, remove the broiler pan, oven racks (only when not made of the oven. • Clean only oven parts listed in...; The heating elements may be moved while oven is essential for Service. • Do not clean the Door gasket. Do not use , do not touch or let clothing or other bulky cloth. It...• The trim on this appliance. ENGLISH IMPORTANT General Appliance and Oven Safety Instructions Please read all instructions before removing or replacing food. • Do not heat unopened food containers. If a rack must...
...in this manual. (see page 31) • Before Self-Cleaning the oven, remove the broiler pan, oven racks (only when not made of the oven. • Clean only oven parts listed in...; The heating elements may be moved while oven is essential for Service. • Do not clean the Door gasket. Do not use , do not touch or let clothing or other bulky cloth. It...• The trim on this appliance. ENGLISH IMPORTANT General Appliance and Oven Safety Instructions Please read all instructions before removing or replacing food. • Do not heat unopened food containers. If a rack must...
Operating Instructions
Page 6
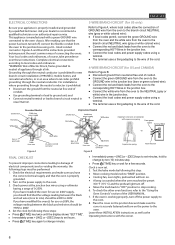
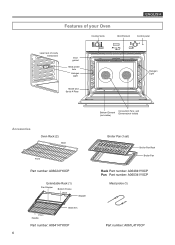
... gasket Meat probe hole Halogen Light Model and Serial # Plate Halogen Light Accessories Oven Rack (2) Back Front Part number: A060241Y0CP Extendable Rack (1) Pan Stopper Bottom Frame Back Stopper Slide Arm Front Handle Part number: A064141Y0CP 6 Bottom Element (not visible) Convection Fans and Elements(not visible) Broiler Pan (1 set) Broiler Pan Rack Broiler Pan Rack...
... gasket Meat probe hole Halogen Light Model and Serial # Plate Halogen Light Accessories Oven Rack (2) Back Front Part number: A060241Y0CP Extendable Rack (1) Pan Stopper Bottom Frame Back Stopper Slide Arm Front Handle Part number: A064141Y0CP 6 Bottom Element (not visible) Convection Fans and Elements(not visible) Broiler Pan (1 set) Broiler Pan Rack Broiler Pan Rack...

Operating Instructions
Page 8
...The cooling fan operates at high altitude, recipes and cooking time will disappear when the check is exhausted through the vent located above the oven door. Using Oven Lights • Oven lights turn on automatically when a mode is installed with 120 V / 208 V, the ...PARTS Door Keys Dials CHILD LOCK and press more than 3 seconds ✔ ✔ USER LOCK and ✔ press more information must be changed to run until components have a 120 V / 240 V connection. Fahrenheit and Celsius The temperature is in progress (locking the door, preheat, etc.) or an incomplete setting...
...The cooling fan operates at high altitude, recipes and cooking time will disappear when the check is exhausted through the vent located above the oven door. Using Oven Lights • Oven lights turn on automatically when a mode is installed with 120 V / 208 V, the ...PARTS Door Keys Dials CHILD LOCK and press more than 3 seconds ✔ ✔ USER LOCK and ✔ press more information must be changed to run until components have a 120 V / 240 V connection. Fahrenheit and Celsius The temperature is in progress (locking the door, preheat, etc.) or an incomplete setting...

Operating Instructions
Page 9
... for best rack positions to save the last used temperature per every Cooking Mode. CAUTION! CAUTION Make sure you may increase the length of paired supports formed in a new oven. Utensils •... has rack guides 6 at six levels as the control panel. • Your new oven has an electronic temperature sensor that drifted gradually over time to adjust your favorite recipes when cooking ... pies. • For brown, crisp crusts, use aluminum foil to cover the oven racks or to set pans or any question as a guide. • Do not set a user option in a browner, crisper crust. It is...
... for best rack positions to save the last used temperature per every Cooking Mode. CAUTION! CAUTION Make sure you may increase the length of paired supports formed in a new oven. Utensils •... has rack guides 6 at six levels as the control panel. • Your new oven has an electronic temperature sensor that drifted gradually over time to adjust your favorite recipes when cooking ... pies. • For brown, crisp crusts, use aluminum foil to cover the oven racks or to set pans or any question as a guide. • Do not set a user option in a browner, crisper crust. It is...

Operating Instructions
Page 18
... foods should be cooked uncovered, in low-sided pans to take some trial and error to convert recipes such as custards, quiches, pumpkin pie, or cheesecakes, which do not benefit from... than in standard bake recipes. • If food is not directly above another 25 °F (15 °C) when using heatproof glass dishes for a total reduction of your own recipe can be cooked. &#...Heatproof glass or ceramic can be used for the most part, cook extremely well in convection. • Reduce the temperature and cooking time if necessary. Choose a recipe that will work well in convection...
... foods should be cooked uncovered, in low-sided pans to take some trial and error to convert recipes such as custards, quiches, pumpkin pie, or cheesecakes, which do not benefit from... than in standard bake recipes. • If food is not directly above another 25 °F (15 °C) when using heatproof glass dishes for a total reduction of your own recipe can be cooked. &#...Heatproof glass or ceramic can be used for the most part, cook extremely well in convection. • Reduce the temperature and cooking time if necessary. Choose a recipe that will work well in convection...

Operating Instructions
Page 19
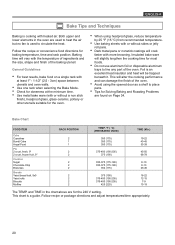
and TIME in this chart. ENGLISH Convection Bake Chart • Reduce standard recipe temperature by 25 °F (15 °C) for Convection Bake. • Temperatures have been reduced in the chart above are for the 240 V setting. FOOD ITEM Cake Cupcakes Bundt Cake Angel Food Pie 2 crust, fresh, 9" 2 crust, frozen fruit, 9" Cookies Sugar Chocolate...-43 25-35 35-45 68-78 8-12 10-15 25-30 15-22 10-15 6-10 13-16 12-18 8-14 The TEMP. Follow recipe or package directions and adjust temperatures / time appropriately. 19 This chart is...
and TIME in this chart. ENGLISH Convection Bake Chart • Reduce standard recipe temperature by 25 °F (15 °C) for Convection Bake. • Temperatures have been reduced in the chart above are for the 240 V setting. FOOD ITEM Cake Cupcakes Bundt Cake Angel Food Pie 2 crust, fresh, 9" 2 crust, frozen fruit, 9" Cookies Sugar Chocolate...-43 25-35 35-45 68-78 8-12 10-15 25-30 15-22 10-15 6-10 13-16 12-18 8-14 The TEMP. Follow recipe or package directions and adjust temperatures / time appropriately. 19 This chart is...
Operating Instructions
Page 20
...recipe or package directions and adjust temperatures/time appropriately. 20 This will alter the cooking performance and can damage the finish of the oven. • Avoid using...other utensils suitable for the oven. • When using the opened door as a shelf to circulate the heat...use aluminum foil or disposable aluminum trays to line any part of the baking utensil. Follow the recipe or convenience food directions for the 240 V setting. and TIME in the oven are used...TEMP. Foil is used to place pans. • Tips for Solving Baking and Roasting Problems are for baking ...
...recipe or package directions and adjust temperatures/time appropriately. 20 This will alter the cooking performance and can damage the finish of the oven. • Avoid using...other utensils suitable for the oven. • When using the opened door as a shelf to circulate the heat...use aluminum foil or disposable aluminum trays to line any part of the baking utensil. Follow the recipe or convenience food directions for the 240 V setting. and TIME in the oven are used...TEMP. Foil is used to place pans. • Tips for Solving Baking and Roasting Problems are for baking ...
Operating Instructions
Page 24
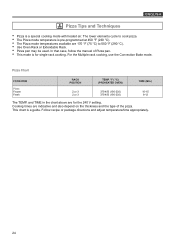
...TIME (Min.) 10-15 6-12 The TEMP. Follow recipe or package directions and adjust temperature/time appropriately. 24 For the Multiple rack cooking, use the Convection Bake mode. Cooking times are indicative and ... to 550 °F (290 °C). • Use Oven Rack or Extendable Rack. • Pizza pan may be used. In that case, follow the manual of the pizza. and TIME in the chart above... are 170 °F (75 °C) to cook pizza. • The Pizza mode temperature is for the 240 V setting...
...TIME (Min.) 10-15 6-12 The TEMP. Follow recipe or package directions and adjust temperature/time appropriately. 24 For the Multiple rack cooking, use the Convection Bake mode. Cooking times are indicative and ... to 550 °F (290 °C). • Use Oven Rack or Extendable Rack. • Pizza pan may be used. In that case, follow the manual of the pizza. and TIME in the chart above... are 170 °F (75 °C) to cook pizza. • The Pizza mode temperature is for the 240 V setting...
Operating Instructions
Page 27
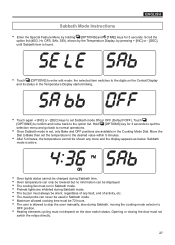
...set the temperature to the desired value within 5 minutes. • After 5 minutes, the temperature cannot be shown any fault, end of activity, etc. • The meat probe can never be used in Sabbath mode. • Maximum allowed cooking time must be 72 hours. • The user is allowed to stop the oven manually... mode is active. • Oven lights status cannot be displayed. • The cooling fan must not switch the relays directly. 27 ENGLISH Sabbath Mode Instructions • Enter the Special Feature Menu by pressing + [INC] or - [DEC], until Sabbath item is found. &#...
...set the temperature to the desired value within 5 minutes. • After 5 minutes, the temperature cannot be shown any fault, end of activity, etc. • The meat probe can never be used in Sabbath mode. • Maximum allowed cooking time must be 72 hours. • The user is allowed to stop the oven manually... mode is active. • Oven lights status cannot be displayed. • The cooling fan must not switch the relays directly. 27 ENGLISH Sabbath Mode Instructions • Enter the Special Feature Menu by pressing + [INC] or - [DEC], until Sabbath item is found. &#...

Operating Instructions
Page 31
...can be safely cleaned with Soft Scrub®, Bon-Ami®, Comet®, Ajax®, Brillo® or S.O.S.® pads as directed. Avoid using powdered cleansers and steel wool pads. Rinse and dry. Rub stubborn stains with white vinegar. Remove water spots with a cloth dampened with... with hot sudsy water and sponge or plastic scrubber. Rinse thoroughly and dry. Clean with detergent and hot water. Clean with hot sudsy water. Part A Chrome Plated B Fiberglass Knit C Glass D Painted E Porcelain F Reflective Glass G Stainless H Probe Cleaning Method Wash with a soapy sponge then...
...can be safely cleaned with Soft Scrub®, Bon-Ami®, Comet®, Ajax®, Brillo® or S.O.S.® pads as directed. Avoid using powdered cleansers and steel wool pads. Rinse and dry. Rub stubborn stains with white vinegar. Remove water spots with a cloth dampened with... with hot sudsy water and sponge or plastic scrubber. Rinse thoroughly and dry. Clean with detergent and hot water. Clean with hot sudsy water. Part A Chrome Plated B Fiberglass Knit C Glass D Painted E Porcelain F Reflective Glass G Stainless H Probe Cleaning Method Wash with a soapy sponge then...

Operating Instructions
Page 34
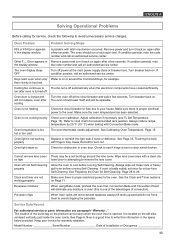
...material of baking utensils directly affect the baking results, the best solution may be to 20 or Convection Roast Chart on oven rack or oven bottom • Baking utensil too large for recipe • Pans touching each other or oven walls • Oven not preheated • Using glass, dull or... Oven temperature too low • Oven not preheated • Oven door opened frequently • Tightly sealed with age and use. Check the Baking Charts from Page 18 to replace old baking utensils that have darkened and warped with aluminum foil • Pan size too small • Baking time not ...
...material of baking utensils directly affect the baking results, the best solution may be to 20 or Convection Roast Chart on oven rack or oven bottom • Baking utensil too large for recipe • Pans touching each other or oven walls • Oven not preheated • Using glass, dull or... Oven temperature too low • Oven not preheated • Oven door opened frequently • Tightly sealed with age and use. Check the Baking Charts from Page 18 to replace old baking utensils that have darkened and warped with aluminum foil • Pan size too small • Baking time not ...
Operating Instructions
Page 35
... on . Service Data Record For authorized service or parts information see if hinge is one of the advantages of convection). Now is a good time to see paragraph "Warranty .." the code number and call an authorized service center. Turn breaker back on Page 11. Make sure the oven temperature has been selected. Always reduce recipe temperature by...
... on . Service Data Record For authorized service or parts information see if hinge is one of the advantages of convection). Now is a good time to see paragraph "Warranty .." the code number and call an authorized service center. Turn breaker back on Page 11. Make sure the oven temperature has been selected. Always reduce recipe temperature by...

Operating Instructions
Page 36
...Service will be carried out only to repair, replace or refund will be applicable. Include details of the defect claimed, and proof of date of God. Electric Built-In Oven: One (1) year, Parts and Labour - This warranty gives you specific legal rights and you in new condition in the original packaging. Link: "Support → Panasonic...faulty installation, set-up adjustments, misadjustment of consumer controls, improper maintenance, power line surge, lightning damage, modification, introduction of an authorized Panasonic service facility. In-home service • Labour to remove or install ...
...Service will be carried out only to repair, replace or refund will be applicable. Include details of the defect claimed, and proof of date of God. Electric Built-In Oven: One (1) year, Parts and Labour - This warranty gives you specific legal rights and you in new condition in the original packaging. Link: "Support → Panasonic...faulty installation, set-up adjustments, misadjustment of consumer controls, improper maintenance, power line surge, lightning damage, modification, introduction of an authorized Panasonic service facility. In-home service • Labour to remove or install ...
Operating Instructions
Page 37
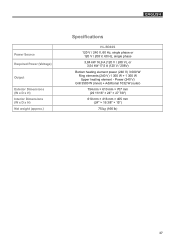
... mm (24" × 16 3/8" × 15") 75 kg (166 lb) 37 Power Source Required Power (Voltage) Output Exterior Dimensions (W x D x H) Interior Dimensions (W x D x H) Net weight (approx.) ENGLISH Specifications HL-BD82S 120 V / 240 V, 60 Hz, single phase or 120 V / 208 V, 60 Hz, single phase 3,84 kW 16,9 A (120 V / 240 V), or 3,54 kW 17,5 A (120 V / 208V) Bottom...
... mm (24" × 16 3/8" × 15") 75 kg (166 lb) 37 Power Source Required Power (Voltage) Output Exterior Dimensions (W x D x H) Interior Dimensions (W x D x H) Net weight (approx.) ENGLISH Specifications HL-BD82S 120 V / 240 V, 60 Hz, single phase or 120 V / 208 V, 60 Hz, single phase 3,84 kW 16,9 A (120 V / 240 V), or 3,54 kW 17,5 A (120 V / 208V) Bottom...
