
HCV10 User Guide
Page 1
Owner's Manual Digital Video Camera HC-V10 Model No. For USA and Puerto Rico assistance, please call: 1-800-211-PANA(7262) or, contact us via the web at: http://www.panasonic.com/contactinfo For Canadian assistance, please call: 1-800-561-5505 or visit us at www.panasonic.ca P PC PU VQT4C31 HC-V10M HC-V11M Before connecting, operating or adjusting this product, please read the instructions completely.
Owner's Manual Digital Video Camera HC-V10 Model No. For USA and Puerto Rico assistance, please call: 1-800-211-PANA(7262) or, contact us via the web at: http://www.panasonic.com/contactinfo For Canadian assistance, please call: 1-800-561-5505 or visit us at www.panasonic.ca P PC PU VQT4C31 HC-V10M HC-V11M Before connecting, operating or adjusting this product, please read the instructions completely.
HCV10 User Guide
Page 2
.... 2 VQT4C31 Be sure to qualified service personnel. Install this unit by yourself. You have purchased one of naked flames, such as lighted candles, on this manual as vases, on the underside of fire, electric shock or product damage, ≥ Do not install or place this unit to fill in another confined... enjoyment. CAUTION! Serial No. To reduce the risk of your convenient camera information source. Used properly, we're sure it will bring you for choosing Panasonic!
.... 2 VQT4C31 Be sure to qualified service personnel. Install this unit by yourself. You have purchased one of naked flames, such as lighted candles, on this manual as vases, on the underside of fire, electric shock or product damage, ≥ Do not install or place this unit to fill in another confined... enjoyment. CAUTION! Serial No. To reduce the risk of your convenient camera information source. Used properly, we're sure it will bring you for choosing Panasonic!
HCV10 User Guide
Page 9
...models may be slightly different from the original. ≥ The illustrations used for still picture recording/still picture playback are indicated by in this owner's manual show model , however, parts of the explanation refer to page 104. ∫ Cards that you can use with this unit SD Memory Card,...or 48 GB or more Memory Cards that do not have the SDXC logo are indicated by an arrow, for example: l 00 This owner's manual is fogged up) Condensation occurs when the ambient temperature or humidity changes. Pictures may be available depending on SD cards. ∫ For the ...
...models may be slightly different from the original. ≥ The illustrations used for still picture recording/still picture playback are indicated by in this owner's manual show model , however, parts of the explanation refer to page 104. ∫ Cards that you can use with this unit SD Memory Card,...or 48 GB or more Memory Cards that do not have the SDXC logo are indicated by an arrow, for example: l 00 This owner's manual is fogged up) Condensation occurs when the ambient temperature or humidity changes. Pictures may be available depending on SD cards. ∫ For the ...
HCV10 User Guide
Page 10
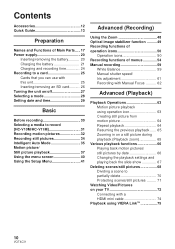
... Optical image stabilizer function .......... 49 Recording functions of operation icons 50 Operation icons 50 Recording functions of menus 54 Manual recording 59 White Balance 59 Manual shutter speed/ Iris adjustment 61 Recording with Manual Focus .......... 62 Advanced (Playback) Playback Operations 63 Motion picture playback using operation icon 63 Creating still picture from motion...
... Optical image stabilizer function .......... 49 Recording functions of operation icons 50 Operation icons 50 Recording functions of menus 54 Manual recording 59 White Balance 59 Manual shutter speed/ Iris adjustment 61 Recording with Manual Focus .......... 62 Advanced (Playback) Playback Operations 63 Motion picture playback using operation icon 63 Creating still picture from motion...

HCV10 User Guide
Page 14
... turn on the unit. ∫ Selecting a mode Operate the mode switch to change the mode to operate the menu screen. ≥ In this owner's manual, the cursor button is denoted as shown below or as 3/4/2/1. ∫ Turning the unit on/off Turning the unit on and off with the LCD...
... turn on the unit. ∫ Selecting a mode Operate the mode switch to change the mode to operate the menu screen. ≥ In this owner's manual, the cursor button is denoted as shown below or as 3/4/2/1. ∫ Turning the unit on/off Turning the unit on and off with the LCD...
HCV10 User Guide
Page 17
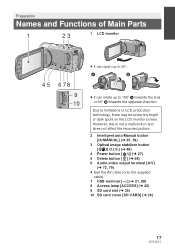
... 180o A towards the lens or 90o B towards the opposite direction. However, this is not a malfunction and does not affect the recorded picture. 2 Intelligent auto/Manual button [iA/MANUAL] (l 35, 59) 3 Optical image stabilizer button [ O.I.S.] (l 49) 4 Power button [ ] (l 27) 5 Delete button [ ] (l 68) 6 Audio-video output terminal [A/V] (l 72, 79) ≥ Use the AV cable...
... 180o A towards the lens or 90o B towards the opposite direction. However, this is not a malfunction and does not affect the recorded picture. 2 Intelligent auto/Manual button [iA/MANUAL] (l 35, 59) 3 Optical image stabilizer button [ O.I.S.] (l 49) 4 Power button [ ] (l 27) 5 Delete button [ ] (l 68) 6 Audio-video output terminal [A/V] (l 72, 79) ≥ Use the AV cable...

HCV10 User Guide
Page 18
..., 40, 50) ≥ Use the cursor button to select the recording functions and playback operations, and to operate the menu screen. ≥ In this owner's manual, the cursor button is denoted as shown below or as 3/4/2/ 1.
..., 40, 50) ≥ Use the cursor button to select the recording functions and playback operations, and to operate the menu screen. ≥ In this owner's manual, the cursor button is denoted as shown below or as 3/4/2/ 1.

HCV10 User Guide
Page 35
...depending on the recording conditions, the unit may be surrounded by pointing the unit to what you want to record. /MANUAL Intelligent auto/Manual button Press this button to switch Intelligent Auto Mode/Manual Mode. ≥ Please refer to give a clear picture. ≥ Depending on the recording conditions, such as ... so it is recorded clearly. In modes other than those described above, the contrast is adjusted to page 59 for details about Manual Mode. Basic Intelligent Auto Mode The following modes (appropriate for the condition) are set just by white frame when detected.
...depending on the recording conditions, the unit may be surrounded by pointing the unit to what you want to record. /MANUAL Intelligent auto/Manual button Press this button to switch Intelligent Auto Mode/Manual Mode. ≥ Please refer to give a clear picture. ≥ Depending on the recording conditions, such as ... so it is recorded clearly. In modes other than those described above, the contrast is adjusted to page 59 for details about Manual Mode. Basic Intelligent Auto Mode The following modes (appropriate for the condition) are set just by white frame when detected.

HCV10 User Guide
Page 36
...by highly reflective objects 36 VQT4C31 Depending on the brightness of Automatic White Balance adjustment on light sources or scenes. Record pictures in the Manual Focus Mode. (l 62) j Recording distant and close-up objects at the same time j Recording a subject behind dirty or dusty ...window j Recording a subject that is not functioning normally, adjust the White Balance manually. (l 59) 2 000K 8) Auto Focus 9) The unit focuses automatically. ≥ Auto Focus does not work correctly in the following situations. ∫...
...by highly reflective objects 36 VQT4C31 Depending on the brightness of Automatic White Balance adjustment on light sources or scenes. Record pictures in the Manual Focus Mode. (l 62) j Recording distant and close-up objects at the same time j Recording a subject behind dirty or dusty ...window j Recording a subject that is not functioning normally, adjust the White Balance manually. (l 59) 2 000K 8) Auto Focus 9) The unit focuses automatically. ≥ Auto Focus does not work correctly in the following situations. ∫...
HCV10 User Guide
Page 56
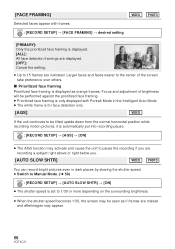
... to be seen as orange frames. [FACE FRAMING] Detected faces appear with Portrait Mode in dark places by slowing the shutter speed. ≥ Switch to Manual Mode. (l 59) : [RECORD SETUP] # [AUTO SLOW SHTR] # [ON] ≥ The shutter speed is set to 1/30 or more depending on the surrounding brightness. ≥ When...
... to be seen as orange frames. [FACE FRAMING] Detected faces appear with Portrait Mode in dark places by slowing the shutter speed. ≥ Switch to Manual Mode. (l 59) : [RECORD SETUP] # [AUTO SLOW SHTR] # [ON] ≥ The shutter speed is set to 1/30 or more depending on the surrounding brightness. ≥ When...
HCV10 User Guide
Page 57
... ≥ In Intelligent Auto Mode this setting is set to [AUTO] and cannot be set . The desired recording level can be adjusted. ≥ Switch to Manual Mode. (l 59) 1 Select the menu. : [RECORD SETUP] # [MIC LEVEL] # desired setting [AUTO]: [SETr ]: [SET]: AGC is activated,...8805; (Microphone input level meter) appears on the recording conditions. [MIC LEVEL] When recording, the input level from the 2 built-in microphones. ≥ Switch to Manual Mode. (l 59) : [RECORD SETUP] # [WIND CUT] # [ON] ≥ This function's default setting is [OFF]. ≥ When switching to Intelligent...
... ≥ In Intelligent Auto Mode this setting is set to [AUTO] and cannot be set . The desired recording level can be adjusted. ≥ Switch to Manual Mode. (l 59) 1 Select the menu. : [RECORD SETUP] # [MIC LEVEL] # desired setting [AUTO]: [SETr ]: [SET]: AGC is activated,...8805; (Microphone input level meter) appears on the recording conditions. [MIC LEVEL] When recording, the input level from the 2 built-in microphones. ≥ Switch to Manual Mode. (l 59) : [RECORD SETUP] # [WIND CUT] # [ON] ≥ This function's default setting is [OFF]. ≥ When switching to Intelligent...

HCV10 User Guide
Page 59
... 59 VQT4C31 White Balance Automatic White Balance function may not reproduce natural colors depending on the screen. Advanced (Recording) Manual recording ¬ Change the mode to display/not-display the manual icon. ≥ The page changes with each press of 4. If so, you can adjust the White Balance... manually. ≥ Press the iA/MANUAL button to switch to Manual Mode. 1 Select [WB] using the cursor button. 2 Press 2/1 to select White Balance Mode. ≥ Select the optimal mode by confirming ...
... 59 VQT4C31 White Balance Automatic White Balance function may not reproduce natural colors depending on the screen. Advanced (Recording) Manual recording ¬ Change the mode to display/not-display the manual icon. ≥ The page changes with each press of 4. If so, you can adjust the White Balance... manually. ≥ Press the iA/MANUAL button to switch to Manual Mode. 1 Select [WB] using the cursor button. 2 Press 2/1 to select White Balance Mode. ≥ Select the optimal mode by confirming ...

HCV10 User Guide
Page 60
... unit with a white subject. 2 Press 3 to set. ≥ When the display stops flashing and then lights constantly, the setting is stored. Manual adjustment mode: ≥ Mercury-vapor lamps, sodium lamps, some fluorescent lights ≥ Lights used for wedding receptions at hotels, stage spotlights in theaters ...≥ Sunrise, sunset, etc. ≥ To return to auto setting, select AWB or press the iA/MANUAL button. ∫ To set the White Balance manually 1 Press 2/1 to select , and fill the screen with the lens cover closed, the Auto White Balance will not be ...
... unit with a white subject. 2 Press 3 to set. ≥ When the display stops flashing and then lights constantly, the setting is stored. Manual adjustment mode: ≥ Mercury-vapor lamps, sodium lamps, some fluorescent lights ≥ Lights used for wedding receptions at hotels, stage spotlights in theaters ...≥ Sunrise, sunset, etc. ≥ To return to auto setting, select AWB or press the iA/MANUAL button. ∫ To set the White Balance manually 1 Press 2/1 to select , and fill the screen with the lens cover closed, the Auto White Balance will not be ...

HCV10 User Guide
Page 61
... Shutter Speed: Adjust it when the screen is too bright or too dark. ≥ Press the iA/MANUAL button to switch to Manual Mode. (l 59) 1 Select [SHTR] or [IRIS] using the cursor button. 2 Press 2/1 to...supply frequency is 60 Hz, or 1/100 in the Intelligent Auto Mode or set the iris/gain value. Manual iris/gain adjustment ≥ If the gain value is adjusted to brighter than OPEN, it changes to the... gain value. ≥ To return to auto setting, press the iA/MANUAL button. ≥ When setting both the shutter speed and the iris/gain value, set the shutter speed...
... Shutter Speed: Adjust it when the screen is too bright or too dark. ≥ Press the iA/MANUAL button to switch to Manual Mode. (l 59) 1 Select [SHTR] or [IRIS] using the cursor button. 2 Press 2/1 to...supply frequency is 60 Hz, or 1/100 in the Intelligent Auto Mode or set the iris/gain value. Manual iris/gain adjustment ≥ If the gain value is adjusted to brighter than OPEN, it changes to the... gain value. ≥ To return to auto setting, press the iA/MANUAL button. ≥ When setting both the shutter speed and the iris/gain value, set the shutter speed...

HCV10 User Guide
Page 62
MF MF : To focus on a close subject MF : To focus on the screen. 3 Press 2/1 to adjust the focus. Recording with Manual Focus If auto focusing is difficult due to the conditions, then use Manual Focus. ≥ Press the iA/MANUAL button to switch to Manual Mode. (l 59) 1 Press 4 to switch the manual icon. 2 Select [MF] using the cursor button to change to Manual Focus. ≥ MF appears on a faraway subject 5/5 NEXT ≥ To restore Auto Focus, select [AF] or press the iA/MANUAL button. 62 VQT4C31
MF MF : To focus on a close subject MF : To focus on the screen. 3 Press 2/1 to adjust the focus. Recording with Manual Focus If auto focusing is difficult due to the conditions, then use Manual Focus. ≥ Press the iA/MANUAL button to switch to Manual Mode. (l 59) 1 Press 4 to switch the manual icon. 2 Select [MF] using the cursor button to change to Manual Focus. ≥ MF appears on a faraway subject 5/5 NEXT ≥ To restore Auto Focus, select [AF] or press the iA/MANUAL button. 62 VQT4C31
HCV10 User Guide
Page 82
... that the operation of the Software will be responsible for backup purpose. Panasonic or any damage suffered by Licensee's reverse engineering, decompiling, or disassembly of the Software. In this Agreement. Further, Panasonic does not warrant that you agree to the terms and conditions of charge... or not, to use it on the CD-ROM, instruction manuals, and any country the Software in the Software or damage to ,...
... that the operation of the Software will be responsible for backup purpose. Panasonic or any damage suffered by Licensee's reverse engineering, decompiling, or disassembly of the Software. In this Agreement. Further, Panasonic does not warrant that you agree to the terms and conditions of charge... or not, to use it on the CD-ROM, instruction manuals, and any country the Software in the Software or damage to ,...

HCV10 User Guide
Page 84
... 1024k768 pixels or more (1920k1080 pixels or more USB devices are connected to a Blu-ray disc/DVD.) ≥ Operation is not guaranteed in this owner's manual are fulfilled, some PCs cannot be used. ≥ A CD-ROM drive is necessary to install the supplied software applications. (A compatible Blu-ray disc/DVD writer...
... 1024k768 pixels or more (1920k1080 pixels or more USB devices are connected to a Blu-ray disc/DVD.) ≥ Operation is not guaranteed in this owner's manual are fulfilled, some PCs cannot be used. ≥ A CD-ROM drive is necessary to install the supplied software applications. (A compatible Blu-ray disc/DVD writer...

HCV10 User Guide
Page 92
... on the desktop. ≥ For users who have / , [CAM_SD] and [CAM_MEM] are displayed on the desktop. ≥ Files are displayed on PC 1 Connect this owner's manual are fulfilled, some PCs cannot be used . ≥ The USB equipment operates with the driver installed as standard in [100CDPFQ] folder etc. Press the cursor...
... on the desktop. ≥ For users who have / , [CAM_SD] and [CAM_MEM] are displayed on the desktop. ≥ Files are displayed on PC 1 Connect this owner's manual are fulfilled, some PCs cannot be used . ≥ The USB equipment operates with the driver installed as standard in [100CDPFQ] folder etc. Press the cursor...
HCV10 User Guide
Page 93
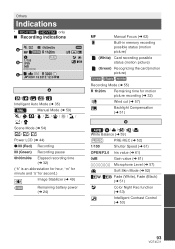
...+1 MF 1/100 OPEN 0dB 0h00m00s R 1h20m PRE-REC 0.9M R 3000 NOV 15 2012 12:34PM A //// Intelligent Auto Mode (l 35) MNL Manual Mode (l 59) / Scene Mode (l 54) +2 / +1 / -1 Power LCD (l 44) ¥/; (Red) Recording ; (Green) Recording pause 0h00m00s Elapsed recording... ("h" is an abbreviation for hour, "m" for minute and "s" for second.) Image Stabilizer (l 49) Remaining battery power (l 24) MF Manual Focus (l 62) Built-in memory recording possible status (motion picture)* (White) Card recording possible status (motion picture) (Green) Recognizing the...
...+1 MF 1/100 OPEN 0dB 0h00m00s R 1h20m PRE-REC 0.9M R 3000 NOV 15 2012 12:34PM A //// Intelligent Auto Mode (l 35) MNL Manual Mode (l 59) / Scene Mode (l 54) +2 / +1 / -1 Power LCD (l 44) ¥/; (Red) Recording ; (Green) Recording pause 0h00m00s Elapsed recording... ("h" is an abbreviation for hour, "m" for minute and "s" for second.) Image Stabilizer (l 49) Remaining battery power (l 24) MF Manual Focus (l 62) Built-in memory recording possible status (motion picture)* (White) Card recording possible status (motion picture) (Green) Recognizing the...
HCV10 User Guide
Page 97
... pictures recorded with other devices may not be displayed when recording in a very dark location. ≥ In a place with the (Indoor mode 2), set it to (Manual adjustment mode). (l 59) ≥ Color or brightness of the image may change, or you may see horizontal bars in the image when the object is...) ≥ The recordable time may also be possible to play back on this is hard to bring into focus in Auto Focus Mode, use the Manual Focus Mode to adjust the focus. (l 36, 62) ≥ Before turning on the unit, open the lens cover. ≥ This message may have shortened due...
... pictures recorded with other devices may not be displayed when recording in a very dark location. ≥ In a place with the (Indoor mode 2), set it to (Manual adjustment mode). (l 59) ≥ Color or brightness of the image may change, or you may see horizontal bars in the image when the object is...) ≥ The recordable time may also be possible to play back on this is hard to bring into focus in Auto Focus Mode, use the Manual Focus Mode to adjust the focus. (l 36, 62) ≥ Before turning on the unit, open the lens cover. ≥ This message may have shortened due...

