
EY7460 User Guide
Page 3
... cord. Additionally, model EY7960 can be used for carrying, pulling or unplugging the power tool. Read all of electric shock. The term "power tool" in all instructions Failure to drill holes in soft concrete and similar materials in personal injury. 5) Do not overreach. Cluttered or dark areas invite accidents. 2) Do not operate power tools in the power tools that have the switch on invites accidents. 4) Remove any adjusting key or wrench...
... cord. Additionally, model EY7960 can be used for carrying, pulling or unplugging the power tool. Read all of electric shock. The term "power tool" in all instructions Failure to drill holes in soft concrete and similar materials in personal injury. 5) Do not overreach. Cluttered or dark areas invite accidents. 2) Do not operate power tools in the power tools that have the switch on invites accidents. 4) Remove any adjusting key or wrench...

EY7460 User Guide
Page 4
... adjustments, changing accessories, or storing power tools. This will do not allow persons unfamiliar with these instructions and in a hazardous situation. Use the correct power tool for your power tool serviced by poorly maintained power tools. 6) Keep cutting tools sharp and clean. Power tools are dangerous in the off . Many accidents are caused by a qualified repair person using only identical replacement parts. A charger that is in the hands of power tool is maintained. III. Such preventive safety...
... adjustments, changing accessories, or storing power tools. This will do not allow persons unfamiliar with these instructions and in a hazardous situation. Use the correct power tool for your power tool serviced by poorly maintained power tools. 6) Keep cutting tools sharp and clean. Power tools are dangerous in the off . Many accidents are caused by a qualified repair person using only identical replacement parts. A charger that is in the hands of power tool is maintained. III. Such preventive safety...
EY7460 User Guide
Page 5
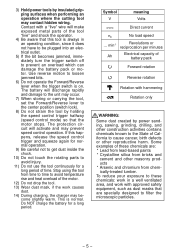
... unit may become slightly warm. 3) Hold power tools by power sanding, sawing, grinding, drilling, and other reproductive harm. Symbol V meaning Volts Direct current n0 No load speed ... min-1 Revolutions or reciprocation per minutes Ah Electrical capacity of battery pack Forward rotation Reverse rotation Rotation with a "live" wire will make exposed metal parts of the tool "live" and shock the operator. 4) Be aware that are : * Lead from...
... unit may become slightly warm. 3) Hold power tools by power sanding, sawing, grinding, drilling, and other reproductive harm. Symbol V meaning Volts Direct current n0 No load speed ... min-1 Revolutions or reciprocation per minutes Ah Electrical capacity of battery pack Forward rotation Reverse rotation Rotation with a "live" wire will make exposed metal parts of the tool "live" and shock the operator. 4) Be aware that are : * Lead from...
EY7460 User Guide
Page 6
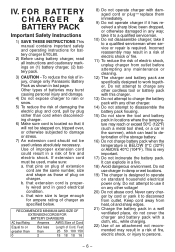
... used , make sure: a. If extension cord must be stepped on standard household electrical power only. c. b. Keep cord away from outlet before attempting any maintenance or cleaning. 12) The charger and battery pack are the same number, size and shape as those of fire and electric shock. RECOMMENDED MINIMUM AWG SIZE OF EXTENSION CORDS FOR BATTERY CHARGERS AC Input Rating. FOR BATTERY CHARGER & BATTERY PACK Important Safety Instructions 1) SAVE THESE INSTRUCTIONS -This manual...
... used , make sure: a. If extension cord must be stepped on standard household electrical power only. c. b. Keep cord away from outlet before attempting any maintenance or cleaning. 12) The charger and battery pack are the same number, size and shape as those of fire and electric shock. RECOMMENDED MINIMUM AWG SIZE OF EXTENSION CORDS FOR BATTERY CHARGERS AC Input Rating. FOR BATTERY CHARGER & BATTERY PACK Important Safety Instructions 1) SAVE THESE INSTRUCTIONS -This manual...
EY7460 User Guide
Page 7
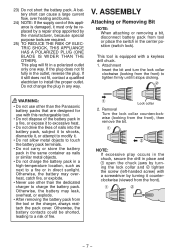
... place and open the chuck jaws by turning the lock collar and tighten the screw (left-handed screw) with a screwdriver by the manufacturer, because special purpose tools are designed for use other than the Panasonic battery packs that are required. 25) TO REDUCE THE RISK OF ELECTRIC SHOCK, THIS APPLIANCE HAS A POLARIZED PLUG (ONE BLADE IS WIDER THAN THE OTHER). Removal Turn the lock collar counterclockwise (looking...
... place and open the chuck jaws by turning the lock collar and tighten the screw (left-handed screw) with a screwdriver by the manufacturer, because special purpose tools are designed for use other than the Panasonic battery packs that are required. 25) TO REDUCE THE RISK OF ELECTRIC SHOCK, THIS APPLIANCE HAS A POLARIZED PLUG (ONE BLADE IS WIDER THAN THE OTHER). Removal Turn the lock collar counterclockwise (looking...
EY7460 User Guide
Page 8
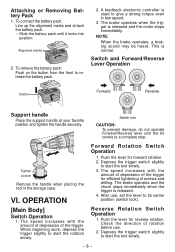
... screws and drilling. Tighten Loosen Remove the handle when placing the tool in low speed. 3. Depress the trigger switch slightly to start the tool slowly. 3. The brake operates and the chuck stops immediately when the trigger is used to its center position (switch lock). NOTE: When the brake operates, a braking sound may be heard. Switch and Forward/Reverse Lever Operation Button Forward Reverse Support handle Place the support handle at -tach the battery pack. Forward Rotation Switch Operation 1. Push the lever...
... screws and drilling. Tighten Loosen Remove the handle when placing the tool in low speed. 3. Depress the trigger switch slightly to start the tool slowly. 3. The brake operates and the chuck stops immediately when the trigger is used to its center position (switch lock). NOTE: When the brake operates, a braking sound may be heard. Switch and Forward/Reverse Lever Operation Button Forward Reverse Support handle Place the support handle at -tach the battery pack. Forward Rotation Switch Operation 1. Push the lever...
EY7460 User Guide
Page 9
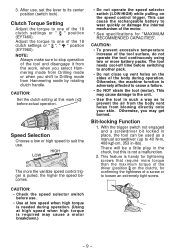
LOW HIGH The more the variable speed control trigger is required may cause a motor breakdown.) - 9 - The tool needs cool-off time before switching to another pack. • Do not close up to stop operation of the motor. * See specifications for tightening screws that require more battery packs. Bit-locking Function 1. After use, set the lever to suit the use . • Use at low speed when high torque is needed during operation. NOTE: Always make sure to...
LOW HIGH The more the variable speed control trigger is required may cause a motor breakdown.) - 9 - The tool needs cool-off time before switching to another pack. • Do not close up to stop operation of the motor. * See specifications for tightening screws that require more battery packs. Bit-locking Function 1. After use, set the lever to suit the use . • Use at low speed when high torque is needed during operation. NOTE: Always make sure to...
EY7460 User Guide
Page 10
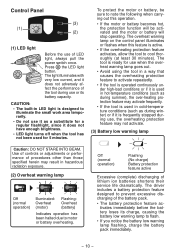
... brightness. • LED light turns off when the tool has not been used in hazardous radiation exposure. (2) Overheat warning lamp Off (normal operation) Illuminated: Overheat (motor) Flashing: Overheat (battery) Indicates operation has been halted due to activate repeatedly. • If the tool is operated continuously under high-load conditions or if it is used for use of the tool during use , the overheating protection feature...
... brightness. • LED light turns off when the tool has not been used in hazardous radiation exposure. (2) Overheat warning lamp Off (normal operation) Illuminated: Overheat (motor) Flashing: Overheat (battery) Indicates operation has been halted due to activate repeatedly. • If the tool is operated continuously under high-load conditions or if it is used for use of the tool during use , the overheating protection feature...
EY7460 User Guide
Page 11
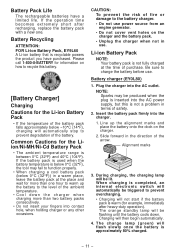
... degradation of safety. 2. The orange standby lamp will not start if the battery pack is warm (for the Li-ion Battery Pack • If the temperature of the battery pack falls approximately below 0°C (32°F)) in the direction of fire or damage to the battery charger. • Do not use . Battery charger (EY0L80) 1. During charging, the charging lamp will be triggered to...
... degradation of safety. 2. The orange standby lamp will not start if the battery pack is warm (for the Li-ion Battery Pack • If the temperature of the battery pack falls approximately below 0°C (32°F)) in the direction of fire or damage to the battery charger. • Do not use . Battery charger (EY0L80) 1. During charging, the charging lamp will be triggered to...

EY7460 User Guide
Page 12
... operation). If a fully charged battery pack is 0°C or less, charging takes longer to full capacity. When charging is not a problem in green color. 5. When charging is completed, an internal electronic switch will not start if the battery pack is completed, the charging lamp will start flashing quickly in terms of the battery pack is inserted into the AC power...
... operation). If a fully charged battery pack is 0°C or less, charging takes longer to full capacity. When charging is not a problem in green color. 5. When charging is completed, an internal electronic switch will not start if the battery pack is completed, the charging lamp will start flashing quickly in terms of the battery pack is inserted into the AC power...

EY7460 User Guide
Page 13
..., or other volatile solvents for wiping the unit. MAINTENANCE Use only a dry, soft cloth for cleaning. ACCESSORIES Use only bits suitable for size of the charger. 0.95 k (2.1 lbs) - 13 - SPECIFICATIONS MAIN UNIT Model Motor voltage No load speed Blows Rate Per Minute Chuck capacity Low High Low High Clutch torque Overall length Weight (with battery pack: EY9L60) EY7460 EY7960 21.6 V DC 100 - 400 min-1 (rpm) 350 - 1500...
..., or other volatile solvents for wiping the unit. MAINTENANCE Use only a dry, soft cloth for cleaning. ACCESSORIES Use only bits suitable for size of the charger. 0.95 k (2.1 lbs) - 13 - SPECIFICATIONS MAIN UNIT Model Motor voltage No load speed Blows Rate Per Minute Chuck capacity Low High Low High Clutch torque Overall length Weight (with battery pack: EY9L60) EY7460 EY7960 21.6 V DC 100 - 400 min-1 (rpm) 350 - 1500...
Service Manual
Page 1
EY7460 EY7960 Europe Oceania TABLE OF CONTENTS PAGE 1 Warning 2 2 Specifications 2 3 Troubleshooting Guide 3 4 Disassembly and Assembly Instructions 6 5 Wiring Connection Diagram 10 6 Schematic Diagram 10 7 Exploded View and Replacement Parts List -----------11 PAGE © Panasonic Electric Works Co., Ltd. 2008. Unauthorized copying and distribution is a violation of law. Order Number PTD0810X45CE Cordless Drill & Driver Cordless Hammer Drill & Driver Model No. All rights reserved.
EY7460 EY7960 Europe Oceania TABLE OF CONTENTS PAGE 1 Warning 2 2 Specifications 2 3 Troubleshooting Guide 3 4 Disassembly and Assembly Instructions 6 5 Wiring Connection Diagram 10 6 Schematic Diagram 10 7 Exploded View and Replacement Parts List -----------11 PAGE © Panasonic Electric Works Co., Ltd. 2008. Unauthorized copying and distribution is a violation of law. Order Number PTD0810X45CE Cordless Drill & Driver Cordless Hammer Drill & Driver Model No. All rights reserved.
Service Manual
Page 6
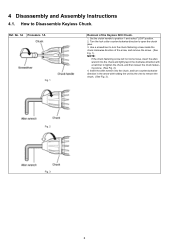
.... 1). Use a screwdriver to turn counterclockwise direction in the clockwise direction with holding the unit by the vise to remove the chuck. (See Fig. 3). Set the clutch handle to Disassemble Keyless Chuck. Fig. 2 Fig. 3 6 NOTE: If the chuck fastening screw will not come loose, insert the allen wrench into the chuck, and turn the chuck fastening screw inside the chuck clockwise direction of the Keyless Drill Chuck. 1. Insert the allen wrench into the chuck and lightly tap...
.... 1). Use a screwdriver to turn counterclockwise direction in the clockwise direction with holding the unit by the vise to remove the chuck. (See Fig. 3). Set the clutch handle to Disassemble Keyless Chuck. Fig. 2 Fig. 3 6 NOTE: If the chuck fastening screw will not come loose, insert the allen wrench into the chuck, and turn the chuck fastening screw inside the chuck clockwise direction of the Keyless Drill Chuck. 1. Insert the allen wrench into the chuck and lightly tap...
Service Manual
Page 7
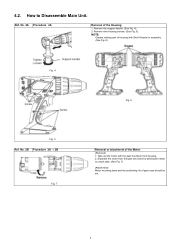
.... Remove the support handle. (See Fig. 4). 2. Remove nine housing screws. (See Fig. 5). Take out the motor with Shell Alvania for assembly. (See Fig. 6) Fig. 4 Fig. 6 Fig. 5 Ref. Separate the motor from housing. 2. How to unlock tabs. (See Fig. 7) (Attachment) Motor mounting base and the positioning rib of the Motor. (Removal) 1. 4.2. Ref. No. 2B Procedure 2A → 2B Fig. 7 Removal or attachment of gear case should be set...
.... Remove the support handle. (See Fig. 4). 2. Remove nine housing screws. (See Fig. 5). Take out the motor with Shell Alvania for assembly. (See Fig. 6) Fig. 4 Fig. 6 Fig. 5 Ref. Separate the motor from housing. 2. How to unlock tabs. (See Fig. 7) (Attachment) Motor mounting base and the positioning rib of the Motor. (Removal) 1. 4.2. Ref. No. 2B Procedure 2A → 2B Fig. 7 Removal or attachment of gear case should be set...
Service Manual
Page 8
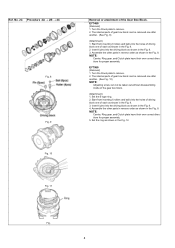
...) 1. Turn the thrust plate to remove. 2. NOTE: Carrier, Ring gear, and Clutch plate have their own correct directions for proper assembly. 5. Start from inserting 6 rollers and balls into the holes of driving block one after another . (See Fig. 10) NOTE: Adjusting screw can be removed one of the Gear Box Block. NOTE: Carrier, Ring gear, and Clutch plate have their own correct directions for proper assembly. The internal parts...
...) 1. Turn the thrust plate to remove. 2. NOTE: Carrier, Ring gear, and Clutch plate have their own correct directions for proper assembly. 5. Start from inserting 6 rollers and balls into the holes of driving block one after another . (See Fig. 10) NOTE: Adjusting screw can be removed one of the Gear Box Block. NOTE: Carrier, Ring gear, and Clutch plate have their own correct directions for proper assembly. The internal parts...

Service Manual
Page 9
...; 2C → 2D → 2E Assembly of thermistor may not contact housing rib. Set the clutch handle with the clutch case. (See Fig. 14) NOTE: Make sure that the parts of the Switch. 1. Fig. 16 9 NOTE: Make sure that the adjusting screw has its own correct direction for clockwise direction. 3. Failure to do so, the clutch handle does not rotate properly. 2.
...; 2C → 2D → 2E Assembly of thermistor may not contact housing rib. Set the clutch handle with the clutch case. (See Fig. 14) NOTE: Make sure that the parts of the Switch. 1. Fig. 16 9 NOTE: Make sure that the adjusting screw has its own correct direction for clockwise direction. 3. Failure to do so, the clutch handle does not rotate properly. 2.

Service Manual
Page 11
7 Exploded View and Replacement Parts List Model No. : EY7460 Exploded View for EY7460
7 Exploded View and Replacement Parts List Model No. : EY7460 Exploded View for EY7460
Service Manual
Page 12
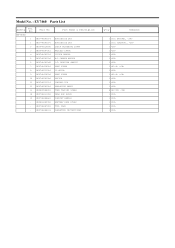
... 12 WEY7460K3958 13 WEY6405K9218 14 WEY7460L1458 15 WEY7460K4628 - WEY7460K8109 Part Name & Description HOUSING AB SET HOUSING AB SET CHUCK FASTENING SCREW KEYLESS CHUCK CLUTCH HANDLE H/L CHANGE HANDLE F/R SELECTOR HANDLE SEMS SCREW DC MOTOR SEMS SCREW SWITCH CONTROL PCB OPERATION PANEL TORX TAPPING SCREW GEAR BOX BLOCK SUPPORT HANDLE BATTERY PACK COVER TOOL CASE OPERATING INSTRUCTIONS Q'ty Remarks 1 (for EUROPE), 1 (for OCEANIA), 1 1 1 1 1 2 (K3*6) 1 2 (K5*6) 1 1 1 9 (K3*20) 1 1 1 1 1 WEY7460K7018 - Model No. : EY7460 Parts List Safety Ref. WEY9L40R2788 -
... 12 WEY7460K3958 13 WEY6405K9218 14 WEY7460L1458 15 WEY7460K4628 - WEY7460K8109 Part Name & Description HOUSING AB SET HOUSING AB SET CHUCK FASTENING SCREW KEYLESS CHUCK CLUTCH HANDLE H/L CHANGE HANDLE F/R SELECTOR HANDLE SEMS SCREW DC MOTOR SEMS SCREW SWITCH CONTROL PCB OPERATION PANEL TORX TAPPING SCREW GEAR BOX BLOCK SUPPORT HANDLE BATTERY PACK COVER TOOL CASE OPERATING INSTRUCTIONS Q'ty Remarks 1 (for EUROPE), 1 (for OCEANIA), 1 1 1 1 1 2 (K3*6) 1 2 (K5*6) 1 1 1 9 (K3*20) 1 1 1 1 1 WEY7460K7018 - Model No. : EY7460 Parts List Safety Ref. WEY9L40R2788 -
Service Manual
Page 14
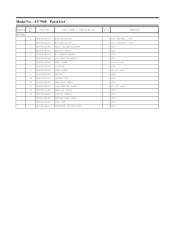
... Safety Ref. EY7960 Part No. 1 WEY7960K3079 1 WEY7960K3070 2 WEY6450L6806 3 WEY6450K7915 4 WEY7460H3238 5 WEY7460H3248 6 WEY7460S6028 7 WEY7460L1009 8 WEY7460S6038 9 WEY7460K2008 10 WEY7460L2118 11 WEY7460K3958 12 WEY6405K9218 13 WEY7960L1458 14 WEY7460K4628 - WEY7460K8109 Part Name & Description HOUSING AB SET HOUSING AB SET CHUCK FASTENING SCREW KEYLESS CHUCK H/L CHANGE HANDLE F/R SELECTOR HANDLE SEMS SCREW DC MOTOR SEMS SCREW SWITCH CONTROL PCB OPERATION PANEL TORX TAPPING SCREW GEAR BOX BLOCK SUPPORT HANDLE BATTERY PACK COVER TOOL CASE OPERATING INSTRUCTIONS...
... Safety Ref. EY7960 Part No. 1 WEY7960K3079 1 WEY7960K3070 2 WEY6450L6806 3 WEY6450K7915 4 WEY7460H3238 5 WEY7460H3248 6 WEY7460S6028 7 WEY7460L1009 8 WEY7460S6038 9 WEY7460K2008 10 WEY7460L2118 11 WEY7460K3958 12 WEY6405K9218 13 WEY7960L1458 14 WEY7460K4628 - WEY7460K8109 Part Name & Description HOUSING AB SET HOUSING AB SET CHUCK FASTENING SCREW KEYLESS CHUCK H/L CHANGE HANDLE F/R SELECTOR HANDLE SEMS SCREW DC MOTOR SEMS SCREW SWITCH CONTROL PCB OPERATION PANEL TORX TAPPING SCREW GEAR BOX BLOCK SUPPORT HANDLE BATTERY PACK COVER TOOL CASE OPERATING INSTRUCTIONS...
Parts List
Page 2
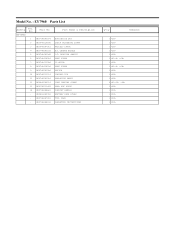
... 5 WEY7460H3248 6 WEY7460S6028 7 WEY7460L1008 8 WEY7460S6038 9 WEY7460K2008 10 WEY7460L2118 11 WEY7460K3958 12 WEY6405K9218 13 WEY7960L1458 14 WEY7460K4628 - Model No. : EY7960 Parts List Safety Ref. WEY7460K8108 Part Name & Description HOUSING AB SET CHUCK FASTENING SCREW KEYLESS CHUCK H/L CHANGE HANDLE F/R SELECTOR HANDLE SEMS SCREW DC MOTOR SEMS SCREW SWITCH CONTROL PCB OPERATION PANEL TORX TAPPING SCREW GEAR BOX BLOCK SUPPORT HANDLE BATTERY PACK COVER TOOL CASE OPERATING INSTRUCTIONS Q'ty Remarks 1 1 1 1 1 2 (K3*6) 1 2 (K5*6) 1 1 1 9 (K3*20) 1 1 1 1 1 No...
... 5 WEY7460H3248 6 WEY7460S6028 7 WEY7460L1008 8 WEY7460S6038 9 WEY7460K2008 10 WEY7460L2118 11 WEY7460K3958 12 WEY6405K9218 13 WEY7960L1458 14 WEY7460K4628 - Model No. : EY7960 Parts List Safety Ref. WEY7460K8108 Part Name & Description HOUSING AB SET CHUCK FASTENING SCREW KEYLESS CHUCK H/L CHANGE HANDLE F/R SELECTOR HANDLE SEMS SCREW DC MOTOR SEMS SCREW SWITCH CONTROL PCB OPERATION PANEL TORX TAPPING SCREW GEAR BOX BLOCK SUPPORT HANDLE BATTERY PACK COVER TOOL CASE OPERATING INSTRUCTIONS Q'ty Remarks 1 1 1 1 1 2 (K3*6) 1 2 (K5*6) 1 1 1 9 (K3*20) 1 1 1 1 1 No...


