
EY4541 User Guide
Page 4
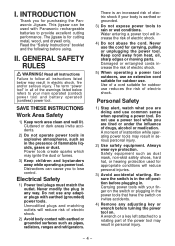
... in the power tools that have the switch on invites accidents. 4) Remove any adjusting key or wrench before using. Do not use a power tool while you are tired or under the influence of electric shock if your main operated (corded) power tool and battery operated (cordless) power tool. This jigsaw can cause you for appropriate conditions will increase the risk of flammable liquids, gases or dust. II. Do not use the cord for cutting metal, wood...
... in the power tools that have the switch on invites accidents. 4) Remove any adjusting key or wrench before using. Do not use a power tool while you are tired or under the influence of electric shock if your main operated (corded) power tool and battery operated (cordless) power tool. This jigsaw can cause you for appropriate conditions will increase the risk of flammable liquids, gases or dust. II. Do not use the cord for cutting metal, wood...
EY4541 User Guide
Page 5
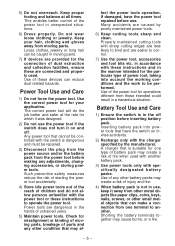
... moving parts, breakage of parts and any other small metal objects that is not in use . Properly maintained cutting tools with the power tool or these instructions to control. 7) Use the power tool, accessories and tool bits etc. Power Tool Use and Care 1) Do not force the power tool. Such preventive safety measures reduce the risk of starting the power tool accidentally. 4) Store idle power tools out of the reach of any adjustments, changing accessories, or storing power tools. Many...
... moving parts, breakage of parts and any other small metal objects that is not in use . Properly maintained cutting tools with the power tool or these instructions to control. 7) Use the power tool, accessories and tool bits etc. Power Tool Use and Care 1) Do not force the power tool. Such preventive safety measures reduce the risk of starting the power tool accidentally. 4) Store idle power tools out of the reach of any adjustments, changing accessories, or storing power tools. Many...
EY4541 User Guide
Page 6
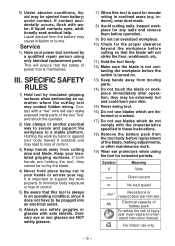
... or reciprocation per minutes Ah Electrical capacity of battery pack To reduce the risk of power tool is turned on. 13) Keep hands away from the tool body before operation. 9) Do not cut by a qualified repair person using the tool for the proper clearance beyond the workpiece before cutting so that the safety of injury, user must read and understand instruction manual. Keep your body leaves it...
... or reciprocation per minutes Ah Electrical capacity of battery pack To reduce the risk of power tool is turned on. 13) Keep hands away from the tool body before operation. 9) Do not cut by a qualified repair person using the tool for the proper clearance beyond the workpiece before cutting so that the safety of injury, user must read and understand instruction manual. Keep your body leaves it...
EY4541 User Guide
Page 7
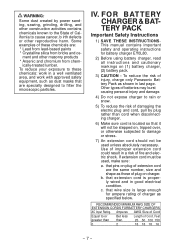
... and ce- IV. b. that wire size is properly wired and in a risk of fire and electric shock. FOR BATTERY CHARGER & BATTERY PACK Important Safety Instructions 1) SAVE THESE INSTRUCTIONSThis manual contains important safety and operating instructions for ampere rating of charger as those of damaging the electric plug and cord, pull by power sanding, sawing, grinding, drilling, and other reproductive harm. RECOMMENDED MINIMUM AWG SIZE OF EXTENSION CORDS FORBATTERY CHARGERS AC Input Rating. To...
... and ce- IV. b. that wire size is properly wired and in a risk of fire and electric shock. FOR BATTERY CHARGER & BATTERY PACK Important Safety Instructions 1) SAVE THESE INSTRUCTIONSThis manual contains important safety and operating instructions for ampere rating of charger as those of damaging the electric plug and cord, pull by power sanding, sawing, grinding, drilling, and other reproductive harm. RECOMMENDED MINIMUM AWG SIZE OF EXTENSION CORDS FORBATTERY CHARGERS AC Input Rating. To...

EY4541 User Guide
Page 8
...charger is designed to operate on any way. - 8 - Do not use it on standard household electrical power only. Do not attempt to use charger in a risk of electric shock or fire. 11) To reduce the risk of fire, electric shock, or injury to persons. 23) Do not short the battery pack. A battery...not incinerate the battery pack. Never carry charger by the manufacturer, because special purpose tools are specifically designed to work together. Do not change the plug in any other voltage! 20) Do not abuse cord. take it to a qualified serviceman when service or repair is required....
...charger is designed to operate on any way. - 8 - Do not use it on standard household electrical power only. Do not attempt to use charger in a risk of electric shock or fire. 11) To reduce the risk of fire, electric shock, or injury to persons. 23) Do not short the battery pack. A battery...not incinerate the battery pack. Never carry charger by the manufacturer, because special purpose tools are specifically designed to work together. Do not change the plug in any other voltage! 20) Do not abuse cord. take it to a qualified serviceman when service or repair is required....
EY4541 User Guide
Page 9
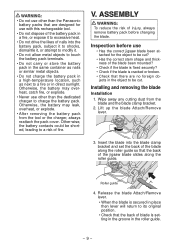
... changing the blade. jects in the object to be shorted, leading to a fire or in direct sunlight. Roller guide 4. Otherwise, the battery may leak, overheat, or explode. • After removing the battery pack from the blade and the blade clamp bracket. 2. Installing and removing the blade Installation 1. Wipe away any cutting dust from the tool or the charger, always reattach the pack cover. Insert the blade into the blade clamp bracket and set...
... changing the blade. jects in the object to be shorted, leading to a fire or in direct sunlight. Roller guide 4. Otherwise, the battery may leak, overheat, or explode. • After removing the battery pack from the blade and the blade clamp bracket. 2. Installing and removing the blade Installation 1. Wipe away any cutting dust from the tool or the charger, always reattach the pack cover. Insert the blade into the blade clamp bracket and set...
EY4541 User Guide
Page 10
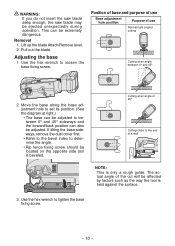
... actual angle of a wall 32 1 0 NOTE: This is only a rough guide. This can also be adjusted to between 0° and 45° 2. Use the hex wrench to tighten the base fixing screw. - 10 - WARNING: If you do not insert the saw blade deep enough, the saw blade may be affected by factors such as the way the tool is beveled. Lift up the blade Attach/Remove lever. 2. Cutting at right...
... actual angle of a wall 32 1 0 NOTE: This is only a rough guide. This can also be adjusted to between 0° and 45° 2. Use the hex wrench to tighten the base fixing screw. - 10 - WARNING: If you do not insert the saw blade deep enough, the saw blade may be affected by factors such as the way the tool is beveled. Lift up the blade Attach/Remove lever. 2. Cutting at right...
EY4541 User Guide
Page 11
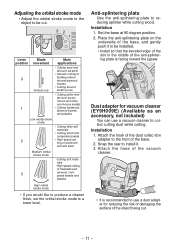
... to use a dust adapter for vacuum cleaner (EY9H009E) (Available as an accessory, not included) You can use a vacuum cleaner to collect cutting dust while cutting. Adjusting the orbital stroke mode • Adjust the orbital stroke mode to the object to be installed. • Install so that the beveled edge of the slot in the middle of the base. 2. Anti-splintering plate Use the anti-splintering plate to install it...
... to use a dust adapter for vacuum cleaner (EY9H009E) (Available as an accessory, not included) You can use a vacuum cleaner to collect cutting dust while cutting. Adjusting the orbital stroke mode • Adjust the orbital stroke mode to the object to be installed. • Install so that the beveled edge of the slot in the middle of the base. 2. Anti-splintering plate Use the anti-splintering plate to install it...
EY4541 User Guide
Page 12
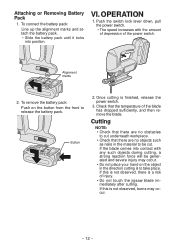
Attaching or Removing Battery Pack 1. Push the switch lock lever down, pull the power switch. • The speed increases with any such objects during cutting, a strong reaction force will be cut underneath workpiece. • Check that there are no objects such as nails in the direction cutting is a risk of injury. • Do not touch the jigsaw blade immediately after cutting. OPERATION 1. To remove the battery pack: Push on the...
Attaching or Removing Battery Pack 1. Push the switch lock lever down, pull the power switch. • The speed increases with any such objects during cutting, a strong reaction force will be cut underneath workpiece. • Check that there are no objects such as nails in the direction cutting is a risk of injury. • Do not touch the jigsaw blade immediately after cutting. OPERATION 1. To remove the battery pack: Push on the...

EY4541 User Guide
Page 13
... the cutting speed and the turning speed. 3. Adjust the cutting position and then tighten the fixing screw. - 13 - Pass the rip fence through . 2. Make a drill hole in the section to be plunge cut before pulling the power switch. Plunge cutting 1. Loosen the rip fence fixing screw. 2. Installing the rip fence 1. Cut along marked lines 1. Pull the power switch, wait until the speed has stabilized, and then place the base against the object to let the blade pass through the mount. 3. Cutting...
... the cutting speed and the turning speed. 3. Adjust the cutting position and then tighten the fixing screw. - 13 - Pass the rip fence through . 2. Make a drill hole in the section to be plunge cut before pulling the power switch. Plunge cutting 1. Loosen the rip fence fixing screw. 2. Installing the rip fence 1. Cut along marked lines 1. Pull the power switch, wait until the speed has stabilized, and then place the base against the object to let the blade pass through the mount. 3. Cutting...
EY4541 User Guide
Page 14
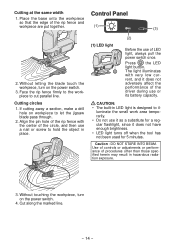
... then use a nail or screw to il- Without touching the workpiece, turn on the power switch. 3. Cut along the marked line. - 14 - If cutting away a section, make a drill hole on the power switch. 4. Press the LED light button. Without letting the blade touch the workpiece, turn on workpiece to cut parallel line. Face the rip fence firmly to the workpiece to let the jigsaw blade pass through. 2. luminate the small work area...
... then use a nail or screw to il- Without touching the workpiece, turn on the power switch. 3. Cut along the marked line. - 14 - If cutting away a section, make a drill hole on the power switch. 4. Press the LED light button. Without letting the blade touch the workpiece, turn on workpiece to cut parallel line. Face the rip fence firmly to the workpiece to let the jigsaw blade pass through. 2. luminate the small work area...
EY4541 User Guide
Page 15
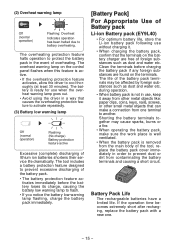
... the main body of lithium ion batteries shortens their service life dramatically. The overheating protection feature halts operation to another. If the operation time becomes extremely short after recharging, replace the battery pack with a new one terminal to protect the battery pack in use without charging it away from other metal objects like: paper clips, coins, keys, nails, screws, or other small metal...
... the main body of lithium ion batteries shortens their service life dramatically. The overheating protection feature halts operation to another. If the operation time becomes extremely short after recharging, replace the battery pack with a new one terminal to protect the battery pack in use without charging it away from other metal objects like: paper clips, coins, keys, nails, screws, or other small metal...
EY4541 User Guide
Page 16
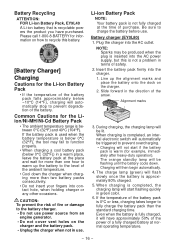
... flash slowly once the battery is below 0°C (32°F), the tool may be triggered to the battery charger. • Do not use power source from an engine generator. • Do not cover vent holes on the charger. 2. CAUTION: To prevent the risk of purchase. Alignment marks 3. If the temperature of the battery. Battery charger (EY0L80) 1. Insert the battery pack firmly into the...
... flash slowly once the battery is below 0°C (32°F), the tool may be triggered to the battery charger. • Do not use power source from an engine generator. • Do not cover vent holes on the charger. 2. CAUTION: To prevent the risk of purchase. Alignment marks 3. If the temperature of the battery. Battery charger (EY0L80) 1. Insert the battery pack firmly into the...
EY4541 User Guide
Page 17
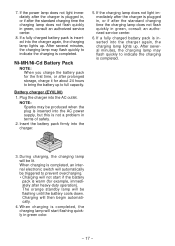
...start if the battery pack is not a problem in green color. - 17 - After several minutes, the charging lamp may be triggered to indicate the charging is completed. If the charging lamp does not light immediately after the charger is inserted into the charger again, the charging lamp lights up . If a fully charged battery pack is inserted into the AC power... full capacity. When charging is completed, an internal electronic switch will then begin automatically. 4. Charging will automatically be produced when the plug is plugged in green, consult an authorized service center. 6.
...start if the battery pack is not a problem in green color. - 17 - After several minutes, the charging lamp may be triggered to indicate the charging is completed. If the charging lamp does not light immediately after the charger is inserted into the charger again, the charging lamp lights up . If a fully charged battery pack is inserted into the AC power... full capacity. When charging is completed, an internal electronic switch will then begin automatically. 4. Charging will automatically be produced when the plug is plugged in green, consult an authorized service center. 6.

EY4541 User Guide
Page 18
... Now charging. Charging will begin when the temperature of the battery pack is plugged into the AC outlet. MAINTENANCE Use only a dry, soft cloth for cleaning. - 18 - Orange Lit Battery pack is warm. VII. The battery pack is being charged slowly to charge. If the temperature ... Lit Charger is -10°C or less, the charging status lamp (orange) will also start flashing. Ready to reduce the load on the battery. (Li-ion only) Orange Flashing Battery pack is cool. Charging will begin when temperature of the battery pack. Clogged with dust or malfunction of battery pack ...
... Now charging. Charging will begin when the temperature of the battery pack is plugged into the AC outlet. MAINTENANCE Use only a dry, soft cloth for cleaning. - 18 - Orange Lit Battery pack is warm. VII. The battery pack is being charged slowly to charge. If the temperature ... Lit Charger is -10°C or less, the charging status lamp (orange) will also start flashing. Ready to reduce the load on the battery. (Li-ion only) Orange Flashing Battery pack is cool. Charging will begin when temperature of the battery pack. Clogged with dust or malfunction of battery pack ...

EY4541 User Guide
Page 19
... mm (10-5/8") 2.2 kg (4.8 lbs) BATTERY PACK Model Storage battery Battery voltage Capacity EY9L40 Li-ion Battery 14.4 V DC (3.6 V x 4 cells) 3 Ah - 19 - SPECIFICATIONS MAIN UNIT Model Motor Max thickness of mounting blade Length of any accessories not specified in this manual may result in general Rip Fence (Optional accessory) • EY9X011E For convenience of rip cuts and repeated cut of same width. Dust Adaptor for Vacuum Cleaner (Optional accessory) • EY9X009E IX. Metal...
... mm (10-5/8") 2.2 kg (4.8 lbs) BATTERY PACK Model Storage battery Battery voltage Capacity EY9L40 Li-ion Battery 14.4 V DC (3.6 V x 4 cells) 3 Ah - 19 - SPECIFICATIONS MAIN UNIT Model Motor Max thickness of mounting blade Length of any accessories not specified in this manual may result in general Rip Fence (Optional accessory) • EY9X011E For convenience of rip cuts and repeated cut of same width. Dust Adaptor for Vacuum Cleaner (Optional accessory) • EY9X009E IX. Metal...
EY4541 User Guide
Page 20
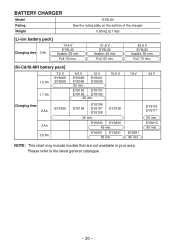
BATTERY CHARGER Model Rating Weight EY0L80 See the rating plate on the bottom of the charger. 0.95 kg (2.1 lbs) [Li-ion battery pack] Charging time 3 Ah 14.4 V EY9L40 Usable: 35 min. EY9210 90 min. EY9200 EY9230 45 min. NOTE: This chart may include models that are not available in your area. Full: 60 min. 28.8 V EY9L80 Usable: 55 min. Full...
BATTERY CHARGER Model Rating Weight EY0L80 See the rating plate on the bottom of the charger. 0.95 kg (2.1 lbs) [Li-ion battery pack] Charging time 3 Ah 14.4 V EY9L40 Usable: 35 min. EY9210 90 min. EY9200 EY9230 45 min. NOTE: This chart may include models that are not available in your area. Full: 60 min. 28.8 V EY9L80 Usable: 55 min. Full...

EY4541 User Guide
Page 60
PANASONIC CONSUMER ELECTRONICS COMPANY One Panasonic Way, Secaucus, New Jersey 07094 No.1 EN, FR, ES EY981045411 H2010 Printed in China
PANASONIC CONSUMER ELECTRONICS COMPANY One Panasonic Way, Secaucus, New Jersey 07094 No.1 EN, FR, ES EY981045411 H2010 Printed in China


