Dvd Recorder - English / Spanish
Page 1
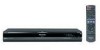
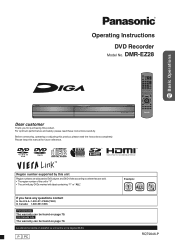
DMR-EZ28 P15 Basic Operations Dear customer Thank you have any questions contact In the U.S.A.:1-800-211-PANA(7262) In Canada: 1-800-561-5505 For U.S.A. Please keep this product. If you for purchasing this manual for future reference. P PC Example: 1 ALL 124 RQT9046-P only The warranty can be found on page 79. For...
DMR-EZ28 P15 Basic Operations Dear customer Thank you have any questions contact In the U.S.A.:1-800-211-PANA(7262) In Canada: 1-800-561-5505 For U.S.A. Please keep this product. If you for purchasing this manual for future reference. P PC Example: 1 ALL 124 RQT9046-P only The warranty can be found on page 79. For...
Dvd Recorder - English / Spanish
Page 4
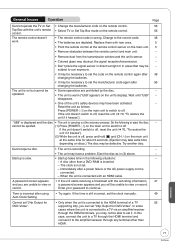
... the DVD On-Screen Menus 42 DVD and Card Management 43 Accessing the Management Menus 43 Setup Menus 46 Set Channels Automatically 46 Set Channels Manually 46 Surf Mode 47 Parental Rating 47 Off Timer 48 Remote Control 48 Clock Settings 48 Quick Start 49 DivX Registration 49 Restore Default Settings...
... the DVD On-Screen Menus 42 DVD and Card Management 43 Accessing the Management Menus 43 Setup Menus 46 Set Channels Automatically 46 Set Channels Manually 46 Surf Mode 47 Parental Rating 47 Off Timer 48 Remote Control 48 Clock Settings 48 Quick Start 49 DivX Registration 49 Restore Default Settings...
Dvd Recorder - English / Spanish
Page 12
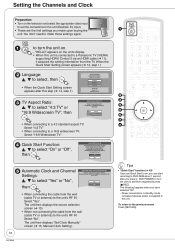
.... You don't need to make upon buying the unit. Please note that Quick Start mode slightly increases power consumption when the unit is connected to a Panasonic TV (VIERA) supporting HDAVI Control 3 via RF IN? Yes No • When connecting the cable from the wall (cable TV or antenna) to... to a 4:3 standard aspect TV: Select "4:3 TV". • When connecting to a 16:9 widescreen TV: Select "16:9 Widescreen TV". The unit then displays "Set Clock Manually" screen (➔ 13, Manual Clock Setting). 8 Tips • "Quick Start" function (➔ 49) If you have selected "On". -
.... You don't need to make upon buying the unit. Please note that Quick Start mode slightly increases power consumption when the unit is connected to a Panasonic TV (VIERA) supporting HDAVI Control 3 via RF IN? Yes No • When connecting the cable from the wall (cable TV or antenna) to... to a 4:3 standard aspect TV: Select "4:3 TV". • When connecting to a 16:9 widescreen TV: Select "16:9 Widescreen TV". The unit then displays "Set Clock Manually" screen (➔ 13, Manual Clock Setting). 8 Tips • "Quick Start" function (➔ 49) If you have selected "On". -

Dvd Recorder - English / Spanish
Page 13
... -10 For other items. 8 to change the setting. - DST (Daylight Saving Time) shows the summertime setting. - When the unit is incomplete." Set Clock Manually Month Day Year 1 / 1 / 2000 SAT Hour Minute 12 : 00 AM DST Time Zone Off EST e, r to confirm new date and time. - ...Setup Channel Setup Disc Video Audio Display TV Screen Set the time change dates for DST" then press [OK]. 5. Restart the set the DST period manually 1. Restarting the Auto-Setup (after completing Auto Channel Setting (➔ 46). Repeat steps 6-7 to change other areas: xx hr • DST ...
... -10 For other items. 8 to change the setting. - DST (Daylight Saving Time) shows the summertime setting. - When the unit is incomplete." Set Clock Manually Month Day Year 1 / 1 / 2000 SAT Hour Minute 12 : 00 AM DST Time Zone Off EST e, r to confirm new date and time. - ...Setup Channel Setup Disc Video Audio Display TV Screen Set the time change dates for DST" then press [OK]. 5. Restart the set the DST period manually 1. Restarting the Auto-Setup (after completing Auto Channel Setting (➔ 46). Repeat steps 6-7 to change other areas: xx hr • DST ...
Dvd Recorder - English / Spanish
Page 14
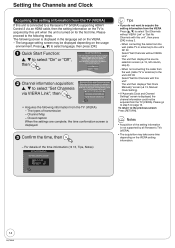
... the wall (cable TV or antenna) to the following screen is displayed in step 2. - The unit then displays "Set Clock Manually" screen (➔ 13, Manual Clock Setting). • If "Automatic Clock and Channel Settings" screen is displayed, the channel information could not be displayed depending on...cable from the wall (cable TV or antenna) to the previous screen Press [RETURN]. Channel Map - On Time Zone---- Please go to a Panasonic TV (VIERA) supporting HDAVI Control 3 via VIERA Link. Setting the Channels and Clock Acquiring the setting information from the TV (VIERA) If ...
... the wall (cable TV or antenna) to the following screen is displayed in step 2. - The unit then displays "Set Clock Manually" screen (➔ 13, Manual Clock Setting). • If "Automatic Clock and Channel Settings" screen is displayed, the channel information could not be displayed depending on...cable from the wall (cable TV or antenna) to the previous screen Press [RETURN]. Channel Map - On Time Zone---- Please go to a Panasonic TV (VIERA) supporting HDAVI Control 3 via VIERA Link. Setting the Channels and Clock Acquiring the setting information from the TV (VIERA) If ...

Dvd Recorder - English / Spanish
Page 34
... connected equipment (e.g., TV) too. when finalizing, etc. • When this unit is connected to an "HDAVI Control" compatible Panasonic receiver with Panasonic's conventional HDAVI equipment supporting VIERA Link function. • Please refer to individual manuals for other manufacturers' equipment that offers linked operations of this unit will not turn on and display the...
... connected equipment (e.g., TV) too. when finalizing, etc. • When this unit is connected to an "HDAVI Control" compatible Panasonic receiver with Panasonic's conventional HDAVI equipment supporting VIERA Link function. • Please refer to individual manuals for other manufacturers' equipment that offers linked operations of this unit will not turn on and display the...
Dvd Recorder - English / Spanish
Page 46
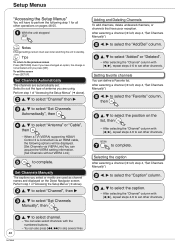
... VIERA Link] to complete. Set Channels Automatically The channels are automatically set other operations on the Direct Navigator screen. Set Channels Manually The captions you have poor reception. After selecting the "Channel" column with [w, q], repeat steps 4-6 to select channel. -... select the "Add/Del" column. Tips To return to select "Antenna" or "Cable", then - After selecting a channel (➔ left , step 4, "Set Channels Manually") w, q to set . e, r to select "Channel" then q e, r to select "Set Channels Automatically", then e, r to the previous screen Press [RETURN...
... VIERA Link] to complete. Set Channels Automatically The channels are automatically set other operations on the Direct Navigator screen. Set Channels Manually The captions you have poor reception. After selecting the "Channel" column with [w, q], repeat steps 4-6 to select channel. -... select the "Add/Del" column. Tips To return to select "Antenna" or "Cable", then - After selecting a channel (➔ left , step 4, "Set Channels Manually") w, q to set . e, r to select "Channel" then q e, r to select "Set Channels Automatically", then e, r to the previous screen Press [RETURN...
Dvd Recorder - English / Spanish
Page 47
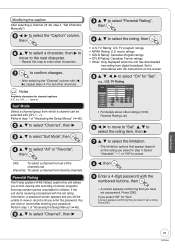
...", then q e, r to select "Parental Rating", then e, r to confirm changes. - e, r, w, q to select "On" for children. Modifying the caption After selecting a channel (➔ 46, step 4, "Set Channels Manually") w, q to select the "Caption" column, then e, r to select a character, then q to move to "Set", e, r to select the rating item, then q e, r to select the limitation. - After...
...", then q e, r to select "Parental Rating", then e, r to confirm changes. - e, r, w, q to select "On" for children. Modifying the caption After selecting a channel (➔ 46, step 4, "Set Channels Manually") w, q to select the "Caption" column, then e, r to select a character, then q to move to "Set", e, r to select the rating item, then q e, r to select the limitation. - After...
Dvd Recorder - English / Spanish
Page 48
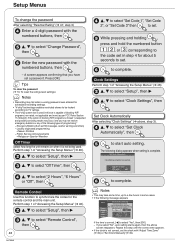
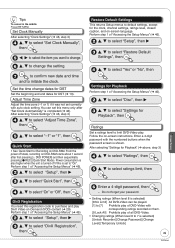
... "Accessing the Setup Menus" (➔ 46). Locally originated programming • News • Political - Finish the setup with "Adjust Time Zone" (➔ 49) or "Set Clock Manually"(➔ 49). e, r to select "Setup", then q e, r to select "Off Timer", then e, r to select "2 Hours", "6 Hours" or "Off", then e, r to select "Set Code 1", "Set Code 2", or...
... "Accessing the Setup Menus" (➔ 46). Locally originated programming • News • Political - Finish the setup with "Adjust Time Zone" (➔ 49) or "Set Clock Manually"(➔ 49). e, r to select "Setup", then q e, r to select "Off Timer", then e, r to select "2 Hours", "6 Hours" or "Off", then e, r to select "Set Code 1", "Set Code 2", or...
Dvd Recorder - English / Spanish
Page 49
... q e, r to select "Settings for Playback", then Ratings Set a ratings level to select "-1" or "1", then Quick Start 1 Sec. Set Clock Manually After selecting "Clock Settings" (➔ 48, step 3) e, r to select "Set Clock Manually", then w, q to select the item you want to initiate the clock. Quick Start for the clock, channel settings, ratings level...
... q e, r to select "Settings for Playback", then Ratings Set a ratings level to select "-1" or "1", then Quick Start 1 Sec. Set Clock Manually After selecting "Clock Settings" (➔ 48, step 3) e, r to select "Set Clock Manually", then w, q to select the item you want to initiate the clock. Quick Start for the clock, channel settings, ratings level...
Dvd Recorder - English / Spanish
Page 71
... HDMI. Change to the correct code. 48 work. • The batteries are unable to view or a password screen appears and you can set the clock manually. 49 Auto Clock Setting. The unit is on but cannot be unable to view or record. When the unit is not set "24p Output for...
... HDMI. Change to the correct code. 48 work. • The batteries are unable to view or a password screen appears and you can set the clock manually. 49 Auto Clock Setting. The unit is on but cannot be unable to view or record. When the unit is not set "24p Output for...


