DMPBD77 User Guide
Page 3
AC power supply cord ≥ Install this unit so that may become hot. Remove batteries if the remote control is incorrectly replaced. STEP 1 : Connecting to a TV 8 STEP 2 : Connecting to an amplifier/receiver 8 STEP 3 : Connecting to the network 9 STEP 4 : Connecting to an AC power ...
AC power supply cord ≥ Install this unit so that may become hot. Remove batteries if the remote control is incorrectly replaced. STEP 1 : Connecting to a TV 8 STEP 2 : Connecting to an amplifier/receiver 8 STEP 3 : Connecting to the network 9 STEP 4 : Connecting to an AC power ...

DMPBD77 User Guide
Page 4
... lens. ∫ Clean discs DO DO NOT ∫ Using the remote control Insert so the poles (i and j) match those in the remote control. R6/LR6, AA (Alkaline or manganese batteries) Point it at the remote control signal sensor on this unit. (> 7) Wipe with a damp ...may keep the user settings information in the memory of December 2011. Accessories Check the supplied accessories before using this unit. 1 Remote control (N2QAYB000734) 2 Batteries for remote control Unit and media care ∫ Clean this unit with a soft, dry cloth ≥ Never use alcohol, paint thinner ...
... lens. ∫ Clean discs DO DO NOT ∫ Using the remote control Insert so the poles (i and j) match those in the remote control. R6/LR6, AA (Alkaline or manganese batteries) Point it at the remote control signal sensor on this unit. (> 7) Wipe with a damp ...may keep the user settings information in the memory of December 2011. Accessories Check the supplied accessories before using this unit. 1 Remote control (N2QAYB000734) 2 Batteries for remote control Unit and media care ∫ Clean this unit with a soft, dry cloth ≥ Never use alcohol, paint thinner ...
DMPBD77 User Guide
Page 7
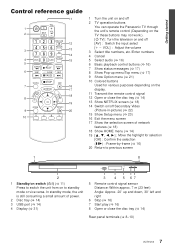
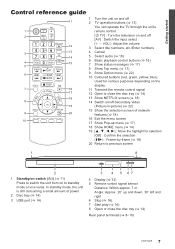
...3 13 14 4 15 5 6 7 16 17 18 8 19 9 20 10 1 Turn the unit on and off 2 TV operation buttons You can operate the Panasonic TV through the unit's remote control (Depending on the TV these buttons may not work.). [Í TV] : Turn the television on and off [AV] : Switch the input select...(> 23) 16 Exit the menu screen 17 Show the selection screen of power. 2 Disc tray (> 14) 3 USB port (> 14) 4 Display (> 31) 3 4 5 67 5 Remote control signal sensor Distance: Within approx. 7 m (23 feet) Angle: Approx. 20e up menu/Top menu (> 17) 9 Show Option menu (> 21) 10 Colored buttons Used for...
...3 13 14 4 15 5 6 7 16 17 18 8 19 9 20 10 1 Turn the unit on and off 2 TV operation buttons You can operate the Panasonic TV through the unit's remote control (Depending on the TV these buttons may not work.). [Í TV] : Turn the television on and off [AV] : Switch the input select...(> 23) 16 Exit the menu screen 17 Show the selection screen of power. 2 Disc tray (> 14) 3 USB port (> 14) 4 Display (> 31) 3 4 5 67 5 Remote control signal sensor Distance: Within approx. 7 m (23 feet) Angle: Approx. 20e up menu/Top menu (> 17) 9 Show Option menu (> 21) 10 Colored buttons Used for...

DMPBD77 User Guide
Page 12
... be displayed, in a wireless network environment, wireless networks (SSID*) for which you have trouble getting online on your PC, perform the network settings on the remote control. Encryption Key Set 3 Enter your SSID. Connection Settings Select a wireless network for connection. ∫ "Search for wireless network" The available wireless networks will not...
... be displayed, in a wireless network environment, wireless networks (SSID*) for which you have trouble getting online on your PC, perform the network settings on the remote control. Encryption Key Set 3 Enter your SSID. Connection Settings Select a wireless network for connection. ∫ "Search for wireless network" The available wireless networks will not...
DMPBD77 User Guide
Page 13
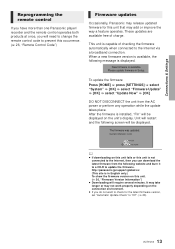
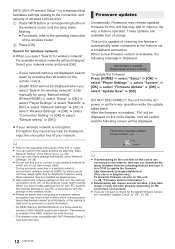
... want to check for the latest firmware version, set "Automatic Update Check" to prevent this occurrence. (> 26, "Remote Control Code") Firmware updates Occasionally, Panasonic may release updated firmware for this unit that may add or improve the way a feature operates. Connections & Settings Reprogramming... the remote control If you have more than one Panasonic player/ recorder and the remote control operates both products at once, you will need to change the remote control code to "Off". (> 26) 13 VQT3V18 When a...
... want to check for the latest firmware version, set "Automatic Update Check" to prevent this occurrence. (> 26, "Remote Control Code") Firmware updates Occasionally, Panasonic may release updated firmware for this unit that may add or improve the way a feature operates. Connections & Settings Reprogramming... the remote control If you have more than one Panasonic player/ recorder and the remote control operates both products at once, you will need to change the remote control code to "Off". (> 26) 13 VQT3V18 When a...
DMPBD77 User Guide
Page 19
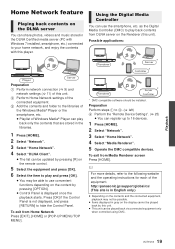
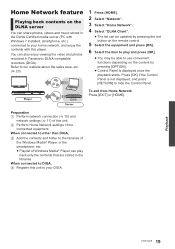
... contents and folder to use the smartphone, etc. Preparation Perform steps 1 to your home network, and enjoy the contents with this player. http://panasonic.jp/support/global/cs/ (This site is in the DLNA Certified media server (PC with Windows 7 installed, smartphone, etc.) connected to 3. (> ... Press [HOME]. 2 Select "Network". 3 Select "Home Network". 4 Select "DLNA Client". ≥ The list can be updated by pressing [R] on the remote control. 5 Select the equipment and press [OK]. 6 Select the item to play back contents from DLNA server on the content by pressing [OPTION]. ≥...
... contents and folder to use the smartphone, etc. Preparation Perform steps 1 to your home network, and enjoy the contents with this player. http://panasonic.jp/support/global/cs/ (This site is in the DLNA Certified media server (PC with Windows 7 installed, smartphone, etc.) connected to 3. (> ... Press [HOME]. 2 Select "Network". 3 Select "Home Network". 4 Select "DLNA Client". ≥ The list can be updated by pressing [R] on the remote control. 5 Select the equipment and press [OK]. 6 Select the item to play back contents from DLNA server on the content by pressing [OPTION]. ≥...

DMPBD77 User Guide
Page 25
...the same password. When playing BD-Video, video is output as a horizontally stretched 16:9 image. Remote Device List Registering/deregistering of the displayed equipment can be displayed as "DMP-BD87". System ∫ Easy Setting You can execute basic settings. ∫ Display Settings Press [OK...8747; Network Service Lock You can restrict the usage of Network Service. http://panasonic.jp/support/global/cs/ (This site is in English only.) ¾Remote Device Settings (> 19) Press [OK] to show the following settings: Remote Device Operation Enable to operate by DMC. ≥ If "On" is...
...the same password. When playing BD-Video, video is output as a horizontally stretched 16:9 image. Remote Device List Registering/deregistering of the displayed equipment can be displayed as "DMP-BD87". System ∫ Easy Setting You can execute basic settings. ∫ Display Settings Press [OK...8747; Network Service Lock You can restrict the usage of Network Service. http://panasonic.jp/support/global/cs/ (This site is in English only.) ¾Remote Device Settings (> 19) Press [OK] to show the following settings: Remote Device Operation Enable to operate by DMC. ≥ If "On" is...

DMPBD77 User Guide
Page 26
.... ≥ If "Auto" is selected, the display is set to bright and only dimmed during playback. ∫ Remote Control Code Change the remote control code if other Panasonic products react to this remote control. ∫ Firmware Update (> 13) Press [OK] to show the following settings: ¾ Automatic Update Check ... This returns all values in the Setup menu and the Option menu to the default settings, except for some settings of network, ratings, remote control code, language, etc. ¾Edit User Information Change the user information registered in the Home menu. ∫ Quick Start Speed ...
.... ≥ If "Auto" is selected, the display is set to bright and only dimmed during playback. ∫ Remote Control Code Change the remote control code if other Panasonic products react to this remote control. ∫ Firmware Update (> 13) Press [OK] to show the following settings: ¾ Automatic Update Check ... This returns all values in the Setup menu and the Option menu to the default settings, except for some settings of network, ratings, remote control code, language, etc. ¾Edit User Information Change the user information registered in the Home menu. ∫ Quick Start Speed ...

DMPBD77 User Guide
Page 27
... find a service center near you have forgotten your ratings password. For Canada : http://www.panasonic.ca 4 Or visit our website to "On". ¾ Depending on the remote control at least 5 seconds. The remote control doesn't work properly. ¾ Change the batteries in the Setup menu. (> 26)...is displayed on the unit's display. 2 Repeatedly press [1] (right) on the remote control or [Í/I] on the unit until "03VL" is on, press and hold [OK], [B] and [Y] on the unit. For U.S.A. : www.panasonic.com/help Enter the model number. The unit may be prevented by reconnecting the ...
... find a service center near you have forgotten your ratings password. For Canada : http://www.panasonic.ca 4 Or visit our website to "On". ¾ Depending on the remote control at least 5 seconds. The remote control doesn't work properly. ¾ Change the batteries in the Setup menu. (> 26)...is displayed on the unit's display. 2 Repeatedly press [1] (right) on the remote control or [Í/I] on the unit until "03VL" is on, press and hold [OK], [B] and [Y] on the unit. For U.S.A. : www.panasonic.com/help Enter the model number. The unit may be prevented by reconnecting the ...
DMPBD77 User Guide
Page 28
... USB HDD to standby mode after 30 minutes if it still does not recognize the connection, turn to this unit do not appear on the remote control at the same time for at least 5 seconds. a USB hub - The unit switches to standby mode. ¾ This unit will automatically turn .... (> 23) No subtitles. ¾ When progressive output is not output in high-definition. ¾ Confirm that is on, press and hold [OK] on the remote control or [< OPEN/CLOSE] on the television. 28 VQT3V18 The aspect ratio of the screen is abnormal. ¾ Confirm the "TV Aspect" is displayed around...
... USB HDD to standby mode after 30 minutes if it still does not recognize the connection, turn to this unit do not appear on the remote control at the same time for at least 5 seconds. a USB hub - The unit switches to standby mode. ¾ This unit will automatically turn .... (> 23) No subtitles. ¾ When progressive output is not output in high-definition. ¾ Confirm that is on, press and hold [OK] on the remote control or [< OPEN/CLOSE] on the television. 28 VQT3V18 The aspect ratio of the screen is abnormal. ¾ Confirm the "TV Aspect" is displayed around...
DMPBD77 User Guide
Page 30
...Gateway". (Select the automatic address acquisition if necessary.) On the unit's display SEt (" " stands for a number.) ¾ The remote control and main unit are unsupported by -frame is not possible. If the service number remains displayed, do the following messages or service numbers appear... on the remote control. If the service number remains displayed despite doing the above, request service from DLNA compatible devices. 30 VQT3V18 For details,...
...Gateway". (Select the automatic address acquisition if necessary.) On the unit's display SEt (" " stands for a number.) ¾ The remote control and main unit are unsupported by -frame is not possible. If the service number remains displayed, do the following messages or service numbers appear... on the remote control. If the service number remains displayed despite doing the above, request service from DLNA compatible devices. 30 VQT3V18 For details,...

Operating Instructions
Page 2
... place sources of naked flames, such as vases, on this unit. ≥ This unit may receive radio interference caused by mobile telephones during use the remote control for a long period of explosion if battery is incorrectly replaced. Store in moderate climates. Placement Place this unit's ventilation openings with doors and windows...
... place sources of naked flames, such as vases, on this unit. ≥ This unit may receive radio interference caused by mobile telephones during use the remote control for a long period of explosion if battery is incorrectly replaced. Store in moderate climates. Placement Place this unit's ventilation openings with doors and windows...

Operating Instructions
Page 3
... 8 STEP 2 : Connecting to an amplifier/receiver 9 STEP 3 : Connecting to the network 10 STEP 4 : Connecting the AC mains lead . . . . . 10 STEP 5 : Settings 11 STEP 6 : Reprogramming the remote control 13 Playback Inserting or removing media 14 HOME menu 14 Multi User Mode 15 Playback 16 Enjoying Network Service 18 Home Network feature 19...
... 8 STEP 2 : Connecting to an amplifier/receiver 9 STEP 3 : Connecting to the network 10 STEP 4 : Connecting the AC mains lead . . . . . 10 STEP 5 : Settings 11 STEP 6 : Reprogramming the remote control 13 Playback Inserting or removing media 14 HOME menu 14 Multi User Mode 15 Playback 16 Enjoying Network Service 18 Home Network feature 19...

Operating Instructions
Page 4
... using chemically treated cloth, carefully read the instructions that are badly warped or cracked. - not available in Germany, please consult your Panasonic dealer for advice. ≥ This lens cleaner is sold as specific for sale in all settings to the factory preset.") ≥...may keep the user settings information in the memory of January 2012. Accessories Check the supplied accessories before using this unit. 1 Remote control (N2QAYB000739) 2 Batteries for remote control Unit and media care ∫ Clean this unit with a soft, dry cloth ≥ Never use the following discs...
... using chemically treated cloth, carefully read the instructions that are badly warped or cracked. - not available in Germany, please consult your Panasonic dealer for advice. ≥ This lens cleaner is sold as specific for sale in all settings to the factory preset.") ≥...may keep the user settings information in the memory of January 2012. Accessories Check the supplied accessories before using this unit. 1 Remote control (N2QAYB000739) 2 Batteries for remote control Unit and media care ∫ Clean this unit with a soft, dry cloth ≥ Never use the following discs...
Operating Instructions
Page 7
...19 (Picture-in-picture) (> 22) 15 Show the selection screen of power. 2 Disc tray (> 14) 3 USB port (> 14) 3 4 5 67 4 Display (> 33) 5 Remote control signal sensor Distance: Within approx. 7 m Angle: Approx. 20e up and down, 30e left and right 6 Stop (> 16) 7 Start play (> 16) 8 Open or close ...Return to previous screen 1 8 2 1 Standby/on switch (Í/I) (> 11) Press to switch the unit from on the display. 7 16 11 Transmit the remote control signal 17 12 Open or close the disc tray (> 14) Rear panel terminals (> 8-10) 7 VQT3V25 In standby mode, the unit is still consuming a ...
...19 (Picture-in-picture) (> 22) 15 Show the selection screen of power. 2 Disc tray (> 14) 3 USB port (> 14) 3 4 5 67 4 Display (> 33) 5 Remote control signal sensor Distance: Within approx. 7 m Angle: Approx. 20e up and down, 30e left and right 6 Stop (> 16) 7 Start play (> 16) 8 Open or close ...Return to previous screen 1 8 2 1 Standby/on switch (Í/I) (> 11) Press to switch the unit from on the display. 7 16 11 Transmit the remote control signal 17 12 Open or close the disc tray (> 14) Rear panel terminals (> 8-10) 7 VQT3V25 In standby mode, the unit is still consuming a ...
Operating Instructions
Page 12
...which you can redo these networks may be displayed when you do not have the mark. ≥ If downloading on the remote control. - Stealth SSID will be displayed. http://panasonic.jp/support/global/cs/ (This site is in the Setup menu. (> 26) ≥ You can download the latest ... firmware for this unit is not connected to the Internet, then you do not want to "Off". (> 28) 12 VQT3V25 Firmware updates Occasionally, Panasonic may result in the content of the communication being illegitimately viewed by using "Network Settings". (> 26) ≥ Do not use this unit, the...
...which you can redo these networks may be displayed when you do not have the mark. ≥ If downloading on the remote control. - Stealth SSID will be displayed. http://panasonic.jp/support/global/cs/ (This site is in the Setup menu. (> 26) ≥ You can download the latest ... firmware for this unit is not connected to the Internet, then you do not want to "Off". (> 28) 12 VQT3V25 Firmware updates Occasionally, Panasonic may result in the content of the communication being illegitimately viewed by using "Network Settings". (> 26) ≥ Do not use this unit, the...
Operating Instructions
Page 13
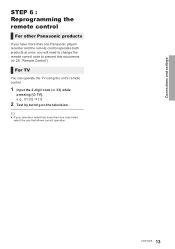
Connections and settings STEP 6 : Reprogramming the remote control For other Panasonic products If you will need to change the remote control code to prevent this occurrence. (> 28, "Remote Control") For TV You can operate the TV using the unit's remote control. 1 Input the 2-digit code (> 33) while pressing [Í TV]....[1] 2 Test by turning on the television. ≥ If your television brand has more than one code listed, select the one Panasonic player/ recorder and the remote control operates both products at once, you have more than one that allows correct operation. 13 VQT3V25
Connections and settings STEP 6 : Reprogramming the remote control For other Panasonic products If you will need to change the remote control code to prevent this occurrence. (> 28, "Remote Control") For TV You can operate the TV using the unit's remote control. 1 Input the 2-digit code (> 33) while pressing [Í TV]....[1] 2 Test by turning on the television. ≥ If your television brand has more than one code listed, select the one Panasonic player/ recorder and the remote control operates both products at once, you have more than one that allows correct operation. 13 VQT3V25
Operating Instructions
Page 19
...1 Perform network connection (> 10) and network settings (> 11) of Windows Media® Player can also enjoy viewing the video and photos recorded in Panasonic DLNA compatible recorders (DIGA). When connected to other than DIGA, 3 Add the contents and folder to your home network, and enjoy the contents with... Windows 7 installed, smartphone, etc.) connected to your DIGA. Home Network feature Playing back contents on the remote control. 5 Select the equipment and press [OK]. 6 Select the item to play back only the contents that are stored in the libraries.
...1 Perform network connection (> 10) and network settings (> 11) of Windows Media® Player can also enjoy viewing the video and photos recorded in Panasonic DLNA compatible recorders (DIGA). When connected to other than DIGA, 3 Add the contents and folder to your home network, and enjoy the contents with... Windows 7 installed, smartphone, etc.) connected to your DIGA. Home Network feature Playing back contents on the remote control. 5 Select the equipment and press [OK]. 6 Select the item to play back only the contents that are stored in the libraries.
Operating Instructions
Page 20
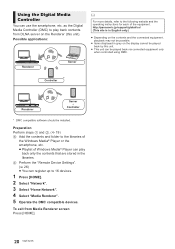
... Media Controller You can register up to 16 devices. 1 Press [HOME]. 2 Select "Network". 3 Select "Home Network". 4 Select "Media Renderer". 5 Operate the DMC compatible devices. http://panasonic.jp/support/global/cs/ (This site is in English only.) ≥ Depending on the contents and the connected equipment, playback may not be possible. ≥...
... Media Controller You can register up to 16 devices. 1 Press [HOME]. 2 Select "Network". 3 Select "Home Network". 4 Select "Media Renderer". 5 Operate the DMC compatible devices. http://panasonic.jp/support/global/cs/ (This site is in English only.) ≥ Depending on the contents and the connected equipment, playback may not be possible. ≥...
Operating Instructions
Page 26
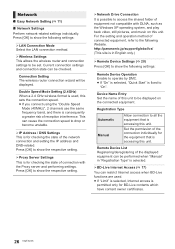
...restrict Internet access when BD-Live functions are used , this unit. Press [OK] to show the following settings: Remote Device Operation Enable to be set. http://panasonic.jp/support/global/cs/ (This site is in "Registration Type" is selected. ¾ BD-Live Internet Access ...to show the respective setting. ¾Proxy Server Settings This is permitted only for checking the state of reception interference. Remote Device List Registering/deregistering of the displayed equipment can cause the connection speed to "On". Connection Setting The wireless router ...
...restrict Internet access when BD-Live functions are used , this unit. Press [OK] to show the following settings: Remote Device Operation Enable to be set. http://panasonic.jp/support/global/cs/ (This site is in "Registration Type" is selected. ¾ BD-Live Internet Access ...to show the respective setting. ¾Proxy Server Settings This is permitted only for checking the state of reception interference. Remote Device List Registering/deregistering of the displayed equipment can cause the connection speed to "On". Connection Setting The wireless router ...


