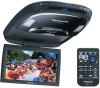
9" Overhead Monitor
Page 2
...the battery's - replace the fuses. while the car is moving , resulting in an q Contact your product or a nearby Panasonic product to not be used in DC 24 V vehicles (such as large trucks, diesel vehicles designed for installing or grounding the product. We shall not guarantee any auto parts damaged during...or cut the cord to connect it with air bag and/or anti-theft install and wire the product could cause electrical shock and injury due to drive the car may result in DC 12 V - or injury. Panasonic assumes no liability for q Run the cords so that they do not wrap...
...the battery's - replace the fuses. while the car is moving , resulting in an q Contact your product or a nearby Panasonic product to not be used in DC 24 V vehicles (such as large trucks, diesel vehicles designed for installing or grounding the product. We shall not guarantee any auto parts damaged during...or cut the cord to connect it with air bag and/or anti-theft install and wire the product could cause electrical shock and injury due to drive the car may result in DC 12 V - or injury. Panasonic assumes no liability for q Run the cords so that they do not wrap...

9" Overhead Monitor
Page 3
...Operating Instructions. 4 CY-VHD9401U/L CY-VHD9401U/L 5 Do not damage, pull too hard, fold, twist, or For details on the cords. q Install the monitor in an accident and/or injury. accident and/or injury. q Wear gloves for and this caution may result in an take care not to ... take care not to damage the wiring near heating appliances or put heavy objects on the your dealer. Observe the following cautions for installation work on installing the under cover. connections. ≥ To prevent damage to the unit, be absolutely sure to heed this caution may break it...
...Operating Instructions. 4 CY-VHD9401U/L CY-VHD9401U/L 5 Do not damage, pull too hard, fold, twist, or For details on the cords. q Install the monitor in an accident and/or injury. accident and/or injury. q Wear gloves for and this caution may result in an take care not to ... take care not to damage the wiring near heating appliances or put heavy objects on the your dealer. Observe the following cautions for installation work on installing the under cover. connections. ≥ To prevent damage to the unit, be absolutely sure to heed this caution may break it...
9" Overhead Monitor
Page 8
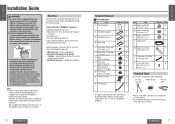
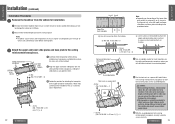
...and injury. Hold the display unit by 30˚ toward the front seat headrest (page 15). You can swivel it to wire and install the product. Professional skill and experience is rotated by the non-slip part in the upper half of safety equipment resulting in order to...you purchased the product to maintain the distances shown even when the display unit is required to the left . WARNING: Have a professional technician wire and install the product. H Open the Display Unit [PUSH OPEN] 2 Display Unit Lateral Angle Adjustment Maximum 120x 30x 30x 1 Push the display release button [...
...and injury. Hold the display unit by 30˚ toward the front seat headrest (page 15). You can swivel it to wire and install the product. Professional skill and experience is rotated by the non-slip part in the upper half of safety equipment resulting in order to...you purchased the product to maintain the distances shown even when the display unit is required to the left . WARNING: Have a professional technician wire and install the product. H Open the Display Unit [PUSH OPEN] 2 Display Unit Lateral Angle Adjustment Maximum 120x 30x 30x 1 Push the display release button [...
9" Overhead Monitor
Page 9
... this out promptly. ≥ Panasonic Servicenter List for the items which are packed with your car dealer or manufacturer to determine the required procedure and strictly follow the procedure may be lost if the battery terminals are required for cold climates, etc.). terminal while wiring and installing the product. Using this product...
... this out promptly. ≥ Panasonic Servicenter List for the items which are packed with your car dealer or manufacturer to determine the required procedure and strictly follow the procedure may be lost if the battery terminals are required for cold climates, etc.). terminal while wiring and installing the product. Using this product...

9" Overhead Monitor
Page 10
...ready to begin connecting them on the fuse block. If your new LCD monitor. Note for an audio unit: Go to the LCD monitor wires. Equipment Connect any equipment you test the unit before making a final installation. After making a few final checks, you 'll use them ...with all these connections made and insulated all other function.) If your LCD monitor. Turn the ignition on , that you have difficulties, consult...
...ready to begin connecting them on the fuse block. If your new LCD monitor. Note for an audio unit: Go to the LCD monitor wires. Equipment Connect any equipment you test the unit before making a final installation. After making a few final checks, you 'll use them ...with all these connections made and insulated all other function.) If your LCD monitor. Turn the ignition on , that you have difficulties, consult...
9" Overhead Monitor
Page 11
...this caution may result in an accident and/or injury. ≥ Wear goggles or protective eyewear to shield your reference. Improper installation could result in failure of safety equipment resulting in a simplified For each step, follow the procedure on way. Caution:...upper), slide plate (lower), base plate CY-VHD9401U/ CY-VHD9401L E N G L I S H WARNING: 7 Have a professional technician wire and install the product. CY-VHD9401U/ CY-VHD9401L Front cover 20 CY-VHD9401U/L CY-VHD9401U/L 21 Instead, be sure to follow the detailed procedures on the following...
...this caution may result in an accident and/or injury. ≥ Wear goggles or protective eyewear to shield your reference. Improper installation could result in failure of safety equipment resulting in a simplified For each step, follow the procedure on way. Caution:...upper), slide plate (lower), base plate CY-VHD9401U/ CY-VHD9401L E N G L I S H WARNING: 7 Have a professional technician wire and install the product. CY-VHD9401U/ CY-VHD9401L Front cover 20 CY-VHD9401U/L CY-VHD9401U/L 21 Instead, be sure to follow the detailed procedures on the following...
9" Overhead Monitor
Page 12
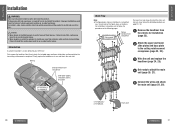
...included screws (5) and nuts (7) in the ceiling reinforcement crosspieces to attach the 3 plates. 7 Nut (No. 10-32 UNF)a 8 E N G L I S H Installation Procedures 1 9 Remove the headliner from the vehicle for attaching the base plate on the upper and lower slide plates. Assembled plates Tool such as a power... (lower) 2 Slide plate (upper) 1 Carefully check the position of chassis lights vary depending on the assembled plates. Failure to be installed while taking care not to damage the interior or its fittings. 2 Now remove the dome light but leave its wiring in an...
...included screws (5) and nuts (7) in the ceiling reinforcement crosspieces to attach the 3 plates. 7 Nut (No. 10-32 UNF)a 8 E N G L I S H Installation Procedures 1 9 Remove the headliner from the vehicle for attaching the base plate on the upper and lower slide plates. Assembled plates Tool such as a power... (lower) 2 Slide plate (upper) 1 Carefully check the position of chassis lights vary depending on the assembled plates. Failure to be installed while taking care not to damage the interior or its fittings. 2 Now remove the dome light but leave its wiring in an...
9" Overhead Monitor
Page 13
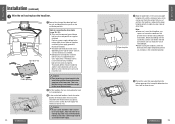
...flected light. ≥ Before cutting the headliner, check the direction of the paper template to prevent any mistakes in the installation position. 5 Pull out the wires that you have other areas of the base plate beforehand so that will expose the reference holes to..., and cut out the section that it will be absolutely sure to ask a dealer or service technician to wire and install the unit. Consult a service technician as the installation position. Rear side 1 Paper template Note: ≥ Some cars have a thick headliner, use spacers or have brought to...
...flected light. ≥ Before cutting the headliner, check the direction of the paper template to prevent any mistakes in the installation position. 5 Pull out the wires that you have other areas of the base plate beforehand so that will expose the reference holes to..., and cut out the section that it will be absolutely sure to ask a dealer or service technician to wire and install the unit. Consult a service technician as the installation position. Rear side 1 Paper template Note: ≥ Some cars have a thick headliner, use spacers or have brought to...

9" Overhead Monitor
Page 14
.../spring washers (9 and :), and push nuts (8) in all 6 locations. When the space washers are to the underside of vehicle, there may not need to complete installation. CY-VHD9401U/L 27 Space washer* (A or B or C)a6 8 Push nut a 6 2 Insert the screws (6), space washers A, B, or C (=, >, or ?),... flat A (in the main unit. A Space washer (D) [t=80 mm {33/16q}] Caution: ≥ Before installing the unit, be absolutely sure to check that the screws do not make any contact with the ceiling panel. Consult your dealer. 26 CY-VHD9401U...
.../spring washers (9 and :), and push nuts (8) in all 6 locations. When the space washers are to the underside of vehicle, there may not need to complete installation. CY-VHD9401U/L 27 Space washer* (A or B or C)a6 8 Push nut a 6 2 Insert the screws (6), space washers A, B, or C (=, >, or ?),... flat A (in the main unit. A Space washer (D) [t=80 mm {33/16q}] Caution: ≥ Before installing the unit, be absolutely sure to check that the screws do not make any contact with the ceiling panel. Consult your dealer. 26 CY-VHD9401U...

9" Overhead Monitor
Page 15
...page 30`31. 1 2 Caution: ≥ When connecting stripped wires, be absolutely sure to ask a dealer or service technician to wire and install the unit. Consult a service technician as needed. ≥ Both positive and negative switched light circuits are two common types of vehicle. If ...lead connection varies depending on properly. Positive systems supply voltage to the interior lights to turn them securely with electrical tape to prevent shorts. E N Installation (continued) G L I 5 S H Connect the wires and attach the main unit. 15 1 Connect the wires (page 30 to 35) which...
...page 30`31. 1 2 Caution: ≥ When connecting stripped wires, be absolutely sure to ask a dealer or service technician to wire and install the unit. Consult a service technician as needed. ≥ Both positive and negative switched light circuits are two common types of vehicle. If ...lead connection varies depending on properly. Positive systems supply voltage to the interior lights to turn them securely with electrical tape to prevent shorts. E N Installation (continued) G L I 5 S H Connect the wires and attach the main unit. 15 1 Connect the wires (page 30 to 35) which...
9" Overhead Monitor
Page 16
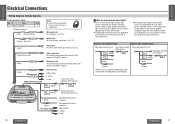
... car chassis. Consult your dealer or technician to the sound using 1 the accessory IR wireless headphones. Power connector Note: Q'ty ≥ Listen to wire and install the unit. Video (yellow) L (white) R (red) 30 CY-VHD9401U/L E N G L I S H Wiring Diagram (Simple System) 17 Accessory used ,...type.) CY-VHD9401U/L 31 Negative door switched type Positive door switched type Dome light lead of this unit To the door switched of the Panasonic DVD changer (CX-DH801U, option). (Black) VIDEO-OUT VTR input cord VTR1-IN Dome light lead (page 31) Video out cord ...
... car chassis. Consult your dealer or technician to the sound using 1 the accessory IR wireless headphones. Power connector Note: Q'ty ≥ Listen to wire and install the unit. Video (yellow) L (white) R (red) 30 CY-VHD9401U/L E N G L I S H Wiring Diagram (Simple System) 17 Accessory used ,...type.) CY-VHD9401U/L 31 Negative door switched type Positive door switched type Dome light lead of this unit To the door switched of the Panasonic DVD changer (CX-DH801U, option). (Black) VIDEO-OUT VTR input cord VTR1-IN Dome light lead (page 31) Video out cord ...


