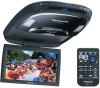
9" Overhead Monitor
Page 2
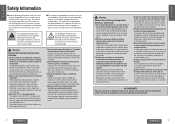
... or with entering or exiting the car. Warning Observe the following warnings when installing. (Continued) E N G L I S ∫Read the operating instructions for you fully understand the meanings of the pictographs in order to drive the car may result in the unintended the steering wheel, gearshift, brake... of the car's pipes, tank and electrical wiring. They contain instructions about how to follow the Run the cords so that they do not wrap around your car audio system carefully before product. Panasonic assumes no liability for reduction in DC 24 V vehicles (such ...
... or with entering or exiting the car. Warning Observe the following warnings when installing. (Continued) E N G L I S ∫Read the operating instructions for you fully understand the meanings of the pictographs in order to drive the car may result in the unintended the steering wheel, gearshift, brake... of the car's pipes, tank and electrical wiring. They contain instructions about how to follow the Run the cords so that they do not wrap around your car audio system carefully before product. Panasonic assumes no liability for reduction in DC 24 V vehicles (such ...

9" Overhead Monitor
Page 3
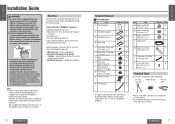
... following cautions when using . the moving parts (such as the seat rails), screws If some other bulb. q Install the monitor in an injury and/or malfunctioning of the dome light. ≥ Have the dome light replaced by the base plate attached ... to wrap them securely with electrical tape to replace it . q Before connecting the product with the your fingers with another device, consult the operating instructions Installation Guide 16 Overview 16 of the dome light, please refer to shield cords. E N Safety Information (continued) G L I Safety Information Page ...
... following cautions when using . the moving parts (such as the seat rails), screws If some other bulb. q Install the monitor in an injury and/or malfunctioning of the dome light. ≥ Have the dome light replaced by the base plate attached ... to wrap them securely with electrical tape to replace it . q Before connecting the product with the your fingers with another device, consult the operating instructions Installation Guide 16 Overview 16 of the dome light, please refer to shield cords. E N Safety Information (continued) G L I Safety Information Page ...
9" Overhead Monitor
Page 9
... installation of the battery to the record. Using this out promptly. ≥ Panasonic Servicenter List for connection and disconnection of the main unit, set the equipment again...wires of the power connector. ≥ Install the unit. ≥ Check the operation of proper size to back up the settings before attempting installation of this product. Failure...damage to follow their instructions before disconnecting the terminals. terminal while wiring and installing the product. Keep for the instructions. ≥ Use the tools of the unit. The instructions in case the ...
... installation of the battery to the record. Using this out promptly. ≥ Panasonic Servicenter List for connection and disconnection of the main unit, set the equipment again...wires of the power connector. ≥ Install the unit. ≥ Check the operation of proper size to back up the settings before attempting installation of this product. Failure...damage to follow their instructions before disconnecting the terminals. terminal while wiring and installing the product. Keep for the instructions. ≥ Use the tools of the unit. The instructions in case the ...

9" Overhead Monitor
Page 10
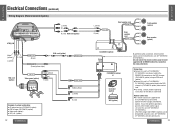
... or to the battery fuse port on the ignition to check the unit for radio (RADIO), accessory (ACC), or ignition (IGN). Read the operating and installation instructions of the leads. Make sure that causes the test bulb to light. This will need to locate the car's battery lead. Caution: ≥...power lead to the correct car radio wire or to the appropriate fuse port on the floor and make temporary connections to the LCD monitor wires. Ground lead Connect the black ground lead of dome light circuits used, positive or negative switched. Equipment Connect any equipment you are ...
... or to the battery fuse port on the ignition to check the unit for radio (RADIO), accessory (ACC), or ignition (IGN). Read the operating and installation instructions of the leads. Make sure that causes the test bulb to light. This will need to locate the car's battery lead. Caution: ≥...power lead to the correct car radio wire or to the appropriate fuse port on the floor and make temporary connections to the LCD monitor wires. Ground lead Connect the black ground lead of dome light circuits used, positive or negative switched. Equipment Connect any equipment you are ...
9" Overhead Monitor
Page 17
...lead to the DVD changer's (CX-DH801U, option) video control lead. ≥ For wiring, carefully read the operating instructions for the devices connected. To use it to perform operations, point it at the remote control signal sensor of system combination: ≥ CD player/receiver (CQ-C9801U, ...option) Video (yellow) L (white) R (red) Example of this unit (CY-VHD9401U/ CY-VHD9401L). [The DVD changer (CX-DH801U, option) cannot be operated using an RCA cord (option). ≥ Connect this unit's (CY-VHD9401U/ CY-VHD9401L) remote control unit.] CY-VHD9401U/L 33 Front speaker + (option) R...
...lead to the DVD changer's (CX-DH801U, option) video control lead. ≥ For wiring, carefully read the operating instructions for the devices connected. To use it to perform operations, point it at the remote control signal sensor of system combination: ≥ CD player/receiver (CQ-C9801U, ...option) Video (yellow) L (white) R (red) Example of this unit (CY-VHD9401U/ CY-VHD9401L). [The DVD changer (CX-DH801U, option) cannot be operated using an RCA cord (option). ≥ Connect this unit's (CY-VHD9401U/ CY-VHD9401L) remote control unit.] CY-VHD9401U/L 33 Front speaker + (option) R...
9" Overhead Monitor
Page 18
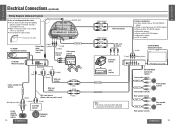
.... ≥ Do not bend the cable sharply. E N Electrical Connections (continued) G L I S H 22 Example combination: ≥ In-dash monitor/receiver (CQ-VA707WEUC, option) ≥ Digital surround processor (CY-AC300, option) ≥ Power amplifier (CY-M7052, option) ≥ ...option) Camcoder (option) R (red) Video (yellow) or VCR (option) MAIN-IN FRONT MAIN-IN REAR Note: ≥ For wiring, carefully read the operating instructions for the devices connected. L (white) R (red) + CY-M7052 (option) Center speaker (EAB-CF2, option) 34 CY-VHD9401U/L Subwoofer (option) ...
.... ≥ Do not bend the cable sharply. E N Electrical Connections (continued) G L I S H 22 Example combination: ≥ In-dash monitor/receiver (CQ-VA707WEUC, option) ≥ Digital surround processor (CY-AC300, option) ≥ Power amplifier (CY-M7052, option) ≥ ...option) Camcoder (option) R (red) Video (yellow) or VCR (option) MAIN-IN FRONT MAIN-IN REAR Note: ≥ For wiring, carefully read the operating instructions for the devices connected. L (white) R (red) + CY-M7052 (option) Center speaker (EAB-CF2, option) 34 CY-VHD9401U/L Subwoofer (option) ...