

CQC8313U User Guide
Page 2
... of reach of this manual. ■ This manual uses pictographs to show you should neither watch the display nor operate the system while driving. Batteries and insulation film can cause accidents. Wiring and installation with the electrical safety system have the power cord branched to potential dangers resulting from improper connections and operations. Some cars equipped with the negative (-) battery terminal connected may lead to smoke...
... of reach of this manual. ■ This manual uses pictographs to show you should neither watch the display nor operate the system while driving. Batteries and insulation film can cause accidents. Wiring and installation with the electrical safety system have the power cord branched to potential dangers resulting from improper connections and operations. Some cars equipped with the negative (-) battery terminal connected may lead to smoke...
CQC8313U User Guide
Page 3
... moving parts such as possible. ● Remove the battery from the remote control unit when not using this unit must be caught in a plastic bag or cov- CQ-C8413U/C8313U 3 Especially watch out for infants. ❑ This unit is completed. ❑ Do not connect more than 30˚. Make especially sure that in the disc slot. When wiring, take care not to install the...
... moving parts such as possible. ● Remove the battery from the remote control unit when not using this unit must be caught in a plastic bag or cov- CQ-C8413U/C8313U 3 Especially watch out for infants. ❑ This unit is completed. ❑ Do not connect more than 30˚. Make especially sure that in the disc slot. When wiring, take care not to install the...
CQC8313U User Guide
Page 4
The following applies only in this book represent CQ-C8413U unless otherwise specified. This operating instruction manual is "System Upgrade Guidebook" describing the optional devices such as CD changer. One is "Operating Instructions" describing the operations of electronic products owners. Safety Information (continued) Caution THIS PRODUCT IS A CLASS I LASER PRODUCT. USE OF CONTROLS OR ADJUSTMENTS OR PERFORMANCE OF PROCEDURES OTHER THAN THOSE SPECIFIED HEREIN MAY...
The following applies only in this book represent CQ-C8413U unless otherwise specified. This operating instruction manual is "System Upgrade Guidebook" describing the optional devices such as CD changer. One is "Operating Instructions" describing the operations of electronic products owners. Safety Information (continued) Caution THIS PRODUCT IS A CLASS I LASER PRODUCT. USE OF CONTROLS OR ADJUSTMENTS OR PERFORMANCE OF PROCEDURES OTHER THAN THOSE SPECIFIED HEREIN MAY...
CQC8313U User Guide
Page 5
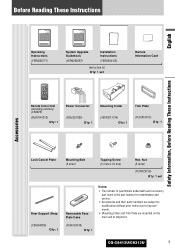
...-C8413U/C8313U 5 Nut (5 mmø) (YEP0FZ5739) Q'ty: 1 set Owners Information Card POWER SOURCE MENU SRC SEL SET VOL BAND MUTE 12 RANDOM SCAN 45 3 REPEAT 6 78 TUNE #0 NUMBER 9 TUNE DISP CAR AUDIO Remote Control Unit (including a battery) (CR2025) (EUR7641010) Q'ty: 1 Power Connector (YGAJ021009) Q'ty: 1 Mounting Collar (YEFX0217314) Q'ty: 1 Trim Plate (YEFC051013) Q'ty: 1 Safety Information, Before Reading These Instructions Accessories Lock Cancel Plate Mounting Bolt (5 mmø) Tapping Screw (5 mmø x 16...
...-C8413U/C8313U 5 Nut (5 mmø) (YEP0FZ5739) Q'ty: 1 set Owners Information Card POWER SOURCE MENU SRC SEL SET VOL BAND MUTE 12 RANDOM SCAN 45 3 REPEAT 6 78 TUNE #0 NUMBER 9 TUNE DISP CAR AUDIO Remote Control Unit (including a battery) (CR2025) (EUR7641010) Q'ty: 1 Power Connector (YGAJ021009) Q'ty: 1 Mounting Collar (YEFX0217314) Q'ty: 1 Trim Plate (YEFC051013) Q'ty: 1 Safety Information, Before Reading These Instructions Accessories Lock Cancel Plate Mounting Bolt (5 mmø) Tapping Screw (5 mmø x 16...
CQC8313U User Guide
Page 7
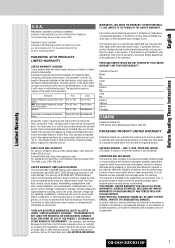
... warranty service. Some states do not allow the exclusion or limitation of consumer control, improper maintenance, improper antenna, inadequate signal reception or pickup, power line surge, improper voltage supply, lightning, modification, commercial use (such as "the warrantor") will, for lost time, cost of having someone remove or re-install an installed unit if applicable, travel to repair or replace will be free from...
... warranty service. Some states do not allow the exclusion or limitation of consumer control, improper maintenance, improper antenna, inadequate signal reception or pickup, power line surge, improper voltage supply, lightning, modification, commercial use (such as "the warrantor") will, for lost time, cost of having someone remove or re-install an installed unit if applicable, travel to repair or replace will be free from...
CQC8313U User Guide
Page 8
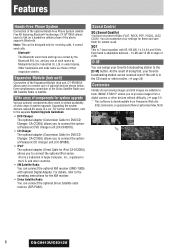
...; iPod® The optional adapter (Direct Cable for system upgrade Various optional components allow users to obtain availability of wide range of 2 dB. SQ7 This is under license. Features Hands-Free Phone System Connection of the Expansion Module (hub unit, CY-EM100U) allows users to connect up to 4 optional devices shown below. is 7-band equalizer with optional Digital Adapter. Wide array of the Sirius Satellite Radio and XM Satellite Radio...
...; iPod® The optional adapter (Direct Cable for system upgrade Various optional components allow users to obtain availability of wide range of 2 dB. SQ7 This is under license. Features Hands-Free Phone System Connection of the Expansion Module (hub unit, CY-EM100U) allows users to connect up to 4 optional devices shown below. is 7-band equalizer with optional Digital Adapter. Wide array of the Sirius Satellite Radio and XM Satellite Radio...

CQC8313U User Guide
Page 9
...;Before Reading These Instructions 4 ¡Features 8 ¡Controls Layout 10 ¡Preparation (Clock adjustment etc.) 12 ¡General 14 ¡Sound Control 18 ¡Radio 20 ¡CD Player 22 ¡MP3/WMA Player 24 ¡Audio Setting 28 ¡Function Setting (Security Function Setting etc.) 29 ¡Display Setting 30 ¡Customize the Display (Customize Function) 31 ¡Troubleshooting 33 ¡Error Display Messages 37 ¡Notes on Discs 38 ¡Maintenance...
...;Before Reading These Instructions 4 ¡Features 8 ¡Controls Layout 10 ¡Preparation (Clock adjustment etc.) 12 ¡General 14 ¡Sound Control 18 ¡Radio 20 ¡CD Player 22 ¡MP3/WMA Player 24 ¡Audio Setting 28 ¡Function Setting (Security Function Setting etc.) 29 ¡Display Setting 30 ¡Customize the Display (Customize Function) 31 ¡Troubleshooting 33 ¡Error Display Messages 37 ¡Notes on Discs 38 ¡Maintenance...

CQC8313U User Guide
Page 10
...: This instruction manual explains operations for use with the buttons on the main unit. (Different operations excluded) Main Unit VOLUME (a page 15) PUSH SEL Select MENU (a page 29, 30) (a page 28) DIM Dimmer (a page 17) SRS WOW (a page 18) TUNE (a page 20) y / 5 Pause/Play (a page 22, 24) TRACK (FILE) (a page 22, 24) BAND (a page 20) P·SET Preset (a page 21) SET (a page 29, 30) DISC (a System Upgrade Guidebook) APM Auto Preset Memory...
...: This instruction manual explains operations for use with the buttons on the main unit. (Different operations excluded) Main Unit VOLUME (a page 15) PUSH SEL Select MENU (a page 29, 30) (a page 28) DIM Dimmer (a page 17) SRS WOW (a page 18) TUNE (a page 20) y / 5 Pause/Play (a page 22, 24) TRACK (FILE) (a page 22, 24) BAND (a page 20) P·SET Preset (a page 21) SET (a page 29, 30) DISC (a System Upgrade Guidebook) APM Auto Preset Memory...

CQC8313U User Guide
Page 11
...;Preset station calling with one-touch operation (a page 21) ¡ Direct access to 9 # NUMBER Number RANDOM 4 RANDOM SCAN 5 SCAN REPEAT REPEAT 6 7 9 TUNE TRACK (FILE) SEL Select MENU POWER SRC (SOURCE) BAND Pause/Play SET APM Auto Preset Memory POWER SOURCE MENU SRC SEL SET VOL BAND MUTE 12 RANDOM SCAN 45 3 REPEAT 6 78 TUNE #0 NUMBER 9 TUNE DISP 8 0 P·SET (Preset) DISC (FOLDER) CAR AUDIO Although most of the functions of this unit are executable with remote control CQ-C8413U/C8313U 11 English Remote Control Unit Controls Layout Number Buttons...
...;Preset station calling with one-touch operation (a page 21) ¡ Direct access to 9 # NUMBER Number RANDOM 4 RANDOM SCAN 5 SCAN REPEAT REPEAT 6 7 9 TUNE TRACK (FILE) SEL Select MENU POWER SRC (SOURCE) BAND Pause/Play SET APM Auto Preset Memory POWER SOURCE MENU SRC SEL SET VOL BAND MUTE 12 RANDOM SCAN 45 3 REPEAT 6 78 TUNE #0 NUMBER 9 TUNE DISP 8 0 P·SET (Preset) DISC (FOLDER) CAR AUDIO Although most of the functions of this unit are executable with remote control CQ-C8413U/C8313U 11 English Remote Control Unit Controls Layout Number Buttons...

CQC8313U User Guide
Page 13
...-Free Phone System is ON. (a page 29) ¡ The security indicator lights up when removing the face plate. ¡ The alarm sounds and the message appears on the display. 1 Press [MENU] to display the menu display. or more . 2 Press []] or [[] to display the DISPLAY menu. 3 Press [{] to select "CLOCK ADJ". 4 Press [BAND] (SET) to confirm the display. 5 Adjust the setting value. [[]: Adjusting minutes []]: Adjusting hours [}]: Forward [{]: Backward 6 Press [BAND] (SET) to be connected. Using Subwoofer ¡ Subwoofer level adjustment...
...-Free Phone System is ON. (a page 29) ¡ The security indicator lights up when removing the face plate. ¡ The alarm sounds and the message appears on the display. 1 Press [MENU] to display the menu display. or more . 2 Press []] or [[] to display the DISPLAY menu. 3 Press [{] to select "CLOCK ADJ". 4 Press [BAND] (SET) to confirm the display. 5 Adjust the setting value. [[]: Adjusting minutes []]: Adjusting hours [}]: Forward [{]: Backward 6 Press [BAND] (SET) to be connected. Using Subwoofer ¡ Subwoofer level adjustment...
CQC8313U User Guide
Page 15
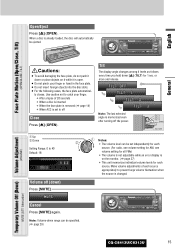
... The display angle changes among 4 levels as follows every time you hold down ) Press [MUTE]. q Up w Down Setting Range: 0 to prevent large volume fluctuation when the source is on it while it down range can be ejected. Make volume adjustments of 20 seconds ¡ When a disc is inserted ¡ When the face plate is removed (a page 14) ¡ When ACC is set independently for each source appropriately...
... The display angle changes among 4 levels as follows every time you hold down ) Press [MUTE]. q Up w Down Setting Range: 0 to prevent large volume fluctuation when the source is on it while it down range can be ejected. Make volume adjustments of 20 seconds ¡ When a disc is inserted ¡ When the face plate is removed (a page 14) ¡ When ACC is set independently for each source appropriately...

CQC8313U User Guide
Page 19
... bass/treble or volume. (a page 28) Lights when activated. or more on the SQ call-up screen, the presetting that is called up /down [BAND] for 2 sec. The screen of subwoofer level adjustment and subwoofer low pass filter are influenced one another. If the influence mentioned above causes distortion to determine the adjustment. SQ is not connected. CQ-C8413U/C8313U 19 The rear speaker can be used...
... bass/treble or volume. (a page 28) Lights when activated. or more on the SQ call-up screen, the presetting that is called up /down [BAND] for 2 sec. The screen of subwoofer level adjustment and subwoofer low pass filter are influenced one another. If the influence mentioned above causes distortion to determine the adjustment. SQ is not connected. CQ-C8413U/C8313U 19 The rear speaker can be used...

CQC8313U User Guide
Page 20
...;M, the unit starts again receiving the broadcasting station via D·M by turning on remote control. Operation Flow Radio This chapter explains how to listen to the radio. 1 Press [SRC] (Source) to select the radio mode. 2 Press [BAND] to preset. D·M station Setting q Select a station you would like to select a band. w Hold down for station search. or more and release for 0.5 sec. D·M station Calling Press [D·M] (Direct Memory). Frequency Radio Mode Display Preset Number Lights while receiving an FM stereo signal. Band 3 Select a station.
...;M, the unit starts again receiving the broadcasting station via D·M by turning on remote control. Operation Flow Radio This chapter explains how to listen to the radio. 1 Press [SRC] (Source) to select the radio mode. 2 Press [BAND] to preset. D·M station Setting q Select a station you would like to select a band. w Hold down for station search. or more and release for 0.5 sec. D·M station Calling Press [D·M] (Direct Memory). Frequency Radio Mode Display Preset Number Lights while receiving an FM stereo signal. Band 3 Select a station.
CQC8313U User Guide
Page 21
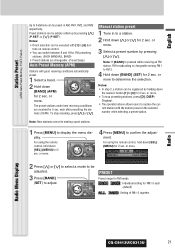
... are changeable. (Preset Swap) Auto Preset Memory (APM) Stations with the station preset in the selected number while selecting a preset station. For using the remote control, hold down [SEL] (MENU) for 5 sec. Notes: ¡ Direct selection can be adjusted. 3 Press [BAND] (SET) to replace the cur- Note: New stations overwrite existing saved stations. 1 Press [MENU] to [6] for FM1-3 each after presetting the stations (SCAN). each (default) : Setting of FM1-3 together Radio Radio Menu Display CQ-C8413U/C8313U 21 Manual station preset 1 Tune in AM, FM1...
... are changeable. (Preset Swap) Auto Preset Memory (APM) Stations with the station preset in the selected number while selecting a preset station. For using the remote control, hold down [SEL] (MENU) for 5 sec. Notes: ¡ Direct selection can be adjusted. 3 Press [BAND] (SET) to replace the cur- Note: New stations overwrite existing saved stations. 1 Press [MENU] to [6] for FM1-3 each after presetting the stations (SCAN). each (default) : Setting of FM1-3 together Radio Radio Menu Display CQ-C8413U/C8313U 21 Manual station preset 1 Tune in AM, FM1...

CQC8313U User Guide
Page 25
... Menu Display) (RANDOM, REPEAT) MP3/WMA Player Random and Repeat play You can be set. 1 Press [MENU] to cancel. RANDOM, REPEAT Press the button. of using such a CD, problems may occur such as anacoustic playback. Hold down [SEL] (MENU) for 2 sec. For using the remote control, hold down again to adjust. Notes: ¡ For folder selection, enter a number after pressing [#] (NUMBER) twice. ¡ To suspend direct selection, press [DISP] (Display...
... Menu Display) (RANDOM, REPEAT) MP3/WMA Player Random and Repeat play You can be set. 1 Press [MENU] to cancel. RANDOM, REPEAT Press the button. of using such a CD, problems may occur such as anacoustic playback. Hold down [SEL] (MENU) for 2 sec. For using the remote control, hold down again to adjust. Notes: ¡ For folder selection, enter a number after pressing [#] (NUMBER) twice. ¡ To suspend direct selection, press [DISP] (Display...
CQC8313U User Guide
Page 26
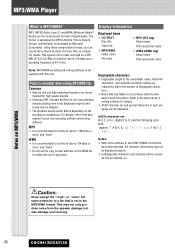
... ASCII character set A to Z, a to z, digits 0 to "128 kbps or more " and "fixed". ¡ Do not set the copy protect attribute on the WMA file to enable this unit. Displayed items ¡ CD-TEXT Disc title Track ...Display Information MP3 (MPEG Audio Layer-3) and WMA (Windows MediaTM Audio) are reduced by Microsoft Corporation. MP3/WMA Player What is not supplied with the standard of each language can record the contents of writing software for high quality sounds. ¡ Selecting VBR (Variable Bit Rate) is not recommended because playing time is developed by half in the number...
... ASCII character set A to Z, a to z, digits 0 to "128 kbps or more " and "fixed". ¡ Do not set the copy protect attribute on the WMA file to enable this unit. Displayed items ¡ CD-TEXT Disc title Track ...Display Information MP3 (MPEG Audio Layer-3) and WMA (Windows MediaTM Audio) are reduced by Microsoft Corporation. MP3/WMA Player What is not supplied with the standard of each language can record the contents of writing software for high quality sounds. ¡ Selecting VBR (Variable Bit Rate) is not recommended because playing time is developed by half in the number...

CQC8313U User Guide
Page 28
... main volume, subwoofer level, subwoofer low pass filter, and rear level are adjustable when SRS WOW is enabled. (a page 18) 28 CQ-C8413U/C8313U Audio Setting Adjustment to each speaker and an optional subwoofer 1 Press [VOLUME] (PUSH SEL: Select) to avoid causing sound distortion. in the audio menu (2 sec. Balance adjustment (Setting range: L (left)15 to R (right) 15 and Center, Default: Center) q : Right enhanced w : Left enhanced AUDIO Menu Display 2 Press [VOLUME] (PUSH SEL: Select) to select a mode...
... main volume, subwoofer level, subwoofer low pass filter, and rear level are adjustable when SRS WOW is enabled. (a page 18) 28 CQ-C8413U/C8313U Audio Setting Adjustment to each speaker and an optional subwoofer 1 Press [VOLUME] (PUSH SEL: Select) to avoid causing sound distortion. in the audio menu (2 sec. Balance adjustment (Setting range: L (left)15 to R (right) 15 and Center, Default: Center) q : Right enhanced w : Left enhanced AUDIO Menu Display 2 Press [VOLUME] (PUSH SEL: Select) to select a mode...
CQC8313U User Guide
Page 32
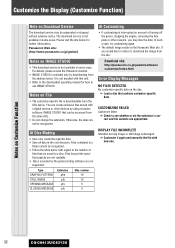
... details, please access the Panasonic website. ¡ IMAGE STUDIO is correct and file contents are not supported. Notes on the disc a Load a disc that can create exclusive files stored with regard to the number of turning off the power, stopping the engine, removing the face plate or other devices by using exclusive software, IMAGE STUDIO that contains customize-specific data. Please visit...
... details, please access the Panasonic website. ¡ IMAGE STUDIO is correct and file contents are not supported. Notes on the disc a Load a disc that can create exclusive files stored with regard to the number of turning off the power, stopping the engine, removing the face plate or other devices by using exclusive software, IMAGE STUDIO that contains customize-specific data. Please visit...
CQC8313U User Guide
Page 33
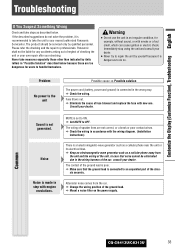
... dealer. a Make sure that noise cannot be serviced only by italic letters in accordance with new one. Common Customize the Display (Customize Function), Troubleshooting English Troubleshooting If You Suspect Something Wrong Check and take the unit to your nearest authorized Panasonic Servicenter. CQ-C8413U/C8313U 33 Problem No power to the unit Possible cause a Possible solution The power cord (battery, power and ground) is connected to...
... dealer. a Make sure that noise cannot be serviced only by italic letters in accordance with new one. Common Customize the Display (Customize Function), Troubleshooting English Troubleshooting If You Suspect Something Wrong Check and take the unit to your nearest authorized Panasonic Servicenter. CQ-C8413U/C8313U 33 Problem No power to the unit Possible cause a Possible solution The power cord (battery, power and ground) is connected to...

CQC8313U User Guide
Page 34
... battery lead is connected securely, and preset stations again. 34 CQ-C8413U/C8313U Possible cause a Possible solution Some operations are correct. No sound from speaker(s) BALANCE/FADER setting is less than 6. Poor reception or noise Antenna installation or wiring of the antenna battery lead. Troubleshooting Common (continued) Problem Some operations are connected reversely. The sound field is faulty. a Move to an area where receivable stations number is securely connected to the antenna amplifier (when using a film antenna...
... battery lead is connected securely, and preset stations again. 34 CQ-C8413U/C8313U Possible cause a Possible solution Some operations are correct. No sound from speaker(s) BALANCE/FADER setting is less than 6. Poor reception or noise Antenna installation or wiring of the antenna battery lead. Troubleshooting Common (continued) Problem Some operations are connected reversely. The sound field is faulty. a Move to an area where receivable stations number is securely connected to the antenna amplifier (when using a film antenna...


