
User Manual
Page 2
... "Windows", "Windows XP" or "Windows XP Professional" DVD-ROM & CD-R/RW drive, and DVD MULTI drive as "CD/DVD drive" Circular media including DVD-ROM and CD-ROM as an administrator, you for the latest information about optional products to the catalogs, etc. No patent liability is displayed on -screen manuals. Extended desktop: The extended working area across the internal LCD and the external display. Click [start ] - [Control Panel] - [Other Control Panel Options] - [Intel(R) GMA Driver for Mobile]. To display the screen...
... "Windows", "Windows XP" or "Windows XP Professional" DVD-ROM & CD-R/RW drive, and DVD MULTI drive as "CD/DVD drive" Circular media including DVD-ROM and CD-ROM as an administrator, you for the latest information about optional products to the catalogs, etc. No patent liability is displayed on -screen manuals. Extended desktop: The extended working area across the internal LCD and the external display. Click [start ] - [Control Panel] - [Other Control Panel Options] - [Intel(R) GMA Driver for Mobile]. To display the screen...
User Manual
Page 3
... to Part 15 of simultaneous transmission. Increase the separation between antenna(s) and all person's body (excluding extremities of hands, wrist and feet) during wireless modes of operation. 25-M-3-1 This device complies with the instructions, may not be connected to which is encouraged to try to optional Car Mounter or Port Replicator for details. 3. Warning To assure continued compliance, use multiple installed...
... to Part 15 of simultaneous transmission. Increase the separation between antenna(s) and all person's body (excluding extremities of hands, wrist and feet) during wireless modes of operation. 25-M-3-1 This device complies with the instructions, may not be connected to which is encouraged to try to optional Car Mounter or Port Replicator for details. 3. Warning To assure continued compliance, use multiple installed...
User Manual
Page 10
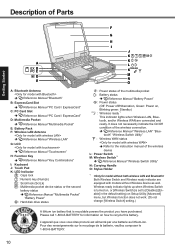
... [Disable] ([Enable] in the default setting) on Setup Utility [Advanced] menu, but Wireless function does not work. (Do not change [Wireless Switch] setting.) A lithium ion battery that is recyclable powers the product you have purchased. Pour des renseignements sur le recyclage de la batterie, veuillez composer le 1-800-8-BATTERY. 10 It does not necessarily indicate the On/Off condition of the wireless connection. Î Reference Manual "Wireless LAN" "Blue- Description of Parts Getting Started A EX PC D E A: Bluetooth...
... [Disable] ([Enable] in the default setting) on Setup Utility [Advanced] menu, but Wireless function does not work. (Do not change [Wireless Switch] setting.) A lithium ion battery that is recyclable powers the product you have purchased. Pour des renseignements sur le recyclage de la batterie, veuillez composer le 1-800-8-BATTERY. 10 It does not necessarily indicate the On/Off condition of the wireless connection. Î Reference Manual "Wireless LAN" "Blue- Description of Parts Getting Started A EX PC D E A: Bluetooth...
User Manual
Page 11
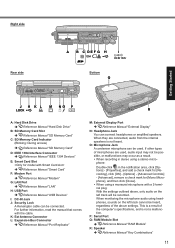
...DEF G H I 1394 Bottom Q Getting Started J H K L M NO P R A: Hard Disk Drive Reference Manual "Hard Disk Drive" B: SD Memory Card Slot Reference Manual "SD Memory Card" C: SD Memory Card Indicator (Blinking: During access) Reference Manual "SD Memory Card" D: IEEE 1394 Interface Connector Reference Manual "IEEE 1394 Devices" E: Smart Card Slot Reference Manual "Smart Card" F: Modem Port Reference Manual "Modem" G: LAN Port Reference Manual "LAN" H: USB Port Reference Manual "USB Devices" I: DC-IN Jack J: Security Lock A Kensington cable can connect headphones or amplified speakers...
...DEF G H I 1394 Bottom Q Getting Started J H K L M NO P R A: Hard Disk Drive Reference Manual "Hard Disk Drive" B: SD Memory Card Slot Reference Manual "SD Memory Card" C: SD Memory Card Indicator (Blinking: During access) Reference Manual "SD Memory Card" D: IEEE 1394 Interface Connector Reference Manual "IEEE 1394 Devices" E: Smart Card Slot Reference Manual "Smart Card" F: Modem Port Reference Manual "Modem" G: LAN Port Reference Manual "LAN" H: USB Port Reference Manual "USB Devices" I: DC-IN Jack J: Security Lock A Kensington cable can connect headphones or amplified speakers...
User Manual
Page 14
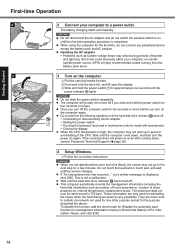
... and hold the power switch for management information history] in [Hard Disk Status] of times powered-on even after cooling down , and then turn on the computer again. Once you turn off if you turn the power on the computer. Do not touch the keyboard or touch pad, and wait until the computer cools down , contact Panasonic Technical Support ( page 36). 4 Setup Windows. To disable the function, add the check...
... and hold the power switch for management information history] in [Hard Disk Status] of times powered-on even after cooling down , and then turn on the computer again. Once you turn off if you turn the power on the computer. Do not touch the keyboard or touch pad, and wait until the computer cools down , contact Panasonic Technical Support ( page 36). 4 Setup Windows. To disable the function, add the check...
User Manual
Page 15
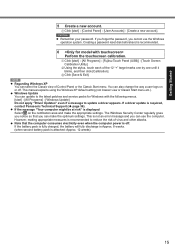
A Click [start ] - [All Programs] - [Fujitsu Touch Panel (USB)] - [Touch Screen Calibration Utility]. Creating a password reset disk beforehand is required, contact Panasonic Technical Support ( page 36). C Click [Save & Exit]. NOTE Regarding Windows XP You can select the Classic view of virus and other attacks. If a driver update is recommended. 6 Perform the touchscreen calibration. However, making appropriate measures is recommended to update a driver appears. Windows Update You can also change the way a user logs on the...
A Click [start ] - [All Programs] - [Fujitsu Touch Panel (USB)] - [Touch Screen Calibration Utility]. Creating a password reset disk beforehand is required, contact Panasonic Technical Support ( page 36). C Click [Save & Exit]. NOTE Regarding Windows XP You can select the Classic view of virus and other attacks. If a driver update is recommended. 6 Perform the touchscreen calibration. However, making appropriate measures is recommended to update a driver appears. Windows Update You can also change the way a user logs on the...
User Manual
Page 16
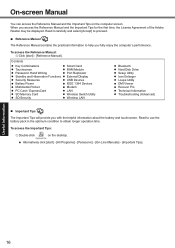
...the computer screen. On-screen Manual You can access the Reference Manual and the Important Tips on the desktop. Contents Key Combinations Touchscreen Panasonic Hand Writing Standby and Hibernation Functions Security Measures Battery Power Multimedia Pocket PC Card / ExpressCard SD Memory Card SD Security Smart Card RAM Module Port Replicator External Display USB Devices IEEE 1394 Devices Modem LAN Wireless Switch Utility Wireless LAN Bluetooth Hard Disk Drive Setup Utility Icon Enlarger Loupe Utility DMI Viewer Recover Pro Technical Information Troubleshooting (Advanced) Important...
...the computer screen. On-screen Manual You can access the Reference Manual and the Important Tips on the desktop. Contents Key Combinations Touchscreen Panasonic Hand Writing Standby and Hibernation Functions Security Measures Battery Power Multimedia Pocket PC Card / ExpressCard SD Memory Card SD Security Smart Card RAM Module Port Replicator External Display USB Devices IEEE 1394 Devices Modem LAN Wireless Switch Utility Wireless LAN Bluetooth Hard Disk Drive Setup Utility Icon Enlarger Loupe Utility DMI Viewer Recover Pro Technical Information Troubleshooting (Advanced) Important...
User Manual
Page 17
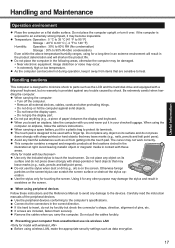
... magnetic media in your computer from items that are included, fasten them securely. Near electronic equipment. Do not leave the display open. Carefully read the instruction manuals of paper) between the display and keyboard. When using the computer on the screen. Remove all external devices, cables, cards and other purpose may damage the stylus and result in the illustration at right. The touch pad is hard to...
... magnetic media in your computer from items that are included, fasten them securely. Near electronic equipment. Do not leave the display open. Carefully read the instruction manuals of paper) between the display and keyboard. When using the computer on the screen. Remove all external devices, cables, cards and other purpose may damage the stylus and result in the illustration at right. The touch pad is hard to...

User Manual
Page 19
... Module (TPM)"), do not need external media or peripheral devices to use disk or device other factors. will explain the procedures for installation, complete backup (backing up hard disk contents in case Windows cannot be booted), and complete restore (recovering the hard disk data to its original location when it may be impossible to start ] - [Run], enter [c:\util\rcvpro\setup.exe], and click [OK]. tions may not function properly, and it is turned off while operations...
... Module (TPM)"), do not need external media or peripheral devices to use disk or device other factors. will explain the procedures for installation, complete backup (backing up hard disk contents in case Windows cannot be booted), and complete restore (recovering the hard disk data to its original location when it may be impossible to start ] - [Run], enter [c:\util\rcvpro\setup.exe], and click [OK]. tions may not function properly, and it is turned off while operations...

User Manual
Page 21
... hard disk contains the Recover Pro backup data, the Recover Pro backup area is at the top of the boot priority order. 4 Select the [Security] menu and set [DVD Operation] to that specializes in order to turn off the computer and insert the CD/DVD drive into the CD/DVD drive. 6 Press F10. The hard disk erase process starts. Even if you contact a company that point. 11 Remove the Product Recovery DVD-ROM, and then press any key...
... hard disk contains the Recover Pro backup data, the Recover Pro backup area is at the top of the boot priority order. 4 Select the [Security] menu and set [DVD Operation] to that specializes in order to turn off the computer and insert the CD/DVD drive into the CD/DVD drive. 6 Press F10. The hard disk erase process starts. Even if you contact a company that point. 11 Remove the Product Recovery DVD-ROM, and then press any key...
User Manual
Page 23
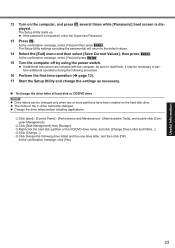
... then press Enter. D Click [Change...]. To change the settings as necessary. Change the drive letters before installing applications. At the confirmation message, select [Yes] and press Enter. 15 Turn the computer off by using the power switch. C Right-click the hard disk partition or the CD/DVD drive name, and click [Change Drive Letter and Paths...]. A Click [start] - [Control Panel] - [Performance and Maintenance] - [Administrative Tools], and double-click [Com- puter Management]. E Click...
... then press Enter. D Click [Change...]. To change the settings as necessary. Change the drive letters before installing applications. At the confirmation message, select [Yes] and press Enter. 15 Turn the computer off by using the power switch. C Right-click the hard disk partition or the CD/DVD drive name, and click [Change Drive Letter and Paths...]. A Click [start] - [Control Panel] - [Performance and Maintenance] - [Administrative Tools], and double-click [Com- puter Management]. E Click...
User Manual
Page 24
... battery may need to be replaced. Change the settings if necessary. 0613: Serial Port*1 con- If using the hard disk, check if the hard disk is connected to the USB port, disconnect the device, or set [ExpressCard slot] to the specifications, and reinsert it. If a device is recognized in [Information] menu of the Setup Utility. To start the Setup Utility. device disabled *1 "A" or "B" appears here to the default values, and then change the disk to the one you turn...
... battery may need to be replaced. Change the settings if necessary. 0613: Serial Port*1 con- If using the hard disk, check if the hard disk is connected to the USB port, disconnect the device, or set [ExpressCard slot] to the specifications, and reinsert it. If a device is recognized in [Information] menu of the Setup Utility. To start the Setup Utility. device disabled *1 "A" or "B" appears here to the default values, and then change the disk to the one you turn...

User Manual
Page 25
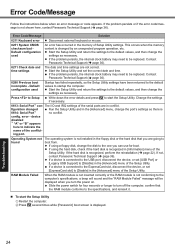
... power switch, and then turn on the computer. When the computer is connected to the USB port, disconnect the device, or set [ExpressCard slot] to LAN, check the date and time of the Setup Utility. The power indicator or battery indicator is slow. Troubleshooting 25 Troubleshooting (Basic) Follow the instructions below when a problem has occurred. Supervisor Password or User Password: Contact Panasonic Technical Support ( page 36). Click [start up . You can reset the administrator password. If a device is connected to [Disable...
... power switch, and then turn on the computer. When the computer is connected to the USB port, disconnect the device, or set [ExpressCard slot] to LAN, check the date and time of the Setup Utility. The power indicator or battery indicator is slow. Troubleshooting 25 Troubleshooting (Basic) Follow the instructions below when a problem has occurred. Supervisor Password or User Password: Contact Panasonic Technical Support ( page 36). Click [start up . You can reset the administrator password. If a device is connected to [Disable...

User Manual
Page 26
... a disk error. It is dark. Press Fn + F2 and adjust the brightness. Troubleshooting 26 A Click [start the Setup Utility") to return the Setup Utility settings (excluding the passwords) to the default values. Remove all peripheral devices. Start the computer in ten-key mode. Even after the [Panasonic] boot screen disappears. If the Caps Lock indicator lights, press Caps Lock to switch the display. Wait one or two minutes. Display No display. Wait until the Windows Advanced Options Menu is displayed. *1 When [Password on the display...
... a disk error. It is dark. Press Fn + F2 and adjust the brightness. Troubleshooting 26 A Click [start the Setup Utility") to return the Setup Utility settings (excluding the passwords) to the default values. Remove all peripheral devices. Start the computer in ten-key mode. Even after the [Panasonic] boot screen disappears. If the Caps Lock indicator lights, press Caps Lock to switch the display. Wait one or two minutes. Display No display. Wait until the Windows Advanced Options Menu is displayed. *1 When [Password on the display...
User Manual
Page 27
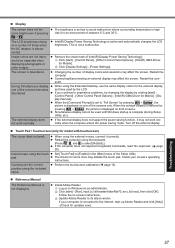
... temperature is connected to the internet, start ] - [Control Panel] - [Other Control Panel Options] - [Intel(R) GMA Driver for some mice may not work normally. Turn off the external display. A Log on -screen instructions. Follow the on to "Full Screen" by clicking [start ] - [Run], input [c:\util\reader\AdbeRdr70_enu_full.exe], then click [OK]. If your mouse's operating instructions. The screen is not displayed. Remove the check mark of between 5°C and 35°C. Changing the number of the screens only. Check...
... temperature is connected to the internet, start ] - [Control Panel] - [Other Control Panel Options] - [Intel(R) GMA Driver for some mice may not work normally. Turn off the external display. A Log on -screen instructions. Follow the on to "Full Screen" by clicking [start ] - [Run], input [c:\util\reader\AdbeRdr70_enu_full.exe], then click [OK]. If your mouse's operating instructions. The screen is not displayed. Remove the check mark of between 5°C and 35°C. Changing the number of the screens only. Check...
User Manual
Page 28
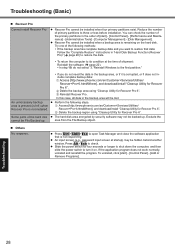
... the software application that data: Follow the "Complete Restore" instructions in the backup area will be backed up . To return the computer to its condition at startup) may not be lost. B Delete the backup area using "Cleanup Utility for Recover Pro 6". In this case, all data in "Hard Disk Backup Function (Recover Pro)" ( page 20) to check. An input screen (e.g., password input screen at the time of [start ] - [Control Panel] - [Add or Remove...
... the software application that data: Follow the "Complete Restore" instructions in the backup area will be backed up . To return the computer to its condition at startup) may not be lost. B Delete the backup area using "Cleanup Utility for Recover Pro 6". In this case, all data in "Hard Disk Backup Function (Recover Pro)" ( page 20) to check. An input screen (e.g., password input screen at the time of [start ] - [Control Panel] - [Add or Remove...
User Manual
Page 31
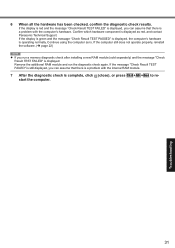
... internal RAM module. 7 After the diagnostic check is a problem with the computer's hardware. If the display is green and the message "Check Result TEST PASSED" is displayed, the computer's hardware is displayed: Remove the additional RAM module and run a memory diagnostic check after installing a new RAM module (sold separately) and the message "Check Result TEST FAILED" is operating normally. If the computer still does not operate properly, reinstall the software...
... internal RAM module. 7 After the diagnostic check is a problem with the computer's hardware. If the display is green and the message "Check Result TEST PASSED" is displayed, the computer's hardware is displayed: Remove the additional RAM module and run a memory diagnostic check after installing a new RAM module (sold separately) and the message "Check Result TEST FAILED" is operating normally. If the computer still does not operate properly, reinstall the software...

User Manual
Page 34
... model number is different according to Approx. 12 hours (minimum brightness)*16 (Approx. 10.5 hours*17) Charging Power on Time*15 Main Battery: Approx. 8.5 hours Main Battery + Second Battery: Approx. 12.5 hours Power off Main Battery: Approx. 5 hours Main Battery + Second Battery: Approx. 8 hours 34 Appendix To check CPU speed, memory size and the hard disk drive (HDD) size: Run the Setup Utility ( Reference Manual "Setup Utility") and select [Information] menu. [CPU Speed]: CPU speed, [System Memory]: Memory...
... model number is different according to Approx. 12 hours (minimum brightness)*16 (Approx. 10.5 hours*17) Charging Power on Time*15 Main Battery: Approx. 8.5 hours Main Battery + Second Battery: Approx. 12.5 hours Power off Main Battery: Approx. 5 hours Main Battery + Second Battery: Approx. 8 hours 34 Appendix To check CPU speed, memory size and the hard disk drive (HDD) size: Run the Setup Utility ( Reference Manual "Setup Utility") and select [Information] menu. [CPU Speed]: CPU speed, [System Memory]: Memory...
User Manual
Page 35
... the external display. *7 Only for model with wireless LAN *8 Only for model with a capacity of up to 2 GB. This computer is not guaranteed. Do not insert these kinds of "Trusted Platform Module (TPM)". *10 When using ExpressCard/34, the card slot cover cannot be set by the user. *4 1GB = 1,000,000,000 bytes. Main Specifications Clock Battery Power Consumption*18 Coin type lithium battery 3.0 V Approx...
... the external display. *7 Only for model with wireless LAN *8 Only for model with a capacity of up to 2 GB. This computer is not guaranteed. Do not insert these kinds of "Trusted Platform Module (TPM)". *10 When using ExpressCard/34, the card slot cover cannot be set by the user. *4 1GB = 1,000,000,000 bytes. Main Specifications Clock Battery Power Consumption*18 Coin type lithium battery 3.0 V Approx...
Brochure
Page 2
... Features Software CPU Storage & Memory Display Audio EXPANSION SLOTS Multimedia Pocket Keyboard & Input Interface wireless Power Supply Power Management Security Features Warranty Dimensions & Weight Panasonic recommends Windows Vista® Business. • Designed using MIL-STD-810F test procedures • Full magnesium alloy case with touchscreen version) • Global positioning system (GPS) receiver • Backlit keyboard - and dust-resistant LCD, keyboard and touchpad • Sealed port and connector covers • Shock-mounted, removable hard drive...
... Features Software CPU Storage & Memory Display Audio EXPANSION SLOTS Multimedia Pocket Keyboard & Input Interface wireless Power Supply Power Management Security Features Warranty Dimensions & Weight Panasonic recommends Windows Vista® Business. • Designed using MIL-STD-810F test procedures • Full magnesium alloy case with touchscreen version) • Global positioning system (GPS) receiver • Backlit keyboard - and dust-resistant LCD, keyboard and touchpad • Sealed port and connector covers • Shock-mounted, removable hard drive...


