
BTLH2550E User Guide
Page 3
... with the manufacturer's instructions. 8) Do not install near water. 6) Clean only with dry cloth. 7) Do not block any heat sources such as power-supply cord or plug is used in any unautho- rized modifications. ference in a particular instal- If DVI-D port is connected. • Consult the dealer or an experienced radio/TV technician for help. If the provided plug does not fit into your safety...
... with the manufacturer's instructions. 8) Do not install near water. 6) Clean only with dry cloth. 7) Do not block any heat sources such as power-supply cord or plug is used in any unautho- rized modifications. ference in a particular instal- If DVI-D port is connected. • Consult the dealer or an experienced radio/TV technician for help. If the provided plug does not fit into your safety...

BTLH2550E User Guide
Page 4
... performed by qualified installation personnel. Use with other confined space. CAUTION: Excessive sound pressure from earphones and headphones can cause hearing loss. CAUTION: Remove the wall mount adaptor when not used with Panasonic Wall Mount Adaptor, BT-WMA26G. Improper installation may result in instability causing possible injury. Extension cords used . CAUTION: Check the installation at least once a year. indicates safety information. 4 No user serviceable parts inside. CAUTION: TO...
... performed by qualified installation personnel. Use with other confined space. CAUTION: Excessive sound pressure from earphones and headphones can cause hearing loss. CAUTION: Remove the wall mount adaptor when not used with Panasonic Wall Mount Adaptor, BT-WMA26G. Improper installation may result in instability causing possible injury. Extension cords used . CAUTION: Check the installation at least once a year. indicates safety information. 4 No user serviceable parts inside. CAUTION: TO...
BTLH2550E User Guide
Page 6
... connecting cables • The purchaser/user is urged to use only the connecting cables described below. Applicable standards and operating environment (BT-LH2550E) The apparatus is recommended that the following instructions in an EMC environment, such as connecting cables. • When connecting to use only equipment which are designed for 75-ohm type high-frequency applications, are recommended for analog audio signals. • Other connecting cables (IEEE1394, USB) Use...
... connecting cables • The purchaser/user is urged to use only the connecting cables described below. Applicable standards and operating environment (BT-LH2550E) The apparatus is recommended that the following instructions in an EMC environment, such as connecting cables. • When connecting to use only equipment which are designed for 75-ohm type high-frequency applications, are recommended for analog audio signals. • Other connecting cables (IEEE1394, USB) Use...

BTLH2550E User Guide
Page 7
... LCD screen. • Do not install the unit in a place exposed to Use the On Screen Menu 15 User Data 20 Main Menu 21 Menu configuration 21 MARKER 22 Marker types 24 VIDEO CONFIG 26 SYSTEM CONFIG 29 FUNCTION 32 GPI 35 INPUT SELECT 36 AUDIO 38 DISPLAY SETUP 39 CONTROL 45 HOURMETER 45 REMOTE Specifications 48 Maintenance inspecions 52 Maintenance 52 Error Display 52 Specifications 53 Standard accessories Power cord × 1 Power cord hook...
... LCD screen. • Do not install the unit in a place exposed to Use the On Screen Menu 15 User Data 20 Main Menu 21 Menu configuration 21 MARKER 22 Marker types 24 VIDEO CONFIG 26 SYSTEM CONFIG 29 FUNCTION 32 GPI 35 INPUT SELECT 36 AUDIO 38 DISPLAY SETUP 39 CONTROL 45 HOURMETER 45 REMOTE Specifications 48 Maintenance inspecions 52 Maintenance 52 Error Display 52 Specifications 53 Standard accessories Power cord × 1 Power cord hook...
BTLH2550E User Guide
Page 8
... broadcasting service and business use. ■ Compact 25.5 type full HD monitor • The monitor is equipped with a high-resolution (1920 x 1200) IPS LCD panel. • Efforts to facilitate composition. ■ Calibration function The monitor can easily be calibrated using a luminance meter. ■ REMOTE control Depending on the intended use of the monitor, you can select between input signal to picture display. • Diagonal line compensation processing circuit reduces vertical image...
... broadcasting service and business use. ■ Compact 25.5 type full HD monitor • The monitor is equipped with a high-resolution (1920 x 1200) IPS LCD panel. • Efforts to facilitate composition. ■ Calibration function The monitor can easily be calibrated using a luminance meter. ■ REMOTE control Depending on the intended use of the monitor, you can select between input signal to picture display. • Diagonal line compensation processing circuit reduces vertical image...

BTLH2550E User Guide
Page 10
Power LED When the power is located at the bottom of the tally lamp Indicates monitor status. Controls and Their Functions Video monitor unit Front view Rear view 6 5 Tally lamp ( page 35, 48) The color of the front panel. Front panel controls ( page 11) POWER switch ( / ) The POWER switch is turned on . Set the switch to to this terminal. This switch turns the power On and Off. DC IN Connect the supplied DC cord of the supplied AC adapter to turn it on , the LED lights green. Rear panel terminals ( page 12) 10
Power LED When the power is located at the bottom of the tally lamp Indicates monitor status. Controls and Their Functions Video monitor unit Front view Rear view 6 5 Tally lamp ( page 35, 48) The color of the front panel. Front panel controls ( page 11) POWER switch ( / ) The POWER switch is turned on . Set the switch to to this terminal. This switch turns the power On and Off. DC IN Connect the supplied DC cord of the supplied AC adapter to turn it on , the LED lights green. Rear panel terminals ( page 12) 10

BTLH2550E User Guide
Page 11
... buttons are not used when the power was last turned off is on , the input line used . 8 MENU button ( ) Press to open a menu, exit a menu or return to a previous menu. 9 ADJUST button ( ) Press to display the picture/volume adjusting menu (PHASE, CHROMA, BRIGHT, B.LIGHT [BACKLIGHT] or CONT. [CONTRAST], VOLUME). 10 Cursor, ENTER, FUNCTION buttons ( , , , , ) /FUNCTION1 : Moves the cursor to the FUNCTION5. • When the control lock is selected. Controls and Their Functions (continued) Front panel controls 78 9 10 7 INPUT button ( ) Selects the signal input...
... buttons are not used when the power was last turned off is on , the input line used . 8 MENU button ( ) Press to open a menu, exit a menu or return to a previous menu. 9 ADJUST button ( ) Press to display the picture/volume adjusting menu (PHASE, CHROMA, BRIGHT, B.LIGHT [BACKLIGHT] or CONT. [CONTRAST], VOLUME). 10 Cursor, ENTER, FUNCTION buttons ( , , , , ) /FUNCTION1 : Moves the cursor to the FUNCTION5. • When the control lock is selected. Controls and Their Functions (continued) Front panel controls 78 9 10 7 INPUT button ( ) Selects the signal input...

BTLH2550E User Guide
Page 14
... adapter. 2. Power Supply Connecting the power cord 1. Do not use the supplied AC adapter. Turn on the AC adapter until it is normal and not a cause for powering other devices. Connect the power cord to the AC inlet of the AC adapter. 4. Power cord hook Screw Power cord Use the supplied screw (for securing power cord) and the power cord hook to secure the power cord to use the supplied AC adapter for concern. 3. The POWER LED lights green. Slide the DC cord into the DC OUT terminal on the POWER switch...
... adapter. 2. Power Supply Connecting the power cord 1. Do not use the supplied AC adapter. Turn on the AC adapter until it is normal and not a cause for powering other devices. Connect the power cord to the AC inlet of the AC adapter. 4. Power cord hook Screw Power cord Use the supplied screw (for securing power cord) and the power cord hook to secure the power cord to use the supplied AC adapter for concern. 3. The POWER LED lights green. Slide the DC cord into the DC OUT terminal on the POWER switch...

BTLH2550E User Guide
Page 15
..." menu to Use the On Screen Menu The screen displays eight types of inaction. 15 Input signal status Picture/volume adjusting menu 1. How to set the display status ( page 29). 3. DVI-VIDEO/DVI-COMP. • Use "STATUS DISPLAY" in the "INPUT SELECT" menu does not match the input signal. • "NO SIGNAL" appears if no signal is displayed. • In split screen display, the screen synchronized to the reference sync changes with the input signal format and "TWO WINDOW SIZE" settings ( page 44). Main window , sub-window indication...
..." menu to Use the On Screen Menu The screen displays eight types of inaction. 15 Input signal status Picture/volume adjusting menu 1. How to set the display status ( page 29). 3. DVI-VIDEO/DVI-COMP. • Use "STATUS DISPLAY" in the "INPUT SELECT" menu does not match the input signal. • "NO SIGNAL" appears if no signal is displayed. • In split screen display, the screen synchronized to the reference sync changes with the input signal format and "TWO WINDOW SIZE" settings ( page 44). Main window , sub-window indication...

BTLH2550E User Guide
Page 19
... unit loads set to "REMOTE," the key mark appears and adjustments cannot be changed. • Setting the MONO function to white. 3. Press [ADJUST] to Use the On Screen Menu (continued) Picture/volume adjusting menu operations 1. How to end adjustments. Press [ , ] to CONT. PHASE 0-60 (30) CHROMA 0, 10-60 (30) BRIGHT 0-60 (30) B.LIGHT [BACKLIGHT] 0-60 (50) VOLUME 0-60 (0) ( ) : Factory defaults • Setting [B.LIGHT/CONT.] to CONT. [CONTRAST] in the "CONTROL" menu is set values when the power is...
... unit loads set to "REMOTE," the key mark appears and adjustments cannot be changed. • Setting the MONO function to white. 3. Press [ADJUST] to Use the On Screen Menu (continued) Picture/volume adjusting menu operations 1. How to end adjustments. Press [ , ] to CONT. PHASE 0-60 (30) CHROMA 0, 10-60 (30) BRIGHT 0-60 (30) B.LIGHT [BACKLIGHT] 0-60 (50) VOLUME 0-60 (0) ( ) : Factory defaults • Setting [B.LIGHT/CONT.] to CONT. [CONTRAST] in the "CONTROL" menu is set values when the power is...

BTLH2550E User Guide
Page 26
... "DVI-D" is set in the split-screen display of the "TWO WINDOW" function. and Canada), EBU (other input (the factory defaults are SHARPNESS MODE: LOW and SHARPNESS H/V: 0). *4 Selecting "VAR1", "VAR2" and "VAR3" engages the WB adjustment mode ( page 28). *5 To select USER0 - 63, 1) Press [ENTER] ("USER" changes to blue). 2) Use [ , ] to STANDARD when "RGB- Sets the gamma curve to that approximates CRT display capability suitable for the selected input signal is...
... "DVI-D" is set in the split-screen display of the "TWO WINDOW" function. and Canada), EBU (other input (the factory defaults are SHARPNESS MODE: LOW and SHARPNESS H/V: 0). *4 Selecting "VAR1", "VAR2" and "VAR3" engages the WB adjustment mode ( page 28). *5 To select USER0 - 63, 1) Press [ENTER] ("USER" changes to blue). 2) Use [ , ] to STANDARD when "RGB- Sets the gamma curve to that approximates CRT display capability suitable for the selected input signal is...

BTLH2550E User Guide
Page 27
... Switches between color and monochrome (MONO). This function is suitable for handling fast video. *8 "SCAN" changes are not available when "RGB-COMP." The gamma curve is set up in the split screen display of the picture/volume adjusting menu is "MODE1". IP mode "MODE1" performs IP conversion using inter-field interpolation. The factory default is fixed at 0. COLOR GAIN B 0 - 30 Fine tunes B component GAIN in sub-window input in the "INPUT...
... Switches between color and monochrome (MONO). This function is suitable for handling fast video. *8 "SCAN" changes are not available when "RGB-COMP." The gamma curve is set up in the split screen display of the picture/volume adjusting menu is "MODE1". IP mode "MODE1" performs IP conversion using inter-field interpolation. The factory default is fixed at 0. COLOR GAIN B 0 - 30 Fine tunes B component GAIN in sub-window input in the "INPUT...

BTLH2550E User Guide
Page 28
... "WHITE BALANCE VAR3" (WB) adjustments. Underlined values indicate factory defaults. Adjusts the GAIN elements for RED.*2 Adjusts the GAIN elements for GREEN.*2 Adjusts the GAIN elements for BLUE.*2 -512 - 511 (Factory default: 0) Adjusts the BIAS elements for RED.*2 Adjusts the BIAS elements for GREEN.*2 Adjusts the BIAS elements for adjustment. and pressing [ENTER] after making a change, opens a confirmation screen. Main Menu (continued) ■ WB adjustment mode Select "VAR1" to color temperature values selected under "COLOR TEMP." *1 Selecting "COLOR...
... "WHITE BALANCE VAR3" (WB) adjustments. Underlined values indicate factory defaults. Adjusts the GAIN elements for RED.*2 Adjusts the GAIN elements for GREEN.*2 Adjusts the GAIN elements for BLUE.*2 -512 - 511 (Factory default: 0) Adjusts the BIAS elements for RED.*2 Adjusts the BIAS elements for GREEN.*2 Adjusts the BIAS elements for adjustment. and pressing [ENTER] after making a change, opens a confirmation screen. Main Menu (continued) ■ WB adjustment mode Select "VAR1" to color temperature values selected under "COLOR TEMP." *1 Selecting "COLOR...

BTLH2550E User Guide
Page 29
... all times Loads saved factory defaults (FACTORY) or user data (USER1 - Selects the settings used when the power was loaded. Center of user data can be saved or loaded. 29 Starts up using USER registered settings. Signal input or menu operation will return the backlight to make a calibration. The backlight dims when no signal (NO SIGNAL) is shipped, settings for input signal status (on -screen menu. in the picture/volume adjusting menu (PHASE/CHROMA/BRIGHT/CONTRAST/BACKLIGHT) except "SETUP SAVE/SETUP LOAD." Adjusts the backlight when the B.LIGHT/CONT. It also...
... all times Loads saved factory defaults (FACTORY) or user data (USER1 - Selects the settings used when the power was loaded. Center of user data can be saved or loaded. 29 Starts up using USER registered settings. Signal input or menu operation will return the backlight to make a calibration. The backlight dims when no signal (NO SIGNAL) is shipped, settings for input signal status (on -screen menu. in the picture/volume adjusting menu (PHASE/CHROMA/BRIGHT/CONTRAST/BACKLIGHT) except "SETUP SAVE/SETUP LOAD." Adjusts the backlight when the B.LIGHT/CONT. It also...

BTLH2550E User Guide
Page 32
... MAIN Switches sub-window inputs in the following order. It also selects button action (1touch, 2-touch, off . Main Menu (continued) FUNCTION Sub menu FUNCTION 1 FUNCTION 5 FUNCTION DISPLAY Settings HV DELAY AUTOSETUP BLUE ONLY GAMMA SELECT COLOR SPACE SD ASPECT SCAN TWO WINDOW SUB INPUT SEL. DELAY OFF H DELAY V DELAY HV DELAY DELAY OFF Performs auto setup for PC display. The display changes in split screen mode. Turns the LEVEL METER display On...
... MAIN Switches sub-window inputs in the following order. It also selects button action (1touch, 2-touch, off . Main Menu (continued) FUNCTION Sub menu FUNCTION 1 FUNCTION 5 FUNCTION DISPLAY Settings HV DELAY AUTOSETUP BLUE ONLY GAMMA SELECT COLOR SPACE SD ASPECT SCAN TWO WINDOW SUB INPUT SEL. DELAY OFF H DELAY V DELAY HV DELAY DELAY OFF Performs auto setup for PC display. The display changes in split screen mode. Turns the LEVEL METER display On...
BTLH2550E User Guide
Page 36
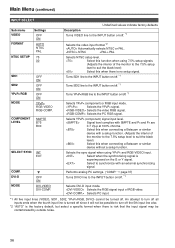
... . Main Menu (continued) INPUT SELECT Sub menu VIDEO FORMAT NTSC SETUP Settings OFF ON AUTO NTSC PAL 75 00 SDI1 SDI2 YPBPR/RGB MODE OFF ON OFF ON OFF ON YPBPR RGB-VIDEO RGB-COMP. Underlined values indicate factory defaults. Selects the YPBPR signal. Selects the sync signal when using 7.5% setup signals. (Adjusts the interior of RGB video. Select to the INPUT button on the G or Y signal. Selects PC input. *1 All five input lines (VIDEO, SDI1, SDI2, YPBPR/RGB, DVI-D) cannot...
... . Main Menu (continued) INPUT SELECT Sub menu VIDEO FORMAT NTSC SETUP Settings OFF ON AUTO NTSC PAL 75 00 SDI1 SDI2 YPBPR/RGB MODE OFF ON OFF ON OFF ON YPBPR RGB-VIDEO RGB-COMP. Underlined values indicate factory defaults. Selects the YPBPR signal. Selects the sync signal when using 7.5% setup signals. (Adjusts the interior of RGB video. Select to the INPUT button on the G or Y signal. Selects PC input. *1 All five input lines (VIDEO, SDI1, SDI2, YPBPR/RGB, DVI-D) cannot...

BTLH2550E User Guide
Page 48
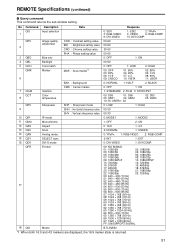
... window or sub-window single screen display. REMOTE Specifications This monitor permits remote operation via GPI/RS-232C terminal. Use the GPI menu to assign functions to terminals are displayed, this marker is superimposed on , the tally color changes to more after a change. 9 GPI8 Assigned item UNDEF MARKER1 ON/OFF*1 MARKER2 ON/OFF*1 MARKER BACK HALF*2 MARKER BACK BLACK*2 CENTER MARKER INPUT SEL. Selects the SYNC when using...
... window or sub-window single screen display. REMOTE Specifications This monitor permits remote operation via GPI/RS-232C terminal. Use the GPI menu to assign functions to terminals are displayed, this marker is superimposed on , the tally color changes to more after a change. 9 GPI8 Assigned item UNDEF MARKER1 ON/OFF*1 MARKER2 ON/OFF*1 MARKER BACK HALF*2 MARKER BACK BLACK*2 CENTER MARKER INPUT SEL. Selects the SYNC when using...

BTLH2550E User Guide
Page 50
... single screen display in "TWO WINDOW" mode and in the main window and subwindow in split-screen display. *3 This command is enabled in the sub-window in single screen display in "TWO WINDOW" mode. 50 REMOTE Specifications (continued) ■ Setting command No Command Description 1 IIS*1 Input switch VPC*2 2 Image quality adjustment 3 OBO*2 4 OHV*1 5 VBL*2 6 DCH*2 7 DSD*2 8 ISM*2 9 IRF*2 10 ISM*2 DMK*3 Blue only HV Delay Backlight Cross hatch Status display Analog mode SELECT Sync DVI-D mode Marker settings...
... single screen display in "TWO WINDOW" mode and in the main window and subwindow in split-screen display. *3 This command is enabled in the sub-window in single screen display in "TWO WINDOW" mode. 50 REMOTE Specifications (continued) ■ Setting command No Command Description 1 IIS*1 Input switch VPC*2 2 Image quality adjustment 3 OBO*2 4 OHV*1 5 VBL*2 6 DCH*2 7 DSD*2 8 ISM*2 9 IRF*2 10 ISM*2 DMK*3 Blue only HV Delay Backlight Cross hatch Status display Analog mode SELECT Sync DVI-D mode Marker settings...
BTLH2550E User Guide
Page 51
...(60 Hz) FF: UNSUPPORT SIGNAL 18 QID Model BT-LH2550 *1 When both 16:9 and 4:3 markers are displayed, the 16:9 marker state is returned. 51 QPC 2 Image quality adjustment CON : Contrast setting value BRI : Brightness setting value CRO : Chroma setting value 00-60 00-60 00-60 PHA : Phase setting value 00-60 3 QBO Blue only 0: OFF 1: ON 4 QBL Backlight 00-60 5 QCH Cross...
...(60 Hz) FF: UNSUPPORT SIGNAL 18 QID Model BT-LH2550 *1 When both 16:9 and 4:3 markers are displayed, the 16:9 marker state is returned. 51 QPC 2 Image quality adjustment CON : Contrast setting value BRI : Brightness setting value CRO : Chroma setting value 00-60 00-60 00-60 PHA : Phase setting value 00-60 3 QBO Blue only 0: OFF 1: ON 4 QBL Backlight 00-60 5 QCH Cross...
BTLH2550E User Guide
Page 53
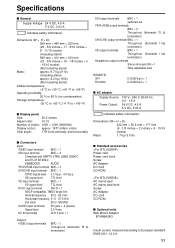
... accessories Power cord Power cord hook Screw AC Adaptor DC cord CD-ROM AC mains lead AC mains lead hook Screw AC Adaptor DC cord CD-ROM ■ Optional units Wall Mount Adaptor BT-WMA26G Inrush current, measured according to +140 °F) ■ Display panel Size: 25.5 inches Aspect ratio: 16:10 Number of pixels: 1920 × 1200 (WUXGA) Display colors: approx. 1677 million colors View angle: 178° both vertically and horizontally SDI...
... accessories Power cord Power cord hook Screw AC Adaptor DC cord CD-ROM AC mains lead AC mains lead hook Screw AC Adaptor DC cord CD-ROM ■ Optional units Wall Mount Adaptor BT-WMA26G Inrush current, measured according to +140 °F) ■ Display panel Size: 25.5 inches Aspect ratio: 16:10 Number of pixels: 1920 × 1200 (WUXGA) Display colors: approx. 1677 million colors View angle: 178° both vertically and horizontally SDI...


