
User Manual
Page 1
BT-LH1710P Model No. BT-LH1710E Before operating this product, please read the instructions carefully and save this manual for future use. F1008T0 -P D Printed in Japan ENGLISH VQT1Z04 BT-LH1760E Model No. Operating Instructions LCD Video Monitor Model No. BT-LH1760P Model No.
BT-LH1710P Model No. BT-LH1710E Before operating this product, please read the instructions carefully and save this manual for future use. F1008T0 -P D Printed in Japan ENGLISH VQT1Z04 BT-LH1760E Model No. Operating Instructions LCD Video Monitor Model No. BT-LH1760P Model No.

User Manual
Page 2
...cause the monitor to the ground. CAUTION: This apparatus can cause hearing loss. Voltages other Wall Mount or Rack Mount Adaptor is completely safe. Please contact either a local or foreign Panasonic authorized service..., or the Electronic Industries Alliance: http://www.eiae.org. 2 only): This product has a fluorescent lamp that the installation is capable of a different AC plug. Wrongly wired extension cords are not... intended for BT-LH1760P/1710P) ■ THIS EQUIPMENT MUST BE GROUNDED To ensure safe operation, ...
...cause the monitor to the ground. CAUTION: This apparatus can cause hearing loss. Voltages other Wall Mount or Rack Mount Adaptor is completely safe. Please contact either a local or foreign Panasonic authorized service..., or the Electronic Industries Alliance: http://www.eiae.org. 2 only): This product has a fluorescent lamp that the installation is capable of a different AC plug. Wrongly wired extension cords are not... intended for BT-LH1760P/1710P) ■ THIS EQUIPMENT MUST BE GROUNDED To ensure safe operation, ...

User Manual
Page 4
...NOT PLACE ANY LIQUID CONTAINERS ON TOP OF THE EQUIPMENT. To prevent risk of electric shock, do not remove covers. CAUTION: This Monitor is for BT-LH1760E/1710E) ■ THIS EQUIPMENT MUST BE EARTHED To ensure safe operation, the three-pin plug must have three cores and be... if you are a major cause of the monitor could cause the monitor to the floor so that it will not topple over. CAUTION: Remove the wall mount adaptor when not used with Panasonic Wall Mount Adaptor, BT-WMA17G, or Panasonic Rack Mount Adaptor, BT-MA1710G. Refer servicing to maintain adequate ventilation, ...
...NOT PLACE ANY LIQUID CONTAINERS ON TOP OF THE EQUIPMENT. To prevent risk of electric shock, do not remove covers. CAUTION: This Monitor is for BT-LH1760E/1710E) ■ THIS EQUIPMENT MUST BE EARTHED To ensure safe operation, the three-pin plug must have three cores and be... if you are a major cause of the monitor could cause the monitor to the floor so that it will not topple over. CAUTION: Remove the wall mount adaptor when not used with Panasonic Wall Mount Adaptor, BT-WMA17G, or Panasonic Rack Mount Adaptor, BT-MA1710G. Refer servicing to maintain adequate ventilation, ...

User Manual
Page 5
...product is equipped with the situation by, for instance, moving the source of mains cable is obtained. ONLY FOR U.K. Check for the ASTA mark or the BSI mark on the body of AC mains cable. If you must be purchased from pointed objects. Exposing the LCD panel to lift the monitor... by ASTA or BSI to strong pressure or pressure from your safety and convenience. Not to be used in the U.K. Should the fuse need to prevent damaging it is refitted when the fuse is only for your local Panasonic...this first ! (for BT-LH1760E/1710E) (continued) ...
...product is equipped with the situation by, for instance, moving the source of mains cable is obtained. ONLY FOR U.K. Check for the ASTA mark or the BSI mark on the body of AC mains cable. If you must be purchased from pointed objects. Exposing the LCD panel to lift the monitor... by ASTA or BSI to strong pressure or pressure from your safety and convenience. Not to be used in the U.K. Should the fuse need to prevent damaging it is refitted when the fuse is only for your local Panasonic...this first ! (for BT-LH1760E/1710E) (continued) ...

User Manual
Page 6
...to high temperature and humidity for an extended period of time may damage the LCD screen and cause blurring. • Streaks of the wall mount adaptor to authorized personnel.) Protection Panel BT-PRP17G (Refer to endure the weight of the pixels are either missing or... constantly lit (red, blue or green). this first 2 Transportation precautions 5 Precautions for Use 6 Standard accessories 6 Optional units 6 Outline 7 Dimensions 7 Controls and Their Functions 8 Video monitor unit 8 Front...
...to high temperature and humidity for an extended period of time may damage the LCD screen and cause blurring. • Streaks of the wall mount adaptor to authorized personnel.) Protection Panel BT-PRP17G (Refer to endure the weight of the pixels are either missing or... constantly lit (red, blue or green). this first 2 Transportation precautions 5 Precautions for Use 6 Standard accessories 6 Optional units 6 Outline 7 Dimensions 7 Controls and Their Functions 8 Video monitor unit 8 Front...

User Manual
Page 7
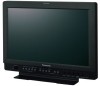
... from interlace to progressive scanning. ■ Multi-format image compatibility • This monitor is equipped with a high performance 17.0-inch wide LCD display panel. ■ High performance LCD panel This monitor achieves outstanding color reproduction, a wide viewing angle, and high-speed response. Dimensions Unit... resolution (that you can select between parallel remote control (GPI) and serial remote control (RS232C). Outline The BT-LH1760/1710 LCD monitor was designed especially for SDI input) of input signals. • Cross hatch overlay function Displays markers at regular...
... from interlace to progressive scanning. ■ Multi-format image compatibility • This monitor is equipped with a high performance 17.0-inch wide LCD display panel. ■ High performance LCD panel This monitor achieves outstanding color reproduction, a wide viewing angle, and high-speed response. Dimensions Unit... resolution (that you can select between parallel remote control (GPI) and serial remote control (RS232C). Outline The BT-LH1760/1710 LCD monitor was designed especially for SDI input) of input signals. • Cross hatch overlay function Displays markers at regular...
User Manual
Page 8
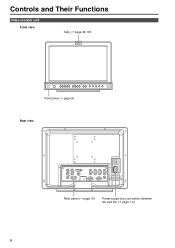
Controls and Their Functions Video monitor unit Front view Tally (J page 29, 36) Front panel (J page 9) Rear view Rear panel (J page 10) Power supply [you can switch between AC and DC (J page 11)] 8
Controls and Their Functions Video monitor unit Front view Tally (J page 29, 36) Front panel (J page 9) Rear view Rear panel (J page 10) Power supply [you can switch between AC and DC (J page 11)] 8

User Manual
Page 9
... input. FUNCTION4 : Confirms a menu item assigned to display and adjust menu settings. input or "DVI-COMP" input, [PHASE] and [CHROMA] operations are loaded when the monitor is disabled. DVI-D : DVI-D input (HDCP compatible) * When using PC Input, select "RGB-COMP." It also confirms a menu item assigned to adjust speaker and headphones...
... input. FUNCTION4 : Confirms a menu item assigned to display and adjust menu settings. input or "DVI-COMP" input, [PHASE] and [CHROMA] operations are loaded when the monitor is disabled. DVI-D : DVI-D input (HDCP compatible) * When using PC Input, select "RGB-COMP." It also confirms a menu item assigned to adjust speaker and headphones...

User Manual
Page 10
... input to a PC RGB signal. HEADPHONES output connector (Stereo mini-jack M3) Connect a pair of headphones turns off the speakers. When multiple monitors are connected in a pair of headphones to the VD terminal. OUT : This is a connection method for all video input terminals. * SDI ...This is automatically selected by using a PC RGB signal, connect the horizontal synchronizing signal to the SYNC/HD terminal, and the vertical synchronizing signal to monitor the sound. * The sound volume and sound quality will depend on . When using a RS232C signal. *1 Unless a cable is connected to ...
... input to a PC RGB signal. HEADPHONES output connector (Stereo mini-jack M3) Connect a pair of headphones turns off the speakers. When multiple monitors are connected in a pair of headphones to the VD terminal. OUT : This is a connection method for all video input terminals. * SDI ...This is automatically selected by using a PC RGB signal, connect the horizontal synchronizing signal to the SYNC/HD terminal, and the vertical synchronizing signal to monitor the sound. * The sound volume and sound quality will depend on . When using a RS232C signal. *1 Unless a cable is connected to ...
User Manual
Page 11
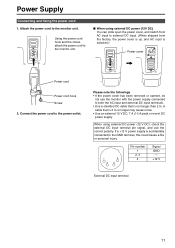
.... ■ When using external DC power (12 V DC), check the external DC input terminal pin signal, and use the monitor with the power supply connected to both the AC input and external DC input terminals. • Use a shielded DC cable that is selected.) Power cover ... terminal 11 If a +12 V power supply is not longer than 2 m. Power Supply Connecting and fixing the power cord 1. A cable that is accidentally connected to the monitor unit. Please note the followings • If the power cover has been removed or opened, do not use the correct polarity.
.... ■ When using external DC power (12 V DC), check the external DC input terminal pin signal, and use the monitor with the power supply connected to both the AC input and external DC input terminals. • Use a shielded DC cable that is selected.) Power cover ... terminal 11 If a +12 V power supply is not longer than 2 m. Power Supply Connecting and fixing the power cord 1. A cable that is accidentally connected to the monitor unit. Please note the followings • If the power cover has been removed or opened, do not use the correct polarity.

User Manual
Page 16
...]. The setting in the sub menu changes to green. The following settings. • Menu settings except "SETUP LOAD/SAVE" (including button function settings on the BT-LH1760. Select "YES" and press [ENTER]. Select "YES" and press [ENTER]. Press [ , ] to display the MAIN menu. 2. This loads the user data... settings and adjustments made with the picture adjustment knob as user data. This saves the user data. *1 Only displayed on the monitor front panel) • Screen adjustments made with the picture adjusting knob Saving user data Loading user data 1.
...]. The setting in the sub menu changes to green. The following settings. • Menu settings except "SETUP LOAD/SAVE" (including button function settings on the BT-LH1760. Select "YES" and press [ENTER]. Select "YES" and press [ENTER]. Press [ , ] to display the MAIN menu. 2. This loads the user data... settings and adjustments made with the picture adjustment knob as user data. This saves the user data. *1 Only displayed on the monitor front panel) • Screen adjustments made with the picture adjusting knob Saving user data Loading user data 1.

User Manual
Page 18
... (TYPE1) 88% area marker (TYPE2) Selects and displays marker type for 4:3 aspect ratio Selects conventional monitor or camera recorder marker size. GPI PRESET2: Selects the marker displayed by the GPI terminal "MARKER1 ON...the SMPTE125M for NTSC and ITU-R BT 601-5 for 16:9 aspect ratio. TYPE2: The effective horizontal area meets the EIA-RS170 for NTSC and ITU-R BT 470-4 for SD signals differ. Sub...They are disabled when the GPI function (J page 36) is selected with the camera recorder (Panasonic) Turns the cross hatch grid on and off and sets its density. 70/256 (displays ...
... (TYPE1) 88% area marker (TYPE2) Selects and displays marker type for 4:3 aspect ratio Selects conventional monitor or camera recorder marker size. GPI PRESET2: Selects the marker displayed by the GPI terminal "MARKER1 ON...the SMPTE125M for NTSC and ITU-R BT 601-5 for 16:9 aspect ratio. TYPE2: The effective horizontal area meets the EIA-RS170 for NTSC and ITU-R BT 470-4 for SD signals differ. Sub...They are disabled when the GPI function (J page 36) is selected with the camera recorder (Panasonic) Turns the cross hatch grid on and off and sets its density. 70/256 (displays ...

User Manual
Page 21
... adjustment. 21 "MODE2" performs IP conversion using inter-frame interpolation. Main Menu (continued) IP mode "MODE1" performs IP conversion using inter-field interpolation. in this monitor suppresses the delay to color temperature values selected under "COLOR TEMP." *1 Selecting "COLOR TEMP." and pressing [ENTER] after making a change, opens a confirmation screen. Underlined values...
... adjustment. 21 "MODE2" performs IP conversion using inter-frame interpolation. Main Menu (continued) IP mode "MODE1" performs IP conversion using inter-field interpolation. in this monitor suppresses the delay to color temperature values selected under "COLOR TEMP." *1 Selecting "COLOR TEMP." and pressing [ENTER] after making a change, opens a confirmation screen. Underlined values...

User Manual
Page 22
...feature can be displayed and set only on . Cuts out the center of the LCD panel.*3 Double speed (120 Hz/100 Hz) Standard speed (60 Hz/50 Hz) *1 When the monitor is turned on the BT-LH1760. 22 Displayed at their original size). Starts up using USER registered settings....images for 60 seconds or longer. Sets the studio standard color shade. Main Menu (continued) SYSTEM CONFIG Underlined values indicate factory defaults. Adjusts LCD backlight brightness. Doubles the speed of the images for "USER1" - Adjust as required by side. Sub menu CONT./BACK. Sets the ...
...feature can be displayed and set only on . Cuts out the center of the LCD panel.*3 Double speed (120 Hz/100 Hz) Standard speed (60 Hz/50 Hz) *1 When the monitor is turned on the BT-LH1760. 22 Displayed at their original size). Starts up using USER registered settings....images for 60 seconds or longer. Sets the studio standard color shade. Main Menu (continued) SYSTEM CONFIG Underlined values indicate factory defaults. Adjusts LCD backlight brightness. Doubles the speed of the images for "USER1" - Adjust as required by side. Sub menu CONT./BACK. Sets the ...

User Manual
Page 30
Selects the video RGB signal. Signal level complies with a setup function. (Adjusts the interior of the monitor to the 7.5% setup level to synchronize with an external synchronizing signal. Select when the synchronizing signal is no setup signal. Selects...setup level. Selects YPBPR (component) or RGB input mode. Selects the sync signal when using 7.5% setup signals. (Adjusts the interior of the monitor to the 7.5% setup level to suit the black level) Select this function when using YPBPR and RGB-VIDEO input. Select to suit the ...
Selects the video RGB signal. Signal level complies with a setup function. (Adjusts the interior of the monitor to the 7.5% setup level to synchronize with an external synchronizing signal. Select when the synchronizing signal is no setup signal. Selects...setup level. Selects YPBPR (component) or RGB input mode. Selects the sync signal when using 7.5% setup signals. (Adjusts the interior of the monitor to the 7.5% setup level to suit the black level) Select this function when using YPBPR and RGB-VIDEO input. Select to suit the ...

User Manual
Page 36
.... GAMMA SEL. PIXEL TO PIXEL Switches screen display between color and monochrome (MONO). (Disabled during PC signal input) Lights the red tally. REMOTE Specifications This monitor permits remote operation via GPI/RS-232C terminal. Use the GPI menu to assign functions to 0%. DVI-D SD ASPECT SCAN R-TALLY*3 Function Undefined (no function...
.... GAMMA SEL. PIXEL TO PIXEL Switches screen display between color and monochrome (MONO). (Disabled during PC signal input) Lights the red tally. REMOTE Specifications This monitor permits remote operation via GPI/RS-232C terminal. Use the GPI menu to assign functions to 0%. DVI-D SD ASPECT SCAN R-TALLY*3 Function Undefined (no function...

User Manual
Page 40
...use of consumables. 40 Remove the three screws on the back and base 2. Necessity of periodic maintenance service The backlight in the LCD panel is a consumable component that deteriorates over time leading to gradual loss of performance that replaces parts when they break down should ...operation and prevent unforeseen breakdown of all its functions. How to Attach the Rack Mount The monitor can be combined with an optional BT-MA1710G rack mount adaptor to keep the monitor in optimum condition and ensure safe operation. Rear Stand Base Screws Screw Rack mount adaptor ...
...use of consumables. 40 Remove the three screws on the back and base 2. Necessity of periodic maintenance service The backlight in the LCD panel is a consumable component that deteriorates over time leading to gradual loss of performance that replaces parts when they break down should ...operation and prevent unforeseen breakdown of all its functions. How to Attach the Rack Mount The monitor can be combined with an optional BT-MA1710G rack mount adaptor to keep the monitor in optimum condition and ensure safe operation. Rear Stand Base Screws Screw Rack mount adaptor ...

User Manual
Page 41
...protection panel by gently wiping it . • Do not use benzene, thinner and similar solvents for any reason an error occurs in this monitor, the LEDs above the picture adjusting knob flash at 1-second intervals to the on the screen. To remove stubborn soiling, use a battery pack.../low voltage Symptom If a malfunction occurs in a weak neutral detergent solution and thoroughly wrung out. Any moisture entering the monitor could damage it with a soft cloth. Any moisture entering the monitor could discolor the surface and cause the paint to peel. • Do not directly expose the...
...protection panel by gently wiping it . • Do not use benzene, thinner and similar solvents for any reason an error occurs in this monitor, the LEDs above the picture adjusting knob flash at 1-second intervals to the on the screen. To remove stubborn soiling, use a battery pack.../low voltage Symptom If a malfunction occurs in a weak neutral detergent solution and thoroughly wrung out. Any moisture entering the monitor could damage it with a soft cloth. Any moisture entering the monitor could discolor the surface and cause the paint to peel. • Do not directly expose the...


