
Network Camera
Page 7
...page 78 Confirming the Status 79 Confirming the Wireless Status 79 Restarting the Camera 80 Updating the Camera Firmware 81 Creating Configuration File 84 Loading Settings from a Configuration File 85 Resetting the Camera to Factory Default 86 Support page 87 Seeing Help page 87 Seeing Wireless Help page 88 Seeing Product Information 88 ... UPnP to Display Camera Shortcut in My Network Places ........ 106 Setting the Internet Temporary File Setting on Web Browser 106 ASCII Character Table 107 3.10 File Size and Number of Buffered Images 108 3.11 Specifications 109 Index ...
...page 78 Confirming the Status 79 Confirming the Wireless Status 79 Restarting the Camera 80 Updating the Camera Firmware 81 Creating Configuration File 84 Loading Settings from a Configuration File 85 Resetting the Camera to Factory Default 86 Support page 87 Seeing Help page 87 Seeing Wireless Help page 88 Seeing Product Information 88 ... UPnP to Display Camera Shortcut in My Network Places ........ 106 Setting the Internet Temporary File Setting on Web Browser 106 ASCII Character Table 107 3.10 File Size and Number of Buffered Images 108 3.11 Specifications 109 Index ...
Network Camera
Page 24
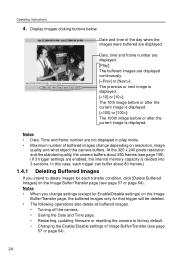
...deleted. • The following operations also delete all buffered images. • Turning off the camera. • Saving the Date and Time page. • Restarting, updating firmware or resetting the camera to factory default. • Changing the Enable/Disable settings of the day when the images .../Transfer page, the buffered images only for each transfer condition, click [Delete Buffered Images] on resolution, image quality and what object the camera buffers. In this case, each trigger can buffer about 250 frames (see page 108). (If 3 trigger settings are displayed continuously. []:...
...deleted. • The following operations also delete all buffered images. • Turning off the camera. • Saving the Date and Time page. • Restarting, updating firmware or resetting the camera to factory default. • Changing the Enable/Disable settings of the day when the images .../Transfer page, the buffered images only for each transfer condition, click [Delete Buffered Images] on resolution, image quality and what object the camera buffers. In this case, each trigger can buffer about 250 frames (see page 108). (If 3 trigger settings are displayed continuously. []:...

Network Camera
Page 63
... page is displayed. 9. But ["] and [end-of Image Buffer/Transfer or Date and Time. • Executing [Restart], [Update Firmware] or [Reset to a large phone bill. is displayed. In an emergency situation, the Email transfer can be stopped by enabling privacy mode using a mobile phone (...click [Save]. • New settings are deleted. • When finished, "Success!" mails may be deleted by doing the following. • Turning off the camera. • Saving the settings of -line] key are not available. *1 But [Space and [>] are not available. 8. Therefore, we recommend you set a...
... page is displayed. 9. But ["] and [end-of Image Buffer/Transfer or Date and Time. • Executing [Restart], [Update Firmware] or [Reset to a large phone bill. is displayed. In an emergency situation, the Email transfer can be stopped by enabling privacy mode using a mobile phone (...click [Save]. • New settings are deleted. • When finished, "Success!" mails may be deleted by doing the following. • Turning off the camera. • Saving the settings of -line] key are not available. *1 But [Space and [>] are not available. 8. Therefore, we recommend you set a...

Network Camera
Page 73
... a mobile phone (see page 64). [For assistance, please call: 1-800-272-7033] 73 For example, if the camera transfers 3 images per minute and 6 images in total with setting 1 minute of non detection time, the sensor will be...will be stopped by doing the following. • Turning off the camera. • Saving the settings of Image Buffer/Transfer or Date and Time. • Executing [Restart], [Update Firmware] or [Reset to Factory Default]. • Clicking [Delete Buffered Images] on .../Transfer page]. • The Image Buffer/Transfer page is displayed. Operating Instructions 11.
... a mobile phone (see page 64). [For assistance, please call: 1-800-272-7033] 73 For example, if the camera transfers 3 images per minute and 6 images in total with setting 1 minute of non detection time, the sensor will be...will be stopped by doing the following. • Turning off the camera. • Saving the settings of Image Buffer/Transfer or Date and Time. • Executing [Restart], [Update Firmware] or [Reset to Factory Default]. • Clicking [Delete Buffered Images] on .../Transfer page]. • The Image Buffer/Transfer page is displayed. Operating Instructions 11.
Network Camera
Page 78
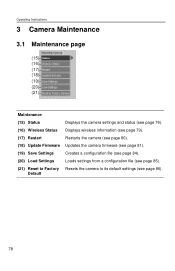
Default 78 Operating Instructions 3 Camera Maintenance 3.1 Maintenance page (15) (16) (17) (18) (19) (20) (21) Maintenance (15) Status Displays the camera settings and status (see page 79). (16) Wireless Status Displays wireless information (see page 79). (17) Restart Restarts the camera (see page 80). (18) Update Firmware Updates the camera firmware (see page 81). (19) Save Settings Creates a configuration file (see page 84). (20) Load Settings Loads settings from a configuration file (see page 85). (21) Reset to Factory Resets the camera to its default settings (see page 86).
Default 78 Operating Instructions 3 Camera Maintenance 3.1 Maintenance page (15) (16) (17) (18) (19) (20) (21) Maintenance (15) Status Displays the camera settings and status (see page 79). (16) Wireless Status Displays wireless information (see page 79). (17) Restart Restarts the camera (see page 80). (18) Update Firmware Updates the camera firmware (see page 81). (19) Save Settings Creates a configuration file (see page 84). (20) Load Settings Loads settings from a configuration file (see page 85). (21) Reset to Factory Resets the camera to its default settings (see page 86).
Network Camera
Page 85
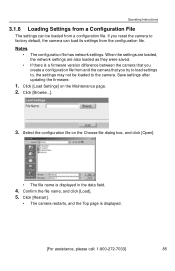
... file on the Maintenance page. 2. Notes • The configuration file has network settings. Save settings after updating the firmware. 1. Confirm the file name, and click [Load]. 5. When the settings are loaded, the network settings are also loaded as they were saved. • If there is ...and click [Open]. • The file name is a firmware version difference between the camera that you create a configuration file from and the camera that you reset the camera to factory default, the camera can be loaded to , the settings may not be loaded from a configuration file. If...
... file on the Maintenance page. 2. Notes • The configuration file has network settings. Save settings after updating the firmware. 1. Confirm the file name, and click [Load]. 5. When the settings are loaded, the network settings are also loaded as they were saved. • If there is ...and click [Open]. • The file name is a firmware version difference between the camera that you create a configuration file from and the camera that you reset the camera to factory default, the camera can be loaded to , the settings may not be loaded from a configuration file. If...

Network Camera
Page 86
...FACTORY DEFAULT RESET button resets the camera to the factory default (see page 40). Click [Reset to AM/ PM mode (see page 89). • All buffered images are deleted when resetting the camera to factory default directly after the Execute button is reset to factory default, the network connection mode... changes to [Automatic Setup]. Notes • The internal clock will not be reset, but the time format will return to...
...FACTORY DEFAULT RESET button resets the camera to the factory default (see page 40). Click [Reset to AM/ PM mode (see page 89). • All buffered images are deleted when resetting the camera to factory default directly after the Execute button is reset to factory default, the network connection mode... changes to [Automatic Setup]. Notes • The internal clock will not be reset, but the time format will return to...

Network Camera
Page 89
... object. Set it again. • See page 90-page 97 for 1 second when the camera is on the bottom. Operating Instructions 3.3 FACTORY DEFAULT RESET Button The camera has a FACTORY DEFAULT RESET button on . • The indicator blinks orange, and then turns off for 10 seconds. ... lose your user name and password, use this button to reset the camera. • Press the FACTORY DEFAULT RESET button for default settings. • All buffered images are deleted when resetting the camera to factory default. • The reset operation takes about 1 minute. [For assistance, please call...
... object. Set it again. • See page 90-page 97 for 1 second when the camera is on the bottom. Operating Instructions 3.3 FACTORY DEFAULT RESET Button The camera has a FACTORY DEFAULT RESET button on . • The indicator blinks orange, and then turns off for 10 seconds. ... lose your user name and password, use this button to reset the camera. • Press the FACTORY DEFAULT RESET button for default settings. • All buffered images are deleted when resetting the camera to factory default. • The reset operation takes about 1 minute. [For assistance, please call...
Network Camera
Page 102
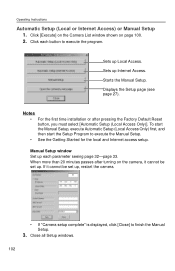
Click [Execute] on the Camera List window shown on the camera, it cannot be set up, restart the camera. • If "Camera setup complete" is displayed, click [Close] to execute the Manual Setup. • See the Getting Started for the local and Internet access setup. ...Manual Setup. Close all Setup windows. 102 Displays the Setup page (see page 27). When more than 20 minutes passes after pressing the Factory Default Reset button, you must select [Automatic Setup (Local Access Only)]. Manual Setup window Set up . Click each parameter seeing page 32-page 33. Operating ...
Click [Execute] on the Camera List window shown on the camera, it cannot be set up, restart the camera. • If "Camera setup complete" is displayed, click [Close] to execute the Manual Setup. • See the Getting Started for the local and Internet access setup. ...Manual Setup. Close all Setup windows. 102 Displays the Setup page (see page 27). When more than 20 minutes passes after pressing the Factory Default Reset button, you must select [Automatic Setup (Local Access Only)]. Manual Setup window Set up . Click each parameter seeing page 32-page 33. Operating ...


