
Network Camera
Page 2
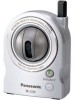
... or using the pan/tilt operation. 2 Color night view mode slows down the frame rate, and images may detect the temperature differences by E-mail or FTP*2. • Color night view mode (auto-adjusted) enables the camera to display images even in flexible mounting. Wireless installation will play an increasing role in 1 lx illuminance*3. Communication via Ethernet® cable is the brightness about 2.5 m (8.2 feet) away from PC or mobile phone • The camera images can be monitored over the Internet. • Pan/tilt operation...
... or using the pan/tilt operation. 2 Color night view mode slows down the frame rate, and images may detect the temperature differences by E-mail or FTP*2. • Color night view mode (auto-adjusted) enables the camera to display images even in flexible mounting. Wireless installation will play an increasing role in 1 lx illuminance*3. Communication via Ethernet® cable is the brightness about 2.5 m (8.2 feet) away from PC or mobile phone • The camera images can be monitored over the Internet. • Pan/tilt operation...
Network Camera
Page 3
... of a global IP address. * Viewnetcam.com service is the service for more information. But if you to configure it. Operating Instructions Easy installation using UPnP (Universal Plug and Play) When connecting the camera with your favorite domain name (e.g. See Panasonic Network Camera support website at http://panasonic.co.jp/pcc/products/en/netwkcam/ for more information. Multi-Language Display Top page, Single Camera and Multi-Camera page can be configured manually.
... of a global IP address. * Viewnetcam.com service is the service for more information. But if you to configure it. Operating Instructions Easy installation using UPnP (Universal Plug and Play) When connecting the camera with your favorite domain name (e.g. See Panasonic Network Camera support website at http://panasonic.co.jp/pcc/products/en/netwkcam/ for more information. Multi-Language Display Top page, Single Camera and Multi-Camera page can be configured manually.

Network Camera
Page 5
... all warnings. 4. Do not install near the camera and easily accessible. 9. Heed all instructions. 2. Servicing is damaged, the unit does not operate normally, or has been dropped. 12. User Name and Password Protection The use of a unique User Name and secret Password is intended for long periods of time. 11. Follow all servicing to reduce the risk of a User Name and Password, this may damage CMOS sensor...
... all warnings. 4. Do not install near the camera and easily accessible. 9. Heed all instructions. 2. Servicing is damaged, the unit does not operate normally, or has been dropped. 12. User Name and Password Protection The use of a unique User Name and secret Password is intended for long periods of time. 11. Follow all servicing to reduce the risk of a User Name and Password, this may damage CMOS sensor...

Network Camera
Page 6
... Operation Bar 15 Setting Home Position/Sensor Position/Preset Button 17 Viewing Multi-Camera page 21 1.4 Viewing Buffered Image page 23 1.4.1 Deleting Buffered Images 24 1.5 Viewing Still Images on Your Mobile Phone 25 2 Various Camera Features 27 2.1 Using Camera Features 27 2.2 Connecting the Camera to Your Network 30 2.3 Using Wireless LAN 34 2.4 Using UPnP (Universal Plug and Play 37 2.5 Registering with the Viewnetcam.com service 38 2.6 Setting Date and Time 40 2.7 Changing Camera Settings 42 2.8 Changing Authentication Setting and Administrator User Name and Password...
... Operation Bar 15 Setting Home Position/Sensor Position/Preset Button 17 Viewing Multi-Camera page 21 1.4 Viewing Buffered Image page 23 1.4.1 Deleting Buffered Images 24 1.5 Viewing Still Images on Your Mobile Phone 25 2 Various Camera Features 27 2.1 Using Camera Features 27 2.2 Connecting the Camera to Your Network 30 2.3 Using Wireless LAN 34 2.4 Using UPnP (Universal Plug and Play 37 2.5 Registering with the Viewnetcam.com service 38 2.6 Setting Date and Time 40 2.7 Changing Camera Settings 42 2.8 Changing Authentication Setting and Administrator User Name and Password...

Network Camera
Page 7
... Factory Default 86 Support page 87 Seeing Help page 87 Seeing Wireless Help page 88 Seeing Product Information 88 Seeing Support Information 88 FACTORY DEFAULT RESET Button 89 3.4 Default Setting List 90 3.5 3.5.1 3.5.2 3.6 Cleaning 98 Cleaning the Main Unit 98 Cleaning the Lens 98 Setting an IP Address on Your PC 99 3.7 Using Setup Program 100 3.8 3.8.1 3.8.2 3.8.3 3.9 Setting Your PC 103 Setting the Proxy Server Settings on Web Browser 103 Setting UPnP to Display Camera Shortcut in My Network Places ........ 106 Setting the Internet...
... Factory Default 86 Support page 87 Seeing Help page 87 Seeing Wireless Help page 88 Seeing Product Information 88 Seeing Support Information 88 FACTORY DEFAULT RESET Button 89 3.4 Default Setting List 90 3.5 3.5.1 3.5.2 3.6 Cleaning 98 Cleaning the Main Unit 98 Cleaning the Lens 98 Setting an IP Address on Your PC 99 3.7 Using Setup Program 100 3.8 3.8.1 3.8.2 3.8.3 3.9 Setting Your PC 103 Setting the Proxy Server Settings on Web Browser 103 Setting UPnP to Display Camera Shortcut in My Network Places ........ 106 Setting the Internet...
Network Camera
Page 11
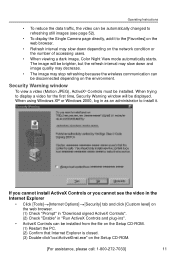
Operating Instructions • To reduce the data traffic, the video can be automatically changed to refreshing still images (see the video in the Internet Explorer • Click [Tools] [Internet Options] [Security] tab and click [Custom level] on the web browser. (1) Check "Prompt" in "Download signed ActiveX Controls". (2) Check "Enable" in as an administrator to install it to display a video for the first time, Security Warning window will be installed. The image will be displayed. When using Windows XP...
Operating Instructions • To reduce the data traffic, the video can be automatically changed to refreshing still images (see the video in the Internet Explorer • Click [Tools] [Internet Options] [Security] tab and click [Custom level] on the web browser. (1) Check "Prompt" in "Download signed ActiveX Controls". (2) Check "Enable" in as an administrator to install it to display a video for the first time, Security Warning window will be installed. The image will be displayed. When using Windows XP...

Network Camera
Page 22
... or the number of accesses, the refresh interval may slow down . Put the cursor on the Network page (see page 14). Then select [Save Picture As...]. Operating Instructions • When viewing video (Motion JPEG), we recommend using the capture image button (see page 33). Enter the administrator's or the general user's user name and password registered for each camera and that the Internet IP address is specified...
... or the number of accesses, the refresh interval may slow down . Put the cursor on the Network page (see page 14). Then select [Save Picture As...]. Operating Instructions • When viewing video (Motion JPEG), we recommend using the capture image button (see page 33). Enter the administrator's or the general user's user name and password registered for each camera and that the Internet IP address is specified...

Network Camera
Page 26
... [Privacy Mode] while setting [Allowing unregistered users] on the Security: Administrator page (see some may not support password authentication. E.g.: The pan reaches the left end. Operating Instructions Notes • If the image is displayed. http:// IP address(or URL):Port Number/mobileh for a mobile phone model list, and the compatibility level which has been verified with Panasonic Network Cameras. "(4)L" disappears. • Some mobile phones are not compatible with the Panasonic Network Camera. • Some mobile phones display images not...
... [Privacy Mode] while setting [Allowing unregistered users] on the Security: Administrator page (see some may not support password authentication. E.g.: The pan reaches the left end. Operating Instructions Notes • If the image is displayed. http:// IP address(or URL):Port Number/mobileh for a mobile phone model list, and the compatibility level which has been verified with Panasonic Network Cameras. "(4)L" disappears. • Some mobile phones are not compatible with the Panasonic Network Camera. • Some mobile phones display images not...
Network Camera
Page 28
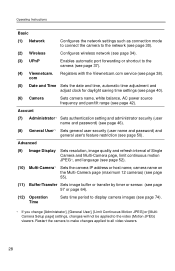
... the Viewnetcam.com service (see page 50). Account (7) Administrator*1 Sets authentication setting and administrator security (user name and password) (see page 46). (8) General User*1 Sets general user security (user name and password) and general user's feature restriction (see page 38). Operating Instructions Basic (1) Network Configures the network settings such as connection mode to connect the camera to the network (see page 30). (2) Wireless Configures wireless network (see page 34). (3) UPnP Enables automatic port forwarding or shortcut to all video viewers. 28
... the Viewnetcam.com service (see page 50). Account (7) Administrator*1 Sets authentication setting and administrator security (user name and password) (see page 46). (8) General User*1 Sets general user security (user name and password) and general user's feature restriction (see page 38). Operating Instructions Basic (1) Network Configures the network settings such as connection mode to connect the camera to the network (see page 30). (2) Wireless Configures wireless network (see page 34). (3) UPnP Enables automatic port forwarding or shortcut to all video viewers. 28
Network Camera
Page 32
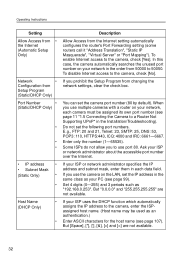
... port number (see page 99). If you prohibit the Setup Program from the Internet setting automatically configures the router's Port Forwarding setting (some routers call it "Address Translation", "Static IP Masquerade", "Virtual Server" or "Port Mapping"). Enter only the number (1-65535). When you to a Router Not Supporting UPnP" in the same class as your network, each data field. To enable Internet access to the camera, check [No]. Some ISPs do not allow you use port...
... port number (see page 99). If you prohibit the Setup Program from the Internet setting automatically configures the router's Port Forwarding setting (some routers call it "Address Translation", "Static IP Masquerade", "Virtual Server" or "Port Mapping"). Enter only the number (1-65535). When you to a Router Not Supporting UPnP" in the same class as your network, each data field. To enable Internet access to the camera, check [No]. Some ISPs do not allow you use port...

Network Camera
Page 33
...: About 18 KB (144 Kbit) Connection Type • Normally, Select [Auto Negotiation]. These are not available. File sizes may change depending on the MultiCamera Setup page • Using the Viewnetcam.com service If you have the assigned DNS server addresses by your ISP or network administrator, enter them in the following file sizes. Operating Instructions Setting Description Default Gateway*1 • (Static/DHCP Only...
...: About 18 KB (144 Kbit) Connection Type • Normally, Select [Auto Negotiation]. These are not available. File sizes may change depending on the MultiCamera Setup page • Using the Viewnetcam.com service If you have the assigned DNS server addresses by your ISP or network administrator, enter them in the following file sizes. Operating Instructions Setting Description Default Gateway*1 • (Static/DHCP Only...

Network Camera
Page 40
Set each parameter. • Clicking [Cancel] cancels your settings without saving changes. 40 Date and time are used for image buffer/transfer, operation time and time stamps on the Setup page. 2. Click [Date and Time] on the buffered image. Operating Instructions 2.6 Setting Date and Time The Date and Time page allows you to set date and time. Note Saving the date and time settings deletes all buffered images. 1.
Set each parameter. • Clicking [Cancel] cancels your settings without saving changes. 40 Date and time are used for image buffer/transfer, operation time and time stamps on the Setup page. 2. Click [Date and Time] on the buffered image. Operating Instructions 2.6 Setting Date and Time The Date and Time page allows you to set date and time. Note Saving the date and time settings deletes all buffered images. 1.

Network Camera
Page 46
... password regularly. • Setting [Permit access from guest users] (permitting access without saving changes. 46 Click [Administrator] on the Setup page. 2. Operating Instructions 2.8 Changing Authentication Setting and Administrator User Name and Password The Security: Administrator page allows you to access the camera. The authentication window is displayed. Notes • If you access the camera for the first time, the window to the camera. Control the contents of a unique User Name and a secret Password. The use of the images...
... password regularly. • Setting [Permit access from guest users] (permitting access without saving changes. 46 Click [Administrator] on the Setup page. 2. Operating Instructions 2.8 Changing Authentication Setting and Administrator User Name and Password The Security: Administrator page allows you to access the camera. The authentication window is displayed. Notes • If you access the camera for the first time, the window to the camera. Control the contents of a unique User Name and a secret Password. The use of the images...
Network Camera
Page 61
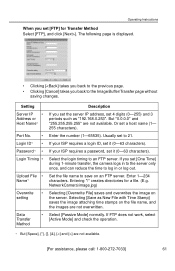
Operating Instructions When you set [FTP] for Transfer Method Select [FTP], and click [Next>]. The following page is displayed. • Clicking [] are not available. [For assistance, please call: 1-800-272-7033] 61
Operating Instructions When you set [FTP] for Transfer Method Select [FTP], and click [Next>]. The following page is displayed. • Clicking [] are not available. [For assistance, please call: 1-800-272-7033] 61
Network Camera
Page 62
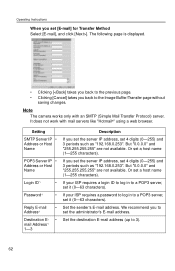
Operating Instructions When you set [E-mail] for Transfer Method Select [E-mail], and click [Next>]. The following page is displayed. • Clicking [
Operating Instructions When you set [E-mail] for Transfer Method Select [E-mail], and click [Next>]. The following page is displayed. • Clicking [

Network Camera
Page 70
Operating Instructions When you set [FTP] for Transfer Method Select [FTP], and click [Next>]. The following page is displayed. • Clicking [] are not available. 70
Operating Instructions When you set [FTP] for Transfer Method Select [FTP], and click [Next>]. The following page is displayed. • Clicking [] are not available. 70
Network Camera
Page 71
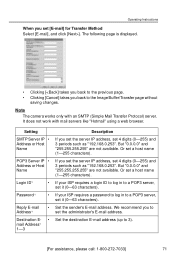
The following page is displayed. • Clicking [ Operating Instructions When you set [E-mail] for Transfer Method Select [E-mail], and click [Next>].
The following page is displayed. • Clicking [ Operating Instructions When you set [E-mail] for Transfer Method Select [E-mail], and click [Next>].

Network Camera
Page 86
.... • All camera settings (user name, password, IP address, subnet mask etc.) are deleted when resetting the camera to [Automatic Setup]. Click [Execute]. • The indicator blinks orange, and then turns off the camera during the reset operation. 86 Reconfigure the camera seeing the Getting Started. Operating Instructions 3.1.7 Resetting the Camera to Factory Default All camera settings are reset to factory default directly after the Execute button is reset to factory default, the network connection mode changes to factory default. • The reset operation takes about 1 minute...
.... • All camera settings (user name, password, IP address, subnet mask etc.) are deleted when resetting the camera to [Automatic Setup]. Click [Execute]. • The indicator blinks orange, and then turns off the camera during the reset operation. 86 Reconfigure the camera seeing the Getting Started. Operating Instructions 3.1.7 Resetting the Camera to Factory Default All camera settings are reset to factory default directly after the Execute button is reset to factory default, the network connection mode changes to factory default. • The reset operation takes about 1 minute...

Network Camera
Page 103
...] 103 Start up Internet Explorer. (The example is Internet Explorer 6.0.) 2. Consult your network administrator before installing the camera. • If the camera is accessed via a proxy server, problems may prevent access to the camera depending in a corporate environment. Consult your ISP or network administrator. How to Set the Proxy Server Settings 1. Operating Instructions 3.8 Setting Your PC 3.8.1 Setting the Proxy Server Settings on Web Browser If the proxy server is not used to protect your web browser must be slow.
...] 103 Start up Internet Explorer. (The example is Internet Explorer 6.0.) 2. Consult your network administrator before installing the camera. • If the camera is accessed via a proxy server, problems may prevent access to the camera depending in a corporate environment. Consult your ISP or network administrator. How to Set the Proxy Server Settings 1. Operating Instructions 3.8 Setting Your PC 3.8.1 Setting the Proxy Server Settings on Web Browser If the proxy server is not used to protect your web browser must be slow.

Network Camera
Page 109
Operating Instructions 3.11 Specifications Network Camera Items Pan/Tilt Angle Number of Pixels Illuminance White Balance Focus Caliber Ratio (F No.) Horizontal Viewing Angle Exposure Specifications Pan: -50 ° to +50 °, Tilt: -40 ° to +10 ° 1/4-inch CMOS Sensor 320,000 pixels 1-10,000 lx Auto/Manual/Hold Fixed 0.5 m (20 inches)-Infinity F2.8 43 ° Auto Other Specifications Items Video Compression Video Resolution Buffered Image*1 Frame rate*2 Supported Protocols Message Transfer Condition Image Transfer Method Specifications JPEG...
Operating Instructions 3.11 Specifications Network Camera Items Pan/Tilt Angle Number of Pixels Illuminance White Balance Focus Caliber Ratio (F No.) Horizontal Viewing Angle Exposure Specifications Pan: -50 ° to +50 °, Tilt: -40 ° to +10 ° 1/4-inch CMOS Sensor 320,000 pixels 1-10,000 lx Auto/Manual/Hold Fixed 0.5 m (20 inches)-Infinity F2.8 43 ° Auto Other Specifications Items Video Compression Video Resolution Buffered Image*1 Frame rate*2 Supported Protocols Message Transfer Condition Image Transfer Method Specifications JPEG...


