Operating Instructions
Page 1
Operating Instructions Operating Instructions Network Camera Recorder with Viewer Software Model No. BB-HNP15A Please read this document before using and save this document for future reference. 1
Operating Instructions Operating Instructions Network Camera Recorder with Viewer Software Model No. BB-HNP15A Please read this document before using and save this document for future reference. 1
Operating Instructions
Page 2
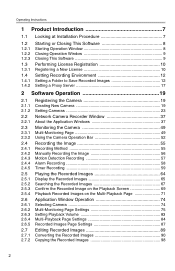
... 12 Setting a Folder to Save Recorded Images 12 Setting a Proxy Server 17 2 Software Operation 19 2.1 2.1.1 2.1.2 2.2 2.2.1 2.3 2.3.1 2.3.2 2.4 2.4.1 2.4.2 2.4.3 2.4.4 2.4.5 2.5 2.5.1 2.5.2 2.5.3 2.5.4 2.6 2.6.1 2.6.2 2.6.3 2.6.4 2.6.5 2.7 2.7.1 2.7.2 Registering the Camera 19 Creating New Camera 19 Setting Cameras 23 Network Camera Recorder Window 37 About the Application Windows 37 Monitoring the Camera 49 Multi-Monitoring Page 49 Using the Camera Operation Bar 52 Recording the Image 55 Recording Method 55 Manually Recording the...
... 12 Setting a Folder to Save Recorded Images 12 Setting a Proxy Server 17 2 Software Operation 19 2.1 2.1.1 2.1.2 2.2 2.2.1 2.3 2.3.1 2.3.2 2.4 2.4.1 2.4.2 2.4.3 2.4.4 2.4.5 2.5 2.5.1 2.5.2 2.5.3 2.5.4 2.6 2.6.1 2.6.2 2.6.3 2.6.4 2.6.5 2.7 2.7.1 2.7.2 Registering the Camera 19 Creating New Camera 19 Setting Cameras 23 Network Camera Recorder Window 37 About the Application Windows 37 Monitoring the Camera 49 Multi-Monitoring Page 49 Using the Camera Operation Bar 52 Recording the Image 55 Recording Method 55 Manually Recording the...

Operating Instructions
Page 3
Operating Instructions 2.7.3 2.7.4 2.7.5 2.7.6 2.8 2.8.1 2.9 2.9.1 2.9.2 2.9.3 2.9.4 2.9.5 2.9.6 2.9.7 2.10 2.11 2.12 2.13 Deleting the Recorded Images 100 Changing the Keyword of the Recorded Images 101 Copying Display Screens 102 Displaying the Recorded Image Information 104 Use Remote Access Functions 105 Configuring the Settings 107 Other Features 117 Audio Transmission 117 Exporting/Importing the Camera Information 118 Copying Camera... Images 120 Deleting the Registered Cameras from the List 121 ...
Operating Instructions 2.7.3 2.7.4 2.7.5 2.7.6 2.8 2.8.1 2.9 2.9.1 2.9.2 2.9.3 2.9.4 2.9.5 2.9.6 2.9.7 2.10 2.11 2.12 2.13 Deleting the Recorded Images 100 Changing the Keyword of the Recorded Images 101 Copying Display Screens 102 Displaying the Recorded Image Information 104 Use Remote Access Functions 105 Configuring the Settings 107 Other Features 117 Audio Transmission 117 Exporting/Importing the Camera Information 118 Copying Camera... Images 120 Deleting the Registered Cameras from the List 121 ...
Operating Instructions
Page 4
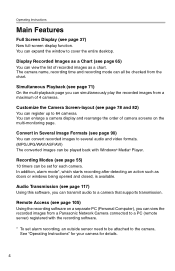
... be checked from a Panasonic Network Camera connected to a PC (remote server) registered with Windows® Media® Player. You can convert recorded images to cover the entire desktop. Operating Instructions Main Features Full Screen Display (see page 117) Using this software, you can view the... recorded images from the chart. Customize the Camera Screen-layout (see page 105) Using the recording software on the multi-monitoring page. ...
... be checked from a Panasonic Network Camera connected to a PC (remote server) registered with Windows® Media® Player. You can convert recorded images to cover the entire desktop. Operating Instructions Main Features Full Screen Display (see page 117) Using this software, you can view the... recorded images from the chart. Customize the Camera Screen-layout (see page 105) Using the recording software on the multi-monitoring page. ...

Operating Instructions
Page 5
The screens displayed when using a different operating system may differ slightly. Trademarks • Microsoft, Windows, Windows Vista, Internet Explorer, and ... reprinted with permission from Microsoft Corporation. • All other trademarks identified herein are the property of their respective owners. 5 Operating Instructions Screen shots in this document Screen shots in the United States and other countries. • ATI Radeon is registered trademark or... registered trademarks of Intel Corporation or its subsidiaries in this document were taken running this software on Windows XP.
The screens displayed when using a different operating system may differ slightly. Trademarks • Microsoft, Windows, Windows Vista, Internet Explorer, and ... reprinted with permission from Microsoft Corporation. • All other trademarks identified herein are the property of their respective owners. 5 Operating Instructions Screen shots in this document Screen shots in the United States and other countries. • ATI Radeon is registered trademark or... registered trademarks of Intel Corporation or its subsidiaries in this document were taken running this software on Windows XP.
Operating Instructions
Page 6
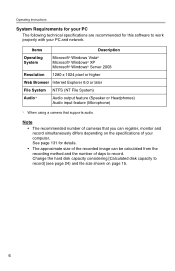
...131 for this software to work properly with your computer. Note • The recommended number of days to record. Operating Instructions System Requirements for your PC The following technical specifications are recommended for details. • The approximate size of your PC and network. Items Description Operating System Microsoft®... NTFS (NT File System) Audio*1 Audio output feature (Speaker or Headphones) Audio input feature (Microphone) *1 When using a camera that you can be calculated from the recording method and the number of cameras that supports audio.
...131 for this software to work properly with your computer. Note • The recommended number of days to record. Operating Instructions System Requirements for your PC The following technical specifications are recommended for details. • The approximate size of your PC and network. Items Description Operating System Microsoft®... NTFS (NT File System) Audio*1 Audio output feature (Speaker or Headphones) Audio input feature (Microphone) *1 When using a camera that you can be calculated from the recording method and the number of cameras that supports audio.

Operating Instructions
Page 7
Playing the recorded images (see page 49). Monitoring the camera (see page 64). 7 You cannot install this software if you disagree. (The legal agreement is necessary. (The attached registration code stickers are required.) Setting Recording Environment (see page 55). Operating Instructions 1 Product Introduction 1.1 Looking at Installation Procedure You must perform the following steps to save...
Playing the recorded images (see page 49). Monitoring the camera (see page 64). 7 You cannot install this software if you disagree. (The legal agreement is necessary. (The attached registration code stickers are required.) Setting Recording Environment (see page 55). Operating Instructions 1 Product Introduction 1.1 Looking at Installation Procedure You must perform the following steps to save...
Operating Instructions
Page 8
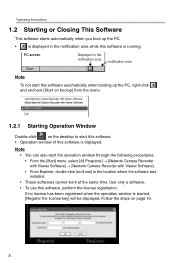
... while this software is displayed. Operating Instructions 1.2 Starting or Closing This Software This software starts automatically when you boot up the PC, right-click and uncheck [Start on bootup] from the menu. 1.2.1 Starting Operation Window Double...Network Camera Recorder with Viewer Software] → [Network Camera Recorder with Viewer Software]. • From Explorer, double-click [ncr3.exe] in the notification area. Follow the steps on the desktop to start this software. • Operation window of this software is running. Use only a software. • To use this software...
... while this software is displayed. Operating Instructions 1.2 Starting or Closing This Software This software starts automatically when you boot up the PC, right-click and uncheck [Start on bootup] from the menu. 1.2.1 Starting Operation Window Double...Network Camera Recorder with Viewer Software] → [Network Camera Recorder with Viewer Software]. • From Explorer, double-click [ncr3.exe] in the notification area. Follow the steps on the desktop to start this software. • Operation window of this software is running. Use only a software. • To use this software...

Operating Instructions
Page 9
1.2.2 Closing Operation Window Click [File] [Exit] on the menu bar or select Operating Instructions on the toolbar. will be removed from the notification area. • When you exit this software, any timers that you have set stop operating. 9 Right-click in the notification area, the timer recording function is closed, notification area. Note Even when the operation window is operating. 1.2.3 Closing This Software 1. Note • When you exit this software, will not be removed from the When is displayed in the notification area and select [Exit]. 2. Click [Yes].
1.2.2 Closing Operation Window Click [File] [Exit] on the menu bar or select Operating Instructions on the toolbar. will be removed from the notification area. • When you exit this software, any timers that you have set stop operating. 9 Right-click in the notification area, the timer recording function is closed, notification area. Note Even when the operation window is operating. 1.2.3 Closing This Software 1. Note • When you exit this software, will not be removed from the When is displayed in the notification area and select [Exit]. 2. Click [Yes].

Operating Instructions
Page 10
Click [OK]. Characters are shown on the menu bar. 2. Enter the registration code and license key, and click [OK]. 3. Follow the steps below. 1.3.1 Registering a New License 1. Operating Instructions 1.3 Performing License Registration If no license has been registered when the operation window is started, [Register the license key] will be displayed. Select [Help] [License Registration] on the attached registration code stickers. Note The registration code and license key are case sensitive, so enter them exactly as printed. 10
Click [OK]. Characters are shown on the menu bar. 2. Enter the registration code and license key, and click [OK]. 3. Follow the steps below. 1.3.1 Registering a New License 1. Operating Instructions 1.3 Performing License Registration If no license has been registered when the operation window is started, [Register the license key] will be displayed. Select [Help] [License Registration] on the attached registration code stickers. Note The registration code and license key are case sensitive, so enter them exactly as printed. 10

Operating Instructions
Page 11
Operating Instructions Note If the registration is complete, [License Registration] on the menu bar is incorrect. Confirm them, and enter them again. • Keep the registration code and license key in a safe place where you will not lose them. Note • If the following window is displayed, the registration code or license key is grayed out. Lost codes and keys cannot be reissued. 11
Operating Instructions Note If the registration is complete, [License Registration] on the menu bar is incorrect. Confirm them, and enter them again. • Keep the registration code and license key in a safe place where you will not lose them. Note • If the following window is displayed, the registration code or license key is grayed out. Lost codes and keys cannot be reissued. 11

Operating Instructions
Page 12
...; If the destination folder is not specified, the recorded images are saved into the [ncrdata] folder in the folder where this software is displayed on your PC. The setting is displayed. 3. See page 44 for the item that you click [OK] or ...the menu bar. 2. Select [Window] [Settings] on the settings icons. 12 Note When you changed . Operating Instructions 1.4 Setting Recording Environment 1.4.1 Setting a Folder to Save Recorded Images This software records camera images to another folder or external hard disk drives. 1. Click [Preferences]. The folder can change a setting...
...; If the destination folder is not specified, the recorded images are saved into the [ncrdata] folder in the folder where this software is displayed on your PC. The setting is displayed. 3. See page 44 for the item that you click [OK] or ...the menu bar. 2. Select [Window] [Settings] on the settings icons. 12 Note When you changed . Operating Instructions 1.4 Setting Recording Environment 1.4.1 Setting a Folder to Save Recorded Images This software records camera images to another folder or external hard disk drives. 1. Click [Preferences]. The folder can change a setting...
Operating Instructions
Page 13
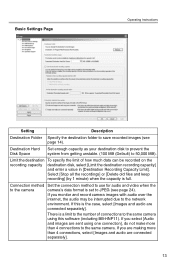
... more than 4 connections to the network environment. There is set to save recorded images (see page 24). If you select [Audio and images are sent using this is full. If this software (including BB-HNP11). If you monitor and record camera images with audio over the internet... method to use for audio and video when the to the camera camera's data format is a limit to the number of how much data can be interrupted due to the same camera. Basic Settings Page Operating Instructions Setting Description Destination Folder Specify the destination folder to JPEG (see...
... more than 4 connections to the network environment. There is set to save recorded images (see page 24). If you select [Audio and images are sent using this is full. If this software (including BB-HNP11). If you monitor and record camera images with audio over the internet... method to use for audio and video when the to the camera camera's data format is a limit to the number of how much data can be interrupted due to the same camera. Basic Settings Page Operating Instructions Setting Description Destination Folder Specify the destination folder to JPEG (see...

Operating Instructions
Page 14
Operating Instructions Note • If you select [Delete old files and keep recording] and change the destination recording capacity limit to a value smaller than the current capacity, ... limit to 2 GB when you recorded images up to 3 GB, 1 GB old images are deleted.) • You can also limit the recording capacity of individual cameras (see page 13). 2. Change the destination folder 1. Select the destination folder, and click [OK]. • Create the folder in the [Basic Settings] page (see page...
Operating Instructions Note • If you select [Delete old files and keep recording] and change the destination recording capacity limit to a value smaller than the current capacity, ... limit to 2 GB when you recorded images up to 3 GB, 1 GB old images are deleted.) • You can also limit the recording capacity of individual cameras (see page 13). 2. Change the destination folder 1. Select the destination folder, and click [OK]. • Create the folder in the [Basic Settings] page (see page...

Operating Instructions
Page 15
D:/Camera Recorder_HNP15/HNP15_Images under 128 characters • File sizes of recorded images listed below can be used as a baseline. [1 frame size (Image only)] Data format: JPEG ... order to behave unexpectedly. • The path of free space. • Do not move, change or delete the files and folders in the destination folder. Operating Instructions Note • The drive containing the destination folder must have more than 100 MB of the destination folder must be calculated by Size (KB) x Frame...
D:/Camera Recorder_HNP15/HNP15_Images under 128 characters • File sizes of recorded images listed below can be used as a baseline. [1 frame size (Image only)] Data format: JPEG ... order to behave unexpectedly. • The path of free space. • Do not move, change or delete the files and folders in the destination folder. Operating Instructions Note • The drive containing the destination folder must have more than 100 MB of the destination folder must be calculated by Size (KB) x Frame...

Operating Instructions
Page 16
Example: 640 x 480 resolution, MPEG-4 Bit Rate 768 Kbps for one hour: 768 (Kbps) ÷ 8 (Bit) x 3,600 (s) = 345,600 KB (337.5 MB) If the audio is attached, add 4 KB per second. 345,600 (KB) + 4 (KB) x 3,600 (s) = 360,000 KB (About 352 MB) * The MPEG-4 Bit Rate is dependent on the value of "MPEG-4 Bit Rate" in "Video Streaming" in the camera settings. 16 Operating Instructions • Recording capacity can be calculated by MPEG-4 Bit Rate (Kbps) ÷ 8 Bit x time (second).
Example: 640 x 480 resolution, MPEG-4 Bit Rate 768 Kbps for one hour: 768 (Kbps) ÷ 8 (Bit) x 3,600 (s) = 345,600 KB (337.5 MB) If the audio is attached, add 4 KB per second. 345,600 (KB) + 4 (KB) x 3,600 (s) = 360,000 KB (About 352 MB) * The MPEG-4 Bit Rate is dependent on the value of "MPEG-4 Bit Rate" in "Video Streaming" in the camera settings. 16 Operating Instructions • Recording capacity can be calculated by MPEG-4 Bit Rate (Kbps) ÷ 8 Bit x time (second).

Operating Instructions
Page 17
Operating Instructions 1.4.2 Setting a Proxy Server You need to configure proxy server settings for all registered cameras is not required. 1. Check [Use a proxy server] on the menu bar. 2. Click [Yes]. • If you select the [Use a proxy server] checkbox. 4. Click [Preferences] [Proxy ... the proxy settings.) If you do not use a proxy server, this setting is selected. (However, a check mark will not be displayed for cameras registered with an IPv6 address.) Click [No] if you want to set the following confirmation window will display when you click [Yes], the [Use a proxy ...
Operating Instructions 1.4.2 Setting a Proxy Server You need to configure proxy server settings for all registered cameras is not required. 1. Check [Use a proxy server] on the menu bar. 2. Click [Yes]. • If you select the [Use a proxy server] checkbox. 4. Click [Preferences] [Proxy ... the proxy settings.) If you do not use a proxy server, this setting is selected. (However, a check mark will not be displayed for cameras registered with an IPv6 address.) Click [No] if you want to set the following confirmation window will display when you click [Yes], the [Use a proxy ...

Operating Instructions
Page 18
... • Proxy server does not support IPv6 connection. In this case, the camera's image is displayed as a connection error (default is not displayed with a proxy server error. Note Normally when the camera cannot access a proxy server, an error message is displayed (see page 80... there are cases when an error message is blue; Enter them after asking your administrator. • Enter the alphanumeric characters. Operating Instructions 5. Proxy Server Settings Page Setting Proxy Server Address and Port Proxy User Name and Proxy Password Description Enter the IP address of...
... • Proxy server does not support IPv6 connection. In this case, the camera's image is displayed as a connection error (default is not displayed with a proxy server error. Note Normally when the camera cannot access a proxy server, an error message is displayed (see page 80... there are cases when an error message is blue; Enter them after asking your administrator. • Enter the alphanumeric characters. Operating Instructions 5. Proxy Server Settings Page Setting Proxy Server Address and Port Proxy User Name and Proxy Password Description Enter the IP address of...
Operating Instructions
Page 19
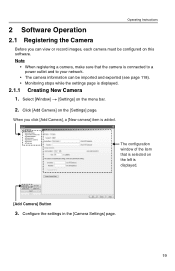
Operating Instructions 2 Software Operation 2.1 Registering the Camera Before you click [Add Camera], a [New camera] item is added. Select [Window] [Settings] on the [Settings] page. The configuration window of the item that the camera is connected to a power outlet and to your network. • The camera information can view or record images, each camera must be imported and exported (see page 118). •...
Operating Instructions 2 Software Operation 2.1 Registering the Camera Before you click [Add Camera], a [New camera] item is added. Select [Window] [Settings] on the [Settings] page. The configuration window of the item that the camera is connected to a power outlet and to your network. • The camera information can view or record images, each camera must be imported and exported (see page 118). •...

Operating Instructions
Page 20
... were changed automatically, and a mark will be displayed on the [OK], [Apply], and [Cancel] buttons. • The default camera name is generated automatically. Default values are displayed. Click[OK]or[Apply]. • If you click [OK], settings page will be... displayed in the multi-monitoring page. Click [Camera Function Check]. • When the check has finished, [Confirmed] is displayed. • The software will connect to register another camera, click [Apply]. • The new camera will close. Operating Instructions 4.
... were changed automatically, and a mark will be displayed on the [OK], [Apply], and [Cancel] buttons. • The default camera name is generated automatically. Default values are displayed. Click[OK]or[Apply]. • If you click [OK], settings page will be... displayed in the multi-monitoring page. Click [Camera Function Check]. • When the check has finished, [Confirmed] is displayed. • The software will connect to register another camera, click [Apply]. • The new camera will close. Operating Instructions 4.


