Operating Instructions
Page 2
... New Camera 19 Setting Cameras 23 Network Camera Recorder Window 37 About the Application Windows 37 Monitoring the Camera 49 Multi-Monitoring Page 49 Using the Camera Operation Bar 52 Recording the Image 55 Recording Method 55 Manually Recording the Image 56 Motion Detection Recording 57 Alarm Recording 58 Timer Recording 59 Playing the Recorded Images 64 Display the Recorded Images 65 Searching the Recorded Images 67 Confirm the Recorded Image on the Playback Screen 69 Playback Recorded Images on the Multi-Playback Page 71 Application Window Operation 74 Selecting Camera...
... New Camera 19 Setting Cameras 23 Network Camera Recorder Window 37 About the Application Windows 37 Monitoring the Camera 49 Multi-Monitoring Page 49 Using the Camera Operation Bar 52 Recording the Image 55 Recording Method 55 Manually Recording the Image 56 Motion Detection Recording 57 Alarm Recording 58 Timer Recording 59 Playing the Recorded Images 64 Display the Recorded Images 65 Searching the Recorded Images 67 Confirm the Recorded Image on the Playback Screen 69 Playback Recorded Images on the Multi-Playback Page 71 Application Window Operation 74 Selecting Camera...
Operating Instructions
Page 4
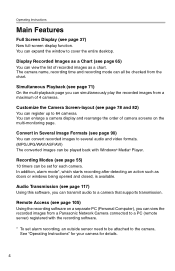
... recording software. * To set for details. 4 The camera name, recording time and recording mode can register up to the camera. Remote Access (see page 78 and 82) You can all be set alarm recording, an outside sensor need to be attached to 64 cameras. Audio Transmission (see page 71) On the multi-playback page you can simultaneously play the recorded images from a Panasonic Network Camera connected to cover the entire desktop. Customize the Camera Screen...
... recording software. * To set for details. 4 The camera name, recording time and recording mode can register up to the camera. Remote Access (see page 78 and 82) You can all be set alarm recording, an outside sensor need to be attached to 64 cameras. Audio Transmission (see page 71) On the multi-playback page you can simultaneously play the recorded images from a Panasonic Network Camera connected to cover the entire desktop. Customize the Camera Screen...
Operating Instructions
Page 6
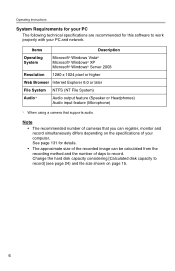
... this software to work properly with your computer. Change the hard disk capacity considering [Calculated disk capacity to record. Items Description Operating System Microsoft® Windows Vista® Microsoft® Windows® XP Microsoft® Windows® Server 2003 Resolution 1280 x 1024 pixel or higher Web Browser Internet Explorer 6.0 or later File System NTFS (NT File System) Audio*1 Audio output feature (Speaker or Headphones) Audio input feature (Microphone) *1 When using a camera that...
... this software to work properly with your computer. Change the hard disk capacity considering [Calculated disk capacity to record. Items Description Operating System Microsoft® Windows Vista® Microsoft® Windows® XP Microsoft® Windows® Server 2003 Resolution 1280 x 1024 pixel or higher Web Browser Internet Explorer 6.0 or later File System NTFS (NT File System) Audio*1 Audio output feature (Speaker or Headphones) Audio input feature (Microphone) *1 When using a camera that...

Operating Instructions
Page 7
... 10). Operating Instructions 1 Product Introduction 1.1 Looking at Installation Procedure You must perform the following steps to save recorded images. • Setting the proxy server when using one. Performing License Registration (see page 19). Monitoring the camera (see page 64). 7 Playing the recorded images (see page 49). Recording the image (see attached leaflet). Read the End-User License Agreement (see page 55). You cannot install this software if...
... 10). Operating Instructions 1 Product Introduction 1.1 Looking at Installation Procedure You must perform the following steps to save recorded images. • Setting the proxy server when using one. Performing License Registration (see page 19). Monitoring the camera (see page 64). 7 Playing the recorded images (see page 49). Recording the image (see attached leaflet). Read the End-User License Agreement (see page 55). You cannot install this software if...
Operating Instructions
Page 8
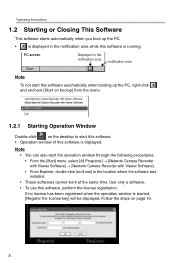
... area Start Note To not start the operation window through the following procedures. • From the [Start] menu, select [All Programs] → [Network Camera Recorder with Viewer Software] → [Network Camera Recorder with Viewer Software]. • From Explorer, double-click [ncr3.exe] in the location where the software was installed. • These softwares cannot work at the same time. Operating Instructions 1.2 Starting or Closing This Software This software starts automatically when you boot up...
... area Start Note To not start the operation window through the following procedures. • From the [Start] menu, select [All Programs] → [Network Camera Recorder with Viewer Software] → [Network Camera Recorder with Viewer Software]. • From Explorer, double-click [ncr3.exe] in the location where the software was installed. • These softwares cannot work at the same time. Operating Instructions 1.2 Starting or Closing This Software This software starts automatically when you boot up...

Operating Instructions
Page 12
... in the [Basic Settings] page and click [OK]. See page 44 for the item that you click [Preferences], the [Basic Settings] page is installed. • You can be changed the destination folder, the recorded images will be saved in the folder that you changed. Select [Window] [Settings] on your PC. Operating Instructions 1.4 Setting Recording Environment 1.4.1 Setting a Folder to Save Recorded Images This software records camera images to another folder or...
... in the [Basic Settings] page and click [OK]. See page 44 for the item that you click [Preferences], the [Basic Settings] page is installed. • You can be changed the destination folder, the recorded images will be saved in the folder that you changed. Select [Window] [Settings] on your PC. Operating Instructions 1.4 Setting Recording Environment 1.4.1 Setting a Folder to Save Recorded Images This software records camera images to another folder or...

Operating Instructions
Page 18
... there are cases when an error message is not displayed with a proxy server error. Enter the user name and password for port number.) • Proxy server does not support IPv6 connection. Note Normally when the camera cannot access a proxy server, an error message is blue; Set the parameters and click [OK]. Operating Instructions 5. Proxy Server Settings Page Setting Proxy Server Address and Port Proxy User Name and Proxy Password Description Enter the IP address of proxy server and port number.
... there are cases when an error message is not displayed with a proxy server error. Enter the user name and password for port number.) • Proxy server does not support IPv6 connection. Note Normally when the camera cannot access a proxy server, an error message is blue; Set the parameters and click [OK]. Operating Instructions 5. Proxy Server Settings Page Setting Proxy Server Address and Port Proxy User Name and Proxy Password Description Enter the IP address of proxy server and port number.
Operating Instructions
Page 19
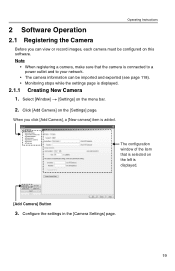
... connected to a power outlet and to your network. • The camera information can view or record images, each camera must be imported and exported (see page 118). • Monitoring stops while the settings page is displayed. 2.1.1 Creating New Camera 1. Note • When registering a camera, make sure that is selected on this software. Operating Instructions 2 Software Operation 2.1 Registering the Camera Before you click [Add Camera], a [New camera] item is displayed. [Add Camera] Button 3. When you can be configured...
... connected to a power outlet and to your network. • The camera information can view or record images, each camera must be imported and exported (see page 118). • Monitoring stops while the settings page is displayed. 2.1.1 Creating New Camera 1. Note • When registering a camera, make sure that is selected on this software. Operating Instructions 2 Software Operation 2.1 Registering the Camera Before you click [Add Camera], a [New camera] item is displayed. [Add Camera] Button 3. When you can be configured...

Operating Instructions
Page 22
... server] in encryption. If the camera uses a proxy server, configure the proxy server settings and select [Use a proxy server]. Consecutive groups of hexadecimal digits divided by the IP address to distinguish it from an IPv4 address. Port Enter the port number. (1 to [Use HTTPS]. When connecting the camera through https, set a general or unregistered user name and password, this software may not work properly. • Password is 80. The default is saved in the proxy server settings...
... server] in encryption. If the camera uses a proxy server, configure the proxy server settings and select [Use a proxy server]. Consecutive groups of hexadecimal digits divided by the IP address to distinguish it from an IPv4 address. Port Enter the port number. (1 to [Use HTTPS]. When connecting the camera through https, set a general or unregistered user name and password, this software may not work properly. • Password is 80. The default is saved in the proxy server settings...

Operating Instructions
Page 24
...], [Display the error message if the program does not work in the specified frequency] will be displayed. 24 To reduce CPU usage, select [Specify the frame rate] from [Preferences] → [Multi-monitoring], and set to [Not Specify]. Select the resolution of the image. Operating Instructions Setting Data Format Image Quality Audio Recording Settings Resolution Recorded Frequency Calculated disk capacity to record Description Select the data format for the camera. [JPEG (Default...
...], [Display the error message if the program does not work in the specified frequency] will be displayed. 24 To reduce CPU usage, select [Specify the frame rate] from [Preferences] → [Multi-monitoring], and set to [Not Specify]. Select the resolution of the image. Operating Instructions Setting Data Format Image Quality Audio Recording Settings Resolution Recorded Frequency Calculated disk capacity to record Description Select the data format for the camera. [JPEG (Default...
Operating Instructions
Page 47
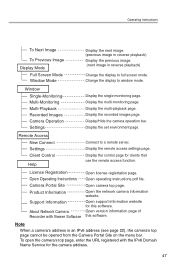
...Remote Access New Connect Settings Client Control Help Connect to a remote server. Open version information page of this software. Window Single-Monitoring Multi-Monitoring Multi-Playback Recorded Images Camera Operation Settings Display the single-monitoring page. Display the set environment page. License Registration Open Operating Instructions Camera Portal Site Product Information Support Information About Network Camera Recorder with the IPv6 Domain Name Service for the camera address. 47 To open the camera's top page, enter the URL registered with Viewer Software...
...Remote Access New Connect Settings Client Control Help Connect to a remote server. Open version information page of this software. Window Single-Monitoring Multi-Monitoring Multi-Playback Recorded Images Camera Operation Settings Display the single-monitoring page. Display the set environment page. License Registration Open Operating Instructions Camera Portal Site Product Information Support Information About Network Camera Recorder with the IPv6 Domain Name Service for the camera address. 47 To open the camera's top page, enter the URL registered with Viewer Software...

Operating Instructions
Page 52
... multi-monitoring page to select the white balance of the camera ([Auto i Balance *2 (Default)], [Indoor], [Fluorescent (White)], [Fluorescent (Daylight)], [Outdoor], [Hold]). Refresh The latest registered buttons are connected to the original position. Pan ( : Left, : Right), Position *1 Tilt ( : Up, : Down) and Home Position ( : Center) e e. White Allows you cannot control their features. *2 If the camera disables their controls, they may be unable to change the brightness of the displayed g image. k. Select [Window] [Camera Operation] on the camera's settings page...
... multi-monitoring page to select the white balance of the camera ([Auto i Balance *2 (Default)], [Indoor], [Fluorescent (White)], [Fluorescent (Daylight)], [Outdoor], [Hold]). Refresh The latest registered buttons are connected to the original position. Pan ( : Left, : Right), Position *1 Tilt ( : Up, : Down) and Home Position ( : Center) e e. White Allows you cannot control their features. *2 If the camera disables their controls, they may be unable to change the brightness of the displayed g image. k. Select [Window] [Camera Operation] on the camera's settings page...
Operating Instructions
Page 53
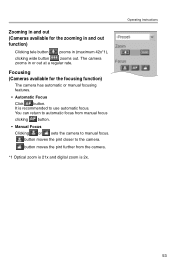
... from manual focus clicking button. • Manual Focus Clicking or sets the camera to automatic focus from the camera. *1 Optical zoom is 21x and digital zoom is recommended to the camera. It is 2x. button moves the pint closer to use automatic focus. Operating Instructions 53 The camera zooms in or out at a regular rate. Focusing (Cameras available for the zooming in and out function) Clicking tele button zooms in (maximum 42x*1), clicking wide button zooms out...
... from manual focus clicking button. • Manual Focus Clicking or sets the camera to automatic focus from the camera. *1 Optical zoom is 21x and digital zoom is recommended to the camera. It is 2x. button moves the pint closer to use automatic focus. Operating Instructions 53 The camera zooms in or out at a regular rate. Focusing (Cameras available for the zooming in and out function) Clicking tele button zooms in (maximum 42x*1), clicking wide button zooms out...
Operating Instructions
Page 105
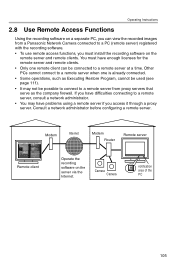
...; You may not be connected to a remote server from proxy servers that serve as the company firewall. If you have problems using a remote server if you access it through a proxy server. Modem Internet Modem Router Remote server Remote client Operate the recording software on the server via the Internet. Consult a network administrator before configuring a remote server. Operating Instructions 2.8 Use Remote Access Functions Using the recording software on a separate PC, you can be possible to connect to a remote server at a time. Camera Camera notification area of the PC...
...; You may not be connected to a remote server from proxy servers that serve as the company firewall. If you have problems using a remote server if you access it through a proxy server. Modem Internet Modem Router Remote server Remote client Operate the recording software on the server via the Internet. Consult a network administrator before configuring a remote server. Operating Instructions 2.8 Use Remote Access Functions Using the recording software on a separate PC, you can be possible to connect to a remote server at a time. Camera Camera notification area of the PC...
Operating Instructions
Page 106
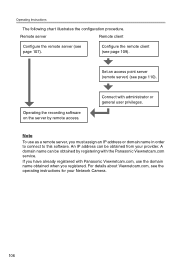
Set an access point server (remote server) (see page 109). Configure the remote client (see page 110). A domain name can be obtained by remote access. If you have already registered with Panasonic Viewnetcam.com, use as a remote server, you registered. Operating the recording software on the server by registering with administrator or general user privileges. Connect with the Panasonic Viewnetcam.com service. Note To use the domain name obtained when you must assign...
Set an access point server (remote server) (see page 109). Configure the remote client (see page 110). A domain name can be obtained by remote access. If you have already registered with Panasonic Viewnetcam.com, use as a remote server, you registered. Operating the recording software on the server by registering with administrator or general user privileges. Connect with the Panasonic Viewnetcam.com service. Note To use the domain name obtained when you must assign...

Operating Instructions
Page 108
... characters). • User Name/User Password Enter the user name and password to use for general user privileges (4 to 65535, except for port forwarding. Server Settings • Port Enter a port number. (Enter a number from 1 to 15 alphanumeric characters). For details on configuring port forwarding, see page 111). • You cannot use remote access until you configure the administrator or general user settings. • Clear the [Use Remote Access Connection] check box to use remote access via the Internet, configure a port for 10081. Operating Instructions 4. Note •...
... characters). • User Name/User Password Enter the user name and password to use for general user privileges (4 to 65535, except for port forwarding. Server Settings • Port Enter a port number. (Enter a number from 1 to 15 alphanumeric characters). For details on configuring port forwarding, see page 111). • You cannot use remote access until you configure the administrator or general user settings. • Clear the [Use Remote Access Connection] check box to use remote access via the Internet, configure a port for 10081. Operating Instructions 4. Note •...
Operating Instructions
Page 131
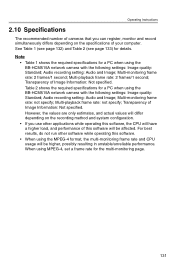
... the required specifications for a PC when using the BB-HCM515A network camera with the following settings: Image quality: Standard; For best results, do not run other applications while operating this software, the CPU will differ depending on the recording method and system configuration. • If you can register, monitor and record simultaneously differs depending on the specifications of this software. • When using MPEG-4, set a frame rate...
... the required specifications for a PC when using the BB-HCM515A network camera with the following settings: Image quality: Standard; For best results, do not run other applications while operating this software, the CPU will differ depending on the recording method and system configuration. • If you can register, monitor and record simultaneously differs depending on the specifications of this software. • When using MPEG-4, set a frame rate...

Operating Instructions
Page 138
... user name and password of the IPv4 domain name service. → Follow the instruction message. Do you apply the proxy settings to keep → Check the address and port number of the frames when enlarging an image frame. → Follow the instruction message. 138 All frames cannot be displayed.) → Follow the instruction message. But IPv6 address cameras are excepted. • You checked [Use a proxy server...
... user name and password of the IPv4 domain name service. → Follow the instruction message. Do you apply the proxy settings to keep → Check the address and port number of the frames when enlarging an image frame. → Follow the instruction message. 138 All frames cannot be displayed.) → Follow the instruction message. But IPv6 address cameras are excepted. • You checked [Use a proxy server...

Operating Instructions
Page 141
Do you save them? Enter the correct user name and password, and try again. To use a proxy server to the IPv6 camera address. Operating Instructions Message Cause and Remedy Connection to the camera cannot • The camera cannot be incorrect. number, proxy settings may be accessed. port number, or proxy settings may be accessed. Image Settings If using the MPEG-4 format, the recording frequency setting, motion detection recording and alarm/sensor recording are unavailable because the functions of the...
Do you save them? Enter the correct user name and password, and try again. To use a proxy server to the IPv6 camera address. Operating Instructions Message Cause and Remedy Connection to the camera cannot • The camera cannot be incorrect. number, proxy settings may be accessed. port number, or proxy settings may be accessed. Image Settings If using the MPEG-4 format, the recording frequency setting, motion detection recording and alarm/sensor recording are unavailable because the functions of the...

Operating Instructions
Page 157
... Instructions Items Default Recorded Images Recording mode colors for graphics on the Recorded Images, Multi-Playback, and Timer List Pages Normal Recording Light Green (RGB(0.255.0)) Motion Detection Recording Yellow (RGB(255.255.0)) Alarm/Sensor Recording Red (RGB(255.0.0)) Playback Options Play automatically Playing List All Navigation Display unit Recorded Time [h] Operation Support Execute Restore Program Restoration Target Folder Destination Folder Delete all images from the deleted camera. After finishing restoration, exit this program and start the Network Camera...
... Instructions Items Default Recorded Images Recording mode colors for graphics on the Recorded Images, Multi-Playback, and Timer List Pages Normal Recording Light Green (RGB(0.255.0)) Motion Detection Recording Yellow (RGB(255.255.0)) Alarm/Sensor Recording Red (RGB(255.0.0)) Playback Options Play automatically Playing List All Navigation Display unit Recorded Time [h] Operation Support Execute Restore Program Restoration Target Folder Destination Folder Delete all images from the deleted camera. After finishing restoration, exit this program and start the Network Camera...


