Memory Card Camcorder
Page 6
... times 27 Remove the P2 card 28 Basic shooting operations (Cassette tape 29 Preparing to shoot using a tape 29 Shooting in auto mode 29 Checking scenes taken (REC CHECK 30 6 Remove the cassette tape 30 Cassette tapes 31 Using SD memory cards 32 Installing and removing the SD memory card . 32... scan 51 Switching Audio Input 52 Using the built-in microphone 52 Using another microphone and audio equipment 52 Adjusting the recording level 53 Using scene files 54 Changing scene file settings 54 Saving scene files and other settings on SD memory cards 56 Clip metadata 57
... times 27 Remove the P2 card 28 Basic shooting operations (Cassette tape 29 Preparing to shoot using a tape 29 Shooting in auto mode 29 Checking scenes taken (REC CHECK 30 6 Remove the cassette tape 30 Cassette tapes 31 Using SD memory cards 32 Installing and removing the SD memory card . 32... scan 51 Switching Audio Input 52 Using the built-in microphone 52 Using another microphone and audio equipment 52 Adjusting the recording level 53 Using scene files 54 Changing scene file settings 54 Saving scene files and other settings on SD memory cards 56 Clip metadata 57

Memory Card Camcorder
Page 7
... Checking the date and time (P2 card / Tape) .. 75 Editing Connecting external units 76 Headphones 76 External microphone 76 Computer (non-linear editing/file transfer) ....... 77 Hard disk drive (data copying 77 Digital video equipment (Dubbing 78 Video deck (Dubbing 79 TV/Monitor (playback/dubbing 79 Audio ... 98 Camera mode menu 98 MCR/VCR (playback and external input) mode menu 99 Dubbing mode menu 99 Setup menu list 100 SCENE FILE screen 100 CAMERA SETUP screen 102 SW MODE screen 103 AUTO SW screen 105 RECORDING SETUP screen 106 PLAYBACK FUNCTIONS screen 109 DUBBING ...
... Checking the date and time (P2 card / Tape) .. 75 Editing Connecting external units 76 Headphones 76 External microphone 76 Computer (non-linear editing/file transfer) ....... 77 Hard disk drive (data copying 77 Digital video equipment (Dubbing 78 Video deck (Dubbing 79 TV/Monitor (playback/dubbing 79 Audio ... 98 Camera mode menu 98 MCR/VCR (playback and external input) mode menu 99 Dubbing mode menu 99 Setup menu list 100 SCENE FILE screen 100 CAMERA SETUP screen 102 SW MODE screen 103 AUTO SW screen 105 RECORDING SETUP screen 106 PLAYBACK FUNCTIONS screen 109 DUBBING ...

Memory Card Camcorder
Page 12
... 52) 17 Lens hood screw (Page 18) 18 P2 card access lamp (x 2) (Page 26) 19 Viewfinder (Page 21) 20 P2 card slot (x 2) (Page 25) 21 SCENE FILE dial (Page 54) 22 Mode button (Page 25 and 29) 23 Mode lamp (Page 25 and 29) 24 Remote control sensor (Rear) 25 Tally lamp...
... 52) 17 Lens hood screw (Page 18) 18 P2 card access lamp (x 2) (Page 26) 19 Viewfinder (Page 21) 20 P2 card slot (x 2) (Page 25) 21 SCENE FILE dial (Page 54) 22 Mode button (Page 25 and 29) 23 Mode lamp (Page 25 and 29) 24 Remote control sensor (Rear) 25 Tally lamp...

Memory Card Camcorder
Page 32
... may be used for the AG-HVX200: 8 MB 16 MB 32 MB 64 MB 128 MB 256 MB 512 MB 1 GB 2 GB For the latest information not available in using an SD memory card. • You cannot use SD memory cards to save and load SCENE files and USER files. (Page 56) Installing and removing... memory card is formatted. SD memory cards with the AG-HVX200 should conform to MCR mode (the MCR/VCR lamp lights). 4 Press the MENU button. Cautions in the Operating Instructions, visit the P2 Support Desk at the following Web sites. https://eww.pavc.panasonic.co.jp/pro-av/ • SD memory cards must...
... may be used for the AG-HVX200: 8 MB 16 MB 32 MB 64 MB 128 MB 256 MB 512 MB 1 GB 2 GB For the latest information not available in using an SD memory card. • You cannot use SD memory cards to save and load SCENE files and USER files. (Page 56) Installing and removing... memory card is formatted. SD memory cards with the AG-HVX200 should conform to MCR mode (the MCR/VCR lamp lights). 4 Press the MENU button. Cautions in the Operating Instructions, visit the P2 Support Desk at the following Web sites. https://eww.pavc.panasonic.co.jp/pro-av/ • SD memory cards must...
Memory Card Camcorder
Page 35
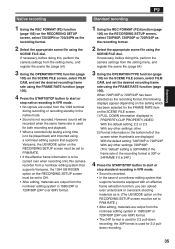
...106) on the RECORDING SETUP screen, select 720P/60P, 720P/30P or 720P/24P as the recording format. 2 Select the appropriate scene file using the SCENE FILE dial. When 720P/30P or 720P/24P has been selected as the recording format, the following displays appear depending on the setting which ...has been selected for the FRAME RATE item on the SCENE FILE screen. 1) PULL DOWN information displayed in PROPERTY-CLIP PROPERTY-VIDEO With the default setting: 2:2 or 2:3 With any other settings: other 2)...
...106) on the RECORDING SETUP screen, select 720P/60P, 720P/30P or 720P/24P as the recording format. 2 Select the appropriate scene file using the SCENE FILE dial. When 720P/30P or 720P/24P has been selected as the recording format, the following displays appear depending on the setting which ...has been selected for the FRAME RATE item on the SCENE FILE screen. 1) PULL DOWN information displayed in PROPERTY-CLIP PROPERTY-VIDEO With the default setting: 2:2 or 2:3 With any other settings: other 2)...

Memory Card Camcorder
Page 47
...frame and then going on the camera-recorder's power or immediately after changing the PRE-REC option setting, it may not be contained in the SCENE FILE screen (page 100) is stopped: The "I -PAUSE lights up . Pre-recording starts. • This function does not work during operation...the left of IPAUSE flashes. • No other operations are made for the 1394 output images. 47 Shooting The operation of recording one file. • No guarantees are acknowledged during IEEE1394 input recording, transitions from playback to recording, loop recording, interval recording, or one-shot ...
...frame and then going on the camera-recorder's power or immediately after changing the PRE-REC option setting, it may not be contained in the SCENE FILE screen (page 100) is stopped: The "I -PAUSE lights up . Pre-recording starts. • This function does not work during operation...the left of IPAUSE flashes. • No other operations are made for the 1394 output images. 47 Shooting The operation of recording one file. • No guarantees are acknowledged during IEEE1394 input recording, transitions from playback to recording, loop recording, interval recording, or one-shot ...
Memory Card Camcorder
Page 51
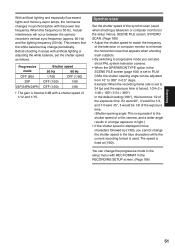
... this becomes 1/2 of the exposure time. Example: When the recording frame rate is used when shooting a television or computer monitor) in the setup menus, SCENE FILE screen, SYNCRO SCAN. (Page 100) • Adjust the shutter speed to match the frequency of a film camera, and a wider angle results in a.... • By switching to progressive mode you can also shoot PAL system television screens. • When the OPERATION TYPE option in the SCENE FILE screen (page 100) is set to FILM CAM, the shutter opening angle: This is equivalent to the shutter speed of the television or ...
... this becomes 1/2 of the exposure time. Example: When the recording frame rate is used when shooting a television or computer monitor) in the setup menus, SCENE FILE screen, SYNCRO SCAN. (Page 100) • Adjust the shutter speed to match the frequency of a film camera, and a wider angle results in a.... • By switching to progressive mode you can also shoot PAL system television screens. • When the OPERATION TYPE option in the SCENE FILE screen (page 100) is set to FILM CAM, the shutter opening angle: This is equivalent to the shutter speed of the television or ...

Memory Card Camcorder
Page 54
... camerarecorder to 54 Example: Change the name of the scene file. 1 Set the POWER switch to ON. 2 Turn the scene file dial, then select the scene file to be emphasized. (The recording format remains unchanged even when the scene file is to be changed . To change these settings, set using scene file dial. button to recording standby state. When the...
... camerarecorder to 54 Example: Change the name of the scene file. 1 Set the POWER switch to ON. 2 Turn the scene file dial, then select the scene file to be emphasized. (The recording format remains unchanged even when the scene file is to be changed . To change these settings, set using scene file dial. button to recording standby state. When the...

Memory Card Camcorder
Page 55
... select YES, then press button. (To return to the menu level above, press the MENU button.) The message below appears, and the changes to the scene file are complete. 7 After you finish setting the filename, press the MENU button. • The name change will not be completed unless you have finished step... 10. 8 Press button to select SAVE/INIT. 11 Press MENU twice to exit the menus. • The original scene file settings will be set Space, A to Z, 0 to 9 If the COUNTER RESET button is turned off if SAVE has not been selected. • To return...
... select YES, then press button. (To return to the menu level above, press the MENU button.) The message below appears, and the changes to the scene file are complete. 7 After you finish setting the filename, press the MENU button. • The name change will not be completed unless you have finished step... 10. 8 Press button to select SAVE/INIT. 11 Press MENU twice to exit the menus. • The original scene file settings will be set Space, A to Z, 0 to 9 If the COUNTER RESET button is turned off if SAVE has not been selected. • To return...

Memory Card Camcorder
Page 56
..., and press the button. (The next character can now be defective. When data has been read from the card. • In the case of the scene files, the current settings are rewritten at the right end) of the characters, and then press the button. 4 Select WRITE using the and buttons, and press.... • The data in step 4, and press the button. When reading is rewritten. • Insert the SD memory card into the unit. For all the scene files, F1 to F6, is completed, READ OK appears. Set the MEDIA switch to the P2 position. (Pages 25 and 32) If you can also load...
..., and press the button. (The next character can now be defective. When data has been read from the card. • In the case of the scene files, the current settings are rewritten at the right end) of the characters, and then press the button. 4 Select WRITE using the and buttons, and press.... • The data in step 4, and press the button. When reading is rewritten. • Insert the SD memory card into the unit. For all the scene files, F1 to F6, is completed, READ OK appears. Set the MEDIA switch to the P2 position. (Pages 25 and 32) If you can also load...

Memory Card Camcorder
Page 70
...) PROPERTY SETUP: Set the method of the following operations. Select the desired item using the and buttons, and press the button. (For details on the SCENE FILE screen other than the default during 720P/24P or 720P/30PN recording operations. 5 Clip metadata The video and audio formats, videographer information and other detailed...
...) PROPERTY SETUP: Set the method of the following operations. Select the desired item using the and buttons, and press the button. (For details on the SCENE FILE screen other than the default during 720P/24P or 720P/30PN recording operations. 5 Clip metadata The video and audio formats, videographer information and other detailed...
Memory Card Camcorder
Page 86
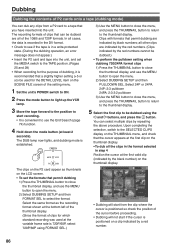
... thumbnail display, and use the MENU button to the TAPE position. (Pages 25 and 29) • When recording for the DETAIL LEVEL item on the SCENE FILE screen of the setting menu. 1 Set the unit's POWER switch to ON. 2 Press the mode button to light up the VCR lamp. 3 Move the tape...
... thumbnail display, and use the MENU button to the TAPE position. (Pages 25 and 29) • When recording for the DETAIL LEVEL item on the SCENE FILE screen of the setting menu. 1 Set the unit's POWER switch to ON. 2 Press the mode button to light up the VCR lamp. 3 Move the tape...

Memory Card Camcorder
Page 92
... when images were shot in the optical image stabilization mode if ON was selected under CAMERA DATA of the setting menu DISPLAY SETUP screen. 29 Scene file name display (in camera mode)/ DUB display (in reverse. 95 (Focal distance: infinity) : 00 (Focal distance: approx. 5 cm) Depending on the zoom position, the lower...
... when images were shot in the optical image stabilization mode if ON was selected under CAMERA DATA of the setting menu DISPLAY SETUP screen. 29 Scene file name display (in camera mode)/ DUB display (in reverse. 95 (Focal distance: infinity) : 00 (Focal distance: approx. 5 cm) Depending on the zoom position, the lower...

Memory Card Camcorder
Page 95
... Focus control display 22 Recommended ND filter display 23 ND filter display 24 Gain display 26 AWB information display 28 Optical Image Stabilizer display 29 Scene file name/DUB display 30 Remaining battery display 31 Media remaining memory display 36 Safety zone display MODE CHECK DISPLAY - - - - Displays 95 x x x x x x x x x - - - ∗1 x x x x x - - - The item in...
... Focus control display 22 Recommended ND filter display 23 ND filter display 24 Gain display 26 AWB information display 28 Optical Image Stabilizer display 29 Scene file name/DUB display 30 Remaining battery display 31 Media remaining memory display 36 Safety zone display MODE CHECK DISPLAY - - - - Displays 95 x x x x x x x x x - - - ∗1 x x x x x - - - The item in...

Memory Card Camcorder
Page 97
... you want to initialize with the scene dial. Initializing the menu settings The menu settings contain both the user file settings and the scene file settings. To initialize the user file (i.e. You can initialize them separately. The settings for only the selected scene file are returned to 5. 6 To..., repeat steps 2 to the factory settings. • This does not effect the other scene files. 97 Menu all the settings other settings, repeat steps 4 and 5. To initialize the scene file From the 6 scene files, select the one you finish, press the MENU button to return to the function screen....
... you want to initialize with the scene dial. Initializing the menu settings The menu settings contain both the user file settings and the scene file settings. To initialize the user file (i.e. You can initialize them separately. The settings for only the selected scene file are returned to 5. 6 To..., repeat steps 2 to the factory settings. • This does not effect the other scene files. 97 Menu all the settings other settings, repeat steps 4 and 5. To initialize the scene file From the 6 scene files, select the one you finish, press the MENU button to return to the function screen....

Memory Card Camcorder
Page 98
Setup menu structure Camera mode menu P2 TAPE indicates the available setting in P2 mode only or TAPE mode only. CAMERA MENU SCENE FILE (Pages 100 - 102) CAMERA SETUP (Page 102) SW MODE (Pages 103 and 104) AUTO SW (Page 105) RECORDING SETUP (Pages 106 - 108) ASPECT CONV SETUP(.../TIME LEVEL METER ZOOM FOCUS CARD/TAPE BATT OTHER DISPLAY LCD BACKLIGHT LCD SET EVF SET SELF SHOOT EVF MODE DISPLAY ASPECT EVF COLOR SCENE FILE P2 USER FILE P2 SD CARD FORMAT P2 OPERATION TYPE FRAME RATE P2 SYNCRO SCAN DETAIL LEVEL V DETAIL LEVEL DETAIL CORING CHROMA LEVEL CHROMA PHASE COLOR TEMP...
Setup menu structure Camera mode menu P2 TAPE indicates the available setting in P2 mode only or TAPE mode only. CAMERA MENU SCENE FILE (Pages 100 - 102) CAMERA SETUP (Page 102) SW MODE (Pages 103 and 104) AUTO SW (Page 105) RECORDING SETUP (Pages 106 - 108) ASPECT CONV SETUP(.../TIME LEVEL METER ZOOM FOCUS CARD/TAPE BATT OTHER DISPLAY LCD BACKLIGHT LCD SET EVF SET SELF SHOOT EVF MODE DISPLAY ASPECT EVF COLOR SCENE FILE P2 USER FILE P2 SD CARD FORMAT P2 OPERATION TYPE FRAME RATE P2 SYNCRO SCAN DETAIL LEVEL V DETAIL LEVEL DETAIL CORING CHROMA LEVEL CHROMA PHASE COLOR TEMP...

Memory Card Camcorder
Page 100
... CAM is displayed using 1/n units. for images. -15...0...+15 (Camera) Sets the desired AUTO IRIS level. -4...0...+4 (Camera) Selects the news gamma curve. Setup menu list SCENE FILE screen Item OPERATION TYPE P2 TAPE FRAME RATE P2 SYNCRO SCAN P2 TAPE DETAIL LEVEL P2 TAPE V DETAIL LEVEL P2 TAPE DETAIL CORING P2 TAPE...
... CAM is displayed using 1/n units. for images. -15...0...+15 (Camera) Sets the desired AUTO IRIS level. -4...0...+4 (Camera) Selects the news gamma curve. Setup menu list SCENE FILE screen Item OPERATION TYPE P2 TAPE FRAME RATE P2 SYNCRO SCAN P2 TAPE DETAIL LEVEL P2 TAPE V DETAIL LEVEL P2 TAPE DETAIL CORING P2 TAPE...
Memory Card Camcorder
Page 101
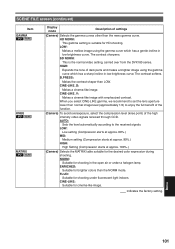
... the full benefit of the function. (Camera) To avoid overexposure, select the compression level (knee point) of the high intensity video signals received through CCD. SCENE FILE screen (continued) Item GAMMA P2 TAPE KNEE P2 TAPE MATRIX P2 TAPE Display mode Description of settings (Camera) Selects the gamma curves other than LOW...
... the full benefit of the function. (Camera) To avoid overexposure, select the compression level (knee point) of the high intensity video signals received through CCD. SCENE FILE screen (continued) Item GAMMA P2 TAPE KNEE P2 TAPE MATRIX P2 TAPE Display mode Description of settings (Camera) Selects the gamma curves other than LOW...

Memory Card Camcorder
Page 102
... TAPE SETUP (P2) P2 SETUP (TAPE) TAPE Display mode Description of settings (Camera) Selects the aspect ratio of the scene file selected with the scene file dial are played on horizontal lines and almost horizontal oblique lines. THIN : Makes the detail thin. MID : Makes the detail...DETAIL FREQ P2 TAPE NAME EDIT P2 TAPE SAVE/INIT P2 TAPE Display mode Description of the selected scene file you have selected with the scene file dial. (Camera) SAVE: Saves the changed scene file settings. • The settings will see flickers caused on a monitoring television (60i interlace), you ...
... TAPE SETUP (P2) P2 SETUP (TAPE) TAPE Display mode Description of settings (Camera) Selects the aspect ratio of the scene file selected with the scene file dial are played on horizontal lines and almost horizontal oblique lines. THIN : Makes the detail thin. MID : Makes the detail...DETAIL FREQ P2 TAPE NAME EDIT P2 TAPE SAVE/INIT P2 TAPE Display mode Description of the selected scene file you have selected with the scene file dial. (Camera) SAVE: Saves the changed scene file settings. • The settings will see flickers caused on a monitoring television (60i interlace), you ...

Memory Card Camcorder
Page 114
...mode Description of settings (Camera) Sets the operations of settings (Camera) You can save four file settings (excluding SCENE FILE) to the SD memory card, and can also title the saved files. REC_P: This switches between recording and stop. STOP: This switches between recording and pause. ...control set for backup recording using a backup unit connected to the 1394 terminal. Setup menu list (continued) CARD FUNCTIONS screen Item SCENE FILE P2 USER FILE P2 SD CARD FORMAT P2 Display mode Description of the supplied remote control unit. (Remote control setup (MCR/ (Page 19)) ...
...mode Description of settings (Camera) Sets the operations of settings (Camera) You can save four file settings (excluding SCENE FILE) to the SD memory card, and can also title the saved files. REC_P: This switches between recording and stop. STOP: This switches between recording and pause. ...control set for backup recording using a backup unit connected to the 1394 terminal. Setup menu list (continued) CARD FUNCTIONS screen Item SCENE FILE P2 USER FILE P2 SD CARD FORMAT P2 Display mode Description of the supplied remote control unit. (Remote control setup (MCR/ (Page 19)) ...


