Memory Card Camcorder
Page 6
...times 27 Remove the P2 card 28 Basic shooting operations (Cassette tape 29 Preparing to shoot using a tape 29 Shooting in auto mode 29 Checking scenes taken (REC CHECK 30 6 Remove the cassette tape 30 Cassette tapes 31 Using SD memory cards 32 Installing and removing the SD memory card ... (ONE-SHOT REC 47 Loop recording (LOOP REC 48 2-slot continuous recording 48 Shot mark function 48 Text memo recording 48 Finding specific scenes(image search 49 Index recording 49 Adjusting the shutter speed 50 Synchro scan 51 Switching Audio Input 52 Using the built-in microphone 52 Using...
...times 27 Remove the P2 card 28 Basic shooting operations (Cassette tape 29 Preparing to shoot using a tape 29 Shooting in auto mode 29 Checking scenes taken (REC CHECK 30 6 Remove the cassette tape 30 Cassette tapes 31 Using SD memory cards 32 Installing and removing the SD memory card ... (ONE-SHOT REC 47 Loop recording (LOOP REC 48 2-slot continuous recording 48 Shot mark function 48 Text memo recording 48 Finding specific scenes(image search 49 Index recording 49 Adjusting the shutter speed 50 Synchro scan 51 Switching Audio Input 52 Using the built-in microphone 52 Using...

Memory Card Camcorder
Page 7
... Setup menu structure 98 Camera mode menu 98 MCR/VCR (playback and external input) mode menu 99 Dubbing mode menu 99 Setup menu list 100 SCENE FILE screen 100 CAMERA SETUP screen 102 SW MODE screen 103 AUTO SW screen 105 RECORDING SETUP screen 106 PLAYBACK FUNCTIONS screen 109 DUBBING SETUP...
... Setup menu structure 98 Camera mode menu 98 MCR/VCR (playback and external input) mode menu 99 Dubbing mode menu 99 Setup menu list 100 SCENE FILE screen 100 CAMERA SETUP screen 102 SW MODE screen 103 AUTO SW screen 105 RECORDING SETUP screen 106 PLAYBACK FUNCTIONS screen 109 DUBBING SETUP...

Memory Card Camcorder
Page 12
... 52) 17 Lens hood screw (Page 18) 18 P2 card access lamp (x 2) (Page 26) 19 Viewfinder (Page 21) 20 P2 card slot (x 2) (Page 25) 21 SCENE FILE dial (Page 54) 22 Mode button (Page 25 and 29) 23 Mode lamp (Page 25 and 29) 24 Remote control sensor (Rear) 25 Tally...
... 52) 17 Lens hood screw (Page 18) 18 P2 card access lamp (x 2) (Page 26) 19 Viewfinder (Page 21) 20 P2 card slot (x 2) (Page 25) 21 SCENE FILE dial (Page 54) 22 Mode button (Page 25 and 29) 23 Mode lamp (Page 25 and 29) 24 Remote control sensor (Rear) 25 Tally...

Memory Card Camcorder
Page 16
... normal, there may seriously burn yourself if you repeatedly start and stop recording. • Discharge the battery before storing it. When storing it for when scenes are using it, but this state. • The battery becomes hot while it is being used or charged. The camera-recorder itself also becomes hot...
... normal, there may seriously burn yourself if you repeatedly start and stop recording. • Discharge the battery before storing it. When storing it for when scenes are using it, but this state. • The battery becomes hot while it is being used or charged. The camera-recorder itself also becomes hot...

Memory Card Camcorder
Page 30
TAPE 3 PUSH PUSH 30 Basic shooting operations (Cassette tape) (continued) Checking scenes taken (REC CHECK) In the shooting pause mode, press the REC CHECK button. 1 A few seconds of the last thing you shot play, and then the ...
TAPE 3 PUSH PUSH 30 Basic shooting operations (Cassette tape) (continued) Checking scenes taken (REC CHECK) In the shooting pause mode, press the REC CHECK button. 1 A few seconds of the last thing you shot play, and then the ...

Memory Card Camcorder
Page 32
... load SCENE files and USER files. (Page 56) Installing and removing the SD memory card Installation 1 Open the cover, and insert the card while making sure it to format cards using an SD memory card. • You cannot use SD memory cards to water droplets; SD memory cards with the AG-HVX200 should... using SD memory cards • SD memory cards used for the AG-HVX200: 8 MB 16 MB 32 MB 64 MB 128 MB 256 MB 512 MB 1 GB 2 GB For the latest information not available in the TAPE mode. 32 https://eww.pavc.panasonic.co.jp/pro-av/ • SD memory cards must not...
... load SCENE files and USER files. (Page 56) Installing and removing the SD memory card Installation 1 Open the cover, and insert the card while making sure it to format cards using an SD memory card. • You cannot use SD memory cards to water droplets; SD memory cards with the AG-HVX200 should... using SD memory cards • SD memory cards used for the AG-HVX200: 8 MB 16 MB 32 MB 64 MB 128 MB 256 MB 512 MB 1 GB 2 GB For the latest information not available in the TAPE mode. 32 https://eww.pavc.panasonic.co.jp/pro-av/ • SD memory cards must not...
Memory Card Camcorder
Page 35
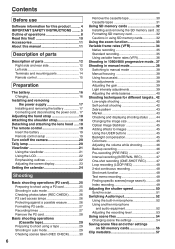
... the REC FORMAT (P2) function (page 106) on the RECORDING SETUP screen, select 720/30PN or 720/24PN as the recording format. 2 Select the appropriate scene file using the FRAME RATE function (page 100). However, sound will be set to FRM.RATE. • If the effective frame information is to be... has been selected as is. (The UB MODE option on the RECORDING SETUP screen must be set to be played back and imported using the SCENE FILE dial. If necessary, before doing this camerarecorder from the nonlinear editing system in the bottom left of the recording format is 30P or 24FRAME...
... the REC FORMAT (P2) function (page 106) on the RECORDING SETUP screen, select 720/30PN or 720/24PN as the recording format. 2 Select the appropriate scene file using the FRAME RATE function (page 100). However, sound will be set to FRM.RATE. • If the effective frame information is to be... has been selected as is. (The UB MODE option on the RECORDING SETUP screen must be set to be played back and imported using the SCENE FILE dial. If necessary, before doing this camerarecorder from the nonlinear editing system in the bottom left of the recording format is 30P or 24FRAME...
Memory Card Camcorder
Page 36
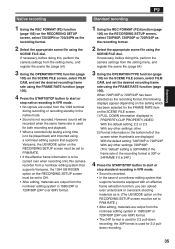
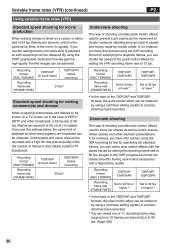
... 720P/30P formats, the quick motion effect can be obtained. Overcrank shooting This way of shooting provides slow motion effects used to present such scenes as with a high film-like images can be obtained by using the 720P progressive mode and cine-like gamma, high-quality film-like picture...30P (2:2 pull-down ) 720P/24PN (native recording) 24 fps∗ Standard speed shooting for making movies to show car chases as well as action scenes, climax scenes and other broadcasts, a frame rate of 30 fps (frames per second), which is the same as for films, is the norm (1x speed). If...
... 720P/30P formats, the quick motion effect can be obtained. Overcrank shooting This way of shooting provides slow motion effects used to present such scenes as with a high film-like images can be obtained by using the 720P progressive mode and cine-like gamma, high-quality film-like picture...30P (2:2 pull-down ) 720P/24PN (native recording) 24 fps∗ Standard speed shooting for making movies to show car chases as well as action scenes, climax scenes and other broadcasts, a frame rate of 30 fps (frames per second), which is the same as for films, is the norm (1x speed). If...

Memory Card Camcorder
Page 47
... functions such as Pre-recording, Interval Recording, One Shot Recording, and Loop Recording. While recording is used only when the OPERATION TYPE option in the SCENE FILE screen (page 100) is set . 1 Select ONE SHOT under REC FUNCTION. • The following displays will appear on the left of recording one -shot...
... functions such as Pre-recording, Interval Recording, One Shot Recording, and Loop Recording. While recording is used only when the OPERATION TYPE option in the SCENE FILE screen (page 100) is set . 1 Select ONE SHOT under REC FUNCTION. • The following displays will appear on the left of recording one -shot...

Memory Card Camcorder
Page 49
...you are pressing the button. 2 Release the button when you find the point you have shot. The camera returns to continue shooting so two scenes come one after the other. 1 Press or in the shooting standby mode, you can search through any point during playback by recording these ...signals. (Page 75) While in the shooting standby mode. VOL + Shooting Finding specific scenes (image search) Camera Remote control or MULTI/ P-IN-P REC A.DUB PLAY STILL ADV PAUSE STILL ADV INDEX STOP INDEX SELECT TAPE Index recording ...
...you are pressing the button. 2 Release the button when you find the point you have shot. The camera returns to continue shooting so two scenes come one after the other. 1 Press or in the shooting standby mode, you can search through any point during playback by recording these ...signals. (Page 75) While in the shooting standby mode. VOL + Shooting Finding specific scenes (image search) Camera Remote control or MULTI/ P-IN-P REC A.DUB PLAY STILL ADV PAUSE STILL ADV INDEX STOP INDEX SELECT TAPE Index recording ...
Memory Card Camcorder
Page 51
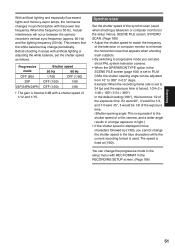
... the OPERATION TYPE option in the blue characters while the current recording format is used when shooting a television or computer monitor) in the setup menus, SCENE FILE screen, SYNCRO SCAN. (Page 100) • Adjust the shutter speed to match the frequency of 1/12 and 1/15. You can be 1/8 of the ... with a shutter speed of the television or computer monitor to minimize the horizontal noise that the white balance may change the shutter speed in the SCENE FILE screen (page 100) is set to 350° in 0.5° steps. Progressive mode OFF (60i) 30P 24P/24PA/24PN Shutter speed 50 Hz...
... the OPERATION TYPE option in the blue characters while the current recording format is used when shooting a television or computer monitor) in the setup menus, SCENE FILE screen, SYNCRO SCAN. (Page 100) • Adjust the shutter speed to match the frequency of 1/12 and 1/15. You can be 1/8 of the ... with a shutter speed of the television or computer monitor to minimize the horizontal noise that the white balance may change the shutter speed in the SCENE FILE screen (page 100) is set to 350° in 0.5° steps. Progressive mode OFF (60i) 30P 24P/24PA/24PN Shutter speed 50 Hz...

Memory Card Camcorder
Page 54
...using the REC FORMAT option on the RECORDING SETUP screen. (Page 106)) Changing scene file settings The setting value of the scene file can be emphasized. (The recording format remains unchanged even when the scene file is shipped from the factory, the following files are stored in each ..., coloring and contrast. When the camera-recorder is changed scene file to each position of scene file dial. Example: Change the name of the scene file. 1 Set the POWER switch to ON. 2 Turn the scene file dial, then select the scene file to be emphasized. (The recording format remains unchanged ...
...using the REC FORMAT option on the RECORDING SETUP screen. (Page 106)) Changing scene file settings The setting value of the scene file can be emphasized. (The recording format remains unchanged even when the scene file is shipped from the factory, the following files are stored in each ..., coloring and contrast. When the camera-recorder is changed scene file to each position of scene file dial. Example: Change the name of the scene file. 1 Set the POWER switch to ON. 2 Turn the scene file dial, then select the scene file to be emphasized. (The recording format remains unchanged ...

Memory Card Camcorder
Page 55
... to the menu level above, press the MENU button.) The message below is turned off if SAVE has not been selected. • To return the scene file settings to the factory settings, select INITIAL in step 9, then do steps 10 to 11. 9 Press button, and use button to exit the menus.... • The original scene file settings will be restored when the power is displayed, so set the file name of six letters using , , or button. Press button. Shooting 55...
... to the menu level above, press the MENU button.) The message below is turned off if SAVE has not been selected. • To return the scene file settings to the factory settings, select INITIAL in step 9, then do steps 10 to 11. 9 Press button, and use button to exit the menus.... • The original scene file settings will be restored when the power is displayed, so set the file name of six letters using , , or button. Press button. Shooting 55...

Memory Card Camcorder
Page 56
.... 6 Press the MENU button four times to cancel the menu mode. When data has been read from the card. • In the case of the scene files, the current settings are rewritten at the right end) of the characters, and then press the button. 4 Select WRITE using the and buttons, and... other settings, select USER FILE. • For menu operations (Page 96) • You can also use the menu buttons on the remote control. (Page 15) SCENE FILE 3 Select the file number (1 to 4) using the and buttons, and press the button. (The next character can now be selected.) • You can erase...
.... 6 Press the MENU button four times to cancel the menu mode. When data has been read from the card. • In the case of the scene files, the current settings are rewritten at the right end) of the characters, and then press the button. 4 Select WRITE using the and buttons, and... other settings, select USER FILE. • For menu operations (Page 96) • You can also use the menu buttons on the remote control. (Page 15) SCENE FILE 3 Select the file number (1 to 4) using the and buttons, and press the button. (The next character can now be selected.) • You can erase...

Memory Card Camcorder
Page 57
https://eww.pavc.panasonic.co.jp/pro-av/ What the clip metadata consists of data collection). GLOBAL CLIP ID: This indicates the global clip ID that the data which ... LAST UPDATE DATE (date on the SD memory card which can be input, you must input TEXT. SCENARIO:*2 This indicates the PROGRAM NAME, SCENE NO. You cannot input the SCENE NO. You cannot input PERSON only. • It may not be displayed by this unit. • Due to the video data you...
https://eww.pavc.panasonic.co.jp/pro-av/ What the clip metadata consists of data collection). GLOBAL CLIP ID: This indicates the global clip ID that the data which ... LAST UPDATE DATE (date on the SD memory card which can be input, you must input TEXT. SCENARIO:*2 This indicates the PROGRAM NAME, SCENE NO. You cannot input the SCENE NO. You cannot input PERSON only. • It may not be displayed by this unit. • Due to the video data you...

Memory Card Camcorder
Page 70
... using the and button, and press the (or ) button. 3 Select the desired item using the and buttons, and press the button. (For details on the SCENE FILE screen other than the default during 720P/24P or 720P/30PN recording operations. 5 Clip metadata The video and audio formats, videographer information and other...
... using the and button, and press the (or ) button. 3 Select the desired item using the and buttons, and press the button. (For details on the SCENE FILE screen other than the default during 720P/24P or 720P/30PN recording operations. 5 Clip metadata The video and audio formats, videographer information and other...

Memory Card Camcorder
Page 73
... playback. SEARCH OFF/ON P.B.DIGITAL PB. When this time. 2 Press the PAGE/AUDIO MON/VAR button to change the playback speed and search for specific scenes. 1 Press the button during playback.
... playback. SEARCH OFF/ON P.B.DIGITAL PB. When this time. 2 Press the PAGE/AUDIO MON/VAR button to change the playback speed and search for specific scenes. 1 Press the button during playback.

Memory Card Camcorder
Page 74
... playback, press the button to pause the camera. 2 Press the button. (backward) or (forward) End search (Tape) You can find the end of the last scene shot even if you change the tapes, the camera will not be able to find unrecorded parts or the end of the last... scene shot. 1 In the setup menus, OTHER FUNCTIONS screen, END SEARCH, set the search method. (Page 115) BLANK: Find unrecorded parts. END SEARCH /REW PLAY FF/ ...
... playback, press the button to pause the camera. 2 Press the button. (backward) or (forward) End search (Tape) You can find the end of the last scene shot even if you change the tapes, the camera will not be able to find unrecorded parts or the end of the last... scene shot. 1 In the setup menus, OTHER FUNCTIONS screen, END SEARCH, set the search method. (Page 115) BLANK: Find unrecorded parts. END SEARCH /REW PLAY FF/ ...

Memory Card Camcorder
Page 75
... thereafter, [S2] and then [S3] are recording on the remote control to the second and subsequent scenes. Time PAGE/ AUDIO MON/VAR Date Time and Date No display OSD START/ DATE/ PHOTO STOP TIME... 1 During play, press the INDEX buttons or . • The tape is cued at the next scene after showing [S1] on the screen. The function may not work properly if the interval between one index...function searches for cue-up to show the information that is output from that section. (Up to nine scenes before or ahead on the tape can view the images on a television if you are displayed, and...
... thereafter, [S2] and then [S3] are recording on the remote control to the second and subsequent scenes. Time PAGE/ AUDIO MON/VAR Date Time and Date No display OSD START/ DATE/ PHOTO STOP TIME... 1 During play, press the INDEX buttons or . • The tape is cued at the next scene after showing [S1] on the screen. The function may not work properly if the interval between one index...function searches for cue-up to show the information that is output from that section. (Up to nine scenes before or ahead on the tape can view the images on a television if you are displayed, and...

Memory Card Camcorder
Page 80
.../VAR MCR VCR PC DUB 5 In the setup menus, select an audio recording system in the AV IN/OUT SETUP screen, A. CAMERA TAPE 6 Find the scene you want keep the sound that was recorded while you are shooting will be performed in the LP mode because the track width on the...
.../VAR MCR VCR PC DUB 5 In the setup menus, select an audio recording system in the AV IN/OUT SETUP screen, A. CAMERA TAPE 6 Find the scene you want keep the sound that was recorded while you are shooting will be performed in the LP mode because the track width on the...


