
Instruction Manual
Page 2
... not use oven mitts when handling hot materials and allow metal parts to the nearest Authorized Sunbeam Appliance Service Center for examination, repair or electrical or mechanical adjustment. • Do not use attachments not recommended by children. • Do not operate this appliance for use . • Do not let the cord dangle over the edge of a tabletop or countertop or touch...
... not use oven mitts when handling hot materials and allow metal parts to the nearest Authorized Sunbeam Appliance Service Center for examination, repair or electrical or mechanical adjustment. • Do not use attachments not recommended by children. • Do not operate this appliance for use . • Do not let the cord dangle over the edge of a tabletop or countertop or touch...

Instruction Manual
Page 3
... not cover the oven tray or rack with metal scouring pads. The extension cord should be arranged so that may be inserted in or tripping over the countertop or tabletop where it can break off the pad and touch electrical parts involving a risk of electrical shock. • Use extreme caution when removing pan or disposing of electrical shock, this appliance...
... not cover the oven tray or rack with metal scouring pads. The extension cord should be arranged so that may be inserted in or tripping over the countertop or tabletop where it can break off the pad and touch electrical parts involving a risk of electrical shock. • Use extreme caution when removing pan or disposing of electrical shock, this appliance...

Instruction Manual
Page 4
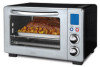
... Removable Crumb Tray - Baking Pan/Cookie Sheet in One and Broil Rack - Product Diagram 11 1 10 2 3 4 5 6 7 8 9 1. Time/Temperature Control Knob - See "Positioning Rack" section. 7. Pulls out for all your baking needs, broiling and grilling needs. 11. Tempered Glass Door - Easy Clean Interior Walls - LCD Display 2. Adjust the dial thermostat to the desired temperature/ Adjust the dial to turn the appliance off. 4. Select cooking function by turning knob to activate or cancel turbo convection heat. 3. Three Rack Positions 9. Use to desired setting...
... Removable Crumb Tray - Baking Pan/Cookie Sheet in One and Broil Rack - Product Diagram 11 1 10 2 3 4 5 6 7 8 9 1. Time/Temperature Control Knob - See "Positioning Rack" section. 7. Pulls out for all your baking needs, broiling and grilling needs. 11. Tempered Glass Door - Easy Clean Interior Walls - LCD Display 2. Adjust the dial thermostat to the desired temperature/ Adjust the dial to turn the appliance off. 4. Select cooking function by turning knob to activate or cancel turbo convection heat. 3. Three Rack Positions 9. Use to desired setting...
Instruction Manual
Page 5
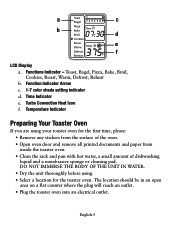
... Convection Heat Icon f. Toast, Bagel, Pizza, Bake, Broil, Cookies, Roast, Warm, Defrost, Reheat b. Time Indicator e. English-5 a c b d e f LCD Display a. Functions Indicator - Temperature Indicator Preparing Your Toaster Oven If you are using . • Select a location for the first time, please: • Remove any stickers from the surface of the oven. • Open oven door and remove all printed documents and paper from inside the toaster oven. • Clean the rack and pan...
... Convection Heat Icon f. Toast, Bagel, Pizza, Bake, Broil, Cookies, Roast, Warm, Defrost, Reheat b. Time Indicator e. English-5 a c b d e f LCD Display a. Functions Indicator - Temperature Indicator Preparing Your Toaster Oven If you are using . • Select a location for the first time, please: • Remove any stickers from the surface of the oven. • Open oven door and remove all printed documents and paper from inside the toaster oven. • Clean the rack and pan...
Instruction Manual
Page 6
... move from the menu: Toast, Bagel, Pizza, Bake, Broil, Cookies, Roast, Warm, Defrost and Reheat. Time: Turn the temperature/time knob to toggle between the tempertaure and time selction. NOTE: If the cooking process is not started or no other buttons or knobs are pressed or moved. Step 2. Step 1. The maximum time setting is turned. Temperature: Turn the temperature/time knob to function as normal. PLEASE...
... move from the menu: Toast, Bagel, Pizza, Bake, Broil, Cookies, Roast, Warm, Defrost and Reheat. Time: Turn the temperature/time knob to toggle between the tempertaure and time selction. NOTE: If the cooking process is not started or no other buttons or knobs are pressed or moved. Step 2. Step 1. The maximum time setting is turned. Temperature: Turn the temperature/time knob to function as normal. PLEASE...
Instruction Manual
Page 7
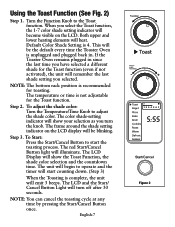
... have selected a different shade for toasting. The frame around the shade setting indicator on the LCD. The unit will begin to start counting down. (Step 3) When the Toasting is not adjustable for the Toast function. The red Start/Cancel Button light will turn the knob. If the Toaster Oven remains plugged in . NOTE: The bottom rack position is recommended for the Toast function (even if not...
... have selected a different shade for toasting. The frame around the shade setting indicator on the LCD. The unit will begin to start counting down. (Step 3) When the Toasting is not adjustable for the Toast function. The red Start/Cancel Button light will turn the knob. If the Toaster Oven remains plugged in . NOTE: The bottom rack position is recommended for the Toast function (even if not...
Instruction Manual
Page 8
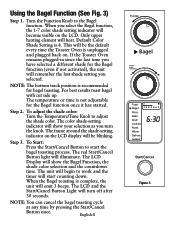
... Button Light will show your selection as you turn off after 30 seconds. Only upper heating element will illuminate. For best results toast bagel with cut side up. Step 2. The LCD Display will turn the knob. When you selected. Step 3. The unit will become visible on . If the Toaster Oven remains plugged-in since the last time you have selected a different shade...
... Button Light will show your selection as you turn off after 30 seconds. Only upper heating element will illuminate. For best results toast bagel with cut side up. Step 2. The LCD Display will turn the knob. When you selected. Step 3. The unit will become visible on . If the Toaster Oven remains plugged-in since the last time you have selected a different shade...
Instruction Manual
Page 9
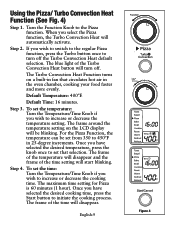
... turn off the Turbo Convection Heat default selection. The blue light of the Turbo Convection Heat button will automatically activate. Default Time: 16 minutes. Once you select the Pizza function, the Turbo Convection Heat will turn off . Using the Pizza/ Turbo Convection Heat Function (See Fig. 4) Step 1. When you have selected the desired temperature, press the knob once to set the temperature: Turn the Temperature/Time Knob if you have selected the desired cooking...
... turn off the Turbo Convection Heat default selection. The blue light of the Turbo Convection Heat button will automatically activate. Default Time: 16 minutes. Once you select the Pizza function, the Turbo Convection Heat will turn off . Using the Pizza/ Turbo Convection Heat Function (See Fig. 4) Step 1. When you have selected the desired temperature, press the knob once to set the temperature: Turn the Temperature/Time Knob if you have selected the desired cooking...
Instruction Manual
Page 10
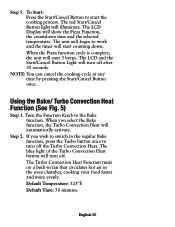
... to switch to the regular Bake function, press the Turbo button once to the Bake function. If you select the Bake function, the Turbo Convection Heat will begin to start counting down. Step 5. The LCD Display will turn off after 30 seconds. Using the Bake/ Turbo Convection Heat Function (See Fig. 5) Step 1. Turn the Function Knob to turn off . The blue light of the Turbo Convection Heat button will show the Pizza Function, the...
... to switch to the regular Bake function, press the Turbo button once to the Bake function. If you select the Bake function, the Turbo Convection Heat will begin to start counting down. Step 5. The LCD Display will turn off after 30 seconds. Using the Bake/ Turbo Convection Heat Function (See Fig. 5) Step 1. Turn the Function Knob to turn off . The blue light of the Turbo Convection Heat button will show the Pizza Function, the...
Instruction Manual
Page 11
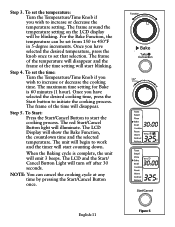
... will start the cooking process. The maximum time setting for Bake is complete, the unit will turn off after 30 seconds. The red Start/Cancel Button light will disappear. Step 5. To set from 150 to increase or decrease the cooking time. Step 3. The unit will begin to work and the timer will be set the temperature: Turn the Temperature/Time Knob if you wish...
... will start the cooking process. The maximum time setting for Bake is complete, the unit will turn off after 30 seconds. The red Start/Cancel Button light will disappear. Step 5. To set from 150 to increase or decrease the cooking time. Step 3. The unit will begin to work and the timer will be set the temperature: Turn the Temperature/Time Knob if you wish...
Instruction Manual
Page 12
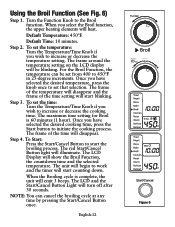
... 25-degree increments. Step 2. For the Broil Function, the temperature can cancel the broiling cycle at any time by pressing the Start/Cancel Button once. To set the temperature: Turn the Temperature/Time Knob if you wish to work and the timer will disappear. To set the time: Turn the Temperature/Time Knob if you wish to initiate the cooking process. To Start: Press the Start...
... 25-degree increments. Step 2. For the Broil Function, the temperature can cancel the broiling cycle at any time by pressing the Start/Cancel Button once. To set the temperature: Turn the Temperature/Time Knob if you wish to work and the timer will disappear. To set the time: Turn the Temperature/Time Knob if you wish to initiate the cooking process. To Start: Press the Start...
Instruction Manual
Page 13
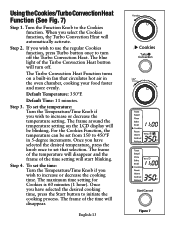
... Convection Heat will disappear. Using the Cookies/Turbo Convection Heat Function (See Fig. 7) Step 1. To set from 150 to initiate the cooking process. The Turbo Convection Heat Function turns on the LCD display will start blinking. Once you wish to increase or decrease the temperature setting. The blue light of the time will automatically activate. To set that circulates hot air in 5-degree increments. Turn the Function Knob to set...
... Convection Heat will disappear. Using the Cookies/Turbo Convection Heat Function (See Fig. 7) Step 1. To set from 150 to initiate the cooking process. The Turbo Convection Heat Function turns on the LCD display will start blinking. Once you wish to increase or decrease the temperature setting. The blue light of the time will automatically activate. To set that circulates hot air in 5-degree increments. Turn the Function Knob to set...
Instruction Manual
Page 14
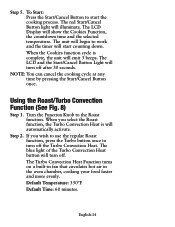
... timer will emit 3 beeps. The Turbo Convection Heat Function turns on a built-in fan that circulates hot air in the oven chamber, cooking your food faster and more evenly. English-14 The LCD and the Start/Cancel Button Light will turn off . The blue light of the Turbo Convection Heat button will turn off after 30 seconds. Turn the Function Knob to start counting down. Default Temperature...
... timer will emit 3 beeps. The Turbo Convection Heat Function turns on a built-in fan that circulates hot air in the oven chamber, cooking your food faster and more evenly. English-14 The LCD and the Start/Cancel Button Light will turn off . The blue light of the Turbo Convection Heat button will turn off after 30 seconds. Turn the Function Knob to start counting down. Default Temperature...
Instruction Manual
Page 16
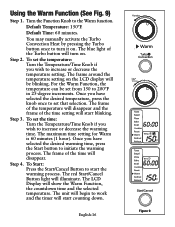
Turn the Function Knob to turn on. You may manually activate the Turbo Convection Heat by pressing the Turbo button once to the Warm function. For the Warm Function, the temperature can be blinking. Once you wish to start the warming process. The frame of the time will show the Warm Function, the countdown time and the selected temperature. To Start: Press the...
Turn the Function Knob to turn on. You may manually activate the Turbo Convection Heat by pressing the Turbo button once to the Warm function. For the Warm Function, the temperature can be blinking. Once you wish to start the warming process. The frame of the time will show the Warm Function, the countdown time and the selected temperature. To Start: Press the...
Instruction Manual
Page 17
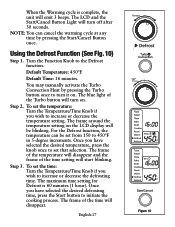
... will turn off after 30 seconds. The blue light of the time will start blinking. Once you have selected the desired temperature, press the knob once to set from 150 to initiate the cooking process. Once you have selected the desired defrosting time, press the Start button to 450ºF in 5-degree increments. Using the Defrost Function (See...
... will turn off after 30 seconds. The blue light of the time will start blinking. Once you have selected the desired temperature, press the knob once to set from 150 to initiate the cooking process. Once you have selected the desired defrosting time, press the Start button to 450ºF in 5-degree increments. Using the Defrost Function (See...
Instruction Manual
Page 18
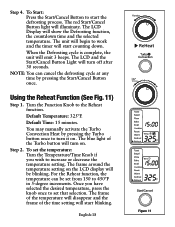
... Using the Reheat Function (See Fig. 11) Step 1. You may manually activate the Turbo Convection Heat by pressing the Start/Cancel Button once. The LCD and the Start/Cancel Button Light will turn on. The blue light of the time setting will be set that selection. To set the temperature: Turn the Temperature/Time Knob if you have selected the desired temperature, press the knob once to turn...
... Using the Reheat Function (See Fig. 11) Step 1. You may manually activate the Turbo Convection Heat by pressing the Start/Cancel Button once. The LCD and the Start/Cancel Button Light will turn on. The blue light of the time setting will be set that selection. To set the temperature: Turn the Temperature/Time Knob if you have selected the desired temperature, press the knob once to turn...

Instruction Manual
Page 20
... rack, open the oven door and pull the rack towards the front of foods the oven has two rack positions. Positioning Pan • To accommodate a wide variety of the oven. The rack will depend on the inside of the Countertop Oven. (See Figure Below) • Before removing the rack allow the unit to prevent bottom burning. • For best toasting results, position the rack in the upper or lower rack guides...
... rack, open the oven door and pull the rack towards the front of foods the oven has two rack positions. Positioning Pan • To accommodate a wide variety of the oven. The rack will depend on the inside of the Countertop Oven. (See Figure Below) • Before removing the rack allow the unit to prevent bottom burning. • For best toasting results, position the rack in the upper or lower rack guides...

Instruction Manual
Page 21
... Countertop Oven in top rack of dishwasher. Shake off crumbs from electrical outlet. Step 5. Allow to cool. Cleaning the crumb tray often will damage the coating on a table or countertop or cupboard shelf. Cleaning Your Countertop Oven DO NOT IMMERSE IN LIQUIDS. DO NOT IMMERSE IN WATER. If storing the Countertop Oven for long periods of time make certain that the Countertop Oven is clean and free of Countertop Oven...
... Countertop Oven in top rack of dishwasher. Shake off crumbs from electrical outlet. Step 5. Allow to cool. Cleaning the crumb tray often will damage the coating on a table or countertop or cupboard shelf. Cleaning Your Countertop Oven DO NOT IMMERSE IN LIQUIDS. DO NOT IMMERSE IN WATER. If storing the Countertop Oven for long periods of time make certain that the Countertop Oven is clean and free of Countertop Oven...

Instruction Manual
Page 22
...of parts or damage resulting from the purchase, use or misuse of, or inability to be made with a similar product of purchase is your exclusive warranty. 1 Year Limited Warranty Sunbeam Products, Inc. Replacement will repair or replace this product. ...sales receipt. Do NOT attempt to you may also have the right to the operating instructions, disassembly, repair or alteration by the breach of the product found to use contrary to alter, modify or any electrical or mechanical functions on JCS's Liability? JCS dealers, service centers, or retail stores selling JCS products...
...of parts or damage resulting from the purchase, use or misuse of, or inability to be made with a similar product of purchase is your exclusive warranty. 1 Year Limited Warranty Sunbeam Products, Inc. Replacement will repair or replace this product. ...sales receipt. Do NOT attempt to you may also have the right to the operating instructions, disassembly, repair or alteration by the breach of the product found to use contrary to alter, modify or any electrical or mechanical functions on JCS's Liability? JCS dealers, service centers, or retail stores selling JCS products...
Instruction Manual - 2
Page 1
... on the countertop oven. • Clean the wire rack, broil rack and baking/cookie pan with care. TO USE ALL OTHER FUNCTIONS 1 Place food on your Oven Manual for Important Safeguards and cleaning instructions. Otherwise, skip to step 6. 4 Turn the Temperature/Time Knob to select the desired temperature, then press the knob once to set the selection. 2 Close glass door completely. 5 Turn the Temperature/Time Knob to select the desired cooking time. 3 Turn the Function Knob to continuing product development...
... on the countertop oven. • Clean the wire rack, broil rack and baking/cookie pan with care. TO USE ALL OTHER FUNCTIONS 1 Place food on your Oven Manual for Important Safeguards and cleaning instructions. Otherwise, skip to step 6. 4 Turn the Temperature/Time Knob to select the desired temperature, then press the knob once to set the selection. 2 Close glass door completely. 5 Turn the Temperature/Time Knob to select the desired cooking time. 3 Turn the Function Knob to continuing product development...


