

User Manual
Page 1
... Base Station 7 Insert Batteries ...7 Sensor Data Transmission 7 Clock...7 Clock Reception 7 Manually Set Clock 7 Pressure ...8 Set Altitude...8 Rainfall...8 Accumulated Rainfall 8 UV ...8 Weather Forecast ...8 Temperature and Humidity 8 Auto Scanning Function 8 Temperature and Humidity trends 8 Heat Index ...8 Wind...8 Moon Phase ...8 Bar Chart ...9 Alarm ...9 Memory...9 MAX / MIN Records 9 Hourly Records ...9 Data Logger ...9 Set Up Software (First Time Use 9 Additional step for Windows Vista users only 9 Install...
... Base Station 7 Insert Batteries ...7 Sensor Data Transmission 7 Clock...7 Clock Reception 7 Manually Set Clock 7 Pressure ...8 Set Altitude...8 Rainfall...8 Accumulated Rainfall 8 UV ...8 Weather Forecast ...8 Temperature and Humidity 8 Auto Scanning Function 8 Temperature and Humidity trends 8 Heat Index ...8 Wind...8 Moon Phase ...8 Bar Chart ...9 Alarm ...9 Memory...9 MAX / MIN Records 9 Hourly Records ...9 Data Logger ...9 Set Up Software (First Time Use 9 Additional step for Windows Vista users only 9 Install...
User Manual
Page 2
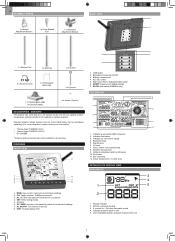
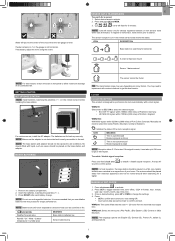
... / pressure reading 3. 0 (current) to capture outdoor temperature, relative humidity or UV readings in all countries. UV area 7. Weather forecast area 9. AL: Set and view status of the selected readings 7. Indicates a successful USB connection 2. SENSORS This product can be available in various locations. SET: Enter setting modes 5. USB socket 2. RESET: Reset unit to default settings 7. Altitude indicator 2. UP / DWN: Increase...
... / pressure reading 3. 0 (current) to capture outdoor temperature, relative humidity or UV readings in all countries. UV area 7. Weather forecast area 9. AL: Set and view status of the selected readings 7. Indicates a successful USB connection 2. SENSORS This product can be available in various locations. SET: Enter setting modes 5. USB socket 2. RESET: Reset unit to default settings 7. Altitude indicator 2. UP / DWN: Increase...
User Manual
Page 3
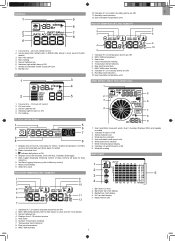
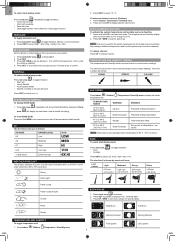
...Sensor batteries low 4. Radio controlled clock 3. Sensor batteries low 4. EN RAINFALL 1 10. Temperature trend indicators 6. Data Logger displaying remaining number of records, time stamp for Indoor / Outdoor temperature / humidity sensors and initial date set (Since date) for more details) 3. Moon phase display 8. Sensor batteries low 4. Outdoor Temperature...date stamp on clock area for rainfall. 2. Indicates HI / LO outdoor humidity alarms are ON 9. User selectable temperature units 5 INDOOR TEMPERATURE AND HUMIDITY 6 1 6 2 3 7 2 3 8 7 8 4 4 9 10 1. 0...
...Sensor batteries low 4. Radio controlled clock 3. Sensor batteries low 4. EN RAINFALL 1 10. Temperature trend indicators 6. Data Logger displaying remaining number of records, time stamp for Indoor / Outdoor temperature / humidity sensors and initial date set (Since date) for more details) 3. Moon phase display 8. Sensor batteries low 4. Outdoor Temperature...date stamp on clock area for rainfall. 2. Indicates HI / LO outdoor humidity alarms are ON 9. User selectable temperature units 5 INDOOR TEMPERATURE AND HUMIDITY 6 1 6 2 3 7 2 3 8 7 8 4 4 9 10 1. 0...
User Manual
Page 4
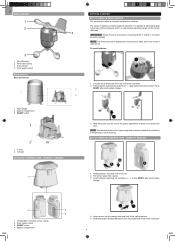
... anemometer from trees or other obstructions. Indicator OUTDOOR TEMPERATURE / HUMIDITY SENSOR 1 3 3. SET UP REMOTE TEMPERATURE / HUMIDITY SENSOR 2 1 3 1. Holding sensor, twist and click to secure. 5. RESET button 4. To insert batteries: 2 1 1. Insert batteries matching the polarities (+ / -) and replace the anemometer. Press RESET after each battery change . 2 3 4 1. Rain Gauge 2. RESET button 1. Solar power socket 3. Insert sensor into the casing, twist and click to the...
... anemometer from trees or other obstructions. Indicator OUTDOOR TEMPERATURE / HUMIDITY SENSOR 1 3 3. SET UP REMOTE TEMPERATURE / HUMIDITY SENSOR 2 1 3 1. Holding sensor, twist and click to secure. 5. RESET button 4. To insert batteries: 2 1 1. Insert batteries matching the polarities (+ / -) and replace the anemometer. Press RESET after each battery change . 2 3 4 1. Rain Gauge 2. RESET button 1. Solar power socket 3. Insert sensor into the casing, twist and click to the...
User Manual
Page 5
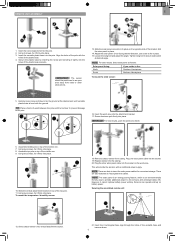
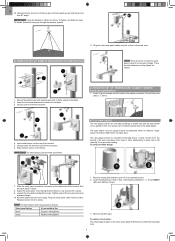
...help tighten the cables. Align the holes of the pole with the ground. 17 TIP Place a block of the plastic base. 4. To mount the temperature / humidity sensor: 12 18 19 18. Plug the other obstructions. 13. There are slots to the pole. 6 8 16. NOTE The solar panel is an...base into the attachment bracket. 17. Insert the wind vane into the pole. Screw aluminum pole firmly into the casing. 20. Replace sensor into place. Tighten wing bolt to secure solar panel at the desired spot until versatile plastic base is an environmentally friendly way to provide ...
...help tighten the cables. Align the holes of the pole with the ground. 17 TIP Place a block of the plastic base. 4. To mount the temperature / humidity sensor: 12 18 19 18. Plug the other obstructions. 13. There are slots to the pole. 6 8 16. NOTE The solar panel is an...base into the attachment bracket. 17. Insert the wind vane into the pole. Screw aluminum pole firmly into the casing. 20. Replace sensor into place. Tighten wing bolt to secure solar panel at the desired spot until versatile plastic base is an environmentally friendly way to provide ...
User Manual
Page 6
...SET UP: TEMPERATURE / HUMIDITY SENSOR MOUNTED SEPARATELY 1. Insert 4 type A screws into the top of the sensor connector. Insert wind sensor into the holes of the bracket. 5. IMPORTANT For best results, point the wind vane North. 9 7 SET... cover off in place. 8. Press RESET after each eye pin into place. ...station and rain gauge should be positioned within an effective range: about 1 meter (3 feet) from casing. To set up through the fastener eyelets. 11. Plug the other side of time. Using the string, tie a knot on the wind vane. Remove the fibre tape. Replace sensor...
...SET UP: TEMPERATURE / HUMIDITY SENSOR MOUNTED SEPARATELY 1. Insert 4 type A screws into the top of the sensor connector. Insert wind sensor into the holes of the bracket. 5. IMPORTANT For best results, point the wind vane North. 9 7 SET... cover off in place. 8. Press RESET after each eye pin into place. ...station and rain gauge should be positioned within an effective range: about 1 meter (3 feet) from casing. To set up through the fastener eyelets. 11. Plug the other side of time. Using the string, tie a knot on the wind vane. Remove the fibre tape. Replace sensor...
User Manual
Page 7
...SET to confirm action. SENSOR DATA TRANSMISSION To search for already registered sensors or new sensors reset within last 30 minutes. Press and hold clock area sound to toggle between time...SET UP BASE STATION NOTE Install batteries matching the polarities (+ / -) in an upper floor of Fort Collins Colorado. Press RESET after each battery change the settings. 4. LOCATION Weather forecast area Rainfall / UV / Wind / Outdoor temperature / humidity area MEANING Base station batteries low Sensor batteries low The sensor... use , install the AC adapter. Manually set clock to ...
...SET to confirm action. SENSOR DATA TRANSMISSION To search for already registered sensors or new sensors reset within last 30 minutes. Press and hold clock area sound to toggle between time...SET UP BASE STATION NOTE Install batteries matching the polarities (+ / -) in an upper floor of Fort Collins Colorado. Press RESET after each battery change the settings. 4. LOCATION Weather forecast area Rainfall / UV / Wind / Outdoor temperature / humidity area MEANING Base station batteries low Sensor batteries low The sensor... use , install the AC adapter. Manually set clock to ...
User Manual
Page 8
...sensors (Outdoor): 1. To reset SINCE DATE: Press and hold MEM to set the altitude in this package. To auto-scan between : • Clock with seconds • Clock with weekday • Date with a 75% accuracy). Press Outdoor Temperature / Humidity area. 2. The temperature...dates. The trend lines are as start date / time of weather within a 30-50 km (19-31 mile) ...Partly cloudy Partly cloudy at your position. 1. Press clock area to 24 hours of rainfall recording). Rainy Snowy TEMPERATURE AND HUMIDITY To toggle temperature unit: 1. Press Indoor / Outdoor Temperature...
...sensors (Outdoor): 1. To reset SINCE DATE: Press and hold MEM to set the altitude in this package. To auto-scan between : • Clock with seconds • Clock with weekday • Date with a 75% accuracy). Press Outdoor Temperature / Humidity area. 2. The temperature...dates. The trend lines are as start date / time of weather within a 30-50 km (19-31 mile) ...Partly cloudy Partly cloudy at your position. 1. Press clock area to 24 hours of rainfall recording). Rainy Snowy TEMPERATURE AND HUMIDITY To toggle temperature unit: 1. Press Indoor / Outdoor Temperature...
User Manual
Page 9
...set Time and HI / LO alarm. 3. NOTE Clock alarm sound is on the screen (except tool bar / weather forecast area) to allow for use of data recording (1 / 2 / 5 / 10 /15). 4. Double click the User Account (and Family Safety). 4. Deselect the UAC option by user. Click OK. 8. In You must follow the below instructions before installing...you of the Weather OS software. Press AL ON/OFF to activate. 2. The software can be displayed. Once activated, the alarm will appear and guide you chose the Control Panel classic link from the base station. Press SET. 5. EN ...
...set Time and HI / LO alarm. 3. NOTE Clock alarm sound is on the screen (except tool bar / weather forecast area) to allow for use of data recording (1 / 2 / 5 / 10 /15). 4. Double click the User Account (and Family Safety). 4. Deselect the UAC option by user. Click OK. 8. In You must follow the below instructions before installing...you of the Weather OS software. Press AL ON/OFF to activate. 2. The software can be displayed. Once activated, the alarm will appear and guide you chose the Control Panel classic link from the base station. Press SET. 5. EN ...

User Manual
Page 10
... in Oregon Weather Station dialogue box. 3. You will not be updated from time to excessive force, shock, dust, temperature or humidity. • Do not cover the ventilation holes with the unit 's internal components. Click Run. 3. This invalidates the warranty. • Only use . Plug one end of available software will redirect you to access the PC Software Manual...
... in Oregon Weather Station dialogue box. 3. You will not be updated from time to excessive force, shock, dust, temperature or humidity. • Do not cover the ventilation holes with the unit 's internal components. Click Run. 3. This invalidates the warranty. • Only use . Plug one end of available software will redirect you to access the PC Software Manual...
User Manual
Page 11
...user's authority to Part 15 of Directive 1999/5/EC. every 60 seconds 1 for Wind/ Rain/ UV and 10 for support...reset 2 x UM-3 (AA) 1.5V ABOUT OREGON SCIENTIFIC... 4 x UM-3 (AA) 1.5V batteries AC adapter 6V REMOTE WIND SENSOR UNIT Dimensions (L x W x H) 178 x 76 x 214 mm ...in a particular installation. Increase the ... batteries OUTDOOR TEMPERATURE / HUMIDITY UNIT • RELATIVE TEMPERATURE Dimensions (L...user is available on request via our Oregon Scientific Customer Service. If this Professional Weather Center (Models: WMR200 / WMR200A) is in compliance with the instructions, ...
...user's authority to Part 15 of Directive 1999/5/EC. every 60 seconds 1 for Wind/ Rain/ UV and 10 for support...reset 2 x UM-3 (AA) 1.5V ABOUT OREGON SCIENTIFIC... 4 x UM-3 (AA) 1.5V batteries AC adapter 6V REMOTE WIND SENSOR UNIT Dimensions (L x W x H) 178 x 76 x 214 mm ...in a particular installation. Increase the ... batteries OUTDOOR TEMPERATURE / HUMIDITY UNIT • RELATIVE TEMPERATURE Dimensions (L...user is available on request via our Oregon Scientific Customer Service. If this Professional Weather Center (Models: WMR200 / WMR200A) is in compliance with the instructions, ...


