
User Manual
Page 1
EN Wireless Rain Gauge with Indoor / Outdoor Thermometer Model: RGR126 User Manual CONTENTS Introduction 2 Product Overview 2 Front View 2 Back View 3 LCD Display 4 Rain Gauge (PCR122 4 Temperature 11 Outdoor 11 Indoor 11 Reset 11 Precautions 11 Technical Specifications 12 Notices 12 Statement of Responsibility 12 About Oregon Scientific 13 FCC Statement 13 Declaration of Conformity 14 Remote Thermo Sensor (THN122N 5 Getting Started 6 Main Unit...
EN Wireless Rain Gauge with Indoor / Outdoor Thermometer Model: RGR126 User Manual CONTENTS Introduction 2 Product Overview 2 Front View 2 Back View 3 LCD Display 4 Rain Gauge (PCR122 4 Temperature 11 Outdoor 11 Indoor 11 Reset 11 Precautions 11 Technical Specifications 12 Notices 12 Statement of Responsibility 12 About Oregon Scientific 13 FCC Statement 13 Declaration of Conformity 14 Remote Thermo Sensor (THN122N 5 Getting Started 6 Main Unit...
User Manual
Page 2
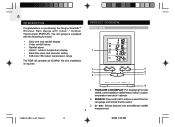
... remote thermo sensor 3. EN INTRODUCTION PRODUCT OVERVIEW Congratulations on purchasing the Oregon ScientificTM Wireless Rain Gauge with the following functions: FRONT VIEW • Daily and total rainfall display • 9-day rainfall history • Rainfall alarm • Indoor / outdoor temperature display 1 • Real-time clock and calendar setting • 328-foot (100-meter) transmission range The RGR126 operates...
... remote thermo sensor 3. EN INTRODUCTION PRODUCT OVERVIEW Congratulations on purchasing the Oregon ScientificTM Wireless Rain Gauge with the following functions: FRONT VIEW • Daily and total rainfall display • 9-day rainfall history • Rainfall alarm • Indoor / outdoor temperature display 1 • Real-time clock and calendar setting • 328-foot (100-meter) transmission range The RGR126 operates...
User Manual
Page 3
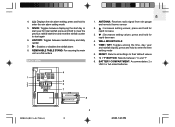
...sensor 2. : Increases setting values; WALL MOUNT HOLE 5. press and hold to clear the previous rainfall start time and reset the rainfall counter to enter the time setting mode 6. REMOVABLE TABLE STAND: For securing the main unit on a flat surface BACK VIEW 1. TIME / SET: Toggles among the time, day, year and rainfall display; RESET: Returns all settings to enter the rain alarm setting...or AA-sized batteries 4 1 5 2 6 3 7 8 RGR126(R13)-4(final) 3 3 4/6/05, 5:46 PM EN 4. ((.)): Displays the rain alarm setting; press and hold for rapid decrease 4. press and hold to their...
...sensor 2. : Increases setting values; WALL MOUNT HOLE 5. press and hold to clear the previous rainfall start time and reset the rainfall counter to enter the time setting mode 6. REMOVABLE TABLE STAND: For securing the main unit on a flat surface BACK VIEW 1. TIME / SET: Toggles among the time, day, year and rainfall display; RESET: Returns all settings to enter the rain alarm setting...or AA-sized batteries 4 1 5 2 6 3 7 8 RGR126(R13)-4(final) 3 3 4/6/05, 5:46 PM EN 4. ((.)): Displays the rain alarm setting; press and hold for rapid decrease 4. press and hold to their...

User Manual
Page 4
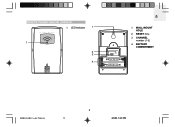
Thermo-sensor RF Reception Status, Outdoor Temp 4. Indoor Temp RAIN GAUGE (PCR122) 1. BATTERY COMPARTMENT: Accommodates 2 x UM-3 or AAsized batteries 1 2 4 RGR126(R13)-4(final) 4 4/6/05, 5:46 PM ANTENNA: Transmits radio signal to main unit 2. Rain Gauge RF Reception Status, Total Rainfall 3. EN LCD DISPLAY 1 2 3 4 1. Today's Rainfall, Rainfall History, Rainfall Alarm, Start Date of Total Rainfall Record, Time / Date 2.
Thermo-sensor RF Reception Status, Outdoor Temp 4. Indoor Temp RAIN GAUGE (PCR122) 1. BATTERY COMPARTMENT: Accommodates 2 x UM-3 or AAsized batteries 1 2 4 RGR126(R13)-4(final) 4 4/6/05, 5:46 PM ANTENNA: Transmits radio signal to main unit 2. Rain Gauge RF Reception Status, Total Rainfall 3. EN LCD DISPLAY 1 2 3 4 1. Today's Rainfall, Rainfall History, Rainfall Alarm, Start Date of Total Rainfall Record, Time / Date 2.
User Manual
Page 5
RESET hole 3. BATTERY COMPARTMENT RGR126(R13)-4(final) 5 5 4/6/05, 5:46 PM EN REMOTE THERMO SENSOR (THN122N) 1. WALL MOUNT HOLE 2. LED Indicator 1 1 2 3 4 1. CHANNEL number (1-3) 4.
RESET hole 3. BATTERY COMPARTMENT RGR126(R13)-4(final) 5 5 4/6/05, 5:46 PM EN REMOTE THERMO SENSOR (THN122N) 1. WALL MOUNT HOLE 2. LED Indicator 1 1 2 3 4 1. CHANNEL number (1-3) 4.
User Manual
Page 6
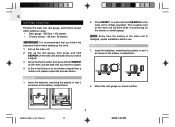
...RESET, or press and hold SEARCH on the main unit and wait until you receive a signal. 3. The reception icon on the main unit to initiate operation. Set up the rain gauge, then press and hold SEARCH on the main unit will blink while it is changed, repeat installation...MAIN UNIT 1. NOTE Every time the battery in the battery compartment. 2. Insert the batteries, matching the polarity (+ and -) as shown in the main unit is searching for the sensor or rainfall gauge. Set up the thermo sensor, then press and hold SEARCH on a level surface. 6 RGR126(R13)-4(final) 6 4/6/05...
...RESET, or press and hold SEARCH on the main unit and wait until you receive a signal. 3. The reception icon on the main unit to initiate operation. Set up the rain gauge, then press and hold SEARCH on the main unit will blink while it is changed, repeat installation...MAIN UNIT 1. NOTE Every time the battery in the battery compartment. 2. Insert the batteries, matching the polarity (+ and -) as shown in the main unit is searching for the sensor or rainfall gauge. Set up the thermo sensor, then press and hold SEARCH on a level surface. 6 RGR126(R13)-4(final) 6 4/6/05...
User Manual
Page 7
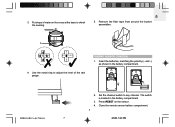
Set the channel switch to adjust the level of water on the sensor. 4. The switch is located in the battery compartment. Close the remote sensor battery compartment. 7 4/6/05, 5:46 PM Insert the batteries, matching the polarity (+ and -) as shown in the battery compartment. 3. Remove the fiber tape from around the bucket assemblies. 3 1 3 2 4 4. Put drops of the rain gauge. EN 3. Press RESET on the cross at the base to check the leveling. 5. THERMO SENSOR (THN122N) 1. RGR126(R13)-4(final) 7 2. Use the metal ring to any channel.
Set the channel switch to adjust the level of water on the sensor. 4. The switch is located in the battery compartment. Close the remote sensor battery compartment. 7 4/6/05, 5:46 PM Insert the batteries, matching the polarity (+ and -) as shown in the battery compartment. 3. Remove the fiber tape from around the bucket assemblies. 3 1 3 2 4 4. Put drops of the rain gauge. EN 3. Press RESET on the cross at the base to check the leveling. 5. THERMO SENSOR (THN122N) 1. RGR126(R13)-4(final) 7 2. Use the metal ring to any channel.
User Manual
Page 8
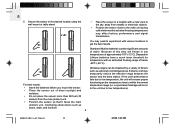
...8226; Position the sensor so that it faces the main (indoor) unit, minimizing obstructions such as the temperature rises to get the best results. Wireless ranges can be ...sensor. • Place the sensor out of below -freezing temperatures may temporarily reduce the effective range between the sensor and the base station. EN 5. moisture. • Do not place the sensor...furniture. 8 RGR126(R13)-4(final) 8 4/6/05, 5:46 PM Disposable Lithium batteries have a much lower threshold for temperature with various locations to within the normal temperature range (i.e....
...8226; Position the sensor so that it faces the main (indoor) unit, minimizing obstructions such as the temperature rises to get the best results. Wireless ranges can be ...sensor. • Place the sensor out of below -freezing temperatures may temporarily reduce the effective range between the sensor and the base station. EN 5. moisture. • Do not place the sensor...furniture. 8 RGR126(R13)-4(final) 8 4/6/05, 5:46 PM Disposable Lithium batteries have a much lower threshold for temperature with various locations to within the normal temperature range (i.e....
User Manual
Page 9
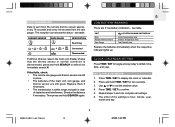
... Sensor Rain Gauge LOCATION ON MAIN UNIT DISPLAY Indoor Temperature Area Outdoor Temperature Area Total Rainfall Area Replace the batteries immediately when the respective indicator lights up. RGR126(R13)-4(final) 9 9 4/6/05, 5:46 PM EN DATA TRANSMISSION Data is sent from the rain gauge. Press and hold SEARCH again. Press TIME / SET to set the desired value. 4. CLOCK / CALENDAR SETTING...
... Sensor Rain Gauge LOCATION ON MAIN UNIT DISPLAY Indoor Temperature Area Outdoor Temperature Area Total Rainfall Area Replace the batteries immediately when the respective indicator lights up. RGR126(R13)-4(final) 9 9 4/6/05, 5:46 PM EN DATA TRANSMISSION Data is sent from the rain gauge. Press and hold SEARCH again. Press TIME / SET to set the desired value. 4. CLOCK / CALENDAR SETTING...
User Manual
Page 10
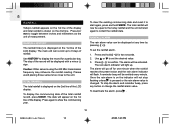
...collect the rainfall data. To clear the existing commencing date and reset it to start again to display the record for one minute when...rain alarm value can record up . To deactivate the alarm, press . 10 RGR126(R13)-4(final) 10 4/6/05, 5:46 PM TOTAL RAINFALL The total rainfall is ... rainfall and the unit will not stop the alarm and reminder beep, press any time by pressing (( • )). Once the rain alarm is on the indicator will...2nd line. The day of rainfall. Please avoid placing those sensors too close to set the rainfall alarm, 1. The main unit can be equal ...
...collect the rainfall data. To clear the existing commencing date and reset it to start again to display the record for one minute when...rain alarm value can record up . To deactivate the alarm, press . 10 RGR126(R13)-4(final) 10 4/6/05, 5:46 PM TOTAL RAINFALL The total rainfall is ... rainfall and the unit will not stop the alarm and reminder beep, press any time by pressing (( • )). Once the rain alarm is on the indicator will...2nd line. The day of rainfall. Please avoid placing those sensors too close to set the rainfall alarm, 1. The main unit can be equal ...
User Manual
Page 11
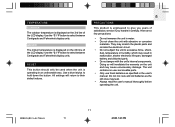
...user's manual thoroughly before operating the unit. RGR126(R13)-4(final) 11 11 4/6/05, 5:46 PM RESET This button should only be used when the unit is engineered to select between Centigrade and Fahrenheit display units. Doing so will return to select between Centigrade and Fahrenheit display units. The unit contains no user-serviceable parts...as specified in an unfavorable way. Use a blunt stylus to excessive force, shock, dust, temperature or humidity, which may cause unnecessary damage. All settings will invalidate the warranty on the unit and may result in water. • Do not...
...user's manual thoroughly before operating the unit. RGR126(R13)-4(final) 11 11 4/6/05, 5:46 PM RESET This button should only be used when the unit is engineered to select between Centigrade and Fahrenheit display units. Doing so will return to select between Centigrade and Fahrenheit display units. The unit contains no user-serviceable parts...as specified in an unfavorable way. Use a blunt stylus to excessive force, shock, dust, temperature or humidity, which may cause unnecessary damage. All settings will invalidate the warranty on the unit and may result in water. • Do not...
User Manual
Page 12
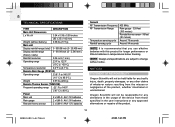
...Oregon Scientific will not be held liable for any bodily injury, death, property damages, or any other claims of whatever nature resulting from those specified in the user instructions or any deviations in the usage of the device from the misuse or negligence of the product. 12 RGR126...260 g) Remote Thermo Sensor (THN122N) Proposed operating range -22° F to 140°F (-30° C to change without notice. Oregon Scientific will not be responsible for longer performance or lithium batteries in temperatures below freezing. NOTE Design and specifications are subject to 60...
...Oregon Scientific will not be held liable for any bodily injury, death, property damages, or any other claims of whatever nature resulting from those specified in the user instructions or any deviations in the usage of the device from the misuse or negligence of the product. 12 RGR126...260 g) Remote Thermo Sensor (THN122N) Proposed operating range -22° F to 140°F (-30° C to change without notice. Oregon Scientific will not be responsible for longer performance or lithium batteries in temperatures below freezing. NOTE Design and specifications are subject to 60...
User Manual
Page 13
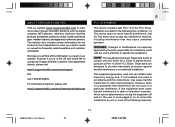
... installation. For international inquiries, please visit: www2.oregonscientific.com/about Oregon Scientific products such as frequently asked questions and customer downloads. These limits are designed to reach us, as well as digital cameras; children's electronic learning products and games; Operation is subject to contact the Oregon Scientific Customer Care department directly, please visit: www2.oregonscientific.com/service/support...
... installation. For international inquiries, please visit: www2.oregonscientific.com/about Oregon Scientific products such as frequently asked questions and customer downloads. These limits are designed to reach us, as well as digital cameras; children's electronic learning products and games; Operation is subject to contact the Oregon Scientific Customer Care department directly, please visit: www2.oregonscientific.com/service/support...
User Manual
Page 14
... instead. We Name: Address: Telephone No.: Fax No.: Oregon Scientific, Inc. 19861 SW 95th Ave., Tualatin, Oregon 97062 USA 1-800-853-8883 1-503-684-3332 declare that to be used as contact for support or sales. DECLARATION OF CONFORMITY The following two conditions: 1)... may cause undesired operation. 14 RGR126(R13)-4(final) 14 4/6/05, 5:46 PM Please call our customer service number (listed on our website at www.oregonscientific.com), or on a circuit different from that the product Product No.: RGR126 Product Name: Wireless Rain Monitor Manufacturer: IDT Technology ...
... instead. We Name: Address: Telephone No.: Fax No.: Oregon Scientific, Inc. 19861 SW 95th Ave., Tualatin, Oregon 97062 USA 1-800-853-8883 1-503-684-3332 declare that to be used as contact for support or sales. DECLARATION OF CONFORMITY The following two conditions: 1)... may cause undesired operation. 14 RGR126(R13)-4(final) 14 4/6/05, 5:46 PM Please call our customer service number (listed on our website at www.oregonscientific.com), or on a circuit different from that the product Product No.: RGR126 Product Name: Wireless Rain Monitor Manufacturer: IDT Technology ...


